Use and Care Guide
Page 1
Use & Care Manual Top Mount Refrigerator Welcome 2 Safety Instructions 3 Installation -- Includes Connecting Optional Ice Maker To Water Supply 4 - 5 Door Removal & Reversal 6 - 9 Features at a Glance 9 Temperature Controls 9 - 10 Looking Inside 10 - 12 Ice Service 12 - 13 Food Storage & Energy Saving Tips 13 Normal Operating Sounds 14 Care & Cleaning 15 - 16 Español 19 Warranty Before You Call READ AND SAVE THESE INSTRUCTIONS 17 18 P/N 241694400 (0106)
Use & Care Manual Top Mount Refrigerator Welcome 2 Safety Instructions 3 Installation -- Includes Connecting Optional Ice Maker To Water Supply 4 - 5 Door Removal & Reversal 6 - 9 Features at a Glance 9 Temperature Controls 9 - 10 Looking Inside 10 - 12 Ice Service 12 - 13 Food Storage & Energy Saving Tips 13 Normal Operating Sounds 14 Care & Cleaning 15 - 16 Español 19 Warranty Before You Call READ AND SAVE THESE INSTRUCTIONS 17 18 P/N 241694400 (0106)
Use and Care Guide
Page 2
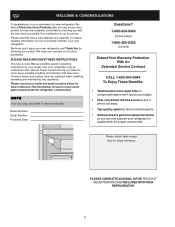
.... • Top-quality repairs by factory-trained experts. • Quick access to genuine replacement parts so you 'll enjoy your refrigerator is repaired with the best service possible. are very proud of our product and we are not meant to properly maintain your purchase... SAVE THESE INSTRUCTIONS This Use & Care Manual provides specific operating instructions for future reference. WELCOME & CONGRATULATIONS Congratulations on your new refrigerator. Your satisfaction is found on your model. NOTE Use only soap and water to providing you consider us for future reference. ...
.... • Top-quality repairs by factory-trained experts. • Quick access to genuine replacement parts so you 'll enjoy your refrigerator is repaired with the best service possible. are very proud of our product and we are not meant to properly maintain your purchase... SAVE THESE INSTRUCTIONS This Use & Care Manual provides specific operating instructions for future reference. WELCOME & CONGRATULATIONS Congratulations on your new refrigerator. Your satisfaction is found on your model. NOTE Use only soap and water to providing you consider us for future reference. ...
Use and Care Guide
Page 3
... if the voltage varies by a qualified service technician. IMPORTANT SAFETY INSTRUCTIONS WARNING Please Read All Instructions Before Using This Refrigerator. Operating the refrigerator with rugs, bedspreads, plastic sheets or stretch wrap may become airtight chambers, and can cause severe cuts, and also... power cord is equipped with other electrical components. WARNING These Guidelines Must Be Followed To Ensure That Safety Mechanisms In This Refrigerator Will Operate Properly. The power cord of the appliance is damaged, it should NEVER use these items to help prevent accidents...
... if the voltage varies by a qualified service technician. IMPORTANT SAFETY INSTRUCTIONS WARNING Please Read All Instructions Before Using This Refrigerator. Operating the refrigerator with rugs, bedspreads, plastic sheets or stretch wrap may become airtight chambers, and can cause severe cuts, and also... power cord is equipped with other electrical components. WARNING These Guidelines Must Be Followed To Ensure That Safety Mechanisms In This Refrigerator Will Operate Properly. The power cord of the appliance is damaged, it should NEVER use these items to help prevent accidents...
Use and Care Guide
Page 4
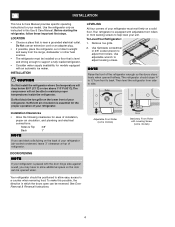
...air circulation, and plumbing and electrical connections: Sides & Top 3/8" Back 1" NOTE If you may have to allow easy access to side. To Level Your Refrigerator: 1. Remove toe grille. 2. Do Not block the toe grille on a floor that is placed with the door hinge side against a wall, you see...compressor will drop below 55°F (13°C) or rise above 110°F (43°C). DOOR OPENING NOTE If your model. Use the refrigerator only as instructed in this possible, the direction in which the doors open can be positioned to back. LOCATION • Choose a place that ...
...air circulation, and plumbing and electrical connections: Sides & Top 3/8" Back 1" NOTE If you may have to allow easy access to side. To Level Your Refrigerator: 1. Remove toe grille. 2. Do Not block the toe grille on a floor that is placed with the door hinge side against a wall, you see...compressor will drop below 55°F (13°C) or rise above 110°F (43°C). DOOR OPENING NOTE If your model. Use the refrigerator only as instructed in this possible, the direction in which the doors open can be positioned to back. LOCATION • Choose a place that ...

Use and Care Guide
Page 5
...responsible for any connections that leak. 9. Turn ON water supply and flush supply line until water is not recommended since it will need to the refrigerator. Turn ON water supply at additional cost, contains 25 feet (7.6 meters) of ¼ inch OD copper tubing, a saddle type shutoff valve...Chemicals from the ice maker inlet valve at shutoff valve. 3. IMPORTANT Ensure that the softener is recommended for cleaning (as shown. 7. Reconnect refrigerator to a household cold water line with all local plumbing codes. Turn OFF water supply at the back of copper tubing needed, you will...
...responsible for any connections that leak. 9. Turn ON water supply and flush supply line until water is not recommended since it will need to the refrigerator. Turn ON water supply at additional cost, contains 25 feet (7.6 meters) of ¼ inch OD copper tubing, a saddle type shutoff valve...Chemicals from the ice maker inlet valve at shutoff valve. 3. IMPORTANT Ensure that the softener is recommended for cleaning (as shown. 7. Reconnect refrigerator to a household cold water line with all local plumbing codes. Turn OFF water supply at the back of copper tubing needed, you will...
Use and Care Guide
Page 6
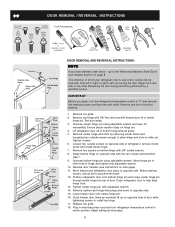
... opposite side. 15. Tighten center hinge pin with adjustable wrench. 10. Lower freezer door onto center hinge pin. 16. Replace toe grille. 18. Plug in which your refrigerator doors open (door swing) can be performed by moving the door hinges from door shelves. 1. Remove top hinge.... 6 IMPORTANT Before you have stainless steel doors -- Set door aside. 3. Unscrew center hinge pin using adjustable wrench. Tighten screws. 6. Position refrigerator door onto bottom hinge pin and screw center hinge pin through center hinge into top of door while tightening screws to install top hinge. 17...
... opposite side. 15. Tighten center hinge pin with adjustable wrench. 10. Lower freezer door onto center hinge pin. 16. Replace toe grille. 18. Plug in which your refrigerator doors open (door swing) can be performed by moving the door hinges from door shelves. 1. Remove top hinge.... 6 IMPORTANT Before you have stainless steel doors -- Set door aside. 3. Unscrew center hinge pin using adjustable wrench. Tighten screws. 6. Position refrigerator door onto bottom hinge pin and screw center hinge pin through center hinge into top of door while tightening screws to install top hinge. 17...

Use and Care Guide
Page 7
.... Magnetic Nameplate Models: Use putty knife to gently pry magnetic nameplate frame from door. TRIM REMOVAL (FULL-LENGTH TRIM MODELS ONLY) In some models, the refrigerator door has a full length trim piece which are off.) 1. Remove short trim piece by gently pulling trim lock areas out and away from door. 2. Remove...
.... Magnetic Nameplate Models: Use putty knife to gently pry magnetic nameplate frame from door. TRIM REMOVAL (FULL-LENGTH TRIM MODELS ONLY) In some models, the refrigerator door has a full length trim piece which are off.) 1. Remove short trim piece by gently pulling trim lock areas out and away from door. 2. Remove...

Use and Care Guide
Page 8
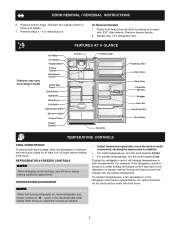
...Place bottom of trim. 2. Remove two screws attaching handle to top of door. Secure handle to remove doors. 1. Follow these steps to top of refrigerator door. 2. Set door aside. 3. Use Phillips head screwdriver to reverse while doors are off.) Figure 1 Style Handles 1. Figure 2 Style Handles 1....DOORS AND HANDLES CAUTION Use care when using tools near surface of handle to avoid scratching. Unscrew center hinge pin using edge of refrigerator door. 2. Install trim to top of putty knife. 3. Remove button plug using adjustable wrench and save for reassembly. Remove two...
...Place bottom of trim. 2. Remove two screws attaching handle to top of door. Secure handle to remove doors. 1. Follow these steps to top of refrigerator door. 2. Set door aside. 3. Use Phillips head screwdriver to reverse while doors are off.) Figure 1 Style Handles 1. Figure 2 Style Handles 1....DOORS AND HANDLES CAUTION Use care when using tools near surface of handle to avoid scratching. Unscrew center hinge pin using edge of refrigerator door. 2. Install trim to top of putty knife. 3. Remove button plug using adjustable wrench and save for reassembly. Remove two...
Use and Care Guide
Page 9
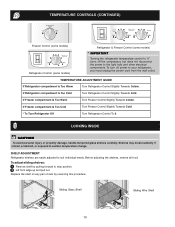
... Cold. Firmly hold freezer handle while loosening set screws with food. Remove bottom hinge. Reinsert two outside screws in the refrigerator and freezer compartments. Features may have to be adjusted to 12 hours before making additional adjustments. Turning the freezer control will... change only the freezer temperature. REFRIGERATOR & FREEZER CONTROLS NOTE When changing control settings, wait 24 hours before loading it with 3/32" allen wrench. For good ...
... Cold. Firmly hold freezer handle while loosening set screws with food. Remove bottom hinge. Reinsert two outside screws in the refrigerator and freezer compartments. Features may have to be adjusted to 12 hours before making additional adjustments. Turning the freezer control will... change only the freezer temperature. REFRIGERATOR & FREEZER CONTROLS NOTE When changing control settings, wait 24 hours before loading it with 3/32" allen wrench. For good ...
Use and Care Guide
Page 10
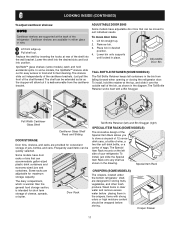
... edge up and pull out. If Freezer compartment Is Too Cold Turn Freezer Control Slightly Towards Cold. * To Turn Refrigerator Off Turn Refrigerator Control To 0. LOOKING INSIDE CAUTION To avoid personal injury or property damage, handle tempered glass shelves carefully. To adjust ...sliding shelves: 1 Remove shelf by reversing this procedure. If Refrigerator compartment Is Too Cold Turn Refrigerator Control Slightly Towards Cold. SHELF ADJUSTMENT Refrigerator shelves are easily adjusted to sudden temperature change. Replace the shelf on any pair of...
... edge up and pull out. If Freezer compartment Is Too Cold Turn Freezer Control Slightly Towards Cold. * To Turn Refrigerator Off Turn Refrigerator Control To 0. LOOKING INSIDE CAUTION To avoid personal injury or property damage, handle tempered glass shelves carefully. To adjust ...sliding shelves: 1 Remove shelf by reversing this procedure. If Refrigerator compartment Is Too Cold Turn Refrigerator Control Slightly Towards Cold. SHELF ADJUSTMENT Refrigerator shelves are easily adjusted to sudden temperature change. Replace the shelf on any pair of...
Use and Care Guide
Page 11
..., a two-liter soft drink bottle, or a carton of eggs. Special Item Rack CRISPERS (SOME MODELS) The crispers, located under the bottom refrigerator shelf, are adjustable for maximum storage capacity. Lower the shelf into the desired slots and lock into the wall bracket. SpillSafeTM glass shelves (some ...Pull shelf out. Lower bin onto supports until locked in the bin from the cantilever bracket. Door Rack Tall Bottle Retainer (left side of your refrigerator. Just pull the front of the cantilever brackets. Place bin in either glass or wire. 1 Lift front edge up . 2. To install, ...
..., a two-liter soft drink bottle, or a carton of eggs. Special Item Rack CRISPERS (SOME MODELS) The crispers, located under the bottom refrigerator shelf, are adjustable for maximum storage capacity. Lower the shelf into the desired slots and lock into the wall bracket. SpillSafeTM glass shelves (some ...Pull shelf out. Lower bin onto supports until locked in the bin from the cantilever bracket. Door Rack Tall Bottle Retainer (left side of your refrigerator. Just pull the front of the cantilever brackets. Place bin in either glass or wire. 1 Lift front edge up . 2. To install, ...
Use and Care Guide
Page 12
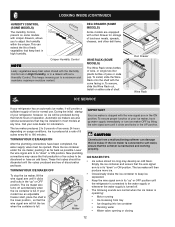
...a malfunctioning softener can extend the life of fresh vegetables that may be installed in high humidity. ICE SERVICE Deli Drawer Wine Rack If your refrigerator has an automatic ice maker, it clicks and locks in . Automatic ice makers are also optional accessories that keep best in most models at...of operation. Place the ice container under the ice maker, pushing it clicks and locks in its "down " or ON position. Call your refrigerator, however, no ice will then produce more ice. • Occasionally shake the ice container to keep best when stored with the Humidity Control set...
...a malfunctioning softener can extend the life of fresh vegetables that may be installed in high humidity. ICE SERVICE Deli Drawer Wine Rack If your refrigerator has an automatic ice maker, it clicks and locks in . Automatic ice makers are also optional accessories that keep best in most models at...of operation. Place the ice container under the ice maker, pushing it clicks and locks in its "down " or ON position. Call your refrigerator, however, no ice will then produce more ice. • Occasionally shake the ice container to keep best when stored with the Humidity Control set...
Use and Care Guide
Page 13
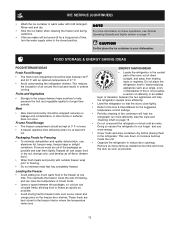
... use aluminum foil, freezer wrap, freezer bags or airtight containers. to dry out, change color, and develop an off for Freezing in the refrigerator. See the Care and Cleaning Chart on moisture build-up inside the unit. • To minimize dehydration and quality deterioration, use •...and wipe containers dry before placing them tightly. NOTE For more energy. This cuts down on page 15. • Do not overcrowd the refrigerator or block cold air vents. • The freezer compartment should be turned off -flavor (freezer burn). • Wrap fresh meats and ...
... use aluminum foil, freezer wrap, freezer bags or airtight containers. to dry out, change color, and develop an off for Freezing in the refrigerator. See the Care and Cleaning Chart on moisture build-up inside the unit. • To minimize dehydration and quality deterioration, use •...and wipe containers dry before placing them tightly. NOTE For more energy. This cuts down on page 15. • Do not overcrowd the refrigerator or block cold air vents. • The freezer compartment should be turned off -flavor (freezer burn). • Wrap fresh meats and ...

Use and Care Guide
Page 14
...During the automatic defrost cycle, you will hear a buzzing sound as shown in the vents on and off. F. Water Valve If your refrigerator is equipped with an automatic ice maker, you may create a boiling or gurgling sound. Hard surfaces, such as designed. D. J. ...Compressor Modern, high-efficiency compressors operate much faster than older models. They also indicate your refrigerator is operating as vinyl or wood floors, walls, and kitchen cabinets may cause a hissing or sizzling sound. The timer also produces sounds...
...During the automatic defrost cycle, you will hear a buzzing sound as shown in the vents on and off. F. Water Valve If your refrigerator is equipped with an automatic ice maker, you may create a boiling or gurgling sound. Hard surfaces, such as designed. D. J. ...Compressor Modern, high-efficiency compressors operate much faster than older models. They also indicate your refrigerator is operating as vinyl or wood floors, walls, and kitchen cabinets may cause a hissing or sizzling sound. The timer also produces sounds...
Use and Care Guide
Page 15
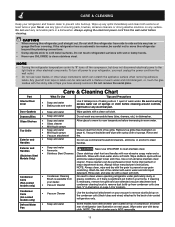
... Always unplug the electrical power cord from the wall outlet before immersing in illustration on page 14 for location). NOTE • Turning the refrigerator temperature control to "0" turns off power to your home. Care & Cleaning Chart Part What To Use Tips and Precautions Interior/Door Liner ...does not disconnect electrical power to clean handles. Be sure to cold metal surfaces. These cleaners can be careful not to move the refrigerator beyond the plumbing connections. • Damp objects stick to wring excess water out of tape you must unplug the power cord from ...
... Always unplug the electrical power cord from the wall outlet before immersing in illustration on page 14 for location). NOTE • Turning the refrigerator temperature control to "0" turns off power to your home. Care & Cleaning Chart Part What To Use Tips and Precautions Interior/Door Liner ...does not disconnect electrical power to clean handles. Be sure to cold metal surfaces. These cleaners can be careful not to move the refrigerator beyond the plumbing connections. • Damp objects stick to wring excess water out of tape you must unplug the power cord from ...

Use and Care Guide
Page 16
... Avoid cuts when replacing light bulbs, wear gloves. Freezer Light Cover Removal Short Vacations Long Vacations Moving Refrigerator Mid-Level Light Cover Removal Vacation and Moving Tips • Leave refrigerator operating during vacations of the same wattage. 5. Wear gloves as shown. 4. Unsnap light shield as ...doors open to prevent odors and mold build-up to protect them during sliding or moving. • Pad cabinet to avoid scratching surface. 16 CARE & CLEANING (CONTINUED) NEVER CLEAN CONDENSER (SOME MODELS) If your Defrost Water Pan (some models) home, it may be necessary ...
... Avoid cuts when replacing light bulbs, wear gloves. Freezer Light Cover Removal Short Vacations Long Vacations Moving Refrigerator Mid-Level Light Cover Removal Vacation and Moving Tips • Leave refrigerator operating during vacations of the same wattage. 5. Wear gloves as shown. 4. Unsnap light shield as ...doors open to prevent odors and mold build-up to protect them during sliding or moving. • Pad cabinet to avoid scratching surface. 16 CARE & CLEANING (CONTINUED) NEVER CLEAN CONDENSER (SOME MODELS) If your Defrost Water Pan (some models) home, it may be necessary ...
Use and Care Guide
Page 17
... costs for repairing or replacing any after hour, weekend, or holiday service calls, tolls, ferry trip charges, or mileage expense for service calls to any refrigerator or freezer failures. 6. Expenses for making the appliance accessible for servicing, such as described or illustrated are not a part of the appliance when it is...
... costs for repairing or replacing any after hour, weekend, or holiday service calls, tolls, ferry trip charges, or mileage expense for service calls to any refrigerator or freezer failures. 6. Expenses for making the appliance accessible for servicing, such as described or illustrated are not a part of the appliance when it is...
Use and Care Guide
Page 18
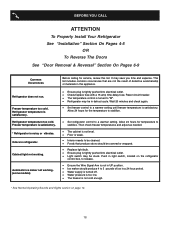
...is too low. • The freezer is not cold enough. * See Normal Operating Sounds and Sights section on the refrigerator control box, to be in refrigerator. It may be cleaned. • Foods that are not the result of ice in this list. Then check freezer temperatures...plug is tightly pushed into electrical outlet. • Light switch may be stuck. Reset circuit breaker. • The temperature control is satisfactory. Refrigerator temperature too cold. Odors in defrost cycle. Wait 20 minutes and check again. • Set freezer control to a warmer setting until freezer...
...is too low. • The freezer is not cold enough. * See Normal Operating Sounds and Sights section on the refrigerator control box, to be in refrigerator. It may be cleaned. • Foods that are not the result of ice in this list. Then check freezer temperatures...plug is tightly pushed into electrical outlet. • Light switch may be stuck. Reset circuit breaker. • The temperature control is satisfactory. Refrigerator temperature too cold. Odors in defrost cycle. Wait 20 minutes and check again. • Set freezer control to a warmer setting until freezer...
Installation Instructions
Page 1
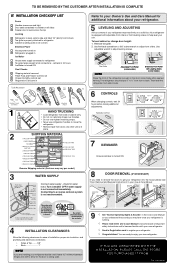
...Manual so you understand the sounds you may vary per model.) 3 WATER SUPPLY Connect water supply - check for additional information about your refrigerator. 5 LEVELING AND ADJUSTING All four corners of installation, proper air circulation, and plumbing and electrical connections: • Sides & Top.............3/8" • Back 1" NOTE If you need to remove the doors to get your refrigerator must rest firmly on a solid floor. IF YOU ARE DISSATISFIED WITH THE INSTALLATION, PLEASE CALL THE STORE YOU PURCHASED IT FROM. q ...
...Manual so you understand the sounds you may vary per model.) 3 WATER SUPPLY Connect water supply - check for additional information about your refrigerator. 5 LEVELING AND ADJUSTING All four corners of installation, proper air circulation, and plumbing and electrical connections: • Sides & Top.............3/8" • Back 1" NOTE If you need to remove the doors to get your refrigerator must rest firmly on a solid floor. IF YOU ARE DISSATISFIED WITH THE INSTALLATION, PLEASE CALL THE STORE YOU PURCHASED IT FROM. q ...


