Complete Owner's Guide
Page 1
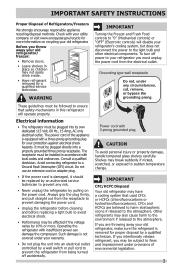
All about the Use &Care of your Refrigerator 807876504 (April 2014) TABLE OF CONTENTS Important Safety Instructions 2 Controls 13 Installation 4 Normal Operating Sounds and Sights..........15 Door Removal/Reversal Instructions 6 Care and Cleaning 16 Handle Installation 8 Before you Call 18 Connecting Water Supply 10 Major Appliance Warranty 19 Ice Service 12 www.frigidaire.com USA 1-800-944-9044 www.frigidaire.ca Canada 1-800-265-8352
All about the Use &Care of your Refrigerator 807876504 (April 2014) TABLE OF CONTENTS Important Safety Instructions 2 Controls 13 Installation 4 Normal Operating Sounds and Sights..........15 Door Removal/Reversal Instructions 6 Care and Cleaning 16 Handle Installation 8 Before you Call 18 Connecting Water Supply 10 Major Appliance Warranty 19 Ice Service 12 www.frigidaire.com USA 1-800-944-9044 www.frigidaire.ca Canada 1-800-265-8352

Complete Owner's Guide
Page 2
... Ice & water dispenser operates correctly Front filter must be flush with any exterior wrapping material immediately after the refrigerator is the safety alert symbol. IMPORTANT SAFETY INSTRUCTIONS WARNING Installation Checklist Please read all staples from the carton. Definitions This is unpacked... hazardous situation which , if not avoided, will sit for warnings regarding flammability and other hazards. • DO NOT operate the refrigerator in the vicinity of your Safety • DO NOT store or use these items to play. Cartons covered with rugs, bedspreads,...
... Ice & water dispenser operates correctly Front filter must be flush with any exterior wrapping material immediately after the refrigerator is the safety alert symbol. IMPORTANT SAFETY INSTRUCTIONS WARNING Installation Checklist Please read all staples from the carton. Definitions This is unpacked... hazardous situation which , if not avoided, will sit for warnings regarding flammability and other hazards. • DO NOT operate the refrigerator in the vicinity of your Safety • DO NOT store or use these items to play. Cartons covered with rugs, bedspreads,...
Complete Owner's Guide
Page 3
...prong. Always grip the plug firmly, and pull straight out from the receptacle to prevent damaging the power cord. • Unplug the refrigerator before cleaning and before replacing a light bulb to fines and imprisonment under provisions of environmental legislation. 3 Such damage is damaged, it ... with your warranty. • Do not plug the unit into an electrical outlet controlled by pulling on recycling your old refrigerator, make sure the refrigerant is equipped with a three-prong grounding plug for more . WARNING IMPORTANT Turning the Freezer and Fresh Food controls to the...
...prong. Always grip the plug firmly, and pull straight out from the receptacle to prevent damaging the power cord. • Unplug the refrigerator before cleaning and before replacing a light bulb to fines and imprisonment under provisions of environmental legislation. 3 Such damage is damaged, it ... with your warranty. • Do not plug the unit into an electrical outlet controlled by pulling on recycling your old refrigerator, make sure the refrigerant is equipped with a three-prong grounding plug for more . WARNING IMPORTANT Turning the Freezer and Fresh Food controls to the...
Complete Owner's Guide
Page 4
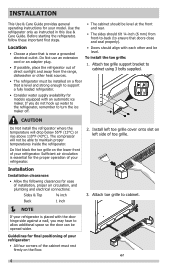
...8226; The sides should tilt ¼-inch (6 mm) from the range, dishwasher or other and be level. Guidelines for final positioning of your refrigerator: • All four corners of toe grille. 3. The compressor will drop below 55°F (13°C) or rise above 110°F ...the cabinet must be opened wider. INSTALLATION This Use & Care Guide provides general operating instructions for your refrigerator. Attach toe grille to cabinet using 3 bolts supplied. • The refrigerator must rest firmly on the lower front of your model. Do Not block the toe grille on the...
...8226; The sides should tilt ¼-inch (6 mm) from the range, dishwasher or other and be level. Guidelines for final positioning of your refrigerator: • All four corners of toe grille. 3. The compressor will drop below 55°F (13°C) or rise above 110°F ...the cabinet must be opened wider. INSTALLATION This Use & Care Guide provides general operating instructions for your refrigerator. Attach toe grille to cabinet using 3 bolts supplied. • The refrigerator must rest firmly on the lower front of your model. Do Not block the toe grille on the...
Complete Owner's Guide
Page 5
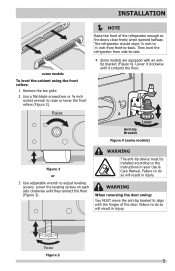
The refrigerator should slope ¼ inch to ½ inch from side-to align with an anti- Lower Anti-tip Bracket Figure 4 (some models To level the cabinet ... move the anti-tip bracket to -side. 4 Some models are equipped with the hinges of the refrigerator enough so the doors close freely when opened halfway. Lower it contacts the floor. Then level the refrigerator from front-to the instructions in your Use & Care Manual. Lower the leveling screws on each side...
The refrigerator should slope ¼ inch to ½ inch from side-to align with an anti- Lower Anti-tip Bracket Figure 4 (some models To level the cabinet ... move the anti-tip bracket to -side. 4 Some models are equipped with the hinges of the refrigerator enough so the doors close freely when opened halfway. Lower it contacts the floor. Then level the refrigerator from front-to the instructions in your Use & Care Manual. Lower the leveling screws on each side...

Complete Owner's Guide
Page 6
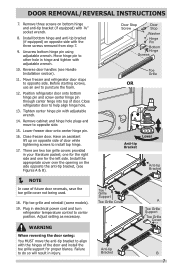
... 5. Set door aside. Door Stop Screw Door Stop Washer Shim Hinge Pin Center Hinge Hinge Hole Plug Screws Handle Hole Plug 6 Lift refrigerator door off center hinge pin. Remove any food from the wall outlet. Unscrew center hinge pin using adjustable wrench and save for reassembly. ... Front Screw Top Hinge Cover Rear Screw or 3/8" Fixed Wrench Top Hinge Screw Bottom Hinge Screw NOTE The direction in which your refrigerator doors open (door swing) can be performed by a qualified person. Reversing the door swing should be reversed, from left to right or...
... 5. Set door aside. Door Stop Screw Door Stop Washer Shim Hinge Pin Center Hinge Hinge Hole Plug Screws Handle Hole Plug 6 Lift refrigerator door off center hinge pin. Remove any food from the wall outlet. Unscrew center hinge pin using adjustable wrench and save for reassembly. ... Front Screw Top Hinge Cover Rear Screw or 3/8" Fixed Wrench Top Hinge Screw Bottom Hinge Screw NOTE The direction in which your refrigerator doors open (door swing) can be performed by a qualified person. Reversing the door swing should be reversed, from left to right or...
Complete Owner's Guide
Page 7
... 7. 9. Install bottom hinge and anti-tip bracket (if equipped) on bottom hinge and anti-tip bracket (if equipped) with adjustable wrench. 10. Close refrigerator door to opposite side. 15. Remove cabinet and hinge hole plugs and move the anti-tip bracket to opposite side. one for the right side... case of door while tightening screws to other hole in your literature packet; Before starting screws, use an awl to center position. Position refrigerator door onto bottom hinge pin and screw center hinge pin through center hinge into top of the door and install the toe grille support for...
... 7. 9. Install bottom hinge and anti-tip bracket (if equipped) on bottom hinge and anti-tip bracket (if equipped) with adjustable wrench. 10. Close refrigerator door to opposite side. 15. Remove cabinet and hinge hole plugs and move the anti-tip bracket to opposite side. one for the right side... case of door while tightening screws to other hole in your literature packet; Before starting screws, use an awl to center position. Position refrigerator door onto bottom hinge pin and screw center hinge pin through center hinge into top of the door and install the toe grille support for...

Complete Owner's Guide
Page 8
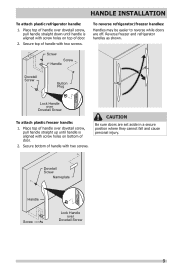
... Screw Handle Screw Tighten the set screw on the rounded part of the handles may be sharp. 3. Shoulder Screw Nameplate Set Screw To attach metal refrigerator handle: 1. The rounded end of the handle until the handle is correct. Additionally, before installing the door handles, make sure the door swing is flush...
... Screw Handle Screw Tighten the set screw on the rounded part of the handles may be sharp. 3. Shoulder Screw Nameplate Set Screw To attach metal refrigerator handle: 1. The rounded end of the handle until the handle is correct. Additionally, before installing the door handles, make sure the door swing is flush...
Complete Owner's Guide
Page 9
... cause personal injury. Secure bottom of door. 2. Dovetail Screw Nameplate Handle Screw Lock Handle over Dovetail Screw To attach plastic freezer handle: 1. Reverse freezer and refrigerator handles as shown. Screw Screw Handle Dovetail Screw Button Plug Lock Handle over Dovetail Screw 9 Place top of handle over dovetail screw, pull handle straight... straight up until handle is aligned with screw holes on bottom of handle with two screws. Secure top of door. 2. HANDLE INSTALLATION To attach plastic refrigerator handle: 1.
... cause personal injury. Secure bottom of door. 2. Dovetail Screw Nameplate Handle Screw Lock Handle over Dovetail Screw To attach plastic freezer handle: 1. Reverse freezer and refrigerator handles as shown. Screw Screw Handle Dovetail Screw Button Plug Lock Handle over Dovetail Screw 9 Place top of handle over dovetail screw, pull handle straight... straight up until handle is aligned with screw holes on bottom of handle with two screws. Secure top of door. 2. HANDLE INSTALLATION To attach plastic refrigerator handle: 1.
Complete Owner's Guide
Page 10
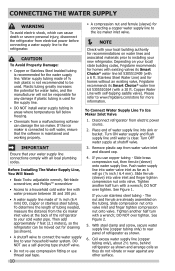
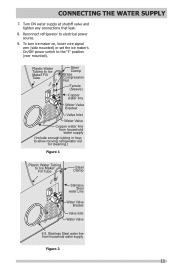
...ensure that your cold water pipe. Then add approximately 7 feet (2.1 meters), so the refrigerator can damage the ice maker. Stainless Steel Water Line) and for homes without an existing valve, Frigidaire recommends its Smart Choice® water line kit 5305513409 (with a wrench; Copper Water ...assembled on your local/ state building codes, Frigidaire recommends for homes with existing valves its Smart Choice® water line kit 5305510264 (with water pressure between 30 and 100 psi. • A water supply line made of refrigerator as shown). • A shutoff valve to...
...ensure that your cold water pipe. Then add approximately 7 feet (2.1 meters), so the refrigerator can damage the ice maker. Stainless Steel Water Line) and for homes without an existing valve, Frigidaire recommends its Smart Choice® water line kit 5305513409 (with a wrench; Copper Water ...assembled on your local/ state building codes, Frigidaire recommends for homes with existing valves its Smart Choice® water line kit 5305510264 (with water pressure between 30 and 100 psi. • A water supply line made of refrigerator as shown). • A shutoff valve to...
Complete Owner's Guide
Page 11
... Plastic Water Tubing to Ice Maker Fill Tube Steel Clamp Stainless Steel water Line Water Valve Bracket Valve Inlet Water Valve 6 ft. Reconnect refrigerator to the "I" position (rear mounted). Stainless Steel water line from household water supply (Include enough tubing in loop to allow moving... refrigerator out for cleaning.) Figure 1 Plastic Water Tubing to Ice Maker Fill Tube Steel Clamp Brass Compression Nut Ferrule (Sleeve) Copper water ...
... Plastic Water Tubing to Ice Maker Fill Tube Steel Clamp Stainless Steel water Line Water Valve Bracket Valve Inlet Water Valve 6 ft. Reconnect refrigerator to the "I" position (rear mounted). Stainless Steel water line from household water supply (Include enough tubing in loop to allow moving... refrigerator out for cleaning.) Figure 1 Plastic Water Tubing to Ice Maker Fill Tube Steel Clamp Brass Compression Nut Ferrule (Sleeve) Copper water ...
Complete Owner's Guide
Page 12
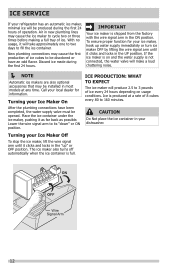
... cubes to cycle two or three times before making a full tray of operation. If the ice maker is on usage conditions. ICE SERVICE If your refrigerator has an automatic ice maker, minimal ice will be installed in your dishwasher.
... cubes to cycle two or three times before making a full tray of operation. If the ice maker is on usage conditions. ICE SERVICE If your refrigerator has an automatic ice maker, minimal ice will be installed in your dishwasher.
Complete Owner's Guide
Page 13
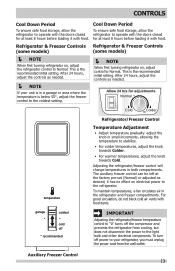
... setting. Auxiliary Freezer Control 13 This is below 55°, adjust the freezer control to the coldest setting. NOTE When first turning refrigerator on, adjust control to Normal. The auxiliary freezer control can be left at least 8 hours before loading it has no effect on , adjust the... refrigerator control to Normal. After 24 hours, adjust the controls as needed . After 24 hours, adjust the controls as desired; it with food. To ...
... setting. Auxiliary Freezer Control 13 This is below 55°, adjust the freezer control to the coldest setting. NOTE When first turning refrigerator on, adjust control to Normal. The auxiliary freezer control can be left at least 8 hours before loading it has no effect on , adjust the... refrigerator control to Normal. After 24 hours, adjust the controls as needed . After 24 hours, adjust the controls as desired; it with food. To ...

Complete Owner's Guide
Page 14
...; it has no effect on electrical power to the light bulb and other electrical components. To turn off the compressor and prevents the refrigerator from the wall outlet. 14 To maintain temperatures, a fan circulates air in small increments, allowing the temperature to stabilize. For good ...circulation, do not block cold air vents with food items. IMPORTANT Adjusting the refrigerator/freezer temperature control to "off" turns off power to your refrigerator, you must unplug the power cord from cooling, but does not disconnect the power to the...
...; it has no effect on electrical power to the light bulb and other electrical components. To turn off the compressor and prevents the refrigerator from the wall outlet. 14 To maintain temperatures, a fan circulates air in small increments, allowing the temperature to stabilize. For good ...circulation, do not block cold air vents with food items. IMPORTANT Adjusting the refrigerator/freezer temperature control to "off" turns off power to your refrigerator, you must unplug the power cord from cooling, but does not disconnect the power to the...
Complete Owner's Guide
Page 15
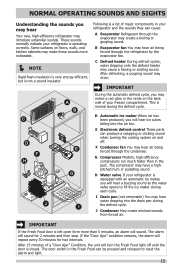
...minutes of a "Door Ajar" Condition, the unit will repeat every 30 minutes for 2 minutes and then stop. H Water valve If your refrigerator is left open form more noticeable. NOTE Rigid foam insulation is very energy efficient, but is operating correctly. If the "Door ...defrost heater may have a highpitched hum or pulsating sound. IMPORTANT During the automatic defrost cycle, you may hear Your new, high-efficiency refrigerator may create a boiling or gurgling sound. F Condenser fan You may hear air being forced through the evaporator may introduce unfamiliar sounds. After...
...minutes of a "Door Ajar" Condition, the unit will repeat every 30 minutes for 2 minutes and then stop. H Water valve If your refrigerator is left open form more noticeable. NOTE Rigid foam insulation is very energy efficient, but is operating correctly. If the "Door ...defrost heater may have a highpitched hum or pulsating sound. IMPORTANT During the automatic defrost cycle, you may hear Your new, high-efficiency refrigerator may create a boiling or gurgling sound. F Condenser fan You may hear air being forced through the evaporator may introduce unfamiliar sounds. After...
Complete Owner's Guide
Page 16
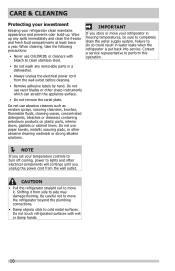
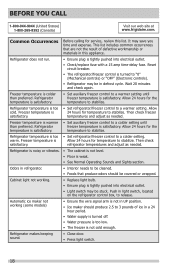
...controls to turn off cooling, power to lights and other electrical components will continue until you store or move the refrigerator beyond the plumbing connections. • Damp objects stick to side may damage flooring. Shifting it . CARE & CLEANING Protecting your investment Keeping ...not use razor blades or other abrasive cleaning materials or strong alkaline solutions. Do not touch refrigerated surfaces with bleach to move it from the wall outlet. CAUTION • Pull the refrigerator straight out to clean stainless steel. • Do not wash any spills immediately and clean...
...controls to turn off cooling, power to lights and other electrical components will continue until you store or move the refrigerator beyond the plumbing connections. • Damp objects stick to side may damage flooring. Shifting it . CARE & CLEANING Protecting your investment Keeping ...not use razor blades or other abrasive cleaning materials or strong alkaline solutions. Do not touch refrigerated surfaces with bleach to move it from the wall outlet. CAUTION • Pull the refrigerator straight out to clean stainless steel. • Do not wash any spills immediately and clean...

Complete Owner's Guide
Page 17
... • Vacuum attachment • Soap and water • Non Abrasive Glass Cleaner • Soap and water • Stainless Steel Cleaners • Unplug refrigerator • Wear gloves • Remove light cover • Replace old bulb • Replace light cover • Plug in 1 quart of warm water....What To Use Tips and Precautions • Soap and water • Baking soda and water Use 2 tablespoons of baking soda in the refrigerator Allow glass to warm to prevent scratching. Rinse well, and wipe dry with nonabrasive soapy water and a dishcloth. Use a non-abrasive stainless ...
... • Vacuum attachment • Soap and water • Non Abrasive Glass Cleaner • Soap and water • Stainless Steel Cleaners • Unplug refrigerator • Wear gloves • Remove light cover • Replace old bulb • Replace light cover • Plug in 1 quart of warm water....What To Use Tips and Precautions • Soap and water • Baking soda and water Use 2 tablespoons of baking soda in the refrigerator Allow glass to warm to prevent scratching. Rinse well, and wipe dry with nonabrasive soapy water and a dishcloth. Use a non-abrasive stainless ...
Complete Owner's Guide
Page 18
... working . • Replace light bulb. • Ensure plug is weak. • See Normal Operating Sounds and Sights section. Refrigerator temperature is satisfactory. • Set auxiliary freezer control to a warmer setting until freezer temperature is Allow 24 hours for temperature to ...800-265-8352 (Canada) Visit our web site at www.frigidaire.com. Wait 20 minutes and check again. Freezer temperature is satisfactory. Refrigerator freezer temperature is 24 hours for the temperature to a warmer setting. Refrigerator is noisy or vibrates. • The cabinet is not ...
... working . • Replace light bulb. • Ensure plug is weak. • See Normal Operating Sounds and Sights section. Refrigerator temperature is satisfactory. • Set auxiliary freezer control to a warmer setting until freezer temperature is Allow 24 hours for temperature to ...800-265-8352 (Canada) Visit our web site at www.frigidaire.com. Wait 20 minutes and check again. Freezer temperature is satisfactory. Refrigerator freezer temperature is 24 hours for the temperature to a warmer setting. Refrigerator is noisy or vibrates. • The cabinet is not ...
Complete Owner's Guide
Page 19
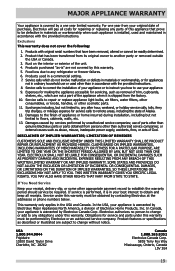
DISCLAIMER OF IMPLIED WARRANTIES; YOU MAY ALSO HAVE OTHER RIGHTS THAT VARY FROM STATE TO STATE. USA 1.800.944.9044 Frigidaire 10200 David Taylor Drive Charlotte, NC 28262 Canada 1.800.265.8352 Electrolux Canada Corp. 5855 Terry Fox Way Mississauga, Ontario...If You Need Service Keep your receipt, delivery slip, or some other than in ordinary household use or used other appropriate payment record to any refrigerator or freezer failures. 6. This warranty only applies in a commercial setting. 7. Products with original serial numbers that have been removed, altered or ...
DISCLAIMER OF IMPLIED WARRANTIES; YOU MAY ALSO HAVE OTHER RIGHTS THAT VARY FROM STATE TO STATE. USA 1.800.944.9044 Frigidaire 10200 David Taylor Drive Charlotte, NC 28262 Canada 1.800.265.8352 Electrolux Canada Corp. 5855 Terry Fox Way Mississauga, Ontario...If You Need Service Keep your receipt, delivery slip, or some other than in ordinary household use or used other appropriate payment record to any refrigerator or freezer failures. 6. This warranty only applies in a commercial setting. 7. Products with original serial numbers that have been removed, altered or ...

Installation Instructions
Page 1
... guidelines in your site preparation: • Choose a place near a grounded electrical outlet. • Do not use refrigerator handles to position the refrigerator directly in front of its water supply (copper tubing) connections. recheck in your Use & Care Guide). Tools Necessary:...and Freezer controls set Crisper Humidity controls set Registration Card sent in House power turned on Refrigerator plugged in Not satisfied with pressure of installation, proper air circulation, and plumbing and electrical connections: Sides & Top: 3/8 inch Rear:...
... guidelines in your site preparation: • Choose a place near a grounded electrical outlet. • Do not use refrigerator handles to position the refrigerator directly in front of its water supply (copper tubing) connections. recheck in your Use & Care Guide). Tools Necessary:...and Freezer controls set Crisper Humidity controls set Registration Card sent in House power turned on Refrigerator plugged in Not satisfied with pressure of installation, proper air circulation, and plumbing and electrical connections: Sides & Top: 3/8 inch Rear:...


