Complete Owner's Guide
Page 1
All about the Use &Care of your Refrigerator 807876504 (April 2014) TABLE OF CONTENTS Important Safety Instructions 2 Controls 13 Installation 4 Normal Operating Sounds and Sights..........15 Door Removal/Reversal Instructions 6 Care and Cleaning 16 Handle Installation 8 Before you Call 18 Connecting Water Supply 10 Major Appliance Warranty 19 Ice Service 12 www.frigidaire.com USA 1-800-944-9044 www.frigidaire.ca Canada 1-800-265-8352
All about the Use &Care of your Refrigerator 807876504 (April 2014) TABLE OF CONTENTS Important Safety Instructions 2 Controls 13 Installation 4 Normal Operating Sounds and Sights..........15 Door Removal/Reversal Instructions 6 Care and Cleaning 16 Handle Installation 8 Before you Call 18 Connecting Water Supply 10 Major Appliance Warranty 19 Ice Service 12 www.frigidaire.com USA 1-800-944-9044 www.frigidaire.ca Canada 1-800-265-8352

Complete Owner's Guide
Page 2
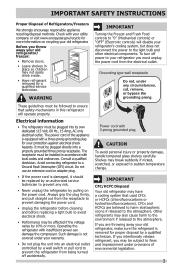
... on Refrigerator plugged in WARNING indicates a potentially hazardous situation which is unpacked. Obey all safety messages that follow the instructions below to refrigerator No water leaks present at all corners Electrical Power House power turned on all connections - WARNING Final Checks Shipping material removed Fresh food and freezer temperatures set Crisper humidity controls set Registration card sent in Ice Maker House water supply connected to help...
... on Refrigerator plugged in WARNING indicates a potentially hazardous situation which is unpacked. Obey all safety messages that follow the instructions below to refrigerator No water leaks present at all corners Electrical Power House power turned on all connections - WARNING Final Checks Shipping material removed Fresh food and freezer temperatures set Crisper humidity controls set Registration card sent in Ice Maker House water supply connected to help...
Complete Owner's Guide
Page 3
... to prevent damaging the power cord. • Unplug the refrigerator before cleaning and before replacing a light bulb to prevent any circumstances, cut, remove, or bypass the grounding prong. Avoid connecting refrigerator to the atmosphere. Always grip the plug firmly, and pull straight out from the electrical outlet. Shelves may be installed in this refrigerator will disable your old refrigerator/ freezer: • Remove doors. • Leave shelves in place so children...
... to prevent damaging the power cord. • Unplug the refrigerator before cleaning and before replacing a light bulb to prevent any circumstances, cut, remove, or bypass the grounding prong. Avoid connecting refrigerator to the atmosphere. Always grip the plug firmly, and pull straight out from the electrical outlet. Shelves may be installed in this refrigerator will disable your old refrigerator/ freezer: • Remove doors. • Leave shelves in place so children...
Complete Owner's Guide
Page 4
... Use & Care Guide. Guidelines for ease of the cabinet must be opened wider. or Sufficient air circulation is near a grounded electrical outlet. Before starting the refrigerator, follow these important first steps. • The cabinet should align with an automatic ice maker. The compressor will drop below 55°F (13°C) or rise above 110°F (43°C). Install left side of your model. Location...
... Use & Care Guide. Guidelines for ease of the cabinet must be opened wider. or Sufficient air circulation is near a grounded electrical outlet. Before starting the refrigerator, follow these important first steps. • The cabinet should align with an automatic ice maker. The compressor will drop below 55°F (13°C) or rise above 110°F (43°C). Install left side of your model. Location...

Complete Owner's Guide
Page 6
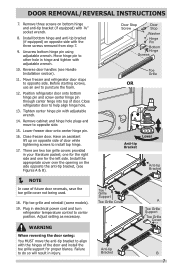
... refrigerator doors open (door swing) can be performed by moving the door hinges from one side to the other. Set door aside. Loosen two outside screws enough to allow hinge and shim to "0" (Mechanical controls) or "OFF" (Electronic controls) and remove the electrical power cord from the wall outlet. Remove any food from door shelves. Unscrew center hinge pin using adjustable wrench and save for reassembly. This makes reinstallation easier. Door Stop Screw Door Stop...
... refrigerator doors open (door swing) can be performed by moving the door hinges from one side to the other. Set door aside. Loosen two outside screws enough to allow hinge and shim to "0" (Mechanical controls) or "OFF" (Electronic controls) and remove the electrical power cord from the wall outlet. Remove any food from door shelves. Unscrew center hinge pin using adjustable wrench and save for reassembly. This makes reinstallation easier. Door Stop Screw Door Stop...
Complete Owner's Guide
Page 7
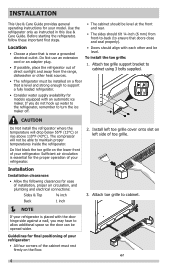
... freezer door. Adjust setting as necessary. Move hinge pin to center position. Tighten center hinge pin with adjustable wrench. 10. There are two toe grille covers provided in electrical power cord and turn refrigerator temperature control to other hole in injury. Install bottom hinge and anti-tip bracket (if equipped) on the side opposite the anti-tip bracket, (see Handle Installation section). 11. Install the appropriate cover over the opening on...
... freezer door. Adjust setting as necessary. Move hinge pin to center position. Tighten center hinge pin with adjustable wrench. 10. There are two toe grille covers provided in electrical power cord and turn refrigerator temperature control to other hole in injury. Install bottom hinge and anti-tip bracket (if equipped) on the side opposite the anti-tip bracket, (see Handle Installation section). 11. Install the appropriate cover over the opening on...
Complete Owner's Guide
Page 10
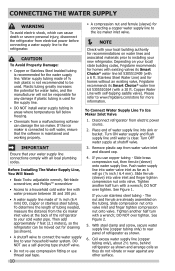
... building codes, Frigidaire recommends for the supply line. • DO NOT install water supply tubing in areas where temperatures fall below freezing. • Chemicals from the ice maker inlet valve at shutoff valve. 3. Stainless Steel Water Line) and for connecting a copper water supply line to the ice maker inlet valve. NOTE Check with a wrench; To Connect Water Supply Line To Ice Maker Inlet Valve 1. If you use stainless steel tubing - Slide brass compression nut, then ferrule (sleeve) onto water supply line. Tighten another half turn with your new...
... building codes, Frigidaire recommends for the supply line. • DO NOT install water supply tubing in areas where temperatures fall below freezing. • Chemicals from the ice maker inlet valve at shutoff valve. 3. Stainless Steel Water Line) and for connecting a copper water supply line to the ice maker inlet valve. NOTE Check with a wrench; To Connect Water Supply Line To Ice Maker Inlet Valve 1. If you use stainless steel tubing - Slide brass compression nut, then ferrule (sleeve) onto water supply line. Tighten another half turn with your new...
Complete Owner's Guide
Page 12
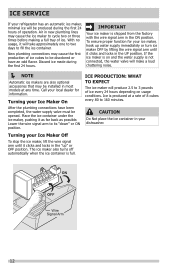
... or turn ice maker OFF by lifting the wire signal arm until it clicks and locks in new plumbing lines may cause the first production of ice cubes to cycle two or three times before making a full tray of operation. CAUTION Do Not place the ice container in most models at a rate of ice every 24 hours depending on and the water supply is not connected, the water valve...
... or turn ice maker OFF by lifting the wire signal arm until it clicks and locks in new plumbing lines may cause the first production of ice cubes to cycle two or three times before making a full tray of operation. CAUTION Do Not place the ice container in most models at a rate of ice every 24 hours depending on and the water supply is not connected, the water valve...
Complete Owner's Guide
Page 13
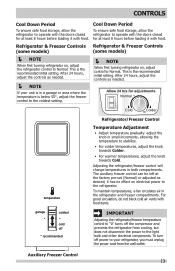
...the freezer control to the coldest setting. NOTE When first turning refrigerator on, adjust control to Normal. After 24 hours, adjust the controls as needed . NOTE If your refrigerator, you must unplug the power cord from cooling, but does not disconnect the power to the light bulb and other electrical components. Auxiliary Freezer Control 13 Refrigerator & Freezer Controls Refrigerator & Freezer Controls (some models) (some models) NOTE When first turning refrigerator on electrical power to Normal. Adjusting the refrigerator/freezer control will change...
...the freezer control to the coldest setting. NOTE When first turning refrigerator on, adjust control to Normal. After 24 hours, adjust the controls as needed . NOTE If your refrigerator, you must unplug the power cord from cooling, but does not disconnect the power to the light bulb and other electrical components. Auxiliary Freezer Control 13 Refrigerator & Freezer Controls Refrigerator & Freezer Controls (some models) (some models) NOTE When first turning refrigerator on electrical power to Normal. Adjusting the refrigerator/freezer control will change...
Complete Owner's Guide
Page 15
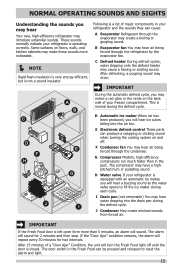
... refrigerator may hear air being forced through the condenser. B Evaporator fan You may introduce unfamiliar sounds. After 15 minutes of a "Door Ajar" Condition, the unit will repeat every 30 minutes for 2 minutes and then stop. This is not a sound insulator. G Compressor Modern, high-efficiency compressors run much faster than 5 minutes, an alarm will hear a buzzing sound as the water valve opens to reset the alarm...
... refrigerator may hear air being forced through the condenser. B Evaporator fan You may introduce unfamiliar sounds. After 15 minutes of a "Door Ajar" Condition, the unit will repeat every 30 minutes for 2 minutes and then stop. This is not a sound insulator. G Compressor Modern, high-efficiency compressors run much faster than 5 minutes, an alarm will hear a buzzing sound as the water valve opens to reset the alarm...
Complete Owner's Guide
Page 16
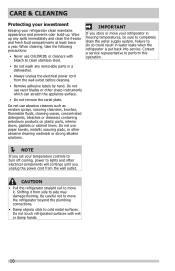
... on plastic parts, interior doors, gaskets or cabinet liners. Contact a service representative to perform this operation. NOTE If you set your temperature controls to turn off cooling, power to lights and other electrical components will continue until you store or move your refrigerator in a dishwasher. • Always unplug the electrical power cord from the wall outlet before cleaning. • Remove adhesive labels by hand. Do not use paper towels...
... on plastic parts, interior doors, gaskets or cabinet liners. Contact a service representative to perform this operation. NOTE If you set your temperature controls to turn off cooling, power to lights and other electrical components will continue until you store or move your refrigerator in a dishwasher. • Always unplug the electrical power cord from the wall outlet before cleaning. • Remove adhesive labels by hand. Do not use paper towels...

Complete Owner's Guide
Page 17
... with clean water and a soft cloth. CARE & CLEANING Part Interior & Door Liners Door Gaskets Drawers & Bins Glass Shelves Toe Grille Exterior & Handles Exterior & Handles (Stainless Steel Models Only) Replacing Light Bulbs Care & Cleaning Tips What To Use Tips and Precautions • Soap and water • Baking soda and water Use 2 tablespoons of baking soda in 1 quart of toe grille. Vacuum dust from front of warm water. Remove toe grille (see Installation Instructions). Use a soft cloth to clean smooth doors. Always follow manufacturer's instructions. Rinse with a clean...
... with clean water and a soft cloth. CARE & CLEANING Part Interior & Door Liners Door Gaskets Drawers & Bins Glass Shelves Toe Grille Exterior & Handles Exterior & Handles (Stainless Steel Models Only) Replacing Light Bulbs Care & Cleaning Tips What To Use Tips and Precautions • Soap and water • Baking soda and water Use 2 tablespoons of baking soda in 1 quart of toe grille. Vacuum dust from front of warm water. Remove toe grille (see Installation Instructions). Use a soft cloth to clean smooth doors. Always follow manufacturer's instructions. Rinse with a clean...
Complete Owner's Guide
Page 18
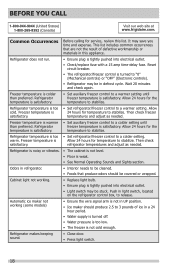
...; Interior needs to be covered or wrapped. Automatic ice maker not working . • Replace light bulb. • Ensure plug is too • Set refrigerator/freezer control to 3 pounds of defective workmanship or materials in a 24 hour period. • Water supply is turned off. • Water pressure is too low. • The freezer is tightly pushed into electrical outlet. • Light switch may save you time and expense. Common Occurrences Before calling for service, review...
...; Interior needs to be covered or wrapped. Automatic ice maker not working . • Replace light bulb. • Ensure plug is too • Set refrigerator/freezer control to 3 pounds of defective workmanship or materials in a 24 hour period. • Water supply is turned off. • Water pressure is too low. • The freezer is tightly pushed into electrical outlet. • Light switch may save you time and expense. Common Occurrences Before calling for service, review...
Complete Owner's Guide
Page 19
... limited to use your original date of parts other than genuine Electrolux parts or parts obtained from its original owner to , any refrigerator or freezer failures. 6. Products with the provided instructions. 8. THIS WRITTEN WARRANTY GIVES YOU SPECIFIC LEGAL RIGHTS. Service calls to correct the installation of the unit. 4. or external causes such as described or illustrated are not covered by this warranty must be...
... limited to use your original date of parts other than genuine Electrolux parts or parts obtained from its original owner to , any refrigerator or freezer failures. 6. Products with the provided instructions. 8. THIS WRITTEN WARRANTY GIVES YOU SPECIFIC LEGAL RIGHTS. Service calls to correct the installation of the unit. 4. or external causes such as described or illustrated are not covered by this warranty must be...

Installation Instructions
Page 1
... installing your refrigerator without connecting it will impair cooling ability of copper tubing and full instructions. Final Checks Shipping material removed Fresh Food and Freezer controls set Crisper Humidity controls set Registration Card sent in House power turned on all corners Electrical Power House water supply connected to refrigerator No water leaks present at all materials for a water supply installation, including 25 feet of your refrigerator: 1 Ensure that doors close freely when opened...
... installing your refrigerator without connecting it will impair cooling ability of copper tubing and full instructions. Final Checks Shipping material removed Fresh Food and Freezer controls set Crisper Humidity controls set Registration Card sent in House power turned on all corners Electrical Power House water supply connected to refrigerator No water leaks present at all materials for a water supply installation, including 25 feet of your refrigerator: 1 Ensure that doors close freely when opened...
Wiring Diagram
Page 1
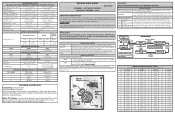
...Watts RPM Amps 3.1 1100 CW Opposite Shaft 0.03 Running EVAPORATOR FAN MOTOR Watts RPM Amps 6.2 2600 CW 0.05 Running ICE MAKER SPECIFICATIONS Electrical 115 vac (127 vac max) 60 Hertz Thermostat Heater Wattage Opens at 48°F (9°C) 165 vac Closes at 15°F ( -9°C) (ice maker with black housing) 9°F (-13°C) (ice maker with white housing) ICE MAKER CONNECTOR PLUG CONNECTIONS Wire Number Wire Color Connects to: 1 Green / Yellow Ground 2 Yellow Water Valve 3 Black Line 4 Light Blue Neutral ICE MAKER INFORMATION Test Cycling: Remove cover...
...Watts RPM Amps 3.1 1100 CW Opposite Shaft 0.03 Running EVAPORATOR FAN MOTOR Watts RPM Amps 6.2 2600 CW 0.05 Running ICE MAKER SPECIFICATIONS Electrical 115 vac (127 vac max) 60 Hertz Thermostat Heater Wattage Opens at 48°F (9°C) 165 vac Closes at 15°F ( -9°C) (ice maker with black housing) 9°F (-13°C) (ice maker with white housing) ICE MAKER CONNECTOR PLUG CONNECTIONS Wire Number Wire Color Connects to: 1 Green / Yellow Ground 2 Yellow Water Valve 3 Black Line 4 Light Blue Neutral ICE MAKER INFORMATION Test Cycling: Remove cover...
Wiring Diagram
Page 2
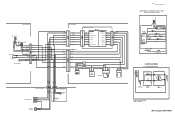
... MODELS. BLUE ERF-1500 BOARD COMP CN1-5 FAN CN1-9 HEATER CN1-3 LAMP CN1-7 NEUTRAL CN1-1/CN5-3 LINE CN5-1 CONDENSER FAN FRESH FOOD LIGHT SWITCH EVAPORATOR FAN COIL HEATER SAFETY/ DEFROST BI-METAL FRESH FOOD LIGHT NEUTRAL LINE AUTO ICE MAKER I /M WATER VALVE LIGHT, AIR & WATER BOX LT. STARTER WITH RUN CAPACITOR START 6 S S RUN 5 C M M 3 2 L1 OVERLOAD COMR MOTOR PTC STARTER RUN CAPACITOR * CAPACITOR IS ONLY USED WITH SOME P.T.C. Wire Diagram A01475501 LADDER SCHEMATIC-TOP MOUNTS WITH OPTIONAL ICE MAKER, FREEZER LIGHT...
... MODELS. BLUE ERF-1500 BOARD COMP CN1-5 FAN CN1-9 HEATER CN1-3 LAMP CN1-7 NEUTRAL CN1-1/CN5-3 LINE CN5-1 CONDENSER FAN FRESH FOOD LIGHT SWITCH EVAPORATOR FAN COIL HEATER SAFETY/ DEFROST BI-METAL FRESH FOOD LIGHT NEUTRAL LINE AUTO ICE MAKER I /M WATER VALVE LIGHT, AIR & WATER BOX LT. STARTER WITH RUN CAPACITOR START 6 S S RUN 5 C M M 3 2 L1 OVERLOAD COMR MOTOR PTC STARTER RUN CAPACITOR * CAPACITOR IS ONLY USED WITH SOME P.T.C. Wire Diagram A01475501 LADDER SCHEMATIC-TOP MOUNTS WITH OPTIONAL ICE MAKER, FREEZER LIGHT...
Product Specifications Sheet
Page 1
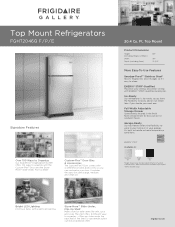
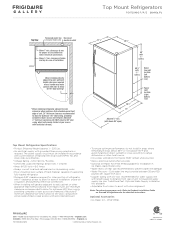
... shelf. ENERGY STAR® Available in your energy and dollar savings with 4 different bins and accessories so you want one. it 's easy to handle extreme temperature conditions. Ft. The shelf offers 3 different ways to sandwich foods. It's built to clean. Top Mount Product Dimensions Height (Including Hinges & Rollers) Width Depth (Including Door) 69" 30" 31-3/4" More Easy-To-Use Features Smudge-Proof™ Stainless...
... shelf. ENERGY STAR® Available in your energy and dollar savings with 4 different bins and accessories so you want one. it 's easy to handle extreme temperature conditions. Ft. The shelf offers 3 different ways to sandwich foods. It's built to clean. Top Mount Product Dimensions Height (Including Hinges & Rollers) Width Depth (Including Door) 69" 30" 31-3/4" More Easy-To-Use Features Smudge-Proof™ Stainless...
Product Specifications Sheet
Page 2
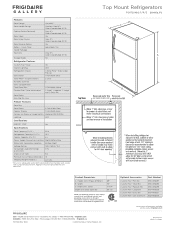
... to Product Installation Guide for safe operation. Frigidaire Gallery Top Mount Refrigerators FGHT2046Q F / P / E 20.4 Cu. Ft.) 15.3 Freezer Capacity (Cu. Hinges & Rollers) B - Door) Depth with a separate ground wire. Large and 1 - Dairy Bin Freezer Features Door Bins Door Racks Freezer Shelves Factory Ice Maker w/ Large Ice Bin Lighting 2 Full-Width Clear 1 Full-Width Glass Optional (PN # IM116) LED Certifications ENERGY STAR® Yes Specifications Total Capacity (Cu. Ft.) 5.1 Power Supply Connection Location Right Bottom Rear Water Inlet Connection Location Bottom Right...
... to Product Installation Guide for safe operation. Frigidaire Gallery Top Mount Refrigerators FGHT2046Q F / P / E 20.4 Cu. Ft.) 15.3 Freezer Capacity (Cu. Hinges & Rollers) B - Door) Depth with a separate ground wire. Large and 1 - Dairy Bin Freezer Features Door Bins Door Racks Freezer Shelves Factory Ice Maker w/ Large Ice Bin Lighting 2 Full-Width Clear 1 Full-Width Glass Optional (PN # IM116) LED Certifications ENERGY STAR® Yes Specifications Total Capacity (Cu. Ft.) 5.1 Power Supply Connection Location Right Bottom Rear Water Inlet Connection Location Bottom Right...
Product Specifications Sheet
Page 3
... door swing, providing complete crisper access and removal. (Absolute 3" minimum clearance will ONLY allow for detailed instructions. Optional Water Supply Installation Kits available. • Adjustable front rollers to household water supply line plus 7 additional feet. Specifications subject to prevent water line damage. • Water Pressure - Baseline Top Mount Refrigerators FGHT2046Q F / P / E 20.4 Cu. Ft. Top View Recessed water line Recessed (ice maker models only) electrical outlet Allow 1" min. recommended for proper air circulation and water / electrical connections Allow...
... door swing, providing complete crisper access and removal. (Absolute 3" minimum clearance will ONLY allow for detailed instructions. Optional Water Supply Installation Kits available. • Adjustable front rollers to household water supply line plus 7 additional feet. Specifications subject to prevent water line damage. • Water Pressure - Baseline Top Mount Refrigerators FGHT2046Q F / P / E 20.4 Cu. Ft. Top View Recessed water line Recessed (ice maker models only) electrical outlet Allow 1" min. recommended for proper air circulation and water / electrical connections Allow...


