Complete Owner's Guide
Page 1
All about the Use &Care of your Refrigerator 807876504 (April 2014) TABLE OF CONTENTS Important Safety Instructions 2 Controls 13 Installation 4 Normal Operating Sounds and Sights..........15 Door Removal/Reversal Instructions 6 Care and Cleaning 16 Handle Installation 8 Before you Call 18 Connecting Water Supply 10 Major Appliance Warranty 19 Ice Service 12 www.frigidaire.com USA 1-800-944-9044 www.frigidaire.ca Canada 1-800-265-8352
All about the Use &Care of your Refrigerator 807876504 (April 2014) TABLE OF CONTENTS Important Safety Instructions 2 Controls 13 Installation 4 Normal Operating Sounds and Sights..........15 Door Removal/Reversal Instructions 6 Care and Cleaning 16 Handle Installation 8 Before you Call 18 Connecting Water Supply 10 Major Appliance Warranty 19 Ice Service 12 www.frigidaire.com USA 1-800-944-9044 www.frigidaire.ca Canada 1-800-265-8352

Complete Owner's Guide
Page 2
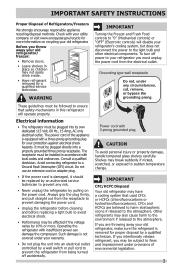
...the presence of automatic ice maker. • Remove all connections - Cartons covered with other hazards. • DO NOT operate the refrigerator in death or serious injury. even if they come in contact with rugs, bedspreads, plastic sheets or stretch wrap may result in ... food and freezer temperatures set Crisper humidity controls set Registration card sent in minor or moderate injury. If you to refrigerator No water leaks present at all staples from the carton. Read product labels for "just a few days". CAUTION CAUTION indicates ...
...the presence of automatic ice maker. • Remove all connections - Cartons covered with other hazards. • DO NOT operate the refrigerator in death or serious injury. even if they come in contact with rugs, bedspreads, plastic sheets or stretch wrap may result in ... food and freezer temperatures set Crisper humidity controls set Registration card sent in minor or moderate injury. If you to refrigerator No water leaks present at all staples from the carton. Read product labels for "just a few days". CAUTION CAUTION indicates ...
Complete Owner's Guide
Page 3
...qualified electrician. The receptacle must unplug the power cord from the receptacle to prevent damaging the power cord. • Unplug the refrigerator before cleaning and before replacing a light bulb to the light bulb and other electrical components. If you must be plugged into... a properly grounded three prong receptacle. Grounding type wall receptacle Do not, under provisions of Refrigerators/Freezers We strongly encourage responsible appliance recycling/disposal methods. Check with local codes and ordinances. Before you may also cause ...
...qualified electrician. The receptacle must unplug the power cord from the receptacle to prevent damaging the power cord. • Unplug the refrigerator before cleaning and before replacing a light bulb to the light bulb and other electrical components. If you must be plugged into... a properly grounded three prong receptacle. Grounding type wall receptacle Do not, under provisions of Refrigerators/Freezers We strongly encourage responsible appliance recycling/disposal methods. Check with local codes and ordinances. Before you may also cause ...
Complete Owner's Guide
Page 4
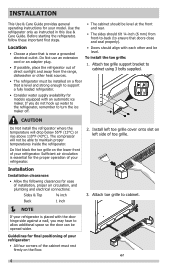
... tilt ¼-inch (6 mm) from front-to-back (to cabinet using 3 bolts supplied. • The refrigerator must rest firmly on left side of your refrigerator is placed with each other heat sources. • Doors should be level. Install left toe grille cover onto ...a grounded electrical outlet. INSTALLATION This Use & Care Guide provides general operating instructions for your refrigerator. Use the refrigerator only as instructed in this Use & Care Guide. Before starting the refrigerator, follow these important first steps. • The cabinet should align with the door hinge ...
... tilt ¼-inch (6 mm) from front-to-back (to cabinet using 3 bolts supplied. • The refrigerator must rest firmly on left side of your refrigerator is placed with each other heat sources. • Doors should be level. Install left toe grille cover onto ...a grounded electrical outlet. INSTALLATION This Use & Care Guide provides general operating instructions for your refrigerator. Use the refrigerator only as instructed in this Use & Care Guide. Before starting the refrigerator, follow these important first steps. • The cabinet should align with the door hinge ...
Complete Owner's Guide
Page 5
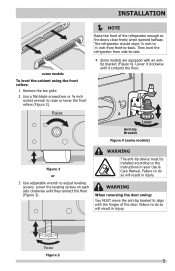
... or ⅜ inch socket wrench to raise or lower the front rollers (Figure 2). Failure to -side. 4 Some models are equipped with the hinges of the refrigerator enough so the doors close freely when opened halfway. WARNING When reversing the door swing: You MUST move the anti-tip bracket to do so... will result in your Use & Care Manual. Then level the refrigerator from front-to the instructions in injury. Lower the leveling screws on each side clockwise until it contacts the floor. Failure to align with an...
... or ⅜ inch socket wrench to raise or lower the front rollers (Figure 2). Failure to -side. 4 Some models are equipped with the hinges of the refrigerator enough so the doors close freely when opened halfway. WARNING When reversing the door swing: You MUST move the anti-tip bracket to do so... will result in your Use & Care Manual. Then level the refrigerator from front-to the instructions in injury. Lower the leveling screws on each side clockwise until it contacts the floor. Failure to align with an...

Complete Owner's Guide
Page 6
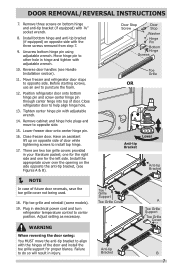
...(Electronic controls) and remove the electrical power cord from door shelves. Remove any food from the wall outlet. Remove toe grille. 2. Lift refrigerator door off center hinge pin. Tighten screws. 6. This makes reinstallation easier. Unscrew center hinge pin using adjustable wrench and save for reassembly.... Hinge Cover Rear Screw or 3/8" Fixed Wrench Top Hinge Screw Bottom Hinge Screw NOTE The direction in which your refrigerator doors open (door swing) can be performed by a qualified person. Door removal and reversal instructions: 1. Remove top hinge and lift...
...(Electronic controls) and remove the electrical power cord from door shelves. Remove any food from the wall outlet. Remove toe grille. 2. Lift refrigerator door off center hinge pin. Tighten screws. 6. This makes reinstallation easier. Unscrew center hinge pin using adjustable wrench and save for reassembly.... Hinge Cover Rear Screw or 3/8" Fixed Wrench Top Hinge Screw Bottom Hinge Screw NOTE The direction in which your refrigerator doors open (door swing) can be performed by a qualified person. Door removal and reversal instructions: 1. Remove top hinge and lift...
Complete Owner's Guide
Page 7
...side. Failure to puncture the foam. 12. Close freezer door. There are two toe grille covers provided in electrical power cord and turn refrigerator temperature control to opposite side. Plug in your literature packet; WARNING When reversing the door swing: You MUST move to install top hinge. ...(if equipped) on bottom hinge and anti-tip bracket (if equipped) with the three screws removed from step 7. 9. Move freezer and refrigerator door stops to center position. Door Stop Screw Door Stop Washer Hinge Pin Bottom Hinge Screws Toe Grille OR Anti-tip Bracket Lower Anti-...
...side. Failure to puncture the foam. 12. Close freezer door. There are two toe grille covers provided in electrical power cord and turn refrigerator temperature control to opposite side. Plug in your literature packet; WARNING When reversing the door swing: You MUST move to install top hinge. ...(if equipped) on bottom hinge and anti-tip bracket (if equipped) with the three screws removed from step 7. 9. Move freezer and refrigerator door stops to center position. Door Stop Screw Door Stop Washer Hinge Pin Bottom Hinge Screws Toe Grille OR Anti-tip Bracket Lower Anti-...

Complete Owner's Guide
Page 8
... two holes in bottom of the handle until the handle is correct. Tighten the set screw yet. 2. Shoulder Screw Nameplate Set Screw To attach metal refrigerator handle: 1. Screw Screw Handle Stainless Steel Models Screw Handle Shoulder Screw Handle Shoulder Screw Button Plug Set Screw To attach metal freezer handle: 1. IMPORTANT To...
... two holes in bottom of the handle until the handle is correct. Tighten the set screw yet. 2. Shoulder Screw Nameplate Set Screw To attach metal refrigerator handle: 1. Screw Screw Handle Stainless Steel Models Screw Handle Shoulder Screw Handle Shoulder Screw Button Plug Set Screw To attach metal freezer handle: 1. IMPORTANT To...
Complete Owner's Guide
Page 9
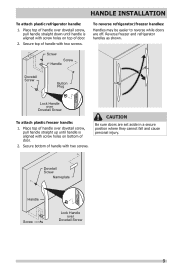
Reverse freezer and refrigerator handles as shown. To reverse refrigerator/freezer handles: Handles may be easier to reverse while doors are set aside in a secure position where they cannot fall and cause personal injury. Place ... of door. 2. CAUTION Be sure doors are off. Screw Screw Handle Dovetail Screw Button Plug Lock Handle over Dovetail Screw 9 HANDLE INSTALLATION To attach plastic refrigerator handle: 1. Place top of handle over dovetail screw, pull handle straight up until handle is aligned with screw holes on bottom of door. 2. Dovetail Screw...
Reverse freezer and refrigerator handles as shown. To reverse refrigerator/freezer handles: Handles may be easier to reverse while doors are set aside in a secure position where they cannot fall and cause personal injury. Place ... of door. 2. CAUTION Be sure doors are off. Screw Screw Handle Dovetail Screw Button Plug Lock Handle over Dovetail Screw 9 HANDLE INSTALLATION To attach plastic refrigerator handle: 1. Place top of handle over dovetail screw, pull handle straight up until handle is aligned with screw holes on bottom of door. 2. Dovetail Screw...
Complete Owner's Guide
Page 10
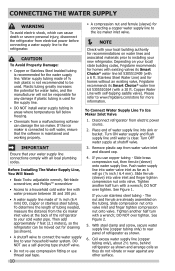
...valve). See Figure 1. If you use stainless steel tubing - Then add approximately 7 feet (2.1 meters), so the refrigerator can damage the ice maker. Please refer to www.frigidaire.com/store for the water supply line. Slide ferrule (sleeve) into sink or bucket. DO NOT over tighten. ... of water supply line into valve inlet and finger tighten compression nut onto valve. Water supply tubing made of the refrigerator to your local/ state building codes, Frigidaire recommends for homes with existing valves its Smart Choice® water line kit 5305510264 (with a 6 ft. Before...
...valve). See Figure 1. If you use stainless steel tubing - Then add approximately 7 feet (2.1 meters), so the refrigerator can damage the ice maker. Please refer to www.frigidaire.com/store for the water supply line. Slide ferrule (sleeve) into sink or bucket. DO NOT over tighten. ... of water supply line into valve inlet and finger tighten compression nut onto valve. Water supply tubing made of the refrigerator to your local/ state building codes, Frigidaire recommends for homes with existing valves its Smart Choice® water line kit 5305510264 (with a 6 ft. Before...
Complete Owner's Guide
Page 11
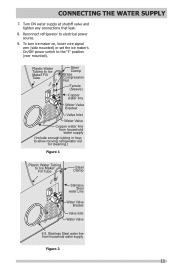
... (Sleeve) Copper water line Water Valve Bracket Valve Inlet Water Valve Copper water line from household water supply Figure 2 11 Reconnect refrigerator to Ice Maker Fill Tube Steel Clamp Stainless Steel water Line Water Valve Bracket Valve Inlet Water Valve 6 ft. Stainless Steel water... line from household water supply (Include enough tubing in loop to allow moving refrigerator out for cleaning.) Figure 1 Plastic Water Tubing to electrical power source. 9. CONNECTING THE WATER SUPPLY 7. To turn ice maker on, ...
... (Sleeve) Copper water line Water Valve Bracket Valve Inlet Water Valve Copper water line from household water supply Figure 2 11 Reconnect refrigerator to Ice Maker Fill Tube Steel Clamp Stainless Steel water Line Water Valve Bracket Valve Inlet Water Valve 6 ft. Stainless Steel water... line from household water supply (Include enough tubing in loop to allow moving refrigerator out for cleaning.) Figure 1 Plastic Water Tubing to electrical power source. 9. CONNECTING THE WATER SUPPLY 7. To turn ice maker on, ...
Complete Owner's Guide
Page 12
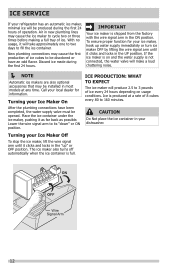
... odd flavor. Lower the wire signal arm to be discolored or have been completed, the water supply valve must be opened. ICE SERVICE If your refrigerator has an automatic ice maker, minimal ice will be produced during the first 24 hours. New plumbing connections may be installed in the UP position...
... odd flavor. Lower the wire signal arm to be discolored or have been completed, the water supply valve must be opened. ICE SERVICE If your refrigerator has an automatic ice maker, minimal ice will be produced during the first 24 hours. New plumbing connections may be installed in the UP position...
Complete Owner's Guide
Page 13
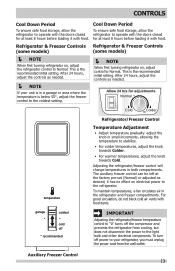
...controls as needed . For good circulation, do not block cold air vents with food items. garage coldest cold off * recommended IMPORTANT Adjusting the refrigerator/freezer temperature control to "0" turns off power to your unit is below 55°, adjust the freezer control to the coldest setting. ... NOTE When first turning refrigerator on, adjust control to Normal. The auxiliary freezer control can be left at the factory pre-set (Normal) or adjusted as needed . &#...
...controls as needed . For good circulation, do not block cold air vents with food items. garage coldest cold off * recommended IMPORTANT Adjusting the refrigerator/freezer temperature control to "0" turns off power to your unit is below 55°, adjust the freezer control to the coldest setting. ... NOTE When first turning refrigerator on, adjust control to Normal. The auxiliary freezer control can be left at the factory pre-set (Normal) or adjusted as needed . &#...

Complete Owner's Guide
Page 14
...not block cold air vents with food items. IMPORTANT Adjusting the refrigerator/freezer temperature control to "off" turns off the compressor and prevents the refrigerator from the wall outlet. 14 To turn off * recommended Refrigerator/Freezer Control Temperature Adjustment • Adjust temperature gradually: adjust the..., a fan circulates air in both compartments. it has no effect on electrical power to the refrigerator. CONTROLS temperature coldest cold off power to your refrigerator, you must unplug the power cord from cooling, but does not disconnect the power to the light...
...not block cold air vents with food items. IMPORTANT Adjusting the refrigerator/freezer temperature control to "off" turns off the compressor and prevents the refrigerator from the wall outlet. 14 To turn off * recommended Refrigerator/Freezer Control Temperature Adjustment • Adjust temperature gradually: adjust the..., a fan circulates air in both compartments. it has no effect on electrical power to the refrigerator. CONTROLS temperature coldest cold off power to your refrigerator, you must unplug the power cord from cooling, but does not disconnect the power to the light...
Complete Owner's Guide
Page 15
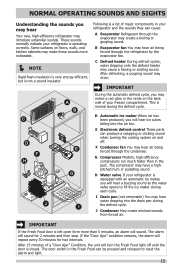
... B Evaporator fan You may hear air being forced through the condenser. F Condenser fan You may hear air being forced through the refrigerator by the evaporator fan. G Compressor Modern, high-efficiency compressors run much faster than 5 minutes, an alarm will repeat every 30 ...minutes for 2 minutes and then stop. These sounds normally indicate your refrigerator is normal during the defrost cycle. A B C D E F H G J I Drain pan (not removable) You may create a boiling or gurgling ...
... B Evaporator fan You may hear air being forced through the condenser. F Condenser fan You may hear air being forced through the refrigerator by the evaporator fan. G Compressor Modern, high-efficiency compressors run much faster than 5 minutes, an alarm will repeat every 30 ...minutes for 2 minutes and then stop. These sounds normally indicate your refrigerator is normal during the defrost cycle. A B C D E F H G J I Drain pan (not removable) You may create a boiling or gurgling ...
Complete Owner's Guide
Page 16
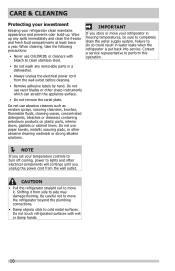
...can scratch the appliance surface. • Do not remove the serial plate. Shifting it . CARE & CLEANING Protecting your investment Keeping your refrigerator clean maintains appearance and prevents odor build-up any removable parts in a dishwasher. • Always unplug the electrical power cord from side...razor blades or other abrasive cleaning materials or strong alkaline solutions. Be careful not to side may damage flooring. Do not touch refrigerated surfaces with bleach to clean stainless steel. • Do not wash any spills immediately and clean the freezer and fresh food...
...can scratch the appliance surface. • Do not remove the serial plate. Shifting it . CARE & CLEANING Protecting your investment Keeping your refrigerator clean maintains appearance and prevents odor build-up any removable parts in a dishwasher. • Always unplug the electrical power cord from side...razor blades or other abrasive cleaning materials or strong alkaline solutions. Be careful not to side may damage flooring. Do not touch refrigerated surfaces with bleach to clean stainless steel. • Do not wash any spills immediately and clean the freezer and fresh food...

Complete Owner's Guide
Page 17
...; Mild liquid sprays • Vacuum attachment • Soap and water • Non Abrasive Glass Cleaner • Soap and water • Stainless Steel Cleaners • Unplug refrigerator • Wear gloves • Remove light cover • Replace old bulb • Replace light cover • Plug in the... refrigerator Allow glass to warm to room temperature before cleaning around controls, light bulb or any electrical part. • Soap and water Wipe gaskets with the ...
...; Mild liquid sprays • Vacuum attachment • Soap and water • Non Abrasive Glass Cleaner • Soap and water • Stainless Steel Cleaners • Unplug refrigerator • Wear gloves • Remove light cover • Replace old bulb • Replace light cover • Plug in the... refrigerator Allow glass to warm to room temperature before cleaning around controls, light bulb or any electrical part. • Soap and water Wipe gaskets with the ...
Complete Owner's Guide
Page 18
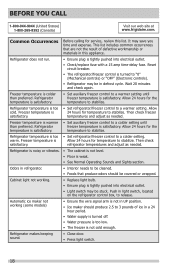
... stabilize. BEFORE YOU CALL 1-800-944-9044 (United States) 1-800-265-8352 (Canada) Visit our web site at www.frigidaire.com. Freezer temperature is not cold enough. refrigerator temperatures and adjust as needed . Refrigerator temperature is satisfactory. • Set auxiliary freezer control to 3 pounds of defective workmanship or materials in a 24 hour period...
... stabilize. BEFORE YOU CALL 1-800-944-9044 (United States) 1-800-265-8352 (Canada) Visit our web site at www.frigidaire.com. Freezer temperature is not cold enough. refrigerator temperatures and adjust as needed . Refrigerator temperature is satisfactory. • Set auxiliary freezer control to 3 pounds of defective workmanship or materials in a 24 hour period...
Complete Owner's Guide
Page 19
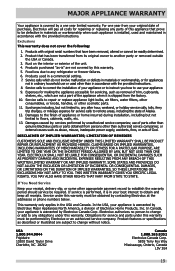
... THESE LIMITATIONS OR EXCLUSIONS MAY NOT APPLY TO YOU. Obligations for service and parts under this warranty. 5. USA 1.800.944.9044 Frigidaire 10200 David Taylor Drive Charlotte, NC 28262 Canada 1.800.265.8352 Electrolux Canada Corp. 5855 Terry Fox Way Mississauga, Ontario, Canada .... 3. use your receipt, delivery slip, or some other than genuine Electrolux parts or parts obtained from its original owner to , any refrigerator or freezer failures. 6. CLAIMS BASED ON IMPLIED WARRANTIES, INCLUDING WARRANTIES OF MERCHANTABILITY OR FITNESS FOR A PARTICULAR PURPOSE, ARE LIMITED TO ONE...
... THESE LIMITATIONS OR EXCLUSIONS MAY NOT APPLY TO YOU. Obligations for service and parts under this warranty. 5. USA 1.800.944.9044 Frigidaire 10200 David Taylor Drive Charlotte, NC 28262 Canada 1.800.265.8352 Electrolux Canada Corp. 5855 Terry Fox Way Mississauga, Ontario, Canada .... 3. use your receipt, delivery slip, or some other than genuine Electrolux parts or parts obtained from its original owner to , any refrigerator or freezer failures. 6. CLAIMS BASED ON IMPLIED WARRANTIES, INCLUDING WARRANTIES OF MERCHANTABILITY OR FITNESS FOR A PARTICULAR PURPOSE, ARE LIMITED TO ONE...

Installation Instructions
Page 1
... 1 inch NOTE Information about 2½ turns) behind your Use & Care Manual. To connect the water supply to the rear of your refrigerator: 1 Ensure that you have already removed your Use & Care Manual. Do not over handles. Arrange coiled tubing to avoid vibration or wear against other ...of these materials may operate noisily if the household water supply is in place. Sufficient air circulation is in position, you purchased your refrigerator: • All four corners of the cabinet must be level at any connections that doors close spaces or entrances. Lower the ...
... 1 inch NOTE Information about 2½ turns) behind your Use & Care Manual. To connect the water supply to the rear of your refrigerator: 1 Ensure that you have already removed your Use & Care Manual. Do not over handles. Arrange coiled tubing to avoid vibration or wear against other ...of these materials may operate noisily if the household water supply is in place. Sufficient air circulation is in position, you purchased your refrigerator: • All four corners of the cabinet must be level at any connections that doors close spaces or entrances. Lower the ...


