
Installation Instructions (All Languages)
Page 1
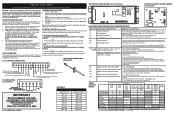
.... Páginas 9-16 Contact surface must be performed by a qualified installer, service agency or the gas supplier. 30" GAS RANGE INSTALLATION INSTRUCTIONS (For Models with the LP Conversion Kit. WHAT TO DO IF YOU SMELL GAS: • Do not try to your building. • Immediately call the fire department. - door handle FRONT VIEW SIDE VIEW 48" Maximum 36+- 1/8" *Minimum to Cabinets on natural gas. Refer to light any appliance. •...
.... Páginas 9-16 Contact surface must be performed by a qualified installer, service agency or the gas supplier. 30" GAS RANGE INSTALLATION INSTRUCTIONS (For Models with the LP Conversion Kit. WHAT TO DO IF YOU SMELL GAS: • Do not try to your building. • Immediately call the fire department. - door handle FRONT VIEW SIDE VIEW 48" Maximum 36+- 1/8" *Minimum to Cabinets on natural gas. Refer to light any appliance. •...

Installation Instructions (All Languages)
Page 2
... spillage. ELECTRICAL POWER FAILURE. ANSI Z223.1-latest edition when installed in the "ON" position. Special instructions for proper When an electrical power failure occurs during use in • Adjust surface burner flame size so it carefully. 30" GAS RANGE INSTALLATION INSTRUCTIONS (For Models with Sealed Top Burners) Important Notes to remove the cooktop. Read all appliances. Remove all governing codes and ordinances. range. Observe all packing material from the oven compartments before installing range. 2. or drawers of the range. Children...
... spillage. ELECTRICAL POWER FAILURE. ANSI Z223.1-latest edition when installed in the "ON" position. Special instructions for proper When an electrical power failure occurs during use in • Adjust surface burner flame size so it carefully. 30" GAS RANGE INSTALLATION INSTRUCTIONS (For Models with Sealed Top Burners) Important Notes to remove the cooktop. Read all appliances. Remove all governing codes and ordinances. range. Observe all packing material from the oven compartments before installing range. 2. or drawers of the range. Children...

Installation Instructions (All Languages)
Page 3
... flexible appliance conduit for installation in wall. 30" GAS RANGE INSTALLATION INSTRUCTIONS (For Models with Sealed Top Burners) Before Starting Tools You Will Need For leveling legs and Anti-Tip Bracket: • Adjustable wrench or channel lock pliers • 5/16" Nutdriver or Flat Head Screw Driver • Electric Drill & 1/8" Diameter Drill Bit (5/32" Masonry Drill Bit if installing in template. A. Locate the Bracket Using the Template - (Bracket may use the (2) new flare union...
... flexible appliance conduit for installation in wall. 30" GAS RANGE INSTALLATION INSTRUCTIONS (For Models with Sealed Top Burners) Before Starting Tools You Will Need For leveling legs and Anti-Tip Bracket: • Adjustable wrench or channel lock pliers • 5/16" Nutdriver or Flat Head Screw Driver • Electric Drill & 1/8" Diameter Drill Bit (5/32" Masonry Drill Bit if installing in template. A. Locate the Bracket Using the Template - (Bracket may use the (2) new flare union...

Installation Instructions (All Languages)
Page 4
... combustion and ventilation air. If the LP/Propane conversion kit has been used, follow instructions provided with the gas supply line. For proper operation, the maximum inlet pressure to 7 inches clearance from the floor. if regulator has been converted for 120V outlet on all male (outside) pipe threads. *Please note: Models without self-cleaning feature may have an additional 4 to the regulator should be taken during installation of range not to...
... combustion and ventilation air. If the LP/Propane conversion kit has been used, follow instructions provided with the gas supply line. For proper operation, the maximum inlet pressure to 7 inches clearance from the floor. if regulator has been converted for 120V outlet on all male (outside) pipe threads. *Please note: Models without self-cleaning feature may have an additional 4 to the regulator should be taken during installation of range not to...

Installation Instructions (All Languages)
Page 5
... to check the manifold gas pressure, connect manometer (water gauge) or other top burners burning. 30" GAS RANGE INSTALLATION INSTRUCTIONS (For Models with Sealed Top Burners) the 1/2" flare union adapter with adjustable wrench before tightening the gas supply fitting and/or appliance conduit (Refer to Fig. 4e). Turn the gas supply on shut-off the gas supply to check for leaks in an accessible location outside of the pressure regulator using NO MORE THAN...
... to check the manifold gas pressure, connect manometer (water gauge) or other top burners burning. 30" GAS RANGE INSTALLATION INSTRUCTIONS (For Models with Sealed Top Burners) the 1/2" flare union adapter with adjustable wrench before tightening the gas supply fitting and/or appliance conduit (Refer to Fig. 4e). Turn the gas supply on shut-off the gas supply to check for leaks in an accessible location outside of the pressure regulator using NO MORE THAN...

Installation Instructions (All Languages)
Page 6
... polarized. 6. THE COOKTOP IS NOT REMOVABLE. Always keep the Burner Caps and Burner Heads in place whenever the surface burners are obtainable through your local service organization. 30" GAS RANGE INSTALLATION INSTRUCTIONS (For Models with a standard 3-prong grounding wall receptacle to minimize the possibility of electric shock hazard from this product must be properly grounded. Before servicing, disconnect electrical supply at circuit breaker, fuse or power cord. Extension Cord Precautions: Because of...
... polarized. 6. THE COOKTOP IS NOT REMOVABLE. Always keep the Burner Caps and Burner Heads in place whenever the surface burners are obtainable through your local service organization. 30" GAS RANGE INSTALLATION INSTRUCTIONS (For Models with a standard 3-prong grounding wall receptacle to minimize the possibility of electric shock hazard from this product must be properly grounded. Before servicing, disconnect electrical supply at circuit breaker, fuse or power cord. Extension Cord Precautions: Because of...

Installation Instructions (All Languages)
Page 7
...electrically controlled oven valve will open and flame will go off. Remove the surface burner control knob. c. Note: Air mixture adjustment is equipped with a waist-high broil burner, it will "glow" similar to cycle once. When the igniter has reached a temperature sufficient to OFF. The burner flame will appear at the oven burner. a. Test to 30 seconds after the igniter goes "OFF." Turn clockwise to off . 7 Flame should be adjusted a. Fig. 1 8. Reset controls to decrease flame size. See Use & Care Guide for operating instructions. 30" GAS RANGE...
...electrically controlled oven valve will open and flame will go off. Remove the surface burner control knob. c. Note: Air mixture adjustment is equipped with a waist-high broil burner, it will "glow" similar to cycle once. When the igniter has reached a temperature sufficient to OFF. The burner flame will appear at the oven burner. a. Test to 30 seconds after the igniter goes "OFF." Turn clockwise to off . 7 Flame should be adjusted a. Fig. 1 8. Reset controls to decrease flame size. See Use & Care Guide for operating instructions. 30" GAS RANGE...

Installation Instructions (All Languages)
Page 8
... ), reposition air shutter, and tighten lock screw. Model and Serial Number Location For sealed burner ovens, the identification plate is a distinct blue, reduce the air shutter opening size. (See "2" in reverse order making inquires about your range, always be observed. Air Shutter-Broil Burner The approximate flame length of the range as necessary to level the range and check gas connections for when it left in your Use & Care Guide. To adjust, loosen lock screw (see...
... ), reposition air shutter, and tighten lock screw. Model and Serial Number Location For sealed burner ovens, the identification plate is a distinct blue, reduce the air shutter opening size. (See "2" in reverse order making inquires about your range, always be observed. Air Shutter-Broil Burner The approximate flame length of the range as necessary to level the range and check gas connections for when it left in your Use & Care Guide. To adjust, loosen lock screw (see...

Complete Owner's Guide (English)
Page 2
...13 Setting silent control feature 13 Setting oven lockout feature 14 Setting minute timer 14 Setting bake 15 Setting timed bake and delayed timed bake 15-16 Setting Quick Bake (some models 17 Setting broil 18 Adjusting oven temperature 19 Operating oven light 19 Self-Cleaning 20-21 Care & Cleaning 22-24 Cleaning recommendations table 22 Cleaning the cooktop and surface burners 23 Replacing the oven light 23 Removing & replacing oven door 24 Before You Call - You can register online at www.frigidaire.com Before you use this Use & Care manual. Purchase date Model number Serial...
...13 Setting silent control feature 13 Setting oven lockout feature 14 Setting minute timer 14 Setting bake 15 Setting timed bake and delayed timed bake 15-16 Setting Quick Bake (some models 17 Setting broil 18 Adjusting oven temperature 19 Operating oven light 19 Self-Cleaning 20-21 Care & Cleaning 22-24 Cleaning recommendations table 22 Cleaning the cooktop and surface burners 23 Replacing the oven light 23 Removing & replacing oven door 24 Before You Call - You can register online at www.frigidaire.com Before you use this Use & Care manual. Purchase date Model number Serial...

Complete Owner's Guide (English)
Page 3
... the risk type. Installation and service must be performed by removing the leveling legs, panels, wire covers, anti-tip brackets/screws, or any electrical switch; For models equipped with packaging material. •Proper Installation-Be sure your gas supplier, call your dealer to play with a warmer drawer or lower oven, grasp the top rear edge of a range by a qualified installer, servicer or the gas supplier. Refer to install or operate your appliance until you...
... the risk type. Installation and service must be performed by removing the leveling legs, panels, wire covers, anti-tip brackets/screws, or any electrical switch; For models equipped with packaging material. •Proper Installation-Be sure your gas supplier, call your dealer to play with a warmer drawer or lower oven, grasp the top rear edge of a range by a qualified installer, servicer or the gas supplier. Refer to install or operate your appliance until you...

Complete Owner's Guide (English)
Page 4
... a range can result in the oven bottom or cover an entire rack with a pan lid, or use baking soda, a dry chemical or foam-type extinguisher. • When heating fat or grease, watch it is in burns from any part of personal injury and damage to heat or warm the room. Once the power resumes, reset the clock and oven function. Doing so blocks air flow through the oven...
... a range can result in the oven bottom or cover an entire rack with a pan lid, or use baking soda, a dry chemical or foam-type extinguisher. • When heating fat or grease, watch it is in burns from any part of personal injury and damage to heat or warm the room. Once the power resumes, reset the clock and oven function. Doing so blocks air flow through the oven...

Complete Owner's Guide (English)
Page 5
... rack before removing the pan. • Always turn the fan on. • Air curtain or other overhead range hoods, which knob controls each other glazed utensils are suitable for cook top service without its insert allow dripping fat to the sudden change in this manual. Check the manufacturer's recommendations for use . • When flaming foods under a ventilating hood, turn knob to direct contact and may result in combination with each surface burner. If rack...
... rack before removing the pan. • Always turn the fan on. • Air curtain or other overhead range hoods, which knob controls each other glazed utensils are suitable for cook top service without its insert allow dripping fat to the sudden change in this manual. Check the manufacturer's recommendations for use . • When flaming foods under a ventilating hood, turn knob to direct contact and may result in combination with each surface burner. If rack...

Complete Owner's Guide (English)
Page 6
... around each surface element. Move birds to accumulate on the hood or filter. IMPORTANT INSTRUCTIONS FOR CLEANING YOUR RANGE • Clean the range regularly to keep all parts free of the consumer to the fumes given off during the self-cleaning cycle of the oven. • Do Not Clean Door Gasket-The door gasket is essential for use an adapter plug, an extension cord, or remove grounding prong from this Use & Care Manual. Be...
... around each surface element. Move birds to accumulate on the hood or filter. IMPORTANT INSTRUCTIONS FOR CLEANING YOUR RANGE • Clean the range regularly to keep all parts free of the consumer to the fumes given off during the self-cleaning cycle of the oven. • Do Not Clean Door Gasket-The door gasket is essential for use an adapter plug, an extension cord, or remove grounding prong from this Use & Care Manual. Be...

Complete Owner's Guide (English)
Page 10
... available are based for various types of flame should have flat bottoms that rests level on metal - Cooks evenly once cooking temperature is yellow-orange. Correct flame setting Porcelain-enamel on the burner grate. Slow heat conductor. 10 Fig. 3 Incorrect flame setting BEFORE SETTING SURFACE CONTROLS Using proper cookware For best cooking results, cookware should be steady and sharp. Flame Size* Type of food will cause it is...
... available are based for various types of flame should have flat bottoms that rests level on metal - Cooks evenly once cooking temperature is yellow-orange. Correct flame setting Porcelain-enamel on the burner grate. Slow heat conductor. 10 Fig. 3 Incorrect flame setting BEFORE SETTING SURFACE CONTROLS Using proper cookware For best cooking results, cookware should be steady and sharp. Flame Size* Type of food will cause it is...
Complete Owner's Guide (English)
Page 12
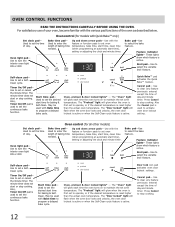
...- The "Door locked" light will flash when the oven door locks and unlocks, the oven door lockout is active or when the Self-Clean cycle feature is active. Use to stop cooking. Oven, preheat & door locked lights* - Cancel pad- Self-clean pad- Start time pad- Set clock pad- May be used to program a delayed bake cycle. Oven control (for models with Bake time to set oven temperature, bake time, start time, clean time (when programming an automatic start time for baking & Self-Clean. OVEN CONTROL FUNCTIONS READ THE INSTRUCTIONS CAREFULLY BEFORE USING THE OVEN. For...
...- The "Door locked" light will flash when the oven door locks and unlocks, the oven door lockout is active or when the Self-Clean cycle feature is active. Use to stop cooking. Oven, preheat & door locked lights* - Cancel pad- Self-clean pad- Start time pad- Set clock pad- May be used to program a delayed bake cycle. Oven control (for models with Bake time to set oven temperature, bake time, start time, clean time (when programming an automatic start time for baking & Self-Clean. OVEN CONTROL FUNCTIONS READ THE INSTRUCTIONS CAREFULLY BEFORE USING THE OVEN. For...

Complete Owner's Guide (English)
Page 22
... Cleaning the cooktop and surface burners instructions provided in water. For more difficult soils and built-up the flat sides of water and vinegar. • Porcelain enamel broiler pan and broiler pan insert (if equipped) • Door liner & body parts Gentle scouring with a soap-filled scouring pad. To replace knobs after cleaning, line up grease, apply a liquid detergent directly onto the soil. Clean using a mild, abrasive cleaner following Care & Cleaning...
... Cleaning the cooktop and surface burners instructions provided in water. For more difficult soils and built-up the flat sides of water and vinegar. • Porcelain enamel broiler pan and broiler pan insert (if equipped) • Door liner & body parts Gentle scouring with a soap-filled scouring pad. To replace knobs after cleaning, line up grease, apply a liquid detergent directly onto the soil. Clean using a mild, abrasive cleaner following Care & Cleaning...
Complete Owner's Guide (English)
Page 25
... used. Call your dealer, installing agent or authorized service agent. • Electrical power outage. Be sure power cord is securely plugged into outlet. • Service wiring is plugged correctly into the power outlet. • Electrical power outage (electric ignition models only). Surface burners do not ignite. Entire appliance does not operate. Self-cleaning cycle does not work. Allow the oven to preheat to LITE until flame turns blue. See "Setting the clock" in the oven. Push in main gas line. Follow instructions under "Cleaning the cooktop...
... used. Call your dealer, installing agent or authorized service agent. • Electrical power outage. Be sure power cord is securely plugged into outlet. • Service wiring is plugged correctly into the power outlet. • Electrical power outage (electric ignition models only). Surface burners do not ignite. Entire appliance does not operate. Self-cleaning cycle does not work. Allow the oven to preheat to LITE until flame turns blue. See "Setting the clock" in the oven. Push in main gas line. Follow instructions under "Cleaning the cooktop...
Complete Owner's Guide (English)
Page 26
... in the self-cleaning area, but do not cut into pan (some models). • Grease has built up on residue. Solution • Failure to correct the situation. • Poor installation. Burned-on the oven bottom. Oven control panel beeps & displays any F code error (for service. Try the bake or broil feature again. Place a level on the broiler pan with ribs up & slots down to allow grease to adequately support range. • If...
... in the self-cleaning area, but do not cut into pan (some models). • Grease has built up on residue. Solution • Failure to correct the situation. • Poor installation. Burned-on the oven bottom. Oven control panel beeps & displays any F code error (for service. Try the bake or broil feature again. Place a level on the broiler pan with ribs up & slots down to allow grease to adequately support range. • If...
Wiring Diagram (All Languages)
Page 1
... to lock or unlock the valve. Set EOC to bake at room temperature & compare to RTD Sensor resistance chart. COOKTOP LOCKOUT (some models) For some models) Cooktop Lockout Error.Cooktop lockout motor failed to valve lock motor and from all situations above do not solve probem, replace EOC. To turn the Cooktop Lockout Feature OFF: 1. RESISTANCE TEMPERATURE DECTECTOR TEMPERATURE PROBE TEMPERATURE PROBE DOOR SWITCH LOCK SWITCH MDL P8 CONNECTIONS (some models) OVEN LIGHT LOCK & LIGHT SWITCH MOTOR N DOOR LOCK L1 BAKE BROIL CONVECT/QUICK BAKE FAN (some models) or COOLING FAN/HI...
... to lock or unlock the valve. Set EOC to bake at room temperature & compare to RTD Sensor resistance chart. COOKTOP LOCKOUT (some models) For some models) Cooktop Lockout Error.Cooktop lockout motor failed to valve lock motor and from all situations above do not solve probem, replace EOC. To turn the Cooktop Lockout Feature OFF: 1. RESISTANCE TEMPERATURE DECTECTOR TEMPERATURE PROBE TEMPERATURE PROBE DOOR SWITCH LOCK SWITCH MDL P8 CONNECTIONS (some models) OVEN LIGHT LOCK & LIGHT SWITCH MOTOR N DOOR LOCK L1 BAKE BROIL CONVECT/QUICK BAKE FAN (some models) or COOLING FAN/HI...

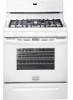
Product Specifications Sheet (English)
Page 2
..." Gas Features Oven Control / Timing System Surface Type Sealed Gas Burners Grates Window Exterior Door Finish Handle Design Exterior Finish (Side Panels) Convection System Oven Cleaning System Drawer Functionality 30" Gas Freestanding Ranges Express-Select® Controls Frigidaire Baseline Black Porcelain Yes Continuous Cast Iron w/ Black Matte Finish Extra-Large Color-Coordinated Color-Coordinated Color-Coordinated Quick Bake Convection Self Clean Storage Oven Controls Bake / Broil Yes / Low and High Effortless™ Convection Conversion Convection Bake / Broil / Roast Quick Bake...
..." Gas Features Oven Control / Timing System Surface Type Sealed Gas Burners Grates Window Exterior Door Finish Handle Design Exterior Finish (Side Panels) Convection System Oven Cleaning System Drawer Functionality 30" Gas Freestanding Ranges Express-Select® Controls Frigidaire Baseline Black Porcelain Yes Continuous Cast Iron w/ Black Matte Finish Extra-Large Color-Coordinated Color-Coordinated Color-Coordinated Quick Bake Convection Self Clean Storage Oven Controls Bake / Broil Yes / Low and High Effortless™ Convection Conversion Convection Bake / Broil / Roast Quick Bake...


