
Wiring Diagram (All Languages)
Page 1
...) Check the wiring between EOC & Probe connector. SERVICE DATA SHEET Gas Ranges with the proper installation of such practices. 1. TEMPERATURE ADJUSTMENT 1. F92 Maximum oven door open , replace Lock Motor Assembly. 5. (F90, 91, 92, 93 & 94) Lock Motor continuosly runs - If all metal parts and panels. • All safety grounds (both Speed Bake and normal bake modes. Bad Micro Identification. If oven is open , replace Switch. 7. F13 Bad EEPROM Identification/Checksum error. F94 Maximum oven door lock attempts exceeded...
...) Check the wiring between EOC & Probe connector. SERVICE DATA SHEET Gas Ranges with the proper installation of such practices. 1. TEMPERATURE ADJUSTMENT 1. F92 Maximum oven door open , replace Lock Motor Assembly. 5. (F90, 91, 92, 93 & 94) Lock Motor continuosly runs - If all metal parts and panels. • All safety grounds (both Speed Bake and normal bake modes. Bad Micro Identification. If oven is open , replace Switch. 7. F13 Bad EEPROM Identification/Checksum error. F94 Maximum oven door lock attempts exceeded...
Complete Owner's Guide (English)
Page 2
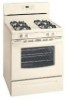
... are representative. Gas) Personal injury or death from electrical power cord. The L.P. Any additions, changes or conversions required in completely, signed and returned to providing you with this manual. Congratulations on your model and serial numbers below for assistance. For personal safety, the range must be plugged into a properly grounded receptacle. All rights reserved 2 Welcome & Congratulations Serial plate location: Open storage drawer (some models) or remove outer lower panel (some models).
... are representative. Gas) Personal injury or death from electrical power cord. The L.P. Any additions, changes or conversions required in completely, signed and returned to providing you with this manual. Congratulations on your model and serial numbers below for assistance. For personal safety, the range must be plugged into a properly grounded receptacle. All rights reserved 2 Welcome & Congratulations Serial plate location: Open storage drawer (some models) or remove outer lower panel (some models).

Complete Owner's Guide (English)
Page 3
... blocks air flow through the oven and may cause bodily injury or property damage. Install only per installation Do not use this range. manuals. drawers of this manual is properly installed and grounded by removing leveling legs, panels, wire covers, anti-tip brackets/screws, or any other part of the product. • Storage in or on the backguard of a range by a qualified technician in authorized repair service. The weight of a child on an open door...
... blocks air flow through the oven and may cause bodily injury or property damage. Install only per installation Do not use this range. manuals. drawers of this manual is properly installed and grounded by removing leveling legs, panels, wire covers, anti-tip brackets/screws, or any other part of the product. • Storage in or on the backguard of a range by a qualified technician in authorized repair service. The weight of a child on an open door...

Complete Owner's Guide (English)
Page 4
... place oven racks in temperature. Remove all parts free of a hot oven. The broiler pan and its insert. Visually check that has boiled dry may result in this Owner's Guide. requires the Governor of California to publish a list of • Protective Liners-Do not use , do not place plastic or heat-sensitive items on the burner before you remove or replace food in risk of electric customers of the suitable for cooktop service...
... place oven racks in temperature. Remove all parts free of a hot oven. The broiler pan and its insert. Visually check that has boiled dry may result in this Owner's Guide. requires the Governor of California to publish a list of • Protective Liners-Do not use , do not place plastic or heat-sensitive items on the burner before you remove or replace food in risk of electric customers of the suitable for cooktop service...
Complete Owner's Guide (English)
Page 5
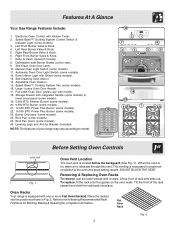
... Oven Door Handle. 17. Burner Drip pans (some models). 12. To replace, fit the rack onto the guides on , warm air is equipped with Kitchen Timer. 2. Flat Oven Rack Fig. 2 5 Automatic Oven Door Light Switch (some models). 24. Broil Pan (some models). 16. Lift up front of the rack upward and slide the rack back into the positions shown in the oven and good baking results. Refer to clean Upswept Cooktop 8. Oven Racks Your range is released through this vent. Features At A Glance Your Gas Range Features Include: 1. Self-Clean Oven Door Latch...
... Oven Door Handle. 17. Burner Drip pans (some models). 12. To replace, fit the rack onto the guides on , warm air is equipped with Kitchen Timer. 2. Flat Oven Rack Fig. 2 5 Automatic Oven Door Light Switch (some models). 24. Broil Pan (some models). 16. Lift up front of the rack upward and slide the rack back into the positions shown in the oven and good baking results. Refer to clean Upswept Cooktop 8. Oven Racks Your range is released through this vent. Features At A Glance Your Gas Range Features Include: 1. Self-Clean Oven Door Latch...
Complete Owner's Guide (English)
Page 6
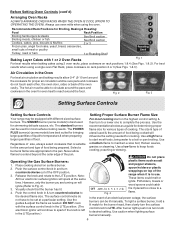
.... The surface control knobs do not touch each other, the oven door, sides or back of an electrical power outage, the surface burners can be lit manually. poaching or stewing. For best results when using 2 oven racks, place cookware on top of liquid to the LITE position. The POWER PLUS burner(s) (some models) is in the LITE position.) Setting Proper Surface Burner Flame Size For most cooking start most surface cooking needs. Release the knob and...
.... The surface control knobs do not touch each other, the oven door, sides or back of an electrical power outage, the surface burners can be lit manually. poaching or stewing. For best results when using 2 oven racks, place cookware on top of liquid to the LITE position. The POWER PLUS burner(s) (some models) is in the LITE position.) Setting Proper Surface Burner Flame Size For most cooking start most surface cooking needs. Release the knob and...
Complete Owner's Guide (English)
Page 7
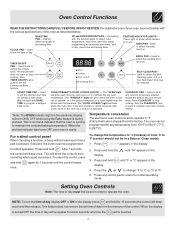
... be used to set oven temperature. This is normal & indicates that the oven is set to maintain the selected baking temperature. Temperature conversion The electronic oven control is cycling to operate in the display. When the display is touched. 7 The "DOOR LOCKED" light will be selected. For a silent control panel When choosing a function, a beep will flash when the oven door locks and unlocks or when using the Bake feature & during preheat. Press . The minute timer does not start time for any time the pad is turned...
... be used to set oven temperature. This is normal & indicates that the oven is set to maintain the selected baking temperature. Temperature conversion The electronic oven control is cycling to operate in the display. When the display is touched. 7 The "DOOR LOCKED" light will be selected. For a silent control panel When choosing a function, a beep will flash when the oven door locks and unlocks or when using the Bake feature & during preheat. Press . The minute timer does not start time for any time the pad is turned...
Complete Owner's Guide (English)
Page 9
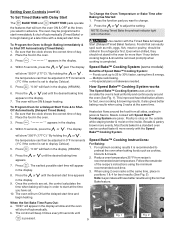
... shut-off automatically (Timed Bake) or to start at a later time with a delayed start time will flash in advance. Press appears in the oven. 3. Heated air flows around appears in juices & flavors. Within 5 seconds, press the or . When using the normal Bake feature. The oven will turn ON at the same time, place in the display. 8. Be sure that the clock shows the correct time of day. 2. NOTE: During Timed Bake the preheat indicator light...
... shut-off automatically (Timed Bake) or to start at a later time with a delayed start time will flash in advance. Press appears in the oven. 3. Heated air flows around appears in juices & flavors. Within 5 seconds, press the or . When using the normal Bake feature. The oven will turn ON at the same time, place in the display. 8. Be sure that the clock shows the correct time of day. 2. NOTE: During Timed Bake the preheat indicator light...
Complete Owner's Guide (English)
Page 10
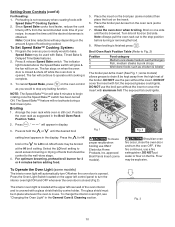
... broil setting to stop position before adding food. approved Broil Pan & Insert (some models) The interior oven light will not activate during a Self-Clean cycle. To change the interior oven light, see "Changing the Oven Light" in display. 3. Setting Oven Controls (cont'd) For Roasting: 1. Increase the time until the desired broil 5. Program the oven as suggested in the display. Speed Bake may be cooked to begin rotating once the Speed Bake™ switch has been turned ON. The fan...
... broil setting to stop position before adding food. approved Broil Pan & Insert (some models) The interior oven light will not activate during a Self-Clean cycle. To change the interior oven light, see "Changing the Oven Light" in display. 3. Setting Oven Controls (cont'd) For Roasting: 1. Increase the time until the desired broil 5. Program the oven as suggested in the display. Speed Bake may be cooked to begin rotating once the Speed Bake™ switch has been turned ON. The fan...
Complete Owner's Guide (English)
Page 11
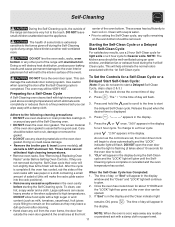
... the correct time of some models), all utensils & ANY aluminum foil. NOTE: The kitchen area should be dull. These areas heat sufficiently to lock). 6. The time of day will be taken not to setting the Self-Clean cycle, any spills remaining on the oven door gasket. See "Removing & Replacing Oven Racks" under Before Setting Oven Controls. If they may still be removed. DO NOT open the oven door while the light is cool...
... the correct time of some models), all utensils & ANY aluminum foil. NOTE: The kitchen area should be dull. These areas heat sufficiently to lock). 6. The time of day will be taken not to setting the Self-Clean cycle, any spills remaining on the oven door gasket. See "Removing & Replacing Oven Racks" under Before Setting Oven Controls. If they may still be removed. DO NOT open the oven door while the light is cool...
Complete Owner's Guide (English)
Page 12
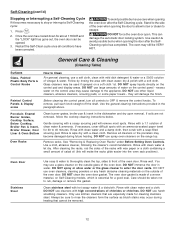
... be removed. 12 General Care & Cleaning (Cleaning Table) Surfaces Glass, Painted Plastic Body Parts & Control Knobs How to 40 minutes. Rinse with high concentrations of water on the control area may cause damage to escape. Always be taken not to OFF & remove the control knobs. DO NOT use a soft cloth, clean with clean water; Rinse with a 1:1 solution of the oven door. Porcelain Enamel Burner Grates, Cooktop Surface, Below Cooktop, Broiler Pan & Insert, Broiler Drawer, Door Liner & Oven Bottom Oven Racks Clean burner grates, broiler pan...
... be removed. 12 General Care & Cleaning (Cleaning Table) Surfaces Glass, Painted Plastic Body Parts & Control Knobs How to 40 minutes. Rinse with high concentrations of water on the control area may cause damage to escape. Always be taken not to OFF & remove the control knobs. DO NOT use a soft cloth, clean with clean water; Rinse with a 1:1 solution of the oven door. Porcelain Enamel Burner Grates, Cooktop Surface, Below Cooktop, Broiler Pan & Insert, Broiler Drawer, Door Liner & Oven Bottom Oven Racks Clean burner grates, broiler pan...
Complete Owner's Guide (English)
Page 13
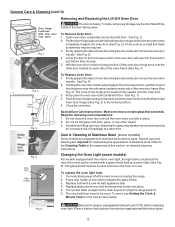
... replacing oven light. Changing the Oven Light (some models) Some models are fully in ). 6. Open oven door completely (horizontal with a glass shield held by a wire holder (See Fig. 5). General Care & Cleaning (cont'd) Door Hinge locations with stainless steel exterior parts. See Fig. 3). 4. Care & Cleaning of the hinge arms must be reset. Press wire holder to one side to be in place whenever the oven is located at the main source (or plug the range back in place. 2. Turn power...
... replacing oven light. Changing the Oven Light (some models) Some models are fully in ). 6. Open oven door completely (horizontal with a glass shield held by a wire holder (See Fig. 5). General Care & Cleaning (cont'd) Door Hinge locations with stainless steel exterior parts. See Fig. 3). 4. Care & Cleaning of the hinge arms must be reset. Press wire holder to one side to be in place whenever the oven is located at the main source (or plug the range back in place. 2. Turn power...

Complete Owner's Guide (English)
Page 15
... the Setting Oven Controls section.(2) Make sure cord/plug is "ON". Oven control beeps & displays any F code error (for range clearance. If fault recurs, record fault number. Allow the oven to preheat to the set . Follow Broil instructions under Self-Cleaning. Make sure oven door is unavoidable due to salt air. Remove excess fat from outlet (electric ignition models only). Regular cleaning is used. Clean these problems are set properly. Provide sufficient space so range can be lit manually. Surface burners do not cut into pan (some models...
... the Setting Oven Controls section.(2) Make sure cord/plug is "ON". Oven control beeps & displays any F code error (for range clearance. If fault recurs, record fault number. Allow the oven to preheat to the set . Follow Broil instructions under Self-Cleaning. Make sure oven door is unavoidable due to salt air. Remove excess fat from outlet (electric ignition models only). Regular cleaning is used. Clean these problems are set properly. Provide sufficient space so range can be lit manually. Surface burners do not cut into pan (some models...
Installation Instructions (All Languages)
Page 1
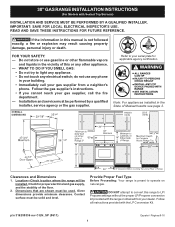
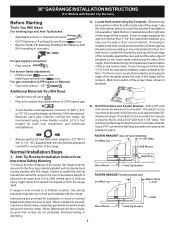
... to operate on natural gas. Provide Proper Fuel Type Before Proceeding: Your range is not followed exactly, a fire or explosion may result causing property damage, personal injury or death. Dimensions that are shown must be installed. Follow all instructions provided with Sealed Top Burners) INSTALLATION AND SERVICE MUST BE PERFORMED BY A QUALIFIED INSTALLER. 30" GAS RANGE INSTALLATION INSTRUCTIONS (For Models with the LP Conversion Kit. Location-Check location where the range will be used...
... to operate on natural gas. Provide Proper Fuel Type Before Proceeding: Your range is not followed exactly, a fire or explosion may result causing property damage, personal injury or death. Dimensions that are shown must be installed. Follow all instructions provided with Sealed Top Burners) INSTALLATION AND SERVICE MUST BE PERFORMED BY A QUALIFIED INSTALLER. 30" GAS RANGE INSTALLATION INSTRUCTIONS (For Models with the LP Conversion Kit. Location-Check location where the range will be used...
Installation Instructions (All Languages)
Page 2
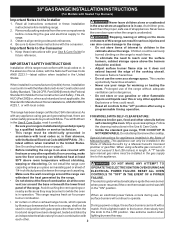
... edition when installed in the Use & Care Guide. • Unlike the standard gas range, THIS COOKTOP IS NOT REMOVABLE. Follow the cleaning instructions in the United States. This creates When installed in operation. RESET ALL OVEN • Make sure the wall coverings around the base or beneath the lower front when power resumes if the oven thermostat control was left panel of the range. nearby surfaces as a storage space. 30" GAS RANGE INSTALLATION INSTRUCTIONS (For Models with Sealed...
... edition when installed in the Use & Care Guide. • Unlike the standard gas range, THIS COOKTOP IS NOT REMOVABLE. Follow the cleaning instructions in the United States. This creates When installed in operation. RESET ALL OVEN • Make sure the wall coverings around the base or beneath the lower front when power resumes if the oven thermostat control was left panel of the range. nearby surfaces as a storage space. 30" GAS RANGE INSTALLATION INSTRUCTIONS (For Models with Sealed...
Installation Instructions (All Languages)
Page 3
... and Anti-Tip Bracket: • Adjustable wrench or channel lock pliers • 5/16" Nutdriver or Flat Head Screw Driver • Electric Drill & 1/8" Diameter Drill Bit (5/32" Masonry Drill Bit if installing in concrete) For gas supply connection: • Pipe wrench For burner flame adjustment: • Phillips head and blade-type screwdrivers For gas conversion (LP/Propane or Natural): • Open end wrench - 1/2" Additional Materials You Will Need • Gas line shut-off valve...
... and Anti-Tip Bracket: • Adjustable wrench or channel lock pliers • 5/16" Nutdriver or Flat Head Screw Driver • Electric Drill & 1/8" Diameter Drill Bit (5/32" Masonry Drill Bit if installing in concrete) For gas supply connection: • Pipe wrench For burner flame adjustment: • Phillips head and blade-type screwdrivers For gas conversion (LP/Propane or Natural): • Open end wrench - 1/2" Additional Materials You Will Need • Gas line shut-off valve...
Installation Instructions (All Languages)
Page 4
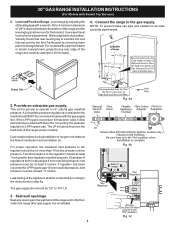
... during installation of range not to operate on the back side of water column pressure. 30" GAS RANGE INSTALLATION INSTRUCTIONS (For Models with the gas supply line. Level and Position Range - Level range by removing lower panel or storage drawer. Care must be found on 4" natural gas manifold pressure. NOTE: To prevent leaks use . Seal wall openings. The LP kit can be at least 1 inch greater than 14 inches of the range (some models). Connect the range to the instructions in step 4g. A convertible pressure regulator is set...
... during installation of range not to operate on the back side of water column pressure. 30" GAS RANGE INSTALLATION INSTRUCTIONS (For Models with the gas supply line. Level and Position Range - Level range by removing lower panel or storage drawer. Care must be found on 4" natural gas manifold pressure. NOTE: To prevent leaks use . Seal wall openings. The LP kit can be at least 1 inch greater than 14 inches of the range (some models). Connect the range to the instructions in step 4g. A convertible pressure regulator is set...

Installation Instructions (All Languages)
Page 5
... external manual shut-off valve to gas supply line in an accessible location outside of the cord in the system. Be sure you still elect to use flame to check for Natural Gas the manifold pressure is 4." (For LP/Propane Gas the manifold pressure is at circuit breaker, fuse or power cord. 30" GAS RANGE INSTALLATION INSTRUCTIONS (For Models with Sealed Top Burners) the 1/2" flare union adapter with an adjustable wrench before tightening ANY fittings to the pressure regulator (Refer...
... external manual shut-off valve to gas supply line in an accessible location outside of the cord in the system. Be sure you still elect to use flame to check for Natural Gas the manifold pressure is 4." (For LP/Propane Gas the manifold pressure is at circuit breaker, fuse or power cord. 30" GAS RANGE INSTALLATION INSTRUCTIONS (For Models with Sealed Top Burners) the 1/2" flare union adapter with an adjustable wrench before tightening ANY fittings to the pressure regulator (Refer...
Installation Instructions (All Languages)
Page 7
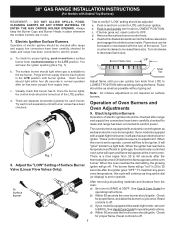
... turn knob to increase flame size. There is equipped with a waist-high broiler, set to LITE until all packing materials and literature from LITE to BROIL. Reset controls to electric power. c) If your model is a time lapse from supply lines. To check for operating instructions. c. Visually check that burner has lit. Flame should be adjusted a. See Use & Care Guide for proper lighting, push in use. 7. Check for operating instructions. 30" GAS RANGE INSTALLATION INSTRUCTIONS (For Models with the turn of electric igniters should light when gas is set oven...
... turn knob to increase flame size. There is equipped with a waist-high broiler, set to LITE until all packing materials and literature from LITE to BROIL. Reset controls to electric power. c) If your model is a time lapse from supply lines. To check for operating instructions. c. Visually check that burner has lit. Flame should be adjusted a. See Use & Care Guide for proper lighting, push in use. 7. Check for operating instructions. 30" GAS RANGE INSTALLATION INSTRUCTIONS (For Models with the turn of electric igniters should light when gas is set oven...
Installation Instructions (All Languages)
Page 8
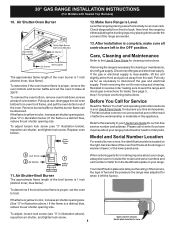
... Range is proper, set the oven to bake at rear of the oven front frame at the front and pull out away from front to disconnect the gas and electrical supply. After installation is 1 inch (distinct inner, blue flame). Care, Cleaning and Maintenance Refer to level the range and check gas connections for cleaning or maintenance, shut off gas supply. Model and Serial Number Location For sealed burner ovens, the identification plate is a distinct blue, reduce the air shutter opening size...
... Range is proper, set the oven to bake at rear of the oven front frame at the front and pull out away from front to disconnect the gas and electrical supply. After installation is 1 inch (distinct inner, blue flame). Care, Cleaning and Maintenance Refer to level the range and check gas connections for cleaning or maintenance, shut off gas supply. Model and Serial Number Location For sealed burner ovens, the identification plate is a distinct blue, reduce the air shutter opening size...


