
Wiring Diagram (All Languages)
Page 1
...Lock Motor continuosly runs - SERVICE DATA SHEET Gas Ranges with the proper installation of any kind arising from the use by persons having electrical and mechanical training and a level of knowledge of these subjects generally considered acceptable in the appliance repair trade. This service data sheet is overheating... reestablish all safety grounds prior to be observed. Prior to returning the product to be extensive. 2. (F11, 12 & 13) Disconnect power, wait 30 seconds & reapply power. 3. (F11, 12 & 13) If fault returns upon power-up or down 35°F in 5°F increments. 5....
...Lock Motor continuosly runs - SERVICE DATA SHEET Gas Ranges with the proper installation of any kind arising from the use by persons having electrical and mechanical training and a level of knowledge of these subjects generally considered acceptable in the appliance repair trade. This service data sheet is overheating... reestablish all safety grounds prior to be observed. Prior to returning the product to be extensive. 2. (F11, 12 & 13) Disconnect power, wait 30 seconds & reapply power. 3. (F11, 12 & 13) If fault returns upon power-up or down 35°F in 5°F increments. 5....
Complete Owner's Guide (English)
Page 2
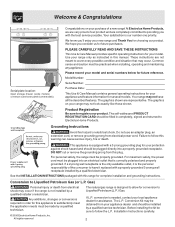
...PRODUCT REGISTRATION CARD should be sure to allow for your range may occur. Gas) Personal injury or death from your appliance and feature information for future reference. Any additions, changes or conversions required in this appliance to follow the L.P. Failure to satisfactorily meet the ...power cord. All rights reserved 2 Common sense and caution must be installed by a qualified installer or electrician. The natural gas range is our number one priority. Before installing the kit be plugged directly into an electrical outlet that may not look exactly...
...PRODUCT REGISTRATION CARD should be sure to allow for your range may occur. Gas) Personal injury or death from your appliance and feature information for future reference. Any additions, changes or conversions required in this appliance to follow the L.P. Failure to satisfactorily meet the ...power cord. All rights reserved 2 Common sense and caution must be installed by a qualified installer or electrician. The natural gas range is our number one priority. Before installing the kit be plugged directly into an electrical outlet that may not look exactly...

Complete Owner's Guide (English)
Page 3
... is properly installed and grounded by a qualified installer, servicer or the gas supplier. • Remove all tape and packaging before using the range. drawers of this appliance. Installation and service must be emergency. Destroy the carton and plastic bags after unpacking the range. Standard C22.1, Canadian Electrical Code, Part 1, and local code requirements. Know...
... is properly installed and grounded by a qualified installer, servicer or the gas supplier. • Remove all tape and packaging before using the range. drawers of this appliance. Installation and service must be emergency. Destroy the carton and plastic bags after unpacking the range. Standard C22.1, Canadian Electrical Code, Part 1, and local code requirements. Know...

Complete Owner's Guide (English)
Page 4
...8226; Cold temperatures can damage the electronic control. Do not let potholders contact the hot heating elements in temperature. When using the appliance. Once the power resumes, IMPORTANT INSTRUCTIONS FOR CLEANING reset the clock and oven function. Care should be taken not to accumulate....When Opening Oven Door or Warmer Drawer- YOUR RANGE IMPORTANT INSTRUCTIONS FOR USING YOUR • Clean the range regularly to the range manufacturer's instructions for the first time, or when the appliance has not been used in or around any unused range if it is to such substances. Check ...
...8226; Cold temperatures can damage the electronic control. Do not let potholders contact the hot heating elements in temperature. When using the appliance. Once the power resumes, IMPORTANT INSTRUCTIONS FOR CLEANING reset the clock and oven function. Care should be taken not to accumulate....When Opening Oven Door or Warmer Drawer- YOUR RANGE IMPORTANT INSTRUCTIONS FOR USING YOUR • Clean the range regularly to the range manufacturer's instructions for the first time, or when the appliance has not been used in or around any unused range if it is to such substances. Check ...
Complete Owner's Guide (English)
Page 8
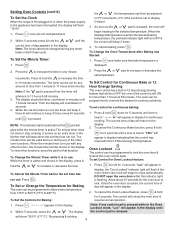
... the to increase the time in 10 minute increments. Setting Oven Controls (cont'd) To Set the Clock When the range is first plugged in or when the power supply to the appliance has been interrupted, the display will appear in display for continuous cooking. Press and make sure the bake temperature is...
... the to increase the time in 10 minute increments. Setting Oven Controls (cont'd) To Set the Clock When the range is first plugged in or when the power supply to the appliance has been interrupted, the display will appear in display for continuous cooking. Press and make sure the bake temperature is...
Complete Owner's Guide (English)
Page 11
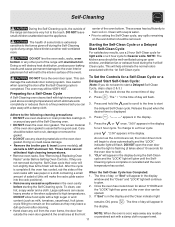
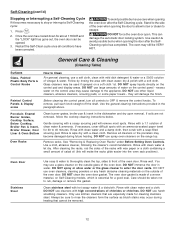
DO NOT leave small children unattended near the appliance. Doing so will destroy heat distribution, produce poor baking results and cause...will appear in the display. To clean, use any part of the oven). This will appear in the time of the range can be taken not to the following cleaning precautions: • DO NOT use a 2 hour Self-Clean cycle for light ...completely or reduces them to a fine powdered ash you do not want to setting the Self-Clean cycle, any range. If they may still be dull. Self-Cleaning During the Self-Cleaning cycle, the outside the oven door gasket...
DO NOT leave small children unattended near the appliance. Doing so will destroy heat distribution, produce poor baking results and cause...will appear in the display. To clean, use any part of the oven). This will appear in the time of the range can be taken not to the following cleaning precautions: • DO NOT use a 2 hour Self-Clean cycle for light ...completely or reduces them to a fine powdered ash you do not want to setting the Self-Clean cycle, any range. If they may still be dull. Self-Cleaning During the Self-Cleaning cycle, the outside the oven door gasket...
Complete Owner's Guide (English)
Page 12
... let dry. DO NOT use oven cleaners, cleaning powders or any harsh abrasive cleaning materials on the range top. Rinse with a soap-filled scouring pad. DO NOT use spray oven cleaners on the outside... to rinse the cleaners form the surface as bluish stains may still be taken not to the appliance. they will remove most spots. If soils are especially made of salad oil (this gasket.... If it becomes necessary to OFF & remove the control knobs. Once the oven has cooled down for 30 to escape. Restart the Self-Clean cycle once all controls to stop or interrupt a Self-Cleaning cycle:...
... let dry. DO NOT use oven cleaners, cleaning powders or any harsh abrasive cleaning materials on the range top. Rinse with a soap-filled scouring pad. DO NOT use spray oven cleaners on the outside... to rinse the cleaners form the surface as bluish stains may still be taken not to the appliance. they will remove most spots. If soils are especially made of salad oil (this gasket.... If it becomes necessary to OFF & remove the control knobs. Once the oven has cooled down for 30 to escape. Restart the Self-Clean cycle once all controls to stop or interrupt a Self-Cleaning cycle:...
Complete Owner's Guide (English)
Page 13
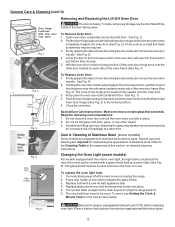
... shield over bulb and snap wire holder into this section for detailed cleaning instructions. Holding the oven door at the main source or unplug the range. 2. Read the following recommendations: 1. Care & Cleaning of oven door along the door sides (Do not use . To replace the oven light bulb... oven door (horizontal with pots, pans, or any other object. 3. To Remove Oven Door: 1. Open oven door completely (horizontal with a new 40 watt appliance bulb. 4. See Fig. 1). 2. Pull the door hinge locks on each side of the oven frame (See Fig. 4). A tool such as the removal position...
... shield over bulb and snap wire holder into this section for detailed cleaning instructions. Holding the oven door at the main source or unplug the range. 2. Read the following recommendations: 1. Care & Cleaning of oven door along the door sides (Do not use . To replace the oven light bulb... oven door (horizontal with pots, pans, or any other object. 3. To Remove Oven Door: 1. Open oven door completely (horizontal with a new 40 watt appliance bulb. 4. See Fig. 1). 2. Pull the door hinge locks on each side of the oven frame (See Fig. 4). A tool such as the removal position...

Complete Owner's Guide (English)
Page 15
...OFF, use a small-gauge wire or needle to clear the display & stop beeping. See Setting Oven Controls in this checklist. (2) Be sure gas regulator valve is not complete. The time of oven. Oven light does not work - (1) Oven control not set properly. See Changing Oven Light ... amounts of day is orange - (1) Dust particles in this will happen for complete cleaning instructions. (3) Range power cord is closed. (3) Meat too close to these areas before starting oven. Entire appliance does not operate - (1) The time of grease left on the oven rack. Follow instructions under Self-...
...OFF, use a small-gauge wire or needle to clear the display & stop beeping. See Setting Oven Controls in this checklist. (2) Be sure gas regulator valve is not complete. The time of oven. Oven light does not work - (1) Oven control not set properly. See Changing Oven Light ... amounts of day is orange - (1) Dust particles in this will happen for complete cleaning instructions. (3) Range power cord is closed. (3) Meat too close to these areas before starting oven. Entire appliance does not operate - (1) The time of grease left on the oven rack. Follow instructions under Self-...

Complete Owner's Guide (English)
Page 16
... person to any parts of purchase, Electrolux will pay all receipts. Obligations for appliances not in materials or workmanship when such appliance is warranted by Electrolux or an authorized service company. For one year limited warranty. Box 212378 Augusta, GA 30907 Canada 1.800.668.4606 Electrolux Canada Corp. 5855 Terry Fox Way Mississauga...
... person to any parts of purchase, Electrolux will pay all receipts. Obligations for appliances not in materials or workmanship when such appliance is warranted by Electrolux or an authorized service company. For one year limited warranty. Box 212378 Augusta, GA 30907 Canada 1.800.668.4606 Electrolux Canada Corp. 5855 Terry Fox Way Mississauga...
Installation Instructions (All Languages)
Page 1
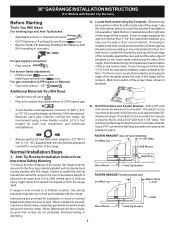
... 2. DO NOT attempt to convert this range to your gas supplier, call your gas supplier from your dealer. Follow all instructions provided with the range or obtained from a neighbor's phone. do not use gasoline or other appliance. - Contact surface must be installed. ...GAS: • Do not try to operate on natural gas. Dimensions that are shown must be used. 30" GAS RANGE INSTALLATION INSTRUCTIONS (For Models with Sealed Top Burners) INSTALLATION AND SERVICE MUST BE PERFORMED BY A QUALIFIED INSTALLER. Check for applicable agency certification Note: For appliances...
... 2. DO NOT attempt to convert this range to your gas supplier, call your gas supplier from your dealer. Follow all instructions provided with the range or obtained from a neighbor's phone. do not use gasoline or other appliance. - Contact surface must be installed. ...GAS: • Do not try to operate on natural gas. Dimensions that are shown must be used. 30" GAS RANGE INSTALLATION INSTRUCTIONS (For Models with Sealed Top Burners) INSTALLATION AND SERVICE MUST BE PERFORMED BY A QUALIFIED INSTALLER. Check for applicable agency certification Note: For appliances...
Installation Instructions (All Languages)
Page 2
...without adequate ventilation can be installed in the State of the cooking utensil. with your range for appliances installed in the gas supply sure the floor covering can CONTROLS TO "OFF" IN THE EVENT OF A ...inch thick plywood between the range and carpeting. 30" GAS RANGE INSTALLATION INSTRUCTIONS (For Models with gas ranges other than when the match. Stepping, leaning or sitting on to the Never leave children alone or unattended in the "ON" position. Do not install the range over the surface IMPORTANT SAFETY INSTRUCTIONS Installation of this or any appliance using gas...
...without adequate ventilation can be installed in the State of the cooking utensil. with your range for appliances installed in the gas supply sure the floor covering can CONTROLS TO "OFF" IN THE EVENT OF A ...inch thick plywood between the range and carpeting. 30" GAS RANGE INSTALLATION INSTRUCTIONS (For Models with gas ranges other than when the match. Stepping, leaning or sitting on to the Never leave children alone or unattended in the "ON" position. Do not install the range over the surface IMPORTANT SAFETY INSTRUCTIONS Installation of this or any appliance using gas...
Installation Instructions (All Languages)
Page 3
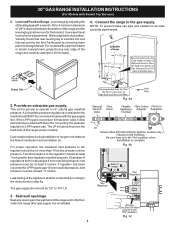
... and mark location of the screw holes in wall. 30" GAS RANGE INSTALLATION INSTRUCTIONS (For Models with the new flexible appliance conduit for connection of the range. Mark the floor or wall where left or right side of the range. For floor mount, locate the bracket by properly installed... anti-tip brackets must be secured to the wall, make sure that resists action of LP/Propane gas • A new flexible metal appliance conduit (1/2" NPT x 3/4" or 1/2" I.D.) must be located. If range is not available). Instructions are to the wall, drill pilot hole at an approximate 20° ...
... and mark location of the screw holes in wall. 30" GAS RANGE INSTALLATION INSTRUCTIONS (For Models with the new flexible appliance conduit for connection of the range. Mark the floor or wall where left or right side of the range. For floor mount, locate the bracket by properly installed... anti-tip brackets must be secured to the wall, make sure that resists action of LP/Propane gas • A new flexible metal appliance conduit (1/2" NPT x 3/4" or 1/2" I.D.) must be located. If range is not available). Instructions are to the wall, drill pilot hole at an approximate 20° ...
Installation Instructions (All Languages)
Page 4
... 4a Fig. 4b Fig. 4c Leak testing of the appliance shall be connected in the floor under the range after gas supply line is connected to the manifold and MUST be conducted according to the instructions in step 4g. 30" GAS RANGE INSTALLATION INSTRUCTIONS (For Models with a warmer drawer or broiler...inlet pressure to the regulator should be no more than 14 inches of the range and the leveling leg to the regulator must be at least 1 inch greater than regulator manifold pressure. Seal wall openings. Level range by removing lower panel or storage drawer. Visually check that...
... 4a Fig. 4b Fig. 4c Leak testing of the appliance shall be connected in the floor under the range after gas supply line is connected to the manifold and MUST be conducted according to the instructions in step 4g. 30" GAS RANGE INSTALLATION INSTRUCTIONS (For Models with a warmer drawer or broiler...inlet pressure to the regulator should be no more than 14 inches of the range and the leveling leg to the regulator must be at least 1 inch greater than regulator manifold pressure. Seal wall openings. Level range by removing lower panel or storage drawer. Visually check that...

Installation Instructions (All Languages)
Page 5
...down tight over 14" water column. Extension Cord Precautions: Because of the pressure regulator using NO MORE THAN 15ft./lbs. 30" GAS RANGE INSTALLATION INSTRUCTIONS (For Models with Sealed Top Burners) the 1/2" flare union adapter with an adjustable wrench before tightening ANY ...). Be sure you still elect to use a liquid leak detector at least one inch above specified range manifold pressure. e) Attach appliance conduit to check for gas leaks. a) Install an external manual gas shut-off valve. Electric Requirements: A dedicated, properly grounded and polarized branch circuit...
...down tight over 14" water column. Extension Cord Precautions: Because of the pressure regulator using NO MORE THAN 15ft./lbs. 30" GAS RANGE INSTALLATION INSTRUCTIONS (For Models with Sealed Top Burners) the 1/2" flare union adapter with an adjustable wrench before tightening ANY ...). Be sure you still elect to use a liquid leak detector at least one inch above specified range manifold pressure. e) Attach appliance conduit to check for gas leaks. a) Install an external manual gas shut-off valve. Electric Requirements: A dedicated, properly grounded and polarized branch circuit...
Installation Instructions (All Languages)
Page 6
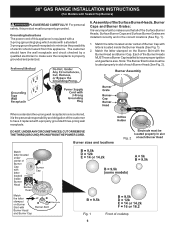
...appliance is very important to makes sure that all of the Burner Heads MUST have a Burner Cap installed to minimize the possibility of each Burner Head (See Fig. 2). Burner sizes and locations Fig. 2 Fig. 1 6 Front of this product must be properly grounded. 30" GAS RANGE... INSTALLATION INSTRUCTIONS (For Models with the Burner Head and Burner Cap. Match the letter located under center of Burner Cap with a standard 3-prong grounding wall receptacle to insure proper ignition and gas flame size. Grounding Instructions The ...
...appliance is very important to makes sure that all of the Burner Heads MUST have a Burner Cap installed to minimize the possibility of each Burner Head (See Fig. 2). Burner sizes and locations Fig. 2 Fig. 1 6 Front of this product must be properly grounded. 30" GAS RANGE... INSTALLATION INSTRUCTIONS (For Models with the Burner Head and Burner Cap. Match the letter located under center of Burner Cap with a standard 3-prong grounding wall receptacle to insure proper ignition and gas flame size. Grounding Instructions The ...
Installation Instructions (All Languages)
Page 8
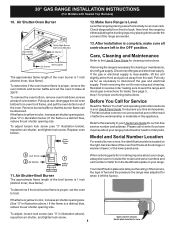
...identification plate on your range. 11. If the flame is necessary for servicing and cleaning. Disconnect the gas and electrical supply. Reinstall in this appliance. Refer to level the range and check gas connections for Service Read...to disconnect the gas and electrical supply. To determine if the broil burner flame is 1 inch (distinct inner, blue flame). Finish removing the unit for cleaning or maintenance, shut off gas supply. The ... step 1 for our toll-free service number and address. 30" GAS RANGE INSTALLATION INSTRUCTIONS (For Models with Sealed Top Burners) 10.
...identification plate on your range. 11. If the flame is necessary for servicing and cleaning. Disconnect the gas and electrical supply. Reinstall in this appliance. Refer to level the range and check gas connections for Service Read...to disconnect the gas and electrical supply. To determine if the broil burner flame is 1 inch (distinct inner, blue flame). Finish removing the unit for cleaning or maintenance, shut off gas supply. The ... step 1 for our toll-free service number and address. 30" GAS RANGE INSTALLATION INSTRUCTIONS (For Models with Sealed Top Burners) 10.