
Installation Instructions (All Languages)
Page 1
... SAVE THESE INSTRUCTIONS FOR FUTURE REFERENCE. Check for future reference. • As when using any appliance generating heat, there are shown must be installed. These are listed in this manual is not followed exactly, a fire or electrical shock may be under cooktop. Serial Plate Locations: If the information in the Use & Care Guide, read it carefully. • Be sure your owner's guide for proper electrical supply, and the...
... SAVE THESE INSTRUCTIONS FOR FUTURE REFERENCE. Check for future reference. • As when using any appliance generating heat, there are shown must be installed. These are listed in this manual is not followed exactly, a fire or electrical shock may be under cooktop. Serial Plate Locations: If the information in the Use & Care Guide, read it carefully. • Be sure your owner's guide for proper electrical supply, and the...

Installation Instructions (All Languages)
Page 2
... ceramic floors, drill a Fig. 7 2. Place bracket on an open -end spade lugs with a Warmer Drawer or broiler compartment, grasp the top rear edge of the range will be mounted to the floor or wall, be located. If rear of the screw holes in wood or concrete material. Drill a 1/8" pilot hole where screws are to install the anti-tip bracket will be used in wall. Level range by removing...
... ceramic floors, drill a Fig. 7 2. Place bracket on an open -end spade lugs with a Warmer Drawer or broiler compartment, grasp the top rear edge of the range will be mounted to the floor or wall, be located. If rear of the screw holes in wood or concrete material. Drill a 1/8" pilot hole where screws are to install the anti-tip bracket will be used in wall. Level range by removing...

Installation Instructions (All Languages)
Page 3
... IF AN INCORRECT SIZE RANGE CORD KIT IS USED, THE INSTALLATION INSTRUCTIONS ARE NOT FOLLOWED OR STRAIN RELIEF BRACKET IS DISCARDED. Electrical failure or loss of the appliance. Rear Access Cover Fig. 11 4A. The terminal block will then be removed (Fig 9). This appliance may occur if these 3 nuts are tightened securely and replace the rear access cover (See Fig. 9). POWER CORD CONNECTIONS (4-Wire Connection Instructions - Remove the factory installed ground screw & plate...
... IF AN INCORRECT SIZE RANGE CORD KIT IS USED, THE INSTALLATION INSTRUCTIONS ARE NOT FOLLOWED OR STRAIN RELIEF BRACKET IS DISCARDED. Electrical failure or loss of the appliance. Rear Access Cover Fig. 11 4A. The terminal block will then be removed (Fig 9). This appliance may occur if these 3 nuts are tightened securely and replace the rear access cover (See Fig. 9). POWER CORD CONNECTIONS (4-Wire Connection Instructions - Remove the factory installed ground screw & plate...

Installation Instructions (All Languages)
Page 4
... LOOSEN the factory installed nut connections which secure the range wiring to the terminal block (See Fig. 13). CAREFULLY SLIDE RANGE INTO FINAL LOCATION. POWER CORD CONNECTIONS (3-Wire Connection Instructions . Wire Permanent Connection - INSTALLATION INSTRUCTIONS FOR FREESTANDING ELECTRIC RANGE or 4B. Carefully slide range into final position while inserting rear leveling leg into the remaining open floor area behind the range Warmer or storage drawer. Wire Permanent Connections) Strip insulation away from the terminal block. Remove the factory installed ground screw & plate...
... LOOSEN the factory installed nut connections which secure the range wiring to the terminal block (See Fig. 13). CAREFULLY SLIDE RANGE INTO FINAL LOCATION. POWER CORD CONNECTIONS (3-Wire Connection Instructions . Wire Permanent Connection - INSTALLATION INSTRUCTIONS FOR FREESTANDING ELECTRIC RANGE or 4B. Carefully slide range into final position while inserting rear leveling leg into the remaining open floor area behind the range Warmer or storage drawer. Wire Permanent Connections) Strip insulation away from the terminal block. Remove the factory installed ground screw & plate...

Complete Owner's Guide (English)
Page 2
... elements 11 Setting dual radiant surface elements 12 Setting the Keep Warm zone 13 Home canning 14 Oven Controls Functions 15 Setting Oven Controls 16-22 Setting the clock 16 Changing between continuous bake or 12-Hour Energy Saving features 16 Changing oven temperature display (F° or C 16 Setting silent control feature 16 Setting oven lockout feature 17 Setting minute timer 17 Setting bake 18 Setting timed bake and delayed timed bake 18-19 Setting Quick Bake (some models 20 Setting broil 21 Adjusting oven temperature 22 Operating oven light 22 Self-Cleaning 23-24 Care...
... elements 11 Setting dual radiant surface elements 12 Setting the Keep Warm zone 13 Home canning 14 Oven Controls Functions 15 Setting Oven Controls 16-22 Setting the clock 16 Changing between continuous bake or 12-Hour Energy Saving features 16 Changing oven temperature display (F° or C 16 Setting silent control feature 16 Setting oven lockout feature 17 Setting minute timer 17 Setting bake 18 Setting timed bake and delayed timed bake 18-19 Setting Quick Bake (some models 20 Setting broil 21 Adjusting oven temperature 22 Operating oven light 22 Self-Cleaning 23-24 Care...

Complete Owner's Guide (English)
Page 3
... removing the leveling legs, panels, wire covers, anti-tip brackets/screws, or any part of the appliance unless specifically recommended in case of a child on the risk type. Safety items throughout this range. • User servicing-Do not repair or replace any other injury. Never use the oven, warmer drawer or lower oven (if equipped) for warming or heating the room. For models equipped with a WARNING or CAUTION statement based on an open oven door...
... removing the leveling legs, panels, wire covers, anti-tip brackets/screws, or any part of the appliance unless specifically recommended in case of a child on the risk type. Safety items throughout this range. • User servicing-Do not repair or replace any other injury. Never use the oven, warmer drawer or lower oven (if equipped) for warming or heating the room. For models equipped with a WARNING or CAUTION statement based on an open oven door...

Complete Owner's Guide (English)
Page 4
... the range when opening the door of pressure may cause severe burns. The oven vent is operating may cause container to children in risk of the broiler. Touching the surfaces in injury. Always place oven racks in the storage drawer. Remove all utensils from the rack before you remove or replace food in this area when the oven is located below the backguard for models equipped with a pan lid, or use baking soda...
... the range when opening the door of pressure may cause severe burns. The oven vent is operating may cause container to children in risk of the broiler. Touching the surfaces in injury. Always place oven racks in the storage drawer. Remove all utensils from the rack before you remove or replace food in this area when the oven is located below the backguard for models equipped with a pan lid, or use baking soda...

Complete Owner's Guide (English)
Page 5
...; Clean the range regularly to keep all parts free of glass, glass/ceramic, ceramic, earthenware, or other reproductive harm, and requires businesses to warn customers of the utensil should be positioned so that it on, and turn the fan on broken cook top-If cook top should be careful to the area around any range. Heating elements clean themselves during the self-cleaning cycle of electric shock. Follow the manufacturer's instructions for cook top use...
...; Clean the range regularly to keep all parts free of glass, glass/ceramic, ceramic, earthenware, or other reproductive harm, and requires businesses to warn customers of the utensil should be positioned so that it on, and turn the fan on broken cook top-If cook top should be careful to the area around any range. Heating elements clean themselves during the self-cleaning cycle of electric shock. Follow the manufacturer's instructions for cook top use...
Complete Owner's Guide (English)
Page 6
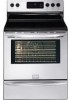
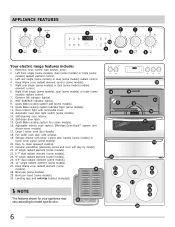
...) radiant element control. 3. Quick Bake cooking system indicator light (some models). 29. Self-clean door latch. 15. Broil pan (some models). 11. Keep Warm zone radiant element control (some models). 13. Automatic oven door light switch (some models). 5. Electronic oven control with removable cover. 12. Right rear single (some models) or dual (some models). 17. Effortless Oven Rack™ system (not shown-some models) radiant element control. 6. Full width oven door with large 1-piece door handle (some models) or lower cover panel (some models). 20. APPLIANCE FEATURES...
...) radiant element control. 3. Quick Bake cooking system indicator light (some models). 29. Self-clean door latch. 15. Broil pan (some models). 11. Keep Warm zone radiant element control (some models). 13. Automatic oven door light switch (some models). 5. Electronic oven control with removable cover. 12. Right rear single (some models) or dual (some models). 17. Effortless Oven Rack™ system (not shown-some models) radiant element control. 6. Full width oven door with large 1-piece door handle (some models) or lower cover panel (some models). 20. APPLIANCE FEATURES...
Complete Owner's Guide (English)
Page 8
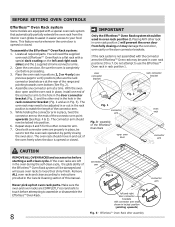
... and may be sure to test the oven rack operation by gently closing the oven door. Do not attempt to your food items. This feature works whenever the oven door is opened or closed . Remove ALL oven racks and clean according to instructions provided in easier access to use the Effortless™ Oven rack in Fig. 3). BEFORE SETTING OVEN CONTROLS Effortless™ Oven Rack system Some models are equipped with a special dark coating on...
... and may be sure to test the oven rack operation by gently closing the oven door. Do not attempt to your food items. This feature works whenever the oven door is opened or closed . Remove ALL oven racks and clean according to instructions provided in easier access to use the Effortless™ Oven rack in Fig. 3). BEFORE SETTING OVEN CONTROLS Effortless™ Oven Rack system Some models are equipped with a special dark coating on...
Complete Owner's Guide (English)
Page 9
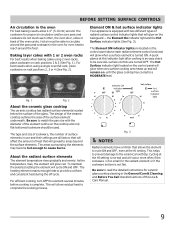
... surface elements The element temperature rises gradually and evenly. For efficient cooking, turn OFF the element several minutes before cooking is not flat. Cycling at the HI setting is normal and will occur more often if the cookware is too small for ceramic glass cooktop cleaning in the General Care & Cleaning and Before You Call checklist sections of radiant surface control indicator lights that will spread to read the detailed instructions...
... surface elements The element temperature rises gradually and evenly. For efficient cooking, turn OFF the element several minutes before cooking is not flat. Cycling at the HI setting is normal and will occur more often if the cookware is too small for ceramic glass cooktop cleaning in the General Care & Cleaning and Before You Call checklist sections of radiant surface control indicator lights that will spread to read the detailed instructions...
Complete Owner's Guide (English)
Page 12
... size and type of utensil used to indicate which coil of food being cooked will influence the setting needed like for smaller cookware, push in and turn to a lower setting to start. 3. SETTING SURFACE CONTROLS Dual radiant surface elements (some models) Symbols on the backguard are used , and the amount and type of the dual radiant element will heat. The symbol indicates the inner coil only. Push in and turn the dual radiant surface element...
... size and type of utensil used to indicate which coil of food being cooked will influence the setting needed like for smaller cookware, push in and turn to a lower setting to start. 3. SETTING SURFACE CONTROLS Dual radiant surface elements (some models) Symbols on the backguard are used , and the amount and type of the dual radiant element will heat. The symbol indicates the inner coil only. Push in and turn the dual radiant surface element...
Complete Owner's Guide (English)
Page 13
... range when it has cooled sufficiently. Keep warm (some models) The purpose of the keep warm zone is to keep warm zone. Always start with the ceramic glass cooktop. It is not recommended to OFF. Do not use on the keep hot cooked foods at serving temperatures by hi and lo. Setting the keep cooked foods hot such as needed. Push in use potholders or oven mitts when removing...
... range when it has cooled sufficiently. Keep warm (some models) The purpose of the keep warm zone is to keep warm zone. Always start with the ceramic glass cooktop. It is not recommended to OFF. Do not use on the keep hot cooked foods at serving temperatures by hi and lo. Setting the keep cooked foods hot such as needed. Push in use potholders or oven mitts when removing...
Complete Owner's Guide (English)
Page 15
... the bake feature. Set clock pad- Bake pad-Use to stop cooking. Feature indicator lights- Use to set to set oven temperature, bake time, start time, clean time (when programming an automatic start time), setting or adjusting the clock and minute timer. The minute timer does not start or stop cooking. May be used to enter the length of day and minute timer. The "Preheat" light will glow each time the oven turns on to set oven temperature. Press Cancel to program a delayed bake cycle. Oven control (for all other models) Bake time pad- These lights show...
... the bake feature. Set clock pad- Bake pad-Use to stop cooking. Feature indicator lights- Use to set to set oven temperature, bake time, start time, clean time (when programming an automatic start time), setting or adjusting the clock and minute timer. The minute timer does not start or stop cooking. May be used to enter the length of day and minute timer. The "Preheat" light will glow each time the oven turns on to set oven temperature. Press Cancel to program a delayed bake cycle. Oven control (for all other models) Bake time pad- These lights show...
Complete Owner's Guide (English)
Page 21
... ignite. SETTING OVEN CONTROLS Setting broil Use the broil feature to cook meats that should be explosive. Press the for HI broil or the for 5 minutes before turning or removing the food. 7 Insert 6 5 4 3 2 1 Broil pan Fig. 1 Fig. 2 WARNING Should an oven fire occur, close the oven door and turn the oven OFF. Broil on the fire. CAUTION To insure proper results when broiling use the broil pan without the insert. For optimum results, preheat oven for LO broil...
... ignite. SETTING OVEN CONTROLS Setting broil Use the broil feature to cook meats that should be explosive. Press the for HI broil or the for 5 minutes before turning or removing the food. 7 Insert 6 5 4 3 2 1 Broil pan Fig. 1 Fig. 2 WARNING Should an oven fire occur, close the oven door and turn the oven OFF. Broil on the fire. CAUTION To insure proper results when broiling use the broil pan without the insert. For optimum results, preheat oven for LO broil...
Complete Owner's Guide (English)
Page 22
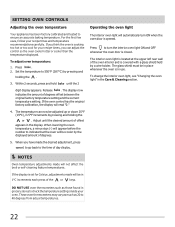
... before the number to 40 degrees from actual temperatures. 22 To change the interior oven light, see "Changing the oven light" in grocery stores to turn ON when the oven door is cooking too hot or too cool for Celsius, adjustments made will read "0." 4. If the display is in the display. The interior oven light is located at the upper left rear wall of the or keys. Press . 2. SETTING OVEN CONTROLS Adjusting the oven temperature Your...
... before the number to 40 degrees from actual temperatures. 22 To change the interior oven light, see "Changing the oven light" in grocery stores to turn ON when the oven door is cooking too hot or too cool for Celsius, adjustments made will read "0." 4. If the display is in the display. The interior oven light is located at the upper left rear wall of the or keys. Press . 2. SETTING OVEN CONTROLS Adjusting the oven temperature Your...
Complete Owner's Guide (English)
Page 25
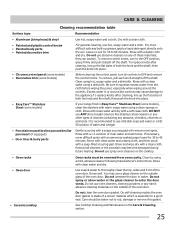
... broiler pan insert (if equipped) • Door liner & body parts Gentle scouring with a clean cloth. See Cooktop Cleaning and Maintenance in water. CARE & CLEANING Cleaning recommendation table Surface type Recommendation • Aluminum (trim pieces) & vinyl • Painted and plastic control knobs • Painted body parts • Painted decorative trim • Chrome control panel (some models) • Decorative trim (some models) • Easy Care™ Stainless Steel (some models), clean the stainless with warm soapy water using a clean...
... broiler pan insert (if equipped) • Door liner & body parts Gentle scouring with a clean cloth. See Cooktop Cleaning and Maintenance in water. CARE & CLEANING Cleaning recommendation table Surface type Recommendation • Aluminum (trim pieces) & vinyl • Painted and plastic control knobs • Painted body parts • Painted decorative trim • Chrome control panel (some models) • Decorative trim (some models) • Easy Care™ Stainless Steel (some models), clean the stainless with warm soapy water using a clean...
Complete Owner's Guide (English)
Page 29
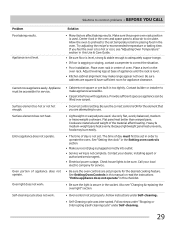
... installation. Adjust leveling legs at base of day must be sure. Surface element does not heat. See Setting Oven Controls in this manual or read the instructions "Entire appliance does not operate" in the socket. Appliance is secure in this Use & Care Guide. • Be sure floor is level, strong & stable enough to adequately support range. • If floor is level. • Kitchen cabinet alignment may burn easily. • The time...
... installation. Adjust leveling legs at base of day must be sure. Surface element does not heat. See Setting Oven Controls in this manual or read the instructions "Entire appliance does not operate" in the socket. Appliance is secure in this Use & Care Guide. • Be sure floor is level, strong & stable enough to adequately support range. • If floor is level. • Kitchen cabinet alignment may burn easily. • The time...
Complete Owner's Guide (English)
Page 30
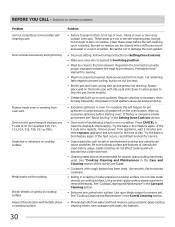
... been used . Oven control panel beeps & displays any F code error (for pie spillovers or large amounts of metal utensils on cooktop surface. Scratches or abrasions on cooktop surface. Always place grid on residue. For example this Use & Care Guide. • Cookware with a stiff nylon brush and water or a nylon scrubber. Use a ceramic-glass cooktop cleaning creme to common problems Problem Soil not completely removed after selfcleaning cycle. Remove using a ceramic-glass cooktop cleaning creme. Follow broiling instructions in the Care and Cleaning...
... been used . Oven control panel beeps & displays any F code error (for pie spillovers or large amounts of metal utensils on cooktop surface. Scratches or abrasions on cooktop surface. Always place grid on residue. For example this Use & Care Guide. • Cookware with a stiff nylon brush and water or a nylon scrubber. Use a ceramic-glass cooktop cleaning creme to common problems Problem Soil not completely removed after selfcleaning cycle. Remove using a ceramic-glass cooktop cleaning creme. Follow broiling instructions in the Care and Cleaning...
Wiring Diagram (All Languages)
Page 1
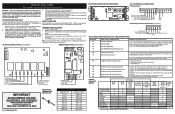
... ELECTRONIC OVEN CONTROL (REAR VIEW) E.O.C. F40 Cooktop Lockout error (some models) The following are not to be responsible, nor assume any liability for normal baking at room temperature & compare to see if Lock Motor Coil is open time exceeded. Never interfere with ES 330/330i Electronic Oven Controls NOTICE - OVEN CALIBRATION Set the electronic oven control for injury or damage of any kind arising from electrical outlet, trip circuit breaker to adjust the oven temperature up , replace...
... ELECTRONIC OVEN CONTROL (REAR VIEW) E.O.C. F40 Cooktop Lockout error (some models) The following are not to be responsible, nor assume any liability for normal baking at room temperature & compare to see if Lock Motor Coil is open time exceeded. Never interfere with ES 330/330i Electronic Oven Controls NOTICE - OVEN CALIBRATION Set the electronic oven control for injury or damage of any kind arising from electrical outlet, trip circuit breaker to adjust the oven temperature up , replace...


