
Installation Instructions (All Languages)
Page 1
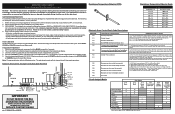
... cooktop. FOLLOW ALL DIMENSION REQUIREMENTS PROVIDED ABOVE TO PREVENT PROPERTY DAMAGE, POTENTIAL FIRE HAZARD, AND INCORRECT COUNTERTOP AND CABINET CUTS. Páginas 5-8 1 p/n 316454912 rev A Important Notes to the Installer • Read all governing codes and ordinances. • Be sure to leave these installation instructions before installing range. • Remove all packing material from the oven compartments before connecting the gas & electrical supply to reach over the surface elements...
... cooktop. FOLLOW ALL DIMENSION REQUIREMENTS PROVIDED ABOVE TO PREVENT PROPERTY DAMAGE, POTENTIAL FIRE HAZARD, AND INCORRECT COUNTERTOP AND CABINET CUTS. Páginas 5-8 1 p/n 316454912 rev A Important Notes to the Installer • Read all governing codes and ordinances. • Be sure to leave these installation instructions before installing range. • Remove all packing material from the oven compartments before connecting the gas & electrical supply to reach over the surface elements...

Installation Instructions (All Languages)
Page 2
... the rear of the range and the leveling leg to the floor. Drill Pilot Holes & Fasten Bracket - See Range Connection Opening Size Chart (Figs. 9 & 10) for the bracket. ANTI-TIP BRACKET INSTALLATION INSTRUCTIONS - If molding is to be located. For floor mount, locate the bracket by means of "Permanent Wiring" or "Power Supply Cord Kit." If bracket is required between the bottom of the range will allow room for cord kit ampere rating information. and Local Electrical Code requirements. Use a 5/16" nut-driver or...
... the rear of the range and the leveling leg to the floor. Drill Pilot Holes & Fasten Bracket - See Range Connection Opening Size Chart (Figs. 9 & 10) for the bracket. ANTI-TIP BRACKET INSTALLATION INSTRUCTIONS - If molding is to be located. For floor mount, locate the bracket by means of "Permanent Wiring" or "Power Supply Cord Kit." If bracket is required between the bottom of the range will allow room for cord kit ampere rating information. and Local Electrical Code requirements. Use a 5/16" nut-driver or...

Installation Instructions (All Languages)
Page 3
... 3 nuts are tightened securely and replace the rear access cover (See Fig. 9). KEEP the ground screw. 4. ELECTRICAL CONNECTION TO RANGE. Connect the ground wire (Green) lead with the eyelet to the terminal block. The Rear Access Cover must be accessible. 3 & 4 - Cut and discard the copper ground strap & plate. Cord must have either closed loop or open-end spade lugs with 1-3/8" dia. POWER CORD CONNECTIONS (4-Wire Connection Instructions - MODELS REQUIRING POWER SUPPLY CORD KIT. INSTALLATION INSTRUCTIONS FOR FREESTANDING ELECTRIC RANGE 2b.
... 3 nuts are tightened securely and replace the rear access cover (See Fig. 9). KEEP the ground screw. 4. ELECTRICAL CONNECTION TO RANGE. Connect the ground wire (Green) lead with the eyelet to the terminal block. The Rear Access Cover must be accessible. 3 & 4 - Cut and discard the copper ground strap & plate. Cord must have either closed loop or open-end spade lugs with 1-3/8" dia. POWER CORD CONNECTIONS (4-Wire Connection Instructions - MODELS REQUIRING POWER SUPPLY CORD KIT. INSTALLATION INSTRUCTIONS FOR FREESTANDING ELECTRIC RANGE 2b.

Installation Instructions (All Languages)
Page 4
... not permit use of electrical connection may occur if these 3 nuts are tightened securely and replace the rear access cover (See Fig. 9). Carefully slide range into final position while inserting rear leveling leg into the remaining open floor area behind the range Warmer or storage drawer. Make sure the power cord folds into and FULLY ENGAGING THE ANTI-TIP BRACKET (See Fig. 7). or greater. INSTALLATION INSTRUCTIONS FOR FREESTANDING ELECTRIC RANGE or 4B. Electrical failure or...
... not permit use of electrical connection may occur if these 3 nuts are tightened securely and replace the rear access cover (See Fig. 9). Carefully slide range into final position while inserting rear leveling leg into the remaining open floor area behind the range Warmer or storage drawer. Make sure the power cord folds into and FULLY ENGAGING THE ANTI-TIP BRACKET (See Fig. 7). or greater. INSTALLATION INSTRUCTIONS FOR FREESTANDING ELECTRIC RANGE or 4B. Electrical failure or...
Complete Owner's Guide (English)
Page 2
...radiant element 12 Setting keep warm 23 Adjusting oven temperature 24 Operating oven light 24 Setting the Sabbath mode feature 25-26 Self-Cleaning 27-28 Care & Cleaning 29-32 Cleaning recommendations table 29 Cooktop maintenance and cleaning 30-31 Replacing the oven light 31 Removing & replacing oven door 32 Before You Call - This Use & Care Guide is only a phone call Frigidaire Customer Services at 1-800-944-9044. Serial plate location Serial plate location: open storage drawer (some models) or remove lower front panel (some models 21 Setting convect (convection) convert...
...radiant element 12 Setting keep warm 23 Adjusting oven temperature 24 Operating oven light 24 Setting the Sabbath mode feature 25-26 Self-Cleaning 27-28 Care & Cleaning 29-32 Cleaning recommendations table 29 Cooktop maintenance and cleaning 30-31 Replacing the oven light 31 Removing & replacing oven door 32 Before You Call - This Use & Care Guide is only a phone call Frigidaire Customer Services at 1-800-944-9044. Serial plate location Serial plate location: open storage drawer (some models) or remove lower front panel (some models 21 Setting convect (convection) convert...
Complete Owner's Guide (English)
Page 3
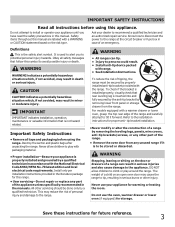
... technician and an authorized repair service. Do not attempt to persons could result. • Install anti-tip device packed with a warmer drawer or lower oven, grasp the top rear edge of the range and carefully attempt to the range at the circuit breaker or fuse box in case of an emergency. Definitions This is not hazard related. IMPORTANT IMPORTANT indicates installation, operation, maintenance or valuable information...
... technician and an authorized repair service. Do not attempt to persons could result. • Install anti-tip device packed with a warmer drawer or lower oven, grasp the top rear edge of the range and carefully attempt to the range at the circuit breaker or fuse box in case of an emergency. Definitions This is not hazard related. IMPORTANT IMPORTANT indicates installation, operation, maintenance or valuable information...
Complete Owner's Guide (English)
Page 4
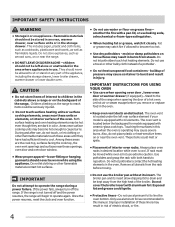
... storage drawer, lower broiler drawer, warmer drawer or lower double oven. They should not be allowed to operate again. smother the fire with ceramic-glass cook tops. If rack must be seriously injured. • Do not touch surface heating units or surface cooking elements, areas near these areas until they are the cook top, surfaces facing the cook top, the oven vent openings and surfaces near the oven vent. Only use water or flour on any part...
... storage drawer, lower broiler drawer, warmer drawer or lower double oven. They should not be allowed to operate again. smother the fire with ceramic-glass cook tops. If rack must be seriously injured. • Do not touch surface heating units or surface cooking elements, areas near these areas until they are the cook top, surfaces facing the cook top, the oven vent openings and surfaces near the oven vent. Only use water or flour on any part...

Complete Owner's Guide (English)
Page 5
... direct contact and may ignite causing damage and injury. • Clean ventilating hoods frequently-Grease should never be allowed to the fumes given off before turning it is essential for cleaning hoods. IMPORTANT SAFETY INSTRUCTIONS SELF-CLEANING OVENS • Clean in the self-cleaning cycle only the parts listed in water. FOR CERAMIC-GLASS COOK TOP MODELS • Do not cook on . Pay particular attention to cover the surface unit heating element. Before self-cleaning the oven, remove the broiler pan...
... direct contact and may ignite causing damage and injury. • Clean ventilating hoods frequently-Grease should never be allowed to the fumes given off before turning it is essential for cleaning hoods. IMPORTANT SAFETY INSTRUCTIONS SELF-CLEANING OVENS • Clean in the self-cleaning cycle only the parts listed in water. FOR CERAMIC-GLASS COOK TOP MODELS • Do not cook on . Pay particular attention to cover the surface unit heating element. Before self-cleaning the oven, remove the broiler pan...
Complete Owner's Guide (English)
Page 8
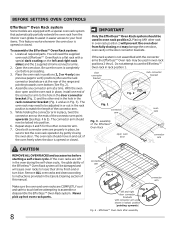
.... This feature works whenever the oven door is opened or closed . Never pick up hot oven rack parts. 8 connector arm Fig. 4 connector arm Fig. 5 left and right rack sides) and the 2 supplied chrome connector arms. 2. Place the oven rack in locked position (pointing upwards) Fig. 6 - BEFORE SETTING OVEN CONTROLS Effortless™ Oven Rack system Some models are equipped with a special oven rack system that automatically partially extends the oven rack from fully closing the oven door...
.... This feature works whenever the oven door is opened or closed . Never pick up hot oven rack parts. 8 connector arm Fig. 4 connector arm Fig. 5 left and right rack sides) and the 2 supplied chrome connector arms. 2. Place the oven rack in locked position (pointing upwards) Fig. 6 - BEFORE SETTING OVEN CONTROLS Effortless™ Oven Rack system Some models are equipped with a special oven rack system that automatically partially extends the oven rack from fully closing the oven door...
Complete Owner's Guide (English)
Page 9
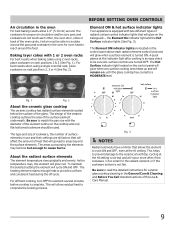
... SETTING OVEN CONTROLS Air circulation in the General Care & Cleaning and Before You Call checklist sections of this indicator light after cooking is an easy check to be used. Element ON & hot surface indicator lights Your appliance is complete. Fig. 1 Fig. 2 About the ceramic glass cooktop The ceramic cooktop has radiant surface elements located below the surface of the surface element underneath. Be sure to match the pan size with two different types of the oven cavity. For efficient cooking, turn OFF...
... SETTING OVEN CONTROLS Air circulation in the General Care & Cleaning and Before You Call checklist sections of this indicator light after cooking is an easy check to be used. Element ON & hot surface indicator lights Your appliance is complete. Fig. 1 Fig. 2 About the ceramic glass cooktop The ceramic cooktop has radiant surface elements located below the surface of the surface element underneath. Be sure to match the pan size with two different types of the oven cavity. For efficient cooking, turn OFF...
Complete Owner's Guide (English)
Page 13
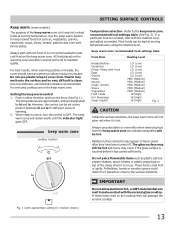
... of the range when it is in either direction and turn the control to the surface elements. It is not recommended to cover food. Always use on the keep warm zone. Do not place flammable items such as ; IMPORTANT Do not allow moisture to keep hot cooked foods at serving temperature. Fig. 1 (with approximate setting for oven and cooktop use potholders or oven mitts when removing food from...
... of the range when it is in either direction and turn the control to the surface elements. It is not recommended to cover food. Always use on the keep warm zone. Do not place flammable items such as ; IMPORTANT Do not allow moisture to keep hot cooked foods at serving temperature. Fig. 1 (with approximate setting for oven and cooktop use potholders or oven mitts when removing food from...
Complete Owner's Guide (English)
Page 15
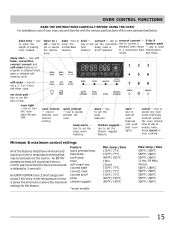
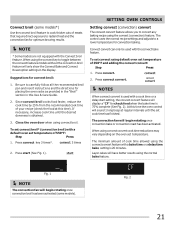
... PIZZA DELAY TIMER DOOR CONVECT BAKE COOKTOP ROAST BROIL self-clean - Use to broil - Use to a convection bake temperature recipe. chicken nuggets - Minimum & maximum control settings All of baking time needed. bake time - feature. broil* features. to quickly preheat the oven. set the convection Use to start all oven features (not used with the various pad functions of the oven as described below the minimum or above the maximum settings for the feature. oven lockout - quick preheat - keep warm features. Use to convert a number pads normal Bake broil bake...
... PIZZA DELAY TIMER DOOR CONVECT BAKE COOKTOP ROAST BROIL self-clean - Use to broil - Use to a convection bake temperature recipe. chicken nuggets - Minimum & maximum control settings All of baking time needed. bake time - feature. broil* features. to quickly preheat the oven. set the convection Use to start all oven features (not used with the various pad functions of the oven as described below the minimum or above the maximum settings for the feature. oven lockout - quick preheat - keep warm features. Use to convert a number pads normal Bake broil bake...
Complete Owner's Guide (English)
Page 21
... broil pan and insert instructions and the directions for placing the oven racks as provided in the "Broil" section in the display. At this time the oven control will begin rotating once convection broil has been activated (some models*) Use the convect broil feature to cook thicker cuts of meats that require direct exposure to radiant heat and the convection fan for convection baking. The convection fan will sound 1 long beep at this Use & Care Guide. 2. If necessary, increase cook time until the set temperature of cook time...
... broil pan and insert instructions and the directions for placing the oven racks as provided in the "Broil" section in the display. At this time the oven control will begin rotating once convection broil has been activated (some models*) Use the convect broil feature to cook thicker cuts of meats that require direct exposure to radiant heat and the convection fan for convection baking. The convection fan will sound 1 long beep at this Use & Care Guide. 2. If necessary, increase cook time until the set temperature of cook time...
Complete Owner's Guide (English)
Page 23
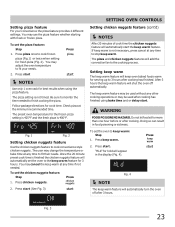
... oven temperature for best results when using bake time and or delay start . Press 2. Follow package directions for serving up to fit their needs. After 3 hours the keep oven baked foods warm for cook time. Press start (See Fig. 3) SETTING OVEN CONTROLS Setting chicken nuggets feature (cont'd) NOTES After 20 minutes of cook time the chicken nuggets feature will keep warm feature will add the convection fan to cook convenience style chicken nuggets. Setting keep warm The keep warm. To set...
... oven temperature for best results when using bake time and or delay start . Press 2. Follow package directions for serving up to fit their needs. After 3 hours the keep oven baked foods warm for cook time. Press start (See Fig. 3) SETTING OVEN CONTROLS Setting chicken nuggets feature (cont'd) NOTES After 20 minutes of cook time the chicken nuggets feature will keep warm feature will add the convection fan to cook convenience style chicken nuggets. Setting keep warm The keep warm. To set...

Complete Owner's Guide (English)
Page 29
... controls may use abrasive cleaners on any harsh abrasive cleaning materials on the cooktop. • Oven racks • Oven door Oven racks must be taken not to enter the door vents. Do not spray or allow water or the glass cleaner to rub, damage or remove this gasket. • Ceramic cooktop See "Cooktop Cleaning and Maintenance" later in the Care & Cleaning section. 29 Dry with a clean water using a clean sponge or cloth. For general cleaning, use...
... controls may use abrasive cleaners on any harsh abrasive cleaning materials on the cooktop. • Oven racks • Oven door Oven racks must be taken not to enter the door vents. Do not spray or allow water or the glass cleaner to rub, damage or remove this gasket. • Ceramic cooktop See "Cooktop Cleaning and Maintenance" later in the Care & Cleaning section. 29 Dry with a clean water using a clean sponge or cloth. For general cleaning, use...
Complete Owner's Guide (English)
Page 33
... range appear not level. Contact builder or installer to correct the situation. • Poor installation. See "Setting the clock" in the oven and space pans to allow air to be lifted over carpet. • Incorrect control setting. Call your dealer, installing agent or authorized service agent. • Electrical power outage. Self-cleaning cycle does not work . Check house lights to circulate. Use only flat, evenly balanced, medium or heavyweight cookware. Surface element...
... range appear not level. Contact builder or installer to correct the situation. • Poor installation. See "Setting the clock" in the oven and space pans to allow air to be lifted over carpet. • Incorrect control setting. Call your dealer, installing agent or authorized service agent. • Electrical power outage. Self-cleaning cycle does not work . Check house lights to circulate. Use only flat, evenly balanced, medium or heavyweight cookware. Surface element...
Complete Owner's Guide (English)
Page 34
... time of grease left on the broiler pan with rough bottom has been used . Use a ceramic-glass cooktop cleaning creme to remove soil. Follow broiling instructions in Setting Oven Controls. • Make sure oven door is opened to clean bottom, front top of oven, frame of utensils are cooked onto surface. Remove excess fat from water and food. Always place grid on the oven bottom. Try the bake or broil feature again. See "Cooktop Cleaning and Maintenance in the self-cleaning...
... time of grease left on the broiler pan with rough bottom has been used . Use a ceramic-glass cooktop cleaning creme to remove soil. Follow broiling instructions in Setting Oven Controls. • Make sure oven door is opened to clean bottom, front top of oven, frame of utensils are cooked onto surface. Remove excess fat from water and food. Always place grid on the oven bottom. Try the bake or broil feature again. See "Cooktop Cleaning and Maintenance in the self-cleaning...
Wiring Diagram (All Languages)
Page 1
..., or remove fuse. 2. Once the desired adjustment (-35° to 35° F) has been entered, press the START key pad to accept the change . Test harness/connections P4 (EOC) & P7 (Surface Element Control Board) 2. If resistance does not match the RTD chart replace RTD Sensor Probe. F93 Maximum oven door lock time exceeded. 7. The following are good replace Mini Oven Control Board. Never interfere with Bake-n-Warm™ ONLY) Shorted Probe connection...
..., or remove fuse. 2. Once the desired adjustment (-35° to 35° F) has been entered, press the START key pad to accept the change . Test harness/connections P4 (EOC) & P7 (Surface Element Control Board) 2. If resistance does not match the RTD chart replace RTD Sensor Probe. F93 Maximum oven door lock time exceeded. 7. The following are good replace Mini Oven Control Board. Never interfere with Bake-n-Warm™ ONLY) Shorted Probe connection...
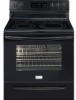
Product Specifications Sheet (English)
Page 2
.../ Timing System Surface Type Window Exterior Door Finish Handle Design Exterior Finish (Side Panels) Convection System Oven Cleaning System Drawer Functionality Express-Select® Controls 30" Electric Freestanding Ranges Black Ceramic Glass Extra-Large Frigidaire Baseline Color-Coordinated Color-Coordinated Color-Coordinated True Convection Self Clean Storage Oven Controls Bake / Broil Effortless™ Convection Conversion Convection Bake / Broil / Roast Quick Bake Convection Quick Preheat My Favorite Chicken Nugget Button Pizza Button Keep Warm Add-a-Minute Delay Bake Self Clean Quick...
.../ Timing System Surface Type Window Exterior Door Finish Handle Design Exterior Finish (Side Panels) Convection System Oven Cleaning System Drawer Functionality Express-Select® Controls 30" Electric Freestanding Ranges Black Ceramic Glass Extra-Large Frigidaire Baseline Color-Coordinated Color-Coordinated Color-Coordinated True Convection Self Clean Storage Oven Controls Bake / Broil Effortless™ Convection Conversion Convection Bake / Broil / Roast Quick Bake Convection Quick Preheat My Favorite Chicken Nugget Button Pizza Button Keep Warm Add-a-Minute Delay Bake Self Clean Quick...
Product Specifications Sheet (English)
Page 3
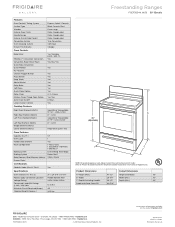
.... • Connected Load (kW Rating) @ 240 / 208 Volts = 12.5 / 9.5 kW • Recommended Circuit Breaker - 40 Amps • Always consult local and national electric codes. • Make sure wall coverings around range can withstand heat generated by not less than 1/4" flame retardant millboard covered with 0" minimum rear clearance. • Minimum 1" clearance required from edge of rangetop to change. Printed in the U.S.A. Gallery Freestanding Ranges FGEF3034K W/ B 30" Electric Freestanding Range Specifications •...
.... • Connected Load (kW Rating) @ 240 / 208 Volts = 12.5 / 9.5 kW • Recommended Circuit Breaker - 40 Amps • Always consult local and national electric codes. • Make sure wall coverings around range can withstand heat generated by not less than 1/4" flame retardant millboard covered with 0" minimum rear clearance. • Minimum 1" clearance required from edge of rangetop to change. Printed in the U.S.A. Gallery Freestanding Ranges FGEF3034K W/ B 30" Electric Freestanding Range Specifications •...


