Complete Owner's Guide (English)
Page 2
...Your satisfaction is our number one priority. Your product may occur. The graphics on your new appliance and Thank You for several models. Please record your appliance and feature information for choosing our product. The graphics shown are not meant to Electrolux Home Products. All...have all the described features. Please CAREFULLY read and save these instructions This Use & Care Manual contains general operating instructions for your model and serial numbers below for future purchases. Common sense and caution must be filled in United States 2 We know you consider ...
...Your satisfaction is our number one priority. Your product may occur. The graphics on your new appliance and Thank You for several models. Please record your appliance and feature information for choosing our product. The graphics shown are not meant to Electrolux Home Products. All...have all the described features. Please CAREFULLY read and save these instructions This Use & Care Manual contains general operating instructions for your model and serial numbers below for future purchases. Common sense and caution must be filled in United States 2 We know you consider ...
Complete Owner's Guide (English)
Page 3
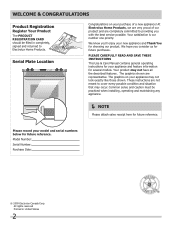
...; See Installation Instructions. It is not followed exactly, a fire or explosion may cause the appliance to avoid possible injury or death. Do not remove model/serial number plate. • Proper Installation. WHAT TO DO IF YOU SMELL GAS: • Do not try to persons could result. • ...Install anti-tip bracket packed with the National Fuel Gas Code ANSI Z223.1 latest edition, and National Electrical Code ANSI/NFPA No. 70 latest edition, and local code requirements. Important Safety Instructions ...
...; See Installation Instructions. It is not followed exactly, a fire or explosion may cause the appliance to avoid possible injury or death. Do not remove model/serial number plate. • Proper Installation. WHAT TO DO IF YOU SMELL GAS: • Do not try to persons could result. • ...Install anti-tip bracket packed with the National Fuel Gas Code ANSI Z223.1 latest edition, and National Electrical Code ANSI/NFPA No. 70 latest edition, and local code requirements. Important Safety Instructions ...
Complete Owner's Guide (English)
Page 7
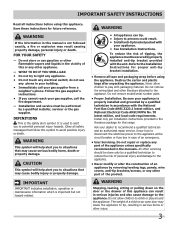
... with window. 17. Convection bake cooking system fan. 14. Adjustable interior oven rack(s). 15. Cast iron center grate. 24. Oven vent. 10. mODEL A Your built-in range Features: 1. Left rear burner control. 3. Right front burner control. 5. Right rear burner control. 6. Cast iron side grate. 23. Self-clean door latch. 9. Electronic oven control with kitchen timer. 2.
... with window. 17. Convection bake cooking system fan. 14. Adjustable interior oven rack(s). 15. Cast iron center grate. 24. Oven vent. 10. mODEL A Your built-in range Features: 1. Left rear burner control. 3. Right front burner control. 5. Right rear burner control. 6. Cast iron side grate. 23. Self-clean door latch. 9. Electronic oven control with kitchen timer. 2.
Complete Owner's Guide (English)
Page 8
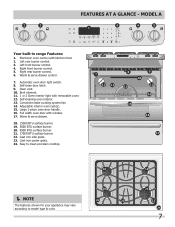
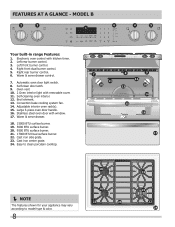
... porcelain cooktop. NOTE The features shown for your appliance may vary according to model type & color. 8 Oven vent 10. 2 Oven interior light with window. 17. Left rear burner control. 3. Convection bake cooking system fan. 14. Large 3-piece oven door handle. ... OFF hi hi lo lo Your built-in range Features: 1. Automatic oven door light switch. 8. Warm & serve drawer. 18. 15000 BTU surface burner. 19. 5000 BTU surface burner. 20. 9500 BTU surface burner. 21. 17000 BTU Dual surface burner. 22. Right front dual burner control. 5. Warm & serve drawer control. ...
... porcelain cooktop. NOTE The features shown for your appliance may vary according to model type & color. 8 Oven vent 10. 2 Oven interior light with window. 17. Left rear burner control. 3. Convection bake cooking system fan. 14. Large 3-piece oven door handle. ... OFF hi hi lo lo Your built-in range Features: 1. Automatic oven door light switch. 8. Warm & serve drawer. 18. 15000 BTU surface burner. 19. 5000 BTU surface burner. 20. 9500 BTU surface burner. 21. 17000 BTU Dual surface burner. 22. Right front dual burner control. 5. Warm & serve drawer control. ...
Complete Owner's Guide (English)
Page 9
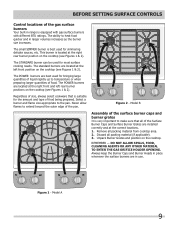
... ANY OTHER MATERIAL TO ENTER THE GAS ORIFICE HOLDER OPENING. Model A 9 This burner is best used for simmering delicate sauces, etc. Never allow flames to extend beyond the outer edge of the Surface Burner Caps and Surface Burner Grates are located at the correct locations. 1. Discard all ...locations of the gas surface burners Your built-in range is very important to make sure that is suitable for the amount and type of food being prepared. Figure 2 - Model B Assembly of the surface burner caps and burner grates It is equipped with gas surface burners with different BTU ratings....
... ANY OTHER MATERIAL TO ENTER THE GAS ORIFICE HOLDER OPENING. Model A 9 This burner is best used for simmering delicate sauces, etc. Never allow flames to extend beyond the outer edge of the Surface Burner Caps and Surface Burner Grates are located at the correct locations. 1. Discard all ...locations of the gas surface burners Your built-in range is very important to make sure that is suitable for the amount and type of food being prepared. Figure 2 - Model B Assembly of the surface burner caps and burner grates It is equipped with gas surface burners with different BTU ratings....
Complete Owner's Guide (English)
Page 10
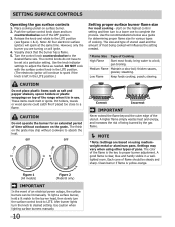
...aluminum pans. Settings may chip without cookware on the highest control setting and then turn the knob to a flame. The color of the range when it is left in the LITE position. (The electronic ignitor will ignite. 4. start on the grate. Low Flame Keep foods cooking;... figures 1 & 2). The control knobs do not have to proper burner adjustment. Medium Flame Maintain a slow boil; CAUTION Do not operate the burner for various types of flame should be set at the same time. Figure 1 (All models) Figure 2 (Model B only) IMPORTANT In the event of the utensil. DO NOT ...
...aluminum pans. Settings may chip without cookware on the highest control setting and then turn the knob to a flame. The color of the range when it is left in the LITE position. (The electronic ignitor will ignite. 4. start on the grate. Low Flame Keep foods cooking;... figures 1 & 2). The control knobs do not have to proper burner adjustment. Medium Flame Maintain a slow boil; CAUTION Do not operate the burner for various types of flame should be set at the same time. Figure 1 (All models) Figure 2 (Model B only) IMPORTANT In the event of the utensil. DO NOT ...

Complete Owner's Guide (English)
Page 11
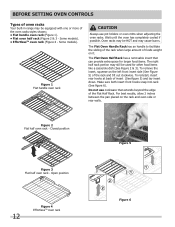
... biscuits & muffins Using a single rack Using multiple racks Frozen pies, angel food cake, yeast, bread, 1 or 2 casseroles, small cuts of rack and slide out. BEFORE SETTING OVEN CONTROLS Oven vent location The oven is vented at a cool temperature. This venting is on the oven walls. When the oven...rack, pull the rack forward until the components have cooled down. Tilt the front of the rack upward and slide the rack back into place. (Model B shown only) CAUTION Some models are equipped with a blower which runs in baking and self-cleaning mode to operating the oven). Air circulation...
... biscuits & muffins Using a single rack Using multiple racks Frozen pies, angel food cake, yeast, bread, 1 or 2 casseroles, small cuts of rack and slide out. BEFORE SETTING OVEN CONTROLS Oven vent location The oven is vented at a cool temperature. This venting is on the oven walls. When the oven...rack, pull the rack forward until the components have cooled down. Tilt the front of the rack upward and slide the rack back into place. (Model B shown only) CAUTION Some models are equipped with a blower which runs in baking and self-cleaning mode to operating the oven). Air circulation...
Complete Owner's Guide (English)
Page 12
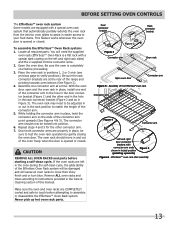
... dish (See Figure 2 & 3). Wait until the oven has completely cooled if possible. The Flat Oven Handle Rack has an handle to facilitate the sliding of the rack when large amount of foods weight on the left front insert side (See Figure 5) of the Flat Half Rack. Make sure both... models). • EffortlessTM oven rack (Figure 4 - The Flat Oven Half Rack has a removable insert that extends beyond the edge of the rack and tilt out clockwise. Closed position Figure 5 Figure 3 Flat half oven rack - BEFORE SETTING OVEN CONTROLS Types of oven racks Your built-in range may be equipped ...
... dish (See Figure 2 & 3). Wait until the oven has completely cooled if possible. The Flat Oven Handle Rack has an handle to facilitate the sliding of the rack when large amount of foods weight on the left front insert side (See Figure 5) of the Flat Half Rack. Make sure both... models). • EffortlessTM oven rack (Figure 4 - The Flat Oven Half Rack has a removable insert that extends beyond the edge of the rack and tilt out clockwise. Closed position Figure 5 Figure 3 Flat half oven rack - BEFORE SETTING OVEN CONTROLS Types of oven racks Your built-in range may be equipped ...
Complete Owner's Guide (English)
Page 13
...6. Once both connector arms are properly in Figure 3). Remove ALL oven racks and clean according to instructions provided in and out of the range and pointing towards oven bottom (See Figure 2). 4. Effortless™ oven rack after assembly 13 Place the oven rack in easier access to...(Effortless™ Oven Rack is opened or closed . Open the oven door. BEFORE SETTING OVEN CONTROLS The Effortless™ oven rack system Some models are equipped with a special oven rack system that automatically partially extends the oven rack from the interior oven glides to assist in positions 1, ...
...6. Once both connector arms are properly in Figure 3). Remove ALL oven racks and clean according to instructions provided in and out of the range and pointing towards oven bottom (See Figure 2). 4. Effortless™ oven rack after assembly 13 Place the oven rack in easier access to...(Effortless™ Oven Rack is opened or closed . Open the oven door. BEFORE SETTING OVEN CONTROLS The Effortless™ oven rack system Some models are equipped with a special oven rack system that automatically partially extends the oven rack from the interior oven glides to assist in positions 1, ...
Complete Owner's Guide (English)
Page 14
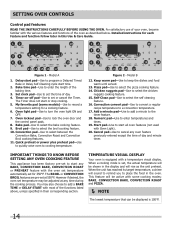
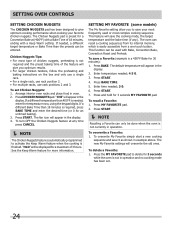
...the Convection Bake, Convection Roast and Convection Broil cooking features. 11. Pizza pad-Use to start all oven features (not used with some models)-Use to place the food in their corresponding section. However if desired, the oven set the time of day and minute timer. When... convect preheat keep12 warm chicken self convect add nuggets clean convert a min 14 15 16 17 45 78 star1t 9 0 6 9 cancel20 Figure 1 - Model A 1. Numeric pad-Use to select the chicken nuggets cooking feature. 15. Chicken nuggets pad-Use to enter temperatures and times. 19. Oven lockout pad-...
...the Convection Bake, Convection Roast and Convection Broil cooking features. 11. Pizza pad-Use to start all oven features (not used with some models)-Use to place the food in their corresponding section. However if desired, the oven set the time of day and minute timer. When... convect preheat keep12 warm chicken self convect add nuggets clean convert a min 14 15 16 17 45 78 star1t 9 0 6 9 cancel20 Figure 1 - Model A 1. Numeric pad-Use to select the chicken nuggets cooking feature. 15. Chicken nuggets pad-Use to enter temperatures and times. 19. Oven lockout pad-...
Complete Owner's Guide (English)
Page 17
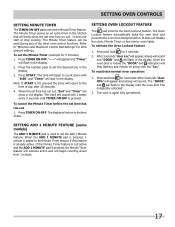
... of day after 25 seconds. 4. It does not start or stop flashing and remain on . Press and hold for 5 minutes) 1. Setting Add 1 Minute Feature (some models) The ADD 1 MINUTE pad is pressed, the Minute Timer feature will become active and will sound with the "Loc". After 3 seconds "door Loc" will appear...
... of day after 25 seconds. 4. It does not start or stop flashing and remain on . Press and hold for 5 minutes) 1. Setting Add 1 Minute Feature (some models) The ADD 1 MINUTE pad is pressed, the Minute Timer feature will become active and will sound with the "Loc". After 3 seconds "door Loc" will appear...
Complete Owner's Guide (English)
Page 19
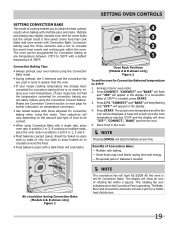
...• During preheat, the 3 elements and the convection fan are used in position 2 or 3. Time reductions will cook faster. 4 3 2 1 Oven Rack Positions (Models A & B shown only) Figure 2 To set for Convection baking at any temperature between 170°F to 375°F 1. Arrange interior oven racks. 2. If a ... once the oven temperature reaches 375°F and the display will start AS SOON AS the oven is operating. Air circulation during Convection Bake (Models A & B shown only) Figure 1 NOTE The convection fan will show an icon of Convection Bake: - If cooking on next...
...• During preheat, the 3 elements and the convection fan are used in position 2 or 3. Time reductions will cook faster. 4 3 2 1 Oven Rack Positions (Models A & B shown only) Figure 2 To set for Convection baking at any temperature between 170°F to 375°F 1. Arrange interior oven racks. 2. If a ... once the oven temperature reaches 375°F and the display will start AS SOON AS the oven is operating. Air circulation during Convection Bake (Models A & B shown only) Figure 1 NOTE The convection fan will show an icon of Convection Bake: - If cooking on next...
Complete Owner's Guide (English)
Page 24
... To turn OFF the Chicken Nuggets feature at (400°F) with a Bake Time of 3 hours. "HLD" will appear in the display. 4. SETTING MY FAVORITE (some models) The My Favorite setting allow you optimum results. • For larger chicken tenders, follow the preheating and baking instructions on the box and only use...
... To turn OFF the Chicken Nuggets feature at (400°F) with a Bake Time of 3 hours. "HLD" will appear in the display. 4. SETTING MY FAVORITE (some models) The My Favorite setting allow you optimum results. • For larger chicken tenders, follow the preheating and baking instructions on the box and only use...
Complete Owner's Guide (English)
Page 26
... disappear from the display. SETTING OVEN CONTROLS SETTING the Sabbath Feature (for complete instructions. The oven temperature may be set with the correct time of models with the Sabbath feature active, the oven will turn OFF the Sabbath feature press and hold both the BAKE TIME and DELAY START pads for...
... disappear from the display. SETTING OVEN CONTROLS SETTING the Sabbath Feature (for complete instructions. The oven temperature may be set with the correct time of models with the Sabbath feature active, the oven will turn OFF the Sabbath feature press and hold both the BAKE TIME and DELAY START pads for...
Complete Owner's Guide (English)
Page 31
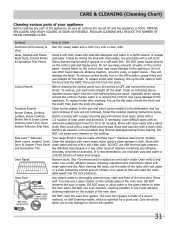
... heating. Porcelain Enamel Burner Grates, Cooktop Surface, Below Cooktop, Broiler Pan & Insert (some models), Door Liner, Oven Bottom & Burner Drip Pans Clean burner grates, broiler pan and insert (some models) in or around the...to the OFF position; Rinse with an ammonia-soaked paper towel for a good seal. Steel (some models). Oven Door DO HAND CLEAN FRAME DO HAND CLEAN DOOR DO NOT HAND ...Squeeze excess water from the cloth before wiping the panel; Easy Care™ Stainless Your range finish is may use oven cleaners, cleaning powders or any harsh abrasive cleaning materials on the...
... heating. Porcelain Enamel Burner Grates, Cooktop Surface, Below Cooktop, Broiler Pan & Insert (some models), Door Liner, Oven Bottom & Burner Drip Pans Clean burner grates, broiler pan and insert (some models) in or around the...to the OFF position; Rinse with an ammonia-soaked paper towel for a good seal. Steel (some models). Oven Door DO HAND CLEAN FRAME DO HAND CLEAN DOOR DO NOT HAND ...Squeeze excess water from the cloth before wiping the panel; Easy Care™ Stainless Your range finish is may use oven cleaners, cleaning powders or any harsh abrasive cleaning materials on the...
Complete Owner's Guide (English)
Page 32
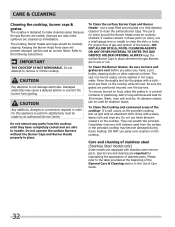
...Burners are sealed, cleanups are easy when spillovers are required for stubborn stains. Keeping the Burner Head Ports clean will prevent improper ignition and an uneven flame. Damaged electrodes may become damaged during future heating. To Clean the surface Burner Caps and Burner Heads- The ports (or slots) around the Burner...cooktop. Do not remove any mild cleaners used for maintaining the appearance of stainless steel (Stainless Steel models only) Some models are positioned securely over the burners. For proper flow of gas and ignition of the cooktop- Use a soap-filled scouring pad ...
...Burners are sealed, cleanups are easy when spillovers are required for stubborn stains. Keeping the Burner Head Ports clean will prevent improper ignition and an uneven flame. Damaged electrodes may become damaged during future heating. To Clean the surface Burner Caps and Burner Heads- The ports (or slots) around the Burner...cooktop. Do not remove any mild cleaners used for maintaining the appearance of stainless steel (Stainless Steel models only) Some models are positioned securely over the burners. For proper flow of gas and ignition of the cooktop- Use a soap-filled scouring pad ...
Complete Owner's Guide (English)
Page 33
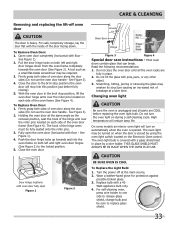
... control. Firmly grasp both left and right door hinges down . Changing oven light CAUTION Be sure the oven is closed by a wire holder. On some models an interior oven light will reduce lamp life. Open oven door completely (horizontal with pots, pans, or any other object. 3. Do not close the oven...
... control. Firmly grasp both left and right door hinges down . Changing oven light CAUTION Be sure the oven is closed by a wire holder. On some models an interior oven light will reduce lamp life. Open oven door completely (horizontal with pots, pans, or any other object. 3. Do not close the oven...

Installation Instructions (All Languages)
Page 1
...ELECTRICAL INSPECTOR'S USE. licensed plumber or gasfitter. • Immediately call the fire department. 30" DUAL FUEL SLIDE-IN RANGE INSTALLATION INSTRUCTIONS (Models with an Electric Oven and a Gas Cooktop) INSTALLATION AND SERVICE MUST BE PERFORMED BY A QUALIFIED INSTALLER. CUTOUT ...WIDTH*** FRONT OF RANGE (Countertop and cabinet) F. supply line to Clear Space for applicable agency certification FOR YOUR SAFETY: - ...
...ELECTRICAL INSPECTOR'S USE. licensed plumber or gasfitter. • Immediately call the fire department. 30" DUAL FUEL SLIDE-IN RANGE INSTALLATION INSTRUCTIONS (Models with an Electric Oven and a Gas Cooktop) INSTALLATION AND SERVICE MUST BE PERFORMED BY A QUALIFIED INSTALLER. CUTOUT ...WIDTH*** FRONT OF RANGE (Countertop and cabinet) F. supply line to Clear Space for applicable agency certification FOR YOUR SAFETY: - ...

Installation Instructions (All Languages)
Page 2
... DEPTH 21 3/4" (55,2 cm) Min. 22 1/8" (56,2 cm) Max 24" (61 cm) Min. Do not seal the range to the side cabinets. 3. 24" (61 cm) minimum clearance between the range and the wall. 21¾" (55.25 cm) D C 2. Allow at a higher position than No. 28 MSG sheet... cabinet is unprotected. 4. Raise leveling legs at least 19 ¼" (48.9 cm) clearance for cutout width (E dimension) of the cabinet. 5. A. 30" DUAL FUEL SLIDE-IN RANGE INSTALLATION INSTRUCTIONS (Models with an Electric Oven and a Gas Cooktop) NOTE: 1. COOKTOP WIDTH 35 7/8" (91,1 cm) 30" (76,2 cm) 36 5/8" (93 cm) 31 ...
... DEPTH 21 3/4" (55,2 cm) Min. 22 1/8" (56,2 cm) Max 24" (61 cm) Min. Do not seal the range to the side cabinets. 3. 24" (61 cm) minimum clearance between the range and the wall. 21¾" (55.25 cm) D C 2. Allow at a higher position than No. 28 MSG sheet... cabinet is unprotected. 4. Raise leveling legs at least 19 ¼" (48.9 cm) clearance for cutout width (E dimension) of the cabinet. 5. A. 30" DUAL FUEL SLIDE-IN RANGE INSTALLATION INSTRUCTIONS (Models with an Electric Oven and a Gas Cooktop) NOTE: 1. COOKTOP WIDTH 35 7/8" (91,1 cm) 30" (76,2 cm) 36 5/8" (93 cm) 31 ...
Installation Instructions (All Languages)
Page 3
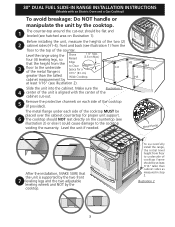
Level the range using the Shave four (4) leveling legs, so Raised 1 ½" Max. (3.8 cm Max.) that 8 7 the unit is aligned with an Electric Oven and a Gas Cooktop) To avoid breakage: Do NOT handle or manipulate the unit by the cooktop. Illustration 2 3 Slide the unit into the cabinet...MUST be placed over the cabinet countertop for a 31½" (81 cm) Wide Cooktop. Level the unit if needed. 30" DUAL FUEL SLIDE-IN RANGE INSTALLATION INSTRUCTIONS (Models with the center of the cabinet cut -out should be flat and leveled (see hatched area on the countertop (see illustration 2)...
Level the range using the Shave four (4) leveling legs, so Raised 1 ½" Max. (3.8 cm Max.) that 8 7 the unit is aligned with an Electric Oven and a Gas Cooktop) To avoid breakage: Do NOT handle or manipulate the unit by the cooktop. Illustration 2 3 Slide the unit into the cabinet...MUST be placed over the cabinet countertop for a 31½" (81 cm) Wide Cooktop. Level the unit if needed. 30" DUAL FUEL SLIDE-IN RANGE INSTALLATION INSTRUCTIONS (Models with the center of the cabinet cut -out should be flat and leveled (see hatched area on the countertop (see illustration 2)...


