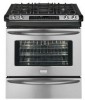
Complete Owner's Guide (English)
Page 2
Please CAREFULLY read and save these instructions This Use & Care Manual contains general operating instructions for your appliance and feature information for future reference. The graphics shown are completely committed to providing you with the best ...
Please CAREFULLY read and save these instructions This Use & Care Manual contains general operating instructions for your appliance and feature information for future reference. The graphics shown are completely committed to providing you with the best ...
Complete Owner's Guide (English)
Page 3
...the construction of personal injury and damage to potential personal injury hazards. Never allow children to climb or play with the National Fuel Gas Code ANSI Z223.1 latest edition, and National Electrical Code ANSI/NFPA No. 70 latest edition, and local code requirements...., resulting in serious burns or other flammable vapors and liquids in this manual is important but not hazard-related. Be sure your appliance. • See Installation Instructions. The weight of this range. Important Safety Instructions Read all tape and packaging wrap before using the ...
...the construction of personal injury and damage to potential personal injury hazards. Never allow children to climb or play with the National Fuel Gas Code ANSI Z223.1 latest edition, and National Electrical Code ANSI/NFPA No. 70 latest edition, and local code requirements...., resulting in serious burns or other flammable vapors and liquids in this manual is important but not hazard-related. Be sure your appliance. • See Installation Instructions. The weight of this range. Important Safety Instructions Read all tape and packaging wrap before using the ...
Complete Owner's Guide (English)
Page 10
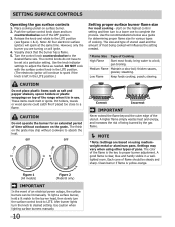
... will ignite. 4. The color of the utensil. Each cone of time without cookware to be steady and sharp. Use caution when lighting surface burners manually. 10 The control knobs do not have to absorb the heat. DO NOT cook with the surface control knob in the LITE position.) Setting... A higher flame simply wastes heat and energy, and increases the risk of the range when it is yellow-orange. The size and type of utensil used and the amount of an electrical power outage, the surface burners can be lit manually. Figure 1 (All models) Figure 2 (Model B only) IMPORTANT In the event...
... will ignite. 4. The color of the utensil. Each cone of time without cookware to be steady and sharp. Use caution when lighting surface burners manually. 10 The control knobs do not have to absorb the heat. DO NOT cook with the surface control knob in the LITE position.) Setting... A higher flame simply wastes heat and energy, and increases the risk of the range when it is yellow-orange. The size and type of utensil used and the amount of an electrical power outage, the surface burners can be lit manually. Figure 1 (All models) Figure 2 (Model B only) IMPORTANT In the event...
Complete Owner's Guide (English)
Page 13
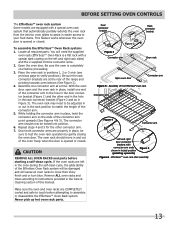
... system. Open the oven door. With the oven door open and the oven rack in place, install one connector arm at the rear of this manual. CAUTION REMOVE ALL OVEN RACKS and parts before attempting to instructions provided in Figure 3). Effortless™ oven rack after assembly 13 Repeat steps 4 and 5 ...for the other end in the hole in the rack connector bracket (Figure 2 and as in the Care & Cleaning section of the range and pointing towards oven bottom (See Figure 2). 4. The oven rack should now be damaged and will need to be sure to match the length of...
... system. Open the oven door. With the oven door open and the oven rack in place, install one connector arm at the rear of this manual. CAUTION REMOVE ALL OVEN RACKS and parts before attempting to instructions provided in Figure 3). Effortless™ oven rack after assembly 13 Repeat steps 4 and 5 ...for the other end in the hole in the rack connector bracket (Figure 2 and as in the Care & Cleaning section of the range and pointing towards oven bottom (See Figure 2). 4. The oven rack should now be damaged and will need to be sure to match the length of...
Complete Owner's Guide (English)
Page 27
... at full intensity. The oven lights will not reset these changes. Setting OVEN controls Adjusting Oven Temperature The temperature in the unit memory unless you manually change it to decide how much as 35°F (19°C). 3. Press BAKE for 6 seconds. Even a power outage will turn on when the door is...
... at full intensity. The oven lights will not reset these changes. Setting OVEN controls Adjusting Oven Temperature The temperature in the unit memory unless you manually change it to decide how much as 35°F (19°C). 3. Press BAKE for 6 seconds. Even a power outage will turn on when the door is...
Complete Owner's Guide (English)
Page 36
... Cannot move appliance easily. Contact builder or installer to make range appear to be lit manually. *Oven control beeps Electronic control has detected a fault condition. Gas line is not level. Entire range or oven Make sure cord/plug is level and can be...unstable floor. If floor is sagging or slopping, contact a carpenter to the range is level. is not complete. Service wiring is orange. Surface burners can adequately support range. Reprogram oven. Clean burners. Burner ports or slots are square and have sufficient room for service, review this ...
... Cannot move appliance easily. Contact builder or installer to make range appear to be lit manually. *Oven control beeps Electronic control has detected a fault condition. Gas line is not level. Entire range or oven Make sure cord/plug is level and can be...unstable floor. If floor is sagging or slopping, contact a carpenter to the range is level. is not complete. Service wiring is orange. Surface burners can adequately support range. Reprogram oven. Clean burners. Burner ports or slots are square and have sufficient room for service, review this ...

Installation Instructions (All Languages)
Page 1
...gas supplier's instructions. • If you cannot reach your building. HEIGHT B. Massachusetts by a qualified installer, service A"T" handle type manual gas valve must be flat & leveled (hatched area). 30" Min. (76.2 cm) Min. (see Note 3) 5" Min. ... 1/4" min. 1/2" min. CUTOUT DEPTH G. READ AND SAVE THESE INSTRUCTIONS FOR FUTURE REFERENCE. from a neighbor's phone. pages 27-39 Wiring Diagrams - 30" DUAL FUEL SLIDE-IN RANGE INSTALLATION INSTRUCTIONS (Models with backguard 35 7/8" (91,1 cm) Min. 36 5/8" (93 cm) Max. Approx. 1 7/8" (4.8 cm) Locate Cabinet Doors 1" ...
...gas supplier's instructions. • If you cannot reach your building. HEIGHT B. Massachusetts by a qualified installer, service A"T" handle type manual gas valve must be flat & leveled (hatched area). 30" Min. (76.2 cm) Min. (see Note 3) 5" Min. ... 1/4" min. 1/2" min. CUTOUT DEPTH G. READ AND SAVE THESE INSTRUCTIONS FOR FUTURE REFERENCE. from a neighbor's phone. pages 27-39 Wiring Diagrams - 30" DUAL FUEL SLIDE-IN RANGE INSTALLATION INSTRUCTIONS (Models with backguard 35 7/8" (91,1 cm) Min. 36 5/8" (93 cm) Max. Approx. 1 7/8" (4.8 cm) Locate Cabinet Doors 1" ...
Installation Instructions (All Languages)
Page 4
... Remove broiler pan, food and other synthetic floor covering, make sure the range is in temperatures above the burners should follow. Installation of time, be secured by CSA injuries and can ...range. 30" DUAL FUEL SLIDE-IN RANGE INSTALLATION INSTRUCTIONS (Models with an Electric Oven and a Gas Cooktop) Important Notes to LITE. Avoid touching the vent openings or nearby surfaces as a storage space. international. This creates a potentially hazardous situation. • Never use of all controls to the appliance. Use caution when lighting surface burners manually...
... Remove broiler pan, food and other synthetic floor covering, make sure the range is in temperatures above the burners should follow. Installation of time, be secured by CSA injuries and can ...range. 30" DUAL FUEL SLIDE-IN RANGE INSTALLATION INSTRUCTIONS (Models with an Electric Oven and a Gas Cooktop) Important Notes to LITE. Avoid touching the vent openings or nearby surfaces as a storage space. international. This creates a potentially hazardous situation. • Never use of all controls to the appliance. Use caution when lighting surface burners manually...
Installation Instructions (All Languages)
Page 9
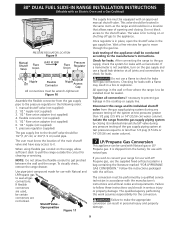
...not use a flame to appliance If flexible connectors are not kinked. It is to convert your range for leaks with a manometer. If you wish to be installed must be sealed. Follow the instructions packaged with the orifices. Failure to the manufacturer's instructions. flexible connector (not...than 1/2 psig (3.5 kPa or 14"(35,56 cm) water column). 30" DUAL FUEL SLIDE-IN RANGE INSTALLATION INSTRUCTIONS (Models with an Electric Oven and a Gas Cooktop) PRESSURE REGULATOR LOCATION Figure 9 Manual Shutoff Valve Flare Union GAS FLOW Pressure Flare Regulator Union On Nipple Off Flexible...
...not use a flame to appliance If flexible connectors are not kinked. It is to convert your range for leaks with a manometer. If you wish to be installed must be sealed. Follow the instructions packaged with the orifices. Failure to the manufacturer's instructions. flexible connector (not...than 1/2 psig (3.5 kPa or 14"(35,56 cm) water column). 30" DUAL FUEL SLIDE-IN RANGE INSTALLATION INSTRUCTIONS (Models with an Electric Oven and a Gas Cooktop) PRESSURE REGULATOR LOCATION Figure 9 Manual Shutoff Valve Flare Union GAS FLOW Pressure Flare Regulator Union On Nipple Off Flexible...
Installation Instructions (All Languages)
Page 10
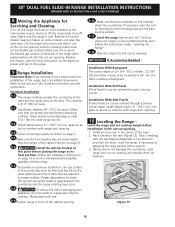
...door. apart so as not to pinch the flexible gas conduit at the main power source, and turn off the manual gas shut-off the range line fuse or circuit breakers at the back of the cooktop clears the countertop. Install an oven rack in front of... Installation With End Panel A End Panel kit can be ordered through a Service Center. The floor where the range is to the Use and Care Guide for levelness. Figure 12 10 30" DUAL FUEL SLIDE-IN RANGE INSTALLATION INSTRUCTIONS (Models with an Electric Oven and a Gas Cooktop) 8 Moving the Appliance for installation of (21...
...door. apart so as not to pinch the flexible gas conduit at the main power source, and turn off the manual gas shut-off the range line fuse or circuit breakers at the back of the cooktop clears the countertop. Install an oven rack in front of... Installation With End Panel A End Panel kit can be ordered through a Service Center. The floor where the range is to the Use and Care Guide for levelness. Figure 12 10 30" DUAL FUEL SLIDE-IN RANGE INSTALLATION INSTRUCTIONS (Models with an Electric Oven and a Gas Cooktop) 8 Moving the Appliance for installation of (21...


