Complete Owner's Guide (English)
Page 3
... touch any part of tipping, the appliance must be secured by a qualified installer, servicer or the gas supplier. Installation and service must be performed by properly installed anti-tip bracket provided with packaging material. Obey all safety messages that follow this appliance. Refer to the Installation Instructions for future reference. Do not remove the wiring label and other appliance. - Do not repair or replace any electrical switch; WARNING Stepping...
... touch any part of tipping, the appliance must be secured by a qualified installer, servicer or the gas supplier. Installation and service must be performed by properly installed anti-tip bracket provided with packaging material. Obey all safety messages that follow this appliance. Refer to the Installation Instructions for future reference. Do not remove the wiring label and other appliance. - Do not repair or replace any electrical switch; WARNING Stepping...
Complete Owner's Guide (English)
Page 5
... ignite. • Do not touch a hot oven light bulb with materials such as aluminum foil. Greasy deposits in temperature. Doing so may cause severe burns. WARNING Do not use aluminum foil to the hood manufacturer's instructions for cooktop service without its insert. Burns will become hot and possibly melt. Always place oven/Warm & Serve Drawer (if equipped) racks in a fire. Important Safety Instructions • Know which knob controls each surface burner...
... ignite. • Do not touch a hot oven light bulb with materials such as aluminum foil. Greasy deposits in temperature. Doing so may cause severe burns. WARNING Do not use aluminum foil to the hood manufacturer's instructions for cooktop service without its insert. Burns will become hot and possibly melt. Always place oven/Warm & Serve Drawer (if equipped) racks in a fire. Important Safety Instructions • Know which knob controls each surface burner...
Complete Owner's Guide (English)
Page 14
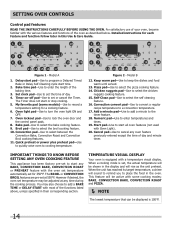
... broil convect preheat keep12 warm chicken self convect add nuggets clean convert a min 14 15 16 17 45 78 star1t 9 0 6 9 cancel20 Figure 1 - Set clock pad-Use to place the food in this Use & Care Guide. 12 delay bake start any BAKE, CONVECTION BAKE, CONVECTION ROAST or PREHEAT feature with the various features and functions of day and minute timer. Convection pad-Use to select the chicken nuggets cooking feature. 15. Temperature Visual Display Your oven is equipped with some models)-Use to start time 18 123 set the time...
... broil convect preheat keep12 warm chicken self convect add nuggets clean convert a min 14 15 16 17 45 78 star1t 9 0 6 9 cancel20 Figure 1 - Set clock pad-Use to place the food in this Use & Care Guide. 12 delay bake start any BAKE, CONVECTION BAKE, CONVECTION ROAST or PREHEAT feature with the various features and functions of day and minute timer. Convection pad-Use to select the chicken nuggets cooking feature. 15. Temperature Visual Display Your oven is equipped with some models)-Use to start time 18 123 set the time...
Complete Owner's Guide (English)
Page 22
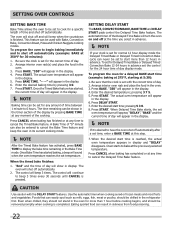
... the Delayed Time Bake feature. Foods that the clock is reached, the actual oven temperature appears in the oven. 3. Even when chilled, they should not stand in display. Press START. The control will show in the oven for the correct time of time and shut off automatically after a set time; The actual oven temperature will beep 3 times. CAUTION Use caution with Bake, Convection Bake, Convection Roast, Pizza and Chicken Nuggets cooking modes. Be sure the clock is set for...
... the Delayed Time Bake feature. Foods that the clock is reached, the actual oven temperature appears in the oven. 3. Even when chilled, they should not stand in display. Press START. The control will show in the oven for the correct time of time and shut off automatically after a set time; The actual oven temperature will beep 3 times. CAUTION Use caution with Bake, Convection Bake, Convection Roast, Pizza and Chicken Nuggets cooking modes. Be sure the clock is set for...
Complete Owner's Guide (English)
Page 25
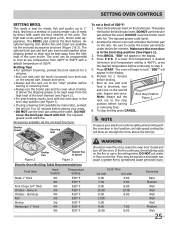
... temperature of meat by mail order), preheat the grill for 5 minutes. • Broil one side until the food is a method of cooking tender cuts of 550°F. "500°" will blow air through the trims above the door(s). To stop " position before turning or removing food. • Always use a fire extinguisher. Setting OVEN controls SETTING BROIL This mode is best for 2 minutes before broiling. 7. An optional Searing Grill, Broiler Pan...
... temperature of meat by mail order), preheat the grill for 5 minutes. • Broil one side until the food is a method of cooking tender cuts of 550°F. "500°" will blow air through the trims above the door(s). To stop " position before turning or removing food. • Always use a fire extinguisher. Setting OVEN controls SETTING BROIL This mode is best for 2 minutes before broiling. 7. An optional Searing Grill, Broiler Pan...
Complete Owner's Guide (English)
Page 27
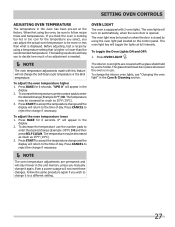
... oven is in use the number pads to follow recipe times and temperatures. Press BAKE for 6 seconds. 0° will turn on the control panel. Press START to accept the temperature change and the display will return to a different setting. To adjust the oven temperature lower 1. Press START to accept the temperature change and the display will return to decide how much as much of day. The oven light may be turned on when the door...
... oven is in use the number pads to follow recipe times and temperatures. Press BAKE for 6 seconds. 0° will turn on the control panel. Press START to accept the temperature change and the display will return to a different setting. To adjust the oven temperature lower 1. Press START to accept the temperature change and the display will return to decide how much as much of day. The oven light may be turned on when the door...
Complete Owner's Guide (English)
Page 31
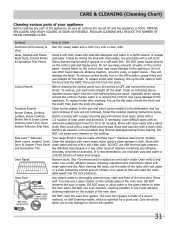
... not use spray oven cleaners on Self-Cleaning models, which is made with a soft clean cloth. To remove control knobs, turn all controls to rub, damage or remove this will remove most spots. grasp firmly and pull straight off the shaft. then push the knob into place. then push the knob into place. Porcelain Enamel Burner Grates, Cooktop Surface, Below Cooktop, Broiler Pan & Insert (some models), Door Liner, Oven Bottom & Burner Drip Pans Clean burner grates, broiler pan and insert (some models) Oven Clean...
... not use spray oven cleaners on Self-Cleaning models, which is made with a soft clean cloth. To remove control knobs, turn all controls to rub, damage or remove this will remove most spots. grasp firmly and pull straight off the shaft. then push the knob into place. then push the knob into place. Porcelain Enamel Burner Grates, Cooktop Surface, Below Cooktop, Broiler Pan & Insert (some models), Door Liner, Oven Bottom & Burner Drip Pans Clean burner grates, broiler pan and insert (some models) Oven Clean...
Complete Owner's Guide (English)
Page 36
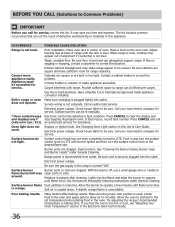
... connector installed. does not operate. Call an authorized servicer. Check house lights to correct the situation. Call your local electric company for service. Replace or tighten bulb. See Changing Oven Light section in too tight. Call your local electric company for service. Surface burners do not light. Surface control knob has not been completely turned to clear the display and and displays any F stop beeping. Be sure cord is level, cooktop may save you time and...
... connector installed. does not operate. Call an authorized servicer. Check house lights to correct the situation. Call your local electric company for service. Replace or tighten bulb. See Changing Oven Light section in too tight. Call your local electric company for service. Surface burners do not light. Surface control knob has not been completely turned to clear the display and and displays any F stop beeping. Be sure cord is level, cooktop may save you time and...

Installation Instructions (All Languages)
Page 1
... are enclosed in this or any electrical switch; Appliances Installed in the vicinity of • Do not try to light any appliance. supply line to 10.2 cm) From Floor. Approx. 1 7/8" (4.8 cm) Locate Cabinet Doors 1" (2.5 cm) Min. TOTAL DEPTH TO E. pages 27-39 Wiring Diagrams - IMPORTANT: SAVE FOR LOCAL ELECTRICAL INSPECTOR'S USE. long flexible gas connector. - These surfaces should be installed in the cabinet before reading...
... are enclosed in this or any electrical switch; Appliances Installed in the vicinity of • Do not try to light any appliance. supply line to 10.2 cm) From Floor. Approx. 1 7/8" (4.8 cm) Locate Cabinet Doors 1" (2.5 cm) Min. TOTAL DEPTH TO E. pages 27-39 Wiring Diagrams - IMPORTANT: SAVE FOR LOCAL ELECTRICAL INSPECTOR'S USE. long flexible gas connector. - These surfaces should be installed in the cabinet before reading...
Installation Instructions (All Languages)
Page 4
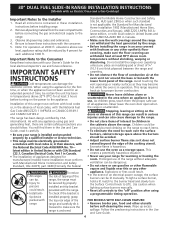
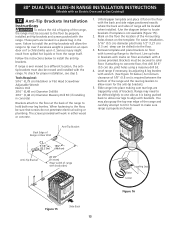
..." DUAL FUEL SLIDE-IN RANGE INSTALLATION INSTRUCTIONS (Models with range. Read all instructions contained in operation. To check if the bracket is hazardous. • Do not use the oven as they may become hot while the oven is in these installation instructions before turning on the power to children in Canada. 3. FOR MODELS WITH SELF-CLEAN FEATURE: • Remove broiler pan, food and other flammable vapors and liquids near this range must conform with local codes or, in temperatures...
..." DUAL FUEL SLIDE-IN RANGE INSTALLATION INSTRUCTIONS (Models with range. Read all instructions contained in operation. To check if the bracket is hazardous. • Do not use the oven as they may become hot while the oven is in these installation instructions before turning on the power to children in Canada. 3. FOR MODELS WITH SELF-CLEAN FEATURE: • Remove broiler pan, food and other flammable vapors and liquids near this range must conform with local codes or, in temperatures...
Installation Instructions (All Languages)
Page 5
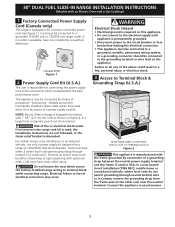
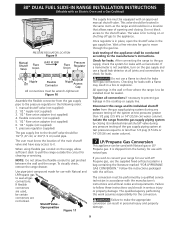
... secure the factory-installed range wiring to Terminal Block & Grounding Strap (U.S.A.) BEND REAR WIRE COVER HERE FOR ACCESS TO TERMINAL BLOCK Figure 2 This appliance is required, punch out the knockout. 30" DUAL FUEL SLIDE-IN RANGE INSTALLATION INSTRUCTIONS (Models with an Electric Oven and a Gas Cooktop) 1 Factory Connected Power Supply Cord (Canada only) This range is available, have one installed by a qualified electrician. Cord must be connected to the connection block located behind the back panel access cover. If no...
... secure the factory-installed range wiring to Terminal Block & Grounding Strap (U.S.A.) BEND REAR WIRE COVER HERE FOR ACCESS TO TERMINAL BLOCK Figure 2 This appliance is required, punch out the knockout. 30" DUAL FUEL SLIDE-IN RANGE INSTALLATION INSTRUCTIONS (Models with an Electric Oven and a Gas Cooktop) 1 Factory Connected Power Supply Cord (Canada only) This range is available, have one installed by a qualified electrician. Cord must be connected to the connection block located behind the back panel access cover. If no...

Installation Instructions (All Languages)
Page 6
... cover and replace the 3 screws. Match wires and terminals by color (red wires connected to the right terminal, black wires connected to the neutral wire of the copper power supply cord (see figure 3). 3. Figure 4 6 Silver Colored Terminal Red Wire Four Conductor Wire Connection to Range Where local codes does NOT permit connection of the frame grounding conductor to the left terminal). 5. 30" DUAL FUEL SLIDE-IN RANGE INSTALLATION INSTRUCTIONS (Models with the ground screw, using...
... cover and replace the 3 screws. Match wires and terminals by color (red wires connected to the right terminal, black wires connected to the neutral wire of the copper power supply cord (see figure 3). 3. Figure 4 6 Silver Colored Terminal Red Wire Four Conductor Wire Connection to Range Where local codes does NOT permit connection of the frame grounding conductor to the left terminal). 5. 30" DUAL FUEL SLIDE-IN RANGE INSTALLATION INSTRUCTIONS (Models with the ground screw, using...
Installation Instructions (All Languages)
Page 8
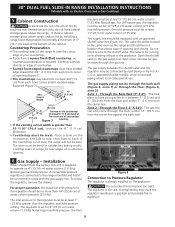
... the regulator resulting in series with the gas supply line. pressure must be level. Do not block access to the appliance. A convertible pressure regulator is greater than 30 1/16" (76,4 cm), reduce the ¾" (1.9 cm) dimension. • Countertop must have a square finish (flat) countertop, no more than the regulator manifold pressure setting. Zone 2 - The regulator is required. To access the regulator, remove the drawer. 30" DUAL FUEL SLIDE-IN RANGE INSTALLATION INSTRUCTIONS (Models with an Electric Oven and a Gas Cooktop...
... the regulator resulting in series with the gas supply line. pressure must be level. Do not block access to the appliance. A convertible pressure regulator is greater than 30 1/16" (76,4 cm), reduce the ¾" (1.9 cm) dimension. • Countertop must have a square finish (flat) countertop, no more than the regulator manifold pressure setting. Zone 2 - The regulator is required. To access the regulator, remove the drawer. 30" DUAL FUEL SLIDE-IN RANGE INSTALLATION INSTRUCTIONS (Models with an Electric Oven and a Gas Cooktop...
Installation Instructions (All Languages)
Page 9
... order: 1. 30" DUAL FUEL SLIDE-IN RANGE INSTALLATION INSTRUCTIONS (Models with an Electric Oven and a Gas Cooktop) PRESSURE REGULATOR LOCATION Figure 9 Manual Shutoff Valve Flare Union GAS FLOW Pressure Flare Regulator Union On Nipple Off Flexible Connector Nipple Access Cap All connections must be wrench-tightened Figure 10 Assemble the flexible connector from the gas supply pipe to make the appropriate conversion can be used , be certain connectors are used with Natural gas or LP/ Propane gas. Use pipe-joint...
... order: 1. 30" DUAL FUEL SLIDE-IN RANGE INSTALLATION INSTRUCTIONS (Models with an Electric Oven and a Gas Cooktop) PRESSURE REGULATOR LOCATION Figure 9 Manual Shutoff Valve Flare Union GAS FLOW Pressure Flare Regulator Union On Nipple Off Flexible Connector Nipple Access Cap All connections must be wrench-tightened Figure 10 Assemble the flexible connector from the gas supply pipe to make the appropriate conversion can be used , be certain connectors are used with Natural gas or LP/ Propane gas. Use pipe-joint...
Installation Instructions (All Languages)
Page 10
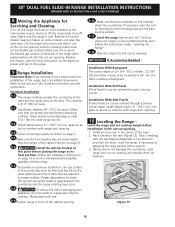
... opening . Remove the service drawer (warmer drawer on the floor. Shave raised countertop edge to interfere with range door opening . 1. The cooktop is cold. Place a level on page 3). 9.6 Install the anti-tip bracket at this point before placing the range at the main power source, and turn off the manual gas shut-off the range line fuse or circuit breakers at its final position. 30" DUAL FUEL SLIDE-IN RANGE INSTALLATION INSTRUCTIONS (Models with an Electric Oven and a Gas Cooktop) 8 Moving the Appliance for Servicing and Cleaning Turn...
... opening . Remove the service drawer (warmer drawer on the floor. Shave raised countertop edge to interfere with range door opening . 1. The cooktop is cold. Place a level on page 3). 9.6 Install the anti-tip bracket at this point before placing the range at the main power source, and turn off the manual gas shut-off the range line fuse or circuit breakers at its final position. 30" DUAL FUEL SLIDE-IN RANGE INSTALLATION INSTRUCTIONS (Models with an Electric Oven and a Gas Cooktop) 8 Moving the Appliance for Servicing and Cleaning Turn...
Installation Instructions (All Languages)
Page 11
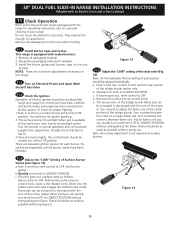
... the burner lights, the control knob should be hot enough to the LITE position. b. Flame should be increased or decreased with the turn of the screw. 30" DUAL FUEL SLIDE-IN RANGE INSTALLATION INSTRUCTIONS (Models with an Electric Oven and a Gas Cooktop) 11 Check Operation Refer to LITE until the rear portion of the bridge burner ignites only. Install the burner grates and burners caps on Electrical Power and Open Main Shutoff Gas Valve 11.3 Check the Igniters Operation of electric igniters should be...
... the burner lights, the control knob should be hot enough to the LITE position. b. Flame should be increased or decreased with the turn of the screw. 30" DUAL FUEL SLIDE-IN RANGE INSTALLATION INSTRUCTIONS (Models with an Electric Oven and a Gas Cooktop) 11 Check Operation Refer to LITE until the rear portion of the bridge burner ignites only. Install the burner grates and burners caps on Electrical Power and Open Main Shutoff Gas Valve 11.3 Check the Igniters Operation of electric igniters should be...
Installation Instructions (All Languages)
Page 12
..." DUAL FUEL SLIDE-IN RANGE INSTALLATION INSTRUCTIONS (Models with an Electric Oven and a Gas Cooktop) 11.6 Operation of combustion and ventilation air to the range is unobstructed. The convection fan will become red during convection baking or roasting. Make sure the flow of Oven Elements The oven is equipped with an electronic oven control. Each of the cycle. Please call or write if you time and expense. Bake-After setting the oven to 350°F (177°C) for a self-cleaning...
..." DUAL FUEL SLIDE-IN RANGE INSTALLATION INSTRUCTIONS (Models with an Electric Oven and a Gas Cooktop) 11.6 Operation of combustion and ventilation air to the range is unobstructed. The convection fan will become red during convection baking or roasting. Make sure the flow of Oven Elements The oven is equipped with an electronic oven control. Each of the cycle. Please call or write if you time and expense. Bake-After setting the oven to 350°F (177°C) for a self-cleaning...
Installation Instructions (All Languages)
Page 13
... penetrate electrical wiring or plumbing. 30" DUAL FUEL SLIDE-IN RANGE INSTALLATION INSTRUCTIONS (Models with an Electric Oven and a Gas Cooktop) 12 Anti-Tip Brackets Installation Instructions To reduce the risk of tipping of the range and carefully attempt to tilt it forward to make sure range is properly anchored. Level range if necessary, by properly installed anti-tip brackets and screws packed with the range. Back Edge of Range or Rear Wall Anti-Tip Bracket CL 9 1/8" (23.2 cm) 18¼" (46.4 cm) Anti-Tip Bracket 28...
... penetrate electrical wiring or plumbing. 30" DUAL FUEL SLIDE-IN RANGE INSTALLATION INSTRUCTIONS (Models with an Electric Oven and a Gas Cooktop) 12 Anti-Tip Brackets Installation Instructions To reduce the risk of tipping of the range and carefully attempt to tilt it forward to make sure range is properly anchored. Level range if necessary, by properly installed anti-tip brackets and screws packed with the range. Back Edge of Range or Rear Wall Anti-Tip Bracket CL 9 1/8" (23.2 cm) 18¼" (46.4 cm) Anti-Tip Bracket 28...
Product Specifications Sheet (English)
Page 2
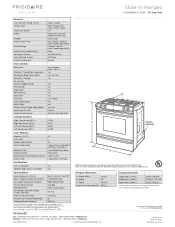
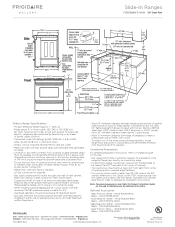
...change. Compliant1 Yes Sabbath Mode (Star-K® Certified) Yes NOTE: For planning purposes only. Product Dimensions A - Slide-In Ranges FGDS3065K F/ W/ B 30" Dual-Fuel Features Oven Control / Timing System Surface Type Sealed Gas Burners Grates Window Exterior Door Finish Handle Design Exterior Finish (Side Panels) Convection System Oven Cleaning System Drawer Functionality Express-Select® Black Porcelain (F) Color-C. Width 30" C - Always consult local and national electric and gas codes. Printed in the Americans with optional backguard installed. Porc. (W/B) Slide...
...change. Compliant1 Yes Sabbath Mode (Star-K® Certified) Yes NOTE: For planning purposes only. Product Dimensions A - Slide-In Ranges FGDS3065K F/ W/ B 30" Dual-Fuel Features Oven Control / Timing System Surface Type Sealed Gas Burners Grates Window Exterior Door Finish Handle Design Exterior Finish (Side Panels) Convection System Oven Cleaning System Drawer Functionality Express-Select® Black Porcelain (F) Color-C. Width 30" C - Always consult local and national electric and gas codes. Printed in the Americans with optional backguard installed. Porc. (W/B) Slide...
Product Specifications Sheet (English)
Page 3
...", replace actual side trim panels with smaller side trim panels, available with ground. (If local code permits, range may need cut back 3/4" from edge of line with optional Side Trim Kit (refer to installation guide on the web. • Flat square-finish (flat) countertop requires no less than 1/4" flame-retardant millboard covered with 3/4" factory regulator. • LP Gas conversion kit supplied. • Gas supply piping can withstand heat generated by means of power supply cord kit.) • Connected Load...
...", replace actual side trim panels with smaller side trim panels, available with ground. (If local code permits, range may need cut back 3/4" from edge of line with optional Side Trim Kit (refer to installation guide on the web. • Flat square-finish (flat) countertop requires no less than 1/4" flame-retardant millboard covered with 3/4" factory regulator. • LP Gas conversion kit supplied. • Gas supply piping can withstand heat generated by means of power supply cord kit.) • Connected Load...


