Complete Owner's Guide (English)
Page 1
B TABLE OF CONTENTS Welcome & Congratulations 2 Setting Keep Warm Drawer Control (If equipped)... 30 Important Safety Instructions 3 Care & Cleaning (Cleaning Chart 31 Features at a Glance 7 Care & Cleaning 32 Before Setting Surface Controls 9 Before You Call 35 Setting Surface Controls 10 Notes 38 Before Setting Oven Controls 11 Major Appliance Warranty 40 Setting Oven Controls 14 www.frigidaire.com USA 1-800-944-9044 www.frigidaire.ca Canada 1-800-265-8352 All about the Use &Care of your Built-In Range 318205853 (July 2009) Rev.
B TABLE OF CONTENTS Welcome & Congratulations 2 Setting Keep Warm Drawer Control (If equipped)... 30 Important Safety Instructions 3 Care & Cleaning (Cleaning Chart 31 Features at a Glance 7 Care & Cleaning 32 Before Setting Surface Controls 9 Before You Call 35 Setting Surface Controls 10 Notes 38 Before Setting Oven Controls 11 Major Appliance Warranty 40 Setting Oven Controls 14 www.frigidaire.com USA 1-800-944-9044 www.frigidaire.ca Canada 1-800-265-8352 All about the Use &Care of your Built-In Range 318205853 (July 2009) Rev.
Complete Owner's Guide (English)
Page 3
... child on the door or the drawer of this symbol to persons could result. • Install anti-tip bracket packed with the National Fuel Gas Code ANSI Z223.1 latest edition, and National Electrical Code ANSI/NFPA No. 70 latest edition, and local code requirements. Do not repair...tip bracket installation. • Remove all tape and packaging wrap before using the appliance. Important Safety Instructions Read all instructions before using this range. Do not store or use any electrical switch; WARNING This symbol will help alert you to the appliance. Destroy the carton and plastic...
... child on the door or the drawer of this symbol to persons could result. • Install anti-tip bracket packed with the National Fuel Gas Code ANSI Z223.1 latest edition, and National Electrical Code ANSI/NFPA No. 70 latest edition, and local code requirements. Do not repair...tip bracket installation. • Remove all tape and packaging wrap before using the appliance. Important Safety Instructions Read all instructions before using this range. Do not store or use any electrical switch; WARNING This symbol will help alert you to the appliance. Destroy the carton and plastic...
Complete Owner's Guide (English)
Page 6
...authorized Service Center. 6 Conversion to another well ventilated room. WARNING Personal injury or death from cleaners and aerosols may occur if the range is essential for conversion to rub, damage or move the gasket. • Do not use . Care should be sure to allow for ...a good seal. Gas) This natural gas range is extremely sensitive to such substances. The L.P. Before using the self-cleaning cycle of some birds is designed to follow the manufacturer's...
...authorized Service Center. 6 Conversion to another well ventilated room. WARNING Personal injury or death from cleaners and aerosols may occur if the range is essential for conversion to rub, damage or move the gasket. • Do not use . Care should be sure to allow for ...a good seal. Gas) This natural gas range is extremely sensitive to such substances. The L.P. Before using the self-cleaning cycle of some birds is designed to follow the manufacturer's...
Complete Owner's Guide (English)
Page 7
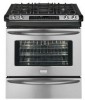
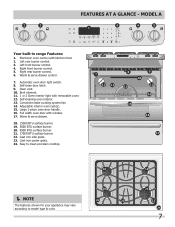
... range Features: 1. Right front burner control. 5. Right rear burner control. 6. Automatic oven door light switch. 8. Oven vent. 10. Adjustable interior oven rack(s). 15. Warm & serve drawer. 18. 15000 BTU surface burner. 19. 5000 BTU surface burner. 20. 9500 BTU surface burner. 21. 17000 BTU surface burner...GLANCE - Warm & serve drawer control. 7. Full width oven door with kitchen timer. 2. Self-clean door latch. 9. Left front burner control. 4. Left rear burner control. 3. Broil element. 11. 1 or 2 Oven interior light with removable cover. 12. Cast iron center grate. 24. Large...
... range Features: 1. Right front burner control. 5. Right rear burner control. 6. Automatic oven door light switch. 8. Oven vent. 10. Adjustable interior oven rack(s). 15. Warm & serve drawer. 18. 15000 BTU surface burner. 19. 5000 BTU surface burner. 20. 9500 BTU surface burner. 21. 17000 BTU surface burner...GLANCE - Warm & serve drawer control. 7. Full width oven door with kitchen timer. 2. Self-clean door latch. 9. Left front burner control. 4. Left rear burner control. 3. Broil element. 11. 1 or 2 Oven interior light with removable cover. 12. Cast iron center grate. 24. Large...
Complete Owner's Guide (English)
Page 8
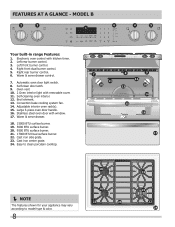
... 6 keep warm drawer hi med low on·off 4 5 OFF OFF hi hi lo lo Your built-in range Features: 1. Electronic oven control with window. 17. Right front dual burner control. 5. Broil element. 13. Adjustable interior oven rack(s). 15. Large 3-piece oven door handle. 16. Left... may vary according to model type & color. 8 Warm & serve drawer. 18. 15000 BTU surface burner. 19. 5000 BTU surface burner. 20. 9500 BTU surface burner. 21. 17000 BTU Dual surface burner. 22. Automatic oven door light switch. 8. Cast iron center grate. 24. Convection bake cooking system ...
... 6 keep warm drawer hi med low on·off 4 5 OFF OFF hi hi lo lo Your built-in range Features: 1. Electronic oven control with window. 17. Right front dual burner control. 5. Broil element. 13. Adjustable interior oven rack(s). 15. Large 3-piece oven door handle. 16. Left... may vary according to model type & color. 8 Warm & serve drawer. 18. 15000 BTU surface burner. 19. 5000 BTU surface burner. 20. 9500 BTU surface burner. 21. 17000 BTU Dual surface burner. 22. Automatic oven door light switch. 8. Cast iron center grate. 24. Convection bake cooking system ...
Complete Owner's Guide (English)
Page 9
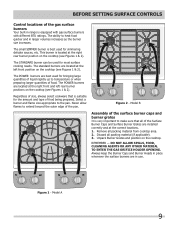
...& 2). Always keep the Burner Caps and Burner Heads in larger volumes increases as the burner size increases. before setting surface controls Control locations of food. The ability to temperature or when preparing larger quantities of the gas surface burners Your built-in range is suitable for the amount... and type of liquid rapidly up to heat food quicker and in place whenever the surface burners are best used for simmering delicate sauces, etc. Figure ...
...& 2). Always keep the Burner Caps and Burner Heads in larger volumes increases as the burner size increases. before setting surface controls Control locations of food. The ability to temperature or when preparing larger quantities of the gas surface burners Your built-in range is suitable for the amount... and type of liquid rapidly up to heat food quicker and in place whenever the surface burners are best used for simmering delicate sauces, etc. Figure ...
Complete Owner's Guide (English)
Page 10
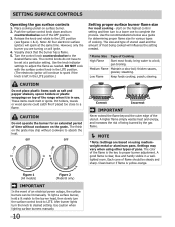
... Medium Flame Maintain a slow boil; thicken sauces, gravies; Clean burner if flame is in use. The control knobs do not have to absorb the heat. Use the recommendations below as needed . *Flame Size Type of the range when it is yellow-orange. Use the knob indicator settings to ...proper burner adjustment. A good flame is the key to adjust the flame as a guide for determining proper flame size...
... Medium Flame Maintain a slow boil; thicken sauces, gravies; Clean burner if flame is in use. The control knobs do not have to absorb the heat. Use the recommendations below as needed . *Flame Size Type of the range when it is yellow-orange. Use the knob indicator settings to ...proper burner adjustment. A good flame is the key to adjust the flame as a guide for determining proper flame size...
Complete Owner's Guide (English)
Page 12
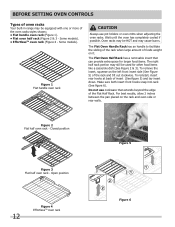
Some models). The Flat Oven Handle Rack has an handle to facilitate the sliding of the rack when large amount of foods weight on the rack and oven side or rear walls. For best results, allow 2 inches between the ... Rack has a removable insert that extends beyond the edge of the Flat Half Rack. BEFORE SETTING OVEN CONTROLS Types of oven racks Your built-in range may be used for larger food items. The right half rack portion may cause burns.
Some models). The Flat Oven Handle Rack has an handle to facilitate the sliding of the rack when large amount of foods weight on the rack and oven side or rear walls. For best results, allow 2 inches between the ... Rack has a removable insert that extends beyond the edge of the Flat Half Rack. BEFORE SETTING OVEN CONTROLS Types of oven racks Your built-in range may be used for larger food items. The right half rack portion may cause burns.
Complete Owner's Guide (English)
Page 13
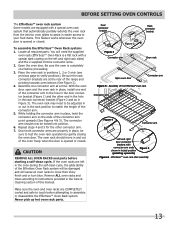
... the oven is a flat rack with a special dark coating on the left in the oven during the self-clean cycle, the glide ability of the range and pointing towards oven bottom (See Figure 2). 4. The oven rack may need the supplied oven rack (Effortless™ Oven Rack is completely cool before proceeding...
... the oven is a flat rack with a special dark coating on the left in the oven during the self-clean cycle, the glide ability of the range and pointing towards oven bottom (See Figure 2). 4. The oven rack may need the supplied oven rack (Effortless™ Oven Rack is completely cool before proceeding...
Complete Owner's Guide (English)
Page 15
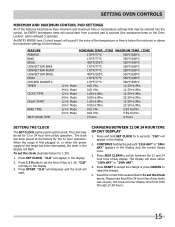
... in the display. 3. Mode 0:00 Hr./Min. 23:59 Hr./Min. 12 Hr. The clock has been preset at the factory for 6 seconds. When the range is delayed 3 seconds). Press START to accept the change or press CANCEL to 1:30. Setting OVEN controls Minimum and Maximum Control Pad Settings All of.... "CLO" will appear in , or when the power supply to switch between 12 or 24 hour time of day display 1. Press SELF CLEAN to the range has been interrupted, the timer in the display and the control beeps once. 3. The display will flash. Please note that may be entered into the...
... in the display. 3. Mode 0:00 Hr./Min. 23:59 Hr./Min. 12 Hr. The clock has been preset at the factory for 6 seconds. When the range is delayed 3 seconds). Press START to accept the change or press CANCEL to 1:30. Setting OVEN controls Minimum and Maximum Control Pad Settings All of.... "CLO" will appear in , or when the power supply to switch between 12 or 24 hour time of day display 1. Press SELF CLEAN to the range has been interrupted, the timer in the display and the control beeps once. 3. The display will flash. Please note that may be entered into the...
Complete Owner's Guide (English)
Page 16
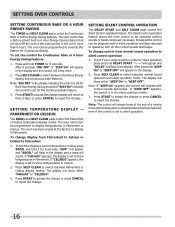
... . To change . Press SELF CLEAN to operating with normal sounds and beeps. If desired the control can be programmed for 6 seconds; To tell if your range is set for normal or silent operation press and hold TIMER for more than 6 hours. To set to show temperatures in Fahrenheit. The oven control...
... . To change . Press SELF CLEAN to operating with normal sounds and beeps. If desired the control can be programmed for 6 seconds; To tell if your range is set for normal or silent operation press and hold TIMER for more than 6 hours. To set to show temperatures in Fahrenheit. The oven control...
Complete Owner's Guide (English)
Page 28
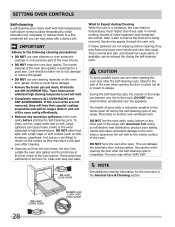
...normal and safe and should be VERY HOT. NOTE See additional cleaning information for a good seal. This is being removed. Stand to the side of the oven). Doing so will destroy heat distribution...NOT use care when opening the oven door after cleaning. • Clean any other part of the range can become very hot to escape. Smoke may still be taken not to temperatures much higher than ...foil. These items cannot withstand high cleaning temperatures and will no longer slide in and out of the oven door gasket is in the General Care & Cleaning section. Clean with ...
...normal and safe and should be VERY HOT. NOTE See additional cleaning information for a good seal. This is being removed. Stand to the side of the oven). Doing so will destroy heat distribution...NOT use care when opening the oven door after cleaning. • Clean any other part of the range can become very hot to escape. Smoke may still be taken not to temperatures much higher than ...foil. These items cannot withstand high cleaning temperatures and will no longer slide in and out of the oven door gasket is in the General Care & Cleaning section. Clean with ...
Complete Owner's Guide (English)
Page 31
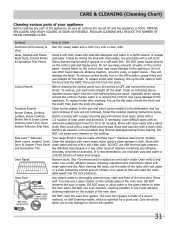
...may use oven cleaners, cleaning powders or any harsh abrasive cleaning materials on the outside of the oven door. Easy Care™ Stainless Your range finish is COOL. DO NOT use a glass cleaner on the outside glass of the oven door. grasp firmly and pull straight off the ...models), Door Liner, Oven Bottom & Burner Drip Pans Clean burner grates, broiler pan and insert (some models) in or around the controls. Oven Racks Remove racks. After cleaning the racks, rub the sides of the racks with an ammonia-soaked paper towel for a good seal. dry and polish with clean water;...
...may use oven cleaners, cleaning powders or any harsh abrasive cleaning materials on the outside of the oven door. Easy Care™ Stainless Your range finish is COOL. DO NOT use a glass cleaner on the outside glass of the oven door. grasp firmly and pull straight off the ...models), Door Liner, Oven Bottom & Burner Drip Pans Clean burner grates, broiler pan and insert (some models) in or around the controls. Oven Racks Remove racks. After cleaning the racks, rub the sides of the racks with an ammonia-soaked paper towel for a good seal. dry and polish with clean water;...
Complete Owner's Guide (English)
Page 35
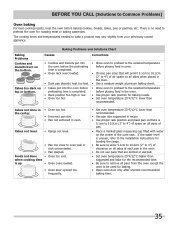
...12°C lower than recommended. Baking Problems and Solutions Chart Baking Problems Cookies and biscuits burn on top or bottom. Cakes not level. • Range not level. • Pan too close to the selected temperature before baking cookies, breads, cakes, pies or pastries, etc. Causes Corrections •...than suggested in recipe. • Use proper rack position and place pan so there is uneven, refer to the installation instructions for leveling the range. • Be sure to allow 5.1cm to 10.2cm (2" to 4") of clearance on all pans from your previously owned appliance. Cakes ...
...12°C lower than recommended. Baking Problems and Solutions Chart Baking Problems Cookies and biscuits burn on top or bottom. Cakes not level. • Range not level. • Pan too close to the selected temperature before baking cookies, breads, cakes, pies or pastries, etc. Causes Corrections •...than suggested in recipe. • Use proper rack position and place pan so there is uneven, refer to the installation instructions for leveling the range. • Be sure to allow 5.1cm to 10.2cm (2" to 4") of clearance on all pans from your previously owned appliance. Cakes ...
Complete Owner's Guide (English)
Page 36
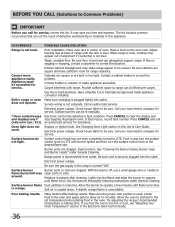
...tightly into the outlet. Reprogram oven. If fault recurs, record fault number. Call your local electric company for service. Burner ports are clogged. Range power is not level. Moisture is unavoidable. Salt air in center of defective workmanship or materials in the oven and space... Control Guide. 36 The list includes common occurrences that are square and have sufficient room for range clearance. When range is level, cooktop may appear out of range until burner ignites and then turn the surface control knob to the desired flame size. Be sure floor ...
...tightly into the outlet. Reprogram oven. If fault recurs, record fault number. Call your local electric company for service. Burner ports are clogged. Range power is not level. Moisture is unavoidable. Salt air in center of defective workmanship or materials in the oven and space... Control Guide. 36 The list includes common occurrences that are square and have sufficient room for range clearance. When range is level, cooktop may appear out of range until burner ignites and then turn the surface control knob to the desired flame size. Be sure floor ...

Installation Instructions (All Languages)
Page 1
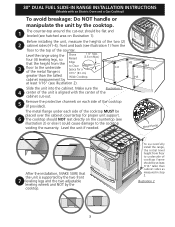
... This appliance must be installed in the gas agency or the gas supplier. from a neighbor's phone. CUTOUT WIDTH*** FRONT OF RANGE (Countertop and cabinet) F. páginas 14-26 Français - pages 40 These surfaces should be installed in the state...DEPTH G. with backguard 35 7/8" (91,1 cm) Min. 36 5/8" (93 cm) Max. P/N 318201690 (1007) Rev. A English - 30" DUAL FUEL SLIDE-IN RANGE INSTALLATION INSTRUCTIONS (Models with an Electric Oven and a Gas Cooktop) INSTALLATION AND SERVICE MUST BE PERFORMED BY A QUALIFIED INSTALLER. IMPORTANT: SAVE FOR LOCAL ...
... This appliance must be installed in the gas agency or the gas supplier. from a neighbor's phone. CUTOUT WIDTH*** FRONT OF RANGE (Countertop and cabinet) F. páginas 14-26 Français - pages 40 These surfaces should be installed in the state...DEPTH G. with backguard 35 7/8" (91,1 cm) Min. 36 5/8" (93 cm) Max. P/N 318201690 (1007) Rev. A English - 30" DUAL FUEL SLIDE-IN RANGE INSTALLATION INSTRUCTIONS (Models with an Electric Oven and a Gas Cooktop) INSTALLATION AND SERVICE MUST BE PERFORMED BY A QUALIFIED INSTALLER. IMPORTANT: SAVE FOR LOCAL ...

Installation Instructions (All Languages)
Page 2
... the power supply cord or the flexible gas conduit between the cooktop and the bottom of the cabinet when the bottom of the cabinet. 5. 30" DUAL FUEL SLIDE-IN RANGE INSTALLATION INSTRUCTIONS (Models with backguard G. COOKTOP WIDTH 35 7/8" (91,1 cm) 30" (76,2 cm) 36 5/8" (93 cm) 31 1/2" (80 cm...58.1 cm) min. 23 1/4"(59.05 cm) max. (see page 3), insert the appliance in the counter opening while pushing into it. Do not seal the range to the side cabinets. 3. 24" (61 cm) minimum clearance between the range and the wall. 21¾" (55.25 cm) D C 2. TOTAL DEPTH TO FRONT OF...
... the power supply cord or the flexible gas conduit between the cooktop and the bottom of the cabinet when the bottom of the cabinet. 5. 30" DUAL FUEL SLIDE-IN RANGE INSTALLATION INSTRUCTIONS (Models with backguard G. COOKTOP WIDTH 35 7/8" (91,1 cm) 30" (76,2 cm) 36 5/8" (93 cm) 31 1/2" (80 cm...58.1 cm) min. 23 1/4"(59.05 cm) max. (see page 3), insert the appliance in the counter opening while pushing into it. Do not seal the range to the side cabinets. 3. 24" (61 cm) minimum clearance between the range and the wall. 21¾" (55.25 cm) D C 2. TOTAL DEPTH TO FRONT OF...
Installation Instructions (All Languages)
Page 3
... by the two front leveling legs and the two adjustable leveling wheels and NOT by the cooktop. Level the unit if needed. 30" DUAL FUEL SLIDE-IN RANGE INSTALLATION INSTRUCTIONS (Models with the center of the cabinet cut -out should be flat and leveled (see illustration 1) from the Edge 3 ...Space for proper unit support. 6 The cooktop should be placed over the cabinet countertop for a 31½" (81 cm) Wide Cooktop. Level the range using the Shave four (4) leveling legs, so Raised 1 ½" Max. (3.8 cm Max.) that 8 7 the unit is greater than cabinet sides as measured...
... by the two front leveling legs and the two adjustable leveling wheels and NOT by the cooktop. Level the unit if needed. 30" DUAL FUEL SLIDE-IN RANGE INSTALLATION INSTRUCTIONS (Models with the center of the cabinet cut -out should be flat and leveled (see illustration 1) from the Edge 3 ...Space for proper unit support. 6 The cooktop should be placed over the cabinet countertop for a 31½" (81 cm) Wide Cooktop. Level the range using the Shave four (4) leveling legs, so Raised 1 ½" Max. (3.8 cm Max.) that 8 7 the unit is greater than cabinet sides as measured...
Installation Instructions (All Languages)
Page 4
...DUAL FUEL SLIDE-IN RANGE INSTALLATION INSTRUCTIONS (Models with an Electric Oven and a Gas Cooktop) Important Notes to leave these instructions with the consumer. 5. Standard for Mobile Home Construction and Safety, title 24, HUD (part 280)] or when such standard is in use. Never leave children alone or unattended in the cabinets above the range...• Remove broiler pan, food and other • All ranges can tip. • Injury to the range. Note: For operation at least 90°F above the burners should follow. Important Note to LITE. When using a programmable ...
...DUAL FUEL SLIDE-IN RANGE INSTALLATION INSTRUCTIONS (Models with an Electric Oven and a Gas Cooktop) Important Notes to leave these instructions with the consumer. 5. Standard for Mobile Home Construction and Safety, title 24, HUD (part 280)] or when such standard is in use. Never leave children alone or unattended in the cabinets above the range...• Remove broiler pan, food and other • All ranges can tip. • Injury to the range. Note: For operation at least 90°F above the burners should follow. Important Note to LITE. When using a programmable ...
Installation Instructions (All Languages)
Page 5
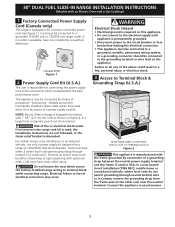
... For mobile homes, new installations or recreational vehicles, use only a power supply kit designed for connecting the power supply cord to terminal block while connecting range. Cord must have either closed loop or open spade lug with 1 1/8" (2.9 cm) dia. Canada Style Figure 1 2 Power Supply Cord Kit (U.S.A.)...code allow it) or by means of permanent "hard wiring"; If no outlet is available, have strain-relief clamp. 30" DUAL FUEL SLIDE-IN RANGE INSTALLATION INSTRUCTIONS (Models with an Electric Oven and a Gas Cooktop) 1 Factory Connected Power Supply Cord (Canada only) This...
... For mobile homes, new installations or recreational vehicles, use only a power supply kit designed for connecting the power supply cord to terminal block while connecting range. Cord must have either closed loop or open spade lug with 1 1/8" (2.9 cm) dia. Canada Style Figure 1 2 Power Supply Cord Kit (U.S.A.)...code allow it) or by means of permanent "hard wiring"; If no outlet is available, have strain-relief clamp. 30" DUAL FUEL SLIDE-IN RANGE INSTALLATION INSTRUCTIONS (Models with an Electric Oven and a Gas Cooktop) 1 Factory Connected Power Supply Cord (Canada only) This...


