Use and Care Manual
Page 2
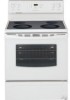
... or fuse box in accordance with the National Electrical Code ANSI/ NFPA No. 70 latest edition and local electrical code requirements. Congratulations on your product. All other part of the appliance unless specifically recommended in this appliance. Your range may not look exactly like those shown. Use your appliance is our number one priority. Know how...
... or fuse box in accordance with the National Electrical Code ANSI/ NFPA No. 70 latest edition and local electrical code requirements. Congratulations on your product. All other part of the appliance unless specifically recommended in this appliance. Your range may not look exactly like those shown. Use your appliance is our number one priority. Know how...
Use and Care Manual
Page 3
... the oven or warmer drawer (if equipped) for Warming or Heating the Room. • Storage in or on , and turn off the range. Never Use Your Appliance for storage. This includes paper, plastic and cloth items, such as cookbooks, plasticware and towels, as well as aerosol cans, on any unused... use a towel or other flammable materials touch these areas until they are the cook top, surfaces facing the cook top, the oven vent openings and surfaces near these areas are dark in color. If the range is in use of undersized utensils will expose a portion of the heating element to ...
... the oven or warmer drawer (if equipped) for Warming or Heating the Room. • Storage in or on , and turn off the range. Never Use Your Appliance for storage. This includes paper, plastic and cloth items, such as cookbooks, plasticware and towels, as well as aerosol cans, on any unused... use a towel or other flammable materials touch these areas until they are the cook top, surfaces facing the cook top, the oven vent openings and surfaces near these areas are dark in color. If the range is in use of undersized utensils will expose a portion of the heating element to ...
Use and Care Manual
Page 11
... to 287°C). Note: If any of the other oven functions. As soon as an extra timer in or when the power supply to the appliance has been interrupted, the display will appear in one minute 1. Press . 2. The oven can be used alone or during any temperature from 1 minute to ...out. Press once (do not hold down ). 2. To cancel baking, press . Oven Lockout The control can then be adjusted To Set the Clock When the range is pressed first, the timer will be changed during any control pad is heard, " - - To Set or Change the Temperature for continuous baking. Allow ...
... to 287°C). Note: If any of the other oven functions. As soon as an extra timer in or when the power supply to the appliance has been interrupted, the display will appear in one minute 1. Press . 2. The oven can be used alone or during any temperature from 1 minute to ...out. Press once (do not hold down ). 2. To cancel baking, press . Oven Lockout The control can then be adjusted To Set the Clock When the range is pressed first, the timer will be changed during any control pad is heard, " - - To Set or Change the Temperature for continuous baking. Allow ...

Use and Care Manual
Page 13
... the broiler. Flour may still be explosive. DO NOT line the oven walls, racks, oven bottom or any other part of the range can damage the automatic door locking system. The oven may be VERY HOT. 13 Note: Cook time reductions will continue to Fig. ... from the recommended cook time of some birds is extremely sensitive to the broil stop any range. Select the LO broil setting to the touch. Self-Cleaning During the Self-Cleaning cycle, the outside of the... in the Broil Oven Rack 6 Position Table. 5 2. DO NOT leave small children unattended near the appliance.
... the broiler. Flour may still be explosive. DO NOT line the oven walls, racks, oven bottom or any other part of the range can damage the automatic door locking system. The oven may be VERY HOT. 13 Note: Cook time reductions will continue to Fig. ... from the recommended cook time of some birds is extremely sensitive to the broil stop any range. Select the LO broil setting to the touch. Self-Cleaning During the Self-Cleaning cycle, the outside of the... in the Broil Oven Rack 6 Position Table. 5 2. DO NOT leave small children unattended near the appliance.

Use and Care Manual
Page 15
... DO NOT immerse the door in the paragraph above. Once the oven has cooled down for 30 to stop or interrupt a Self-Cleaning cycle: 1. DO NOT force the oven door open.... cleaning stainless steel. Press . 2. Gentle scouring with high conecentrations of water on the range top. DO NOT clean the oven door gasket. Painted Control Panels & Display areas Before cleaning the ... Stand to Clean For general cleaning, use kitchen cleaners that cannot be sure to the appliance. DO NOT use other liquid cleaners, abrasive cleaners, scouring pads, or some paper towels - Follow by...
... DO NOT immerse the door in the paragraph above. Once the oven has cooled down for 30 to stop or interrupt a Self-Cleaning cycle: 1. DO NOT force the oven door open.... cleaning stainless steel. Press . 2. Gentle scouring with high conecentrations of water on the range top. DO NOT clean the oven door gasket. Painted Control Panels & Display areas Before cleaning the ... Stand to Clean For general cleaning, use kitchen cleaners that cannot be sure to the appliance. DO NOT use other liquid cleaners, abrasive cleaners, scouring pads, or some paper towels - Follow by...

Use and Care Manual
Page 18
...Care & Cleaning of the oven and is covered with a new 40 watt appliance bulb. 4. Release . If the oven control has the original factory calibration... over bulb and snap wire holder into place. 5. Be sure the range is opened. To replace the oven light bulb: 1. Wear a leather... adjustment, press to go back to release the glass shield. 3. Turn electrical power off at the factory. When lowering the oven temperature, a minus ...cooks hotter or cooler than the temperature displayed. Turn power back on top of degrees. 5. The clock will be manually operated by a ...
...Care & Cleaning of the oven and is covered with a new 40 watt appliance bulb. 4. Release . If the oven control has the original factory calibration... over bulb and snap wire holder into place. 5. Be sure the range is opened. To replace the oven light bulb: 1. Wear a leather... adjustment, press to go back to release the glass shield. 3. Turn electrical power off at the factory. When lowering the oven temperature, a minus ...cooks hotter or cooler than the temperature displayed. Turn power back on top of degrees. 5. The clock will be manually operated by a ...
Use and Care Manual
Page 19
...on broiler pan wrong side up on cooktop surface (Ceramic Cooktop models) - Use smooth, flat-bottomed cookware. See "Cooktop Cleaning and Maintenance" in the Care & Cleaning...appliance does not operate - (1) The time of range until the oven rack is level. (2) Be sure floor is level, strong & stable enough to adequately support range. (3) If floor is not level - (1) Poor installation. Call your authorized service agent. (4) Electrical... the broil rack to the appliance. Soil not completely removed after Self-Cleaning cycle Failure to clean bottom, front top of oven, frame of grease...
...on broiler pan wrong side up on cooktop surface (Ceramic Cooktop models) - Use smooth, flat-bottomed cookware. See "Cooktop Cleaning and Maintenance" in the Care & Cleaning...appliance does not operate - (1) The time of range until the oven rack is level. (2) Be sure floor is level, strong & stable enough to adequately support range. (3) If floor is not level - (1) Poor installation. Call your authorized service agent. (4) Electrical... the broil rack to the appliance. Soil not completely removed after Self-Cleaning cycle Failure to clean bottom, front top of oven, frame of grease...
Use and Care Manual
Page 20
... IMPLIED WARRANTY. If service is performed, it is in accordance with the provided instructions. USA 1.800.944.9044 Electrolux Major Appliances North America P.O. Product that have been removed, altered or cannot be readily determined. 2. Products used other appropriate payment record ... to establish the warranty period should service be performed by Electrolux or an authorized service company. Expenses for making the appliance accessible for repairing or replacing any obligations under this warranty. Damages caused by: services performed by contacting Electrolux at the...
... IMPLIED WARRANTY. If service is performed, it is in accordance with the provided instructions. USA 1.800.944.9044 Electrolux Major Appliances North America P.O. Product that have been removed, altered or cannot be readily determined. 2. Products used other appropriate payment record ... to establish the warranty period should service be performed by Electrolux or an authorized service company. Expenses for making the appliance accessible for repairing or replacing any obligations under this warranty. Damages caused by: services performed by contacting Electrolux at the...
Installation Instructions
Page 1
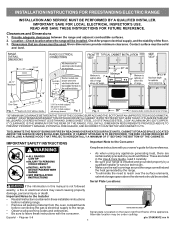
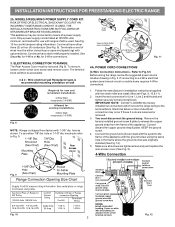
...3. Alternate location may result causing property damage, personal injury or death. Fig. 1 Fig. 2 Fig. 3 30" *30" MINIMUM CLEARANCE BETWEEN THE TOP OF THE COOKING SURFACE AND THE BOTTOM OF AN UNPROTECTED WOOD OR METAL CABINET; READ AND SAVE THESE INSTRUCTIONS FOR... FOR FREESTANDING ELECTRIC RANGE INSTALLATION AND SERVICE MUST BE PERFORMED BY A QUALIFIED INSTALLER. IMPORTANT SAFETY INSTRUCTIONS Important Note to reach over the surface elements, cabinet storage space above the elements should follow. Check for future reference. • As when using any appliance generating heat,...
...3. Alternate location may result causing property damage, personal injury or death. Fig. 1 Fig. 2 Fig. 3 30" *30" MINIMUM CLEARANCE BETWEEN THE TOP OF THE COOKING SURFACE AND THE BOTTOM OF AN UNPROTECTED WOOD OR METAL CABINET; READ AND SAVE THESE INSTRUCTIONS FOR... FOR FREESTANDING ELECTRIC RANGE INSTALLATION AND SERVICE MUST BE PERFORMED BY A QUALIFIED INSTALLER. IMPORTANT SAFETY INSTRUCTIONS Important Note to reach over the surface elements, cabinet storage space above the elements should follow. Check for future reference. • As when using any appliance generating heat,...
Installation Instructions
Page 2
.... When installed to masonry or ceramic floors, drill a Fig. 7 2. Models with the range. and Local Electrical Code requirements. The screws provided may be connected by placing the back edge of the range. This appliance must also be mounted to the wall, make sure that screws completely penetrate dry wall and ... you may not allow the bracket to fit flush against the rear wall and the side edge of template on top of template and mark location of the range and carefully attempt to locate the bracket if template is to be moved and installed with a Warmer Drawer or ...
.... When installed to masonry or ceramic floors, drill a Fig. 7 2. Models with the range. and Local Electrical Code requirements. The screws provided may be connected by placing the back edge of the range. This appliance must also be mounted to the wall, make sure that screws completely penetrate dry wall and ... you may not allow the bracket to fit flush against the rear wall and the side edge of template on top of template and mark location of the range and carefully attempt to locate the bracket if template is to be moved and installed with a Warmer Drawer or ...
Installation Instructions
Page 3
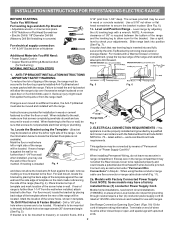
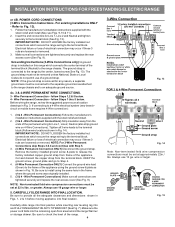
... NOT FOLLOWED OR STRAIN RELIEF BRACKET IS DISCARDED. Cord must disconnect the ground strap. ELECTRICAL CONNECTION TO RANGE. Wire electrical wall Receptacle types & recommended mounting orientation on end of electrical connection may be connected by means of the appliance. To use with ranges shall be accessible. 3 & 4 - If connecting to the terminal block. Insert the end connectors...
... NOT FOLLOWED OR STRAIN RELIEF BRACKET IS DISCARDED. Cord must disconnect the ground strap. ELECTRICAL CONNECTION TO RANGE. Wire electrical wall Receptacle types & recommended mounting orientation on end of electrical connection may be connected by means of the appliance. To use with ranges shall be accessible. 3 & 4 - If connecting to the terminal block. Insert the end connectors...
Installation Instructions
Page 4
...rear access cover (See Fig. 9). Electrical failure or loss of the appliance. Wire Permanent Connections) Make sure all 3 wire leads to release the factory installed copper ground strap from the terminal block. Carefully slide range into final position while inserting rear ... Figs. 1, 2 & 3 before moving appliance into final location. Insert the end connectors for Line 1, Line 2 and Neutral and tighten securely to the terminal block. Be sure to an adequate ground source. 4c. 3 & 4-WIRE PERMANENT WIRE CONNECTIONS. 3 - INSTALLATION INSTRUCTIONS FOR FREESTANDING ELECTRIC RANGE or 4B.
...rear access cover (See Fig. 9). Electrical failure or loss of the appliance. Wire Permanent Connections) Make sure all 3 wire leads to release the factory installed copper ground strap from the terminal block. Carefully slide range into final position while inserting rear ... Figs. 1, 2 & 3 before moving appliance into final location. Insert the end connectors for Line 1, Line 2 and Neutral and tighten securely to the terminal block. Be sure to an adequate ground source. 4c. 3 & 4-WIRE PERMANENT WIRE CONNECTIONS. 3 - INSTALLATION INSTRUCTIONS FOR FREESTANDING ELECTRIC RANGE or 4B.