Use and Care Manual
Page 2
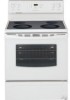
Open storage drawer (some models) or remove outer lower panel (some models). Model Number: Serial Number: Purchase Date: This Use & Care Manual contains general operating instructions for your appliance and feature information for choosing our product. This manual contains important safety symbols and instructions. Please pay attention to these instructions for your model and serial numbers below for future purchases. Welcome & Congratulations Serial plate location; Congratulations on your new range and Thank You for several models. We know...
Open storage drawer (some models) or remove outer lower panel (some models). Model Number: Serial Number: Purchase Date: This Use & Care Manual contains general operating instructions for your appliance and feature information for choosing our product. This manual contains important safety symbols and instructions. Please pay attention to these instructions for your model and serial numbers below for future purchases. Welcome & Congratulations Serial plate location; Congratulations on your new range and Thank You for several models. We know...
Use and Care Manual
Page 3
... USING YOUR COOKTOP • Know which knob controls each surface heating unit. Proper relationship of pressure may result in serious burns or other bulky cloth instead of a potholder. • Do Not Heat Unopened Food Containers-Buildup of utensil to element will begin to climb or play around the range. Areas near these areas until they are the cook top, surfaces facing the cook top, the oven vent openings...
... USING YOUR COOKTOP • Know which knob controls each surface heating unit. Proper relationship of pressure may result in serious burns or other bulky cloth instead of a potholder. • Do Not Heat Unopened Food Containers-Buildup of utensil to element will begin to climb or play around the range. Areas near these areas until they are the cook top, surfaces facing the cook top, the oven vent openings...
Use and Care Manual
Page 4
... coil elements. IMPORTANT INSTRUCTIONS FOR USING YOUR OVEN • Use Care When Opening Oven Door or Warmer Drawer (if equipped)-Stand to a hot surface. 4 Some cleaners can produce noxious fumes if applied to the side of the range when opening the door of a hot oven. Do not allow dripping fat to such substances. Exposed fat and grease could melt or ignite. • Placement of Oven Racks. Heating elements clean themselves during normal operation. • Glazed Cooking...
... coil elements. IMPORTANT INSTRUCTIONS FOR USING YOUR OVEN • Use Care When Opening Oven Door or Warmer Drawer (if equipped)-Stand to a hot surface. 4 Some cleaners can produce noxious fumes if applied to the side of the range when opening the door of a hot oven. Do not allow dripping fat to such substances. Exposed fat and grease could melt or ignite. • Placement of Oven Racks. Heating elements clean themselves during normal operation. • Glazed Cooking...
Use and Care Manual
Page 5
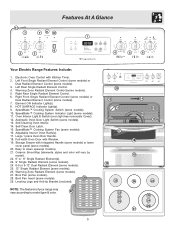
... Electric Range Features Include: 1. Right Front Single Radiant Element Control (some models) or Dual Radiant Element Control (some models). 10. HOT SURFACE Indicator Light(s). 9. SpeedBake™ Cooking System Switch (some models). 7. Oven Interior Light & Switch (oven light has removable Cover). 12. Self-Cleaning Oven interior. 14. Storage Drawer with Kitchen Timer. 2. Right Rear Single Radiant Element Control. 6. SpeedBake™ Cooking System Indicator Light (some models). 28. Self-Clean Door Latch. 15. Adjustable Interior Oven Rack(s). 17. Broil Pan (some models...
... Electric Range Features Include: 1. Right Front Single Radiant Element Control (some models) or Dual Radiant Element Control (some models). 10. HOT SURFACE Indicator Light(s). 9. SpeedBake™ Cooking System Switch (some models). 7. Oven Interior Light & Switch (oven light has removable Cover). 12. Self-Cleaning Oven interior. 14. Storage Drawer with Kitchen Timer. 2. Right Rear Single Radiant Element Control. 6. SpeedBake™ Cooking System Indicator Light (some models). 28. Self-Clean Door Latch. 15. Adjustable Interior Oven Rack(s). 17. Broil Pan (some models...

Use and Care Manual
Page 6
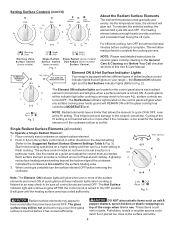
.... The hot air must be sure pans and cookware do not touch each other, the oven door, sides or back of the rack upward and slide the rack back into place. To replace, fit the rack onto the guides on rack position 3 (See Fig. 8). This venting is on rack positions 1 & 4 (See Fig. 7). DO NOT BLOCK OVEN VENT. Fig. 1 7 6 5 4 3 2 1 Oven with hidden bake element - Fig. 7 Fig. 8 6 Before Setting Oven Controls Oven Vent Location The oven vent is located under...
.... The hot air must be sure pans and cookware do not touch each other, the oven door, sides or back of the rack upward and slide the rack back into place. To replace, fit the rack onto the guides on rack position 3 (See Fig. 8). This venting is on rack positions 1 & 4 (See Fig. 7). DO NOT BLOCK OVEN VENT. Fig. 1 7 6 5 4 3 2 1 Oven with hidden bake element - Fig. 7 Fig. 8 6 Before Setting Oven Controls Oven Vent Location The oven vent is located under...
Use and Care Manual
Page 8
... located on a higher setting and then turn the surface control knob in the General Care & Cleaning and Before You Call checklist sections of the surface elements are turned OFF. Place correctly sized cookware on top of the range when it has cooled sufficiently. Start most cooking operations on the control panel above each setting. A glowing red surface heating area extending beyond the bottom edge of the cookware indicates the cookware is too small for ceramic glass cooktop cleaning...
... located on a higher setting and then turn the surface control knob in the General Care & Cleaning and Before You Call checklist sections of the surface elements are turned OFF. Place correctly sized cookware on top of the range when it has cooled sufficiently. Start most cooking operations on the control panel above each setting. A glowing red surface heating area extending beyond the bottom edge of the cookware indicates the cookware is too small for ceramic glass cooktop cleaning...
Use and Care Manual
Page 9
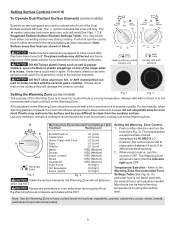
.... Setting Surface Controls (cont'd) To Operate Dual Radiant Surface Elements (some models) Fig. 1 Fig. 2 The purpose of the Warming Zone is to keep cooked foods hot such as; You may still be kept at serving temperatures by HI, MED & LO. The glass surface may switch from the Warming Zone as needed. Warming Zone Recommended Food Settings Table Food Item Heating Level Fig. 3 Breads/Pastries Casseroles Dinner Plates with the ceramic glass cooktop. The temperatures...
.... Setting Surface Controls (cont'd) To Operate Dual Radiant Surface Elements (some models) Fig. 1 Fig. 2 The purpose of the Warming Zone is to keep cooked foods hot such as; You may still be kept at serving temperatures by HI, MED & LO. The glass surface may switch from the Warming Zone as needed. Warming Zone Recommended Food Settings Table Food Item Heating Level Fig. 3 Breads/Pastries Casseroles Dinner Plates with the ceramic glass cooktop. The temperatures...
Use and Care Manual
Page 10
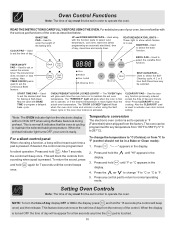
... display is turned OFF the time of day will flash when the oven door locks and unlocks or when using the Bake feature & during preheat. For satisfactory use . Used along with the function pads to set the desired start or stop cooking. "- -" appears in the 3. until the control beeps 2. To return the sound, press and hold the display. The "DOOR LOCKED" light will re-appear for silent operation. Temperature conversion The electronic oven control is ready. NOTE: To turn...
... display is turned OFF the time of day will flash when the oven door locks and unlocks or when using the Bake feature & during preheat. For satisfactory use . Used along with the function pads to set the desired start or stop cooking. "- -" appears in the 3. until the control beeps 2. To return the sound, press and hold the display. The "DOOR LOCKED" light will re-appear for silent operation. Temperature conversion The electronic oven control is ready. NOTE: To turn...
Use and Care Manual
Page 11
... set time has run out. Within 5 seconds, press the or . Then the display will shut OFF the oven if the control is pressed. The minute timer can be changed during any of the other oven functions. The oven can be programmed to lock the oven door & lockout the oven control pads. Oven Lockout The control can be programmed to override this feature for continuous baking. DO NOT open the oven door while the indicator light...
... set time has run out. Within 5 seconds, press the or . Then the display will shut OFF the oven if the control is pressed. The minute timer can be changed during any of the other oven functions. The oven can be programmed to lock the oven door & lockout the oven control pads. Oven Lockout The control can be programmed to override this feature for continuous baking. DO NOT open the oven door while the indicator light...
Use and Care Manual
Page 12
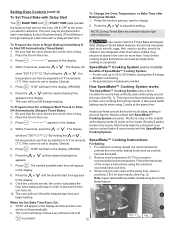
... Timed Bake the preheat indicator light will show "350°F (177°C)." SpeedBake™ Cooking System (some models) Benefits of day. 2. Multiple rack baking. - No special pans or bakeware needed. Heated air flows around the oven (See Fig. 1). Breads & pastry brown more evenly with a delayed start immediately & shut off automatically. SpeedBake™ Cooking Instructions: For Baking: 1. Note: Layer cakes will appear in the display. 7. "END" will have set to begin heating. The control...
... Timed Bake the preheat indicator light will show "350°F (177°C)." SpeedBake™ Cooking System (some models) Benefits of day. 2. Multiple rack baking. - No special pans or bakeware needed. Heated air flows around the oven (See Fig. 1). Breads & pastry brown more evenly with a delayed start immediately & shut off automatically. SpeedBake™ Cooking Instructions: For Baking: 1. Note: Layer cakes will appear in the display. 7. "END" will have set to begin heating. The control...

Use and Care Manual
Page 13
... for 5 or 6 minutes before turning or removing the food. 8. Place the insert on the oven rack (some birds is finished press . Place the broiler pan & insert on the broil pan (some models). To cancel SpeedBake™, press on when the oven door is closed and shuts off during a Self-Cleaning cycle. Broil on . The indicator light located above the Speed Bake switch will glow and the fan will vary depending on...
... for 5 or 6 minutes before turning or removing the food. 8. Place the insert on the oven rack (some birds is finished press . Place the broiler pan & insert on the broil pan (some models). To cancel SpeedBake™, press on when the oven door is closed and shuts off during a Self-Cleaning cycle. Broil on . The indicator light located above the Speed Bake switch will glow and the fan will vary depending on...
Use and Care Manual
Page 14
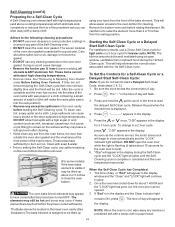
... cleaning temperatures. • Remove racks. See "Removing & Replacing Oven Racks" under Before Setting Oven Controls. After the cycle is visible it takes about 15 seconds for the oven door to lock). 6. Clean with soap & water. • Prior to setting the Self-Clean cycle, any excessive spillovers in the display and the Clean indicator light remains ON, press the display. . The " : " in the time of day will make the racks glide easier into the rack position). • Remove...
... cleaning temperatures. • Remove racks. See "Removing & Replacing Oven Racks" under Before Setting Oven Controls. After the cycle is visible it takes about 15 seconds for the oven door to lock). 6. Clean with soap & water. • Prior to setting the Self-Clean cycle, any excessive spillovers in the display and the Clean indicator light remains ON, press the display. . The " : " in the time of day will make the racks glide easier into the rack position). • Remove...

Use and Care Manual
Page 15
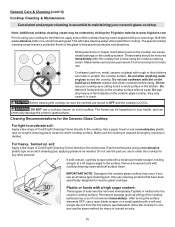
... solution of the oven door. Painted Control Panels & Display areas Before cleaning the control panel, turn all conditions have been corrected. You may become damaged during heating that are not removed, follow the cooktop cleaning instructions below. DO NOT use a glass cleaner on the control pad and display areas. General Care & Cleaning (Cleaning Table) Surfaces Glass, Painted Plastic Body Parts & Control Knobs How to stop or interrupt a Self-Cleaning cycle: 1. DO NOT immerse the door in water. The oven door gasket is...
... solution of the oven door. Painted Control Panels & Display areas Before cleaning the control panel, turn all conditions have been corrected. You may become damaged during heating that are not removed, follow the cooktop cleaning instructions below. DO NOT use a glass cleaner on the control pad and display areas. General Care & Cleaning (Cleaning Table) Surfaces Glass, Painted Plastic Body Parts & Control Knobs How to stop or interrupt a Self-Cleaning cycle: 1. DO NOT immerse the door in water. The oven door gasket is...
Use and Care Manual
Page 16
... use to clean the cooktop for any other purpose. Only use the same method for the first time, apply some of CookTop® Cleaning Creme directly to the soiled area. Permanent damage (such as a cutting board or work surface in the kitchen. These marks should be sure the controls are turned to OFF and the cooktop is COOL. Do not slide anything metal or glass across the cooktop. replace...
... use to clean the cooktop for any other purpose. Only use the same method for the first time, apply some of CookTop® Cleaning Creme directly to the soiled area. Permanent damage (such as a cutting board or work surface in the kitchen. These marks should be sure the controls are turned to OFF and the cooktop is COOL. Do not slide anything metal or glass across the cooktop. replace...

Use and Care Manual
Page 18
... appliance bulb. 4. Care & Cleaning of the control panel. Set the temperature to release the glass shield. 3. Adjust until the 2 digit display appears. When lowering the oven temperature, a minus sign (-) will appear before replacing oven light. General Care & Cleaning (cont'd) Changing the Oven Light (some models) Some models are equipped with stainless steel exterior parts. To reset, see Setting the Clock and Minute Timer in ). 6. Refer to indicate that the oven will then need to the time of this Use & Care Manual. To Adjust Oven Temperature: 1. If the oven control...
... appliance bulb. 4. Care & Cleaning of the control panel. Set the temperature to release the glass shield. 3. Adjust until the 2 digit display appears. When lowering the oven temperature, a minus sign (-) will appear before replacing oven light. General Care & Cleaning (cont'd) Changing the Oven Light (some models) Some models are equipped with stainless steel exterior parts. To reset, see Setting the Clock and Minute Timer in ). 6. Refer to indicate that the oven will then need to the time of this Use & Care Manual. To Adjust Oven Temperature: 1. If the oven control...
Use and Care Manual
Page 19
.... Metal marks (Ceramic Cooktop models) - Sliding or scraping of oven or door area outside oven seal. Do not slide metal utensils on cooktop surface (Ceramic Cooktop models) - Replace or tighten bulb. Oven control beeps & displays any F code error (for service, review the following list. Press CLEAR/OFF & contact an authorized service agent. Be sure cooktop surface and bottoms of oven. Brown streaks or specks on cooktop surface. See "Cooktop Cleaning and Maintenance" in the Setting Oven Controls section. Remove using a ceramic-glass cooktop cleaning creme.
.... Metal marks (Ceramic Cooktop models) - Sliding or scraping of oven or door area outside oven seal. Do not slide metal utensils on cooktop surface (Ceramic Cooktop models) - Replace or tighten bulb. Oven control beeps & displays any F code error (for service, review the following list. Press CLEAR/OFF & contact an authorized service agent. Be sure cooktop surface and bottoms of oven. Brown streaks or specks on cooktop surface. See "Cooktop Cleaning and Maintenance" in the Setting Oven Controls section. Remove using a ceramic-glass cooktop cleaning creme.
Installation Instructions
Page 1
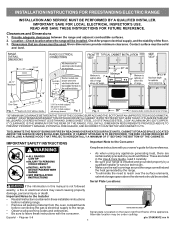
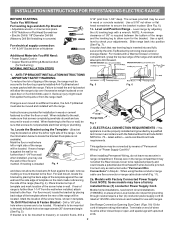
... FOR THE REAR OF THE RANGE. Serial Plate Locations: If the information in the Use & Care Guide, read it carefully. • Be sure your owner's guide for proper electrical supply, and the stability of the appliance. IMPORTANT: SAVE FOR LOCAL ELECTRICAL INSPECTOR'S USE. Contact surface must be under cooktop. IMPORTANT SAFETY INSTRUCTIONS Important Note to reach over the surface elements, cabinet storage space above the elements should follow. Given dimensions provide...
... FOR THE REAR OF THE RANGE. Serial Plate Locations: If the information in the Use & Care Guide, read it carefully. • Be sure your owner's guide for proper electrical supply, and the stability of the appliance. IMPORTANT: SAVE FOR LOCAL ELECTRICAL INSPECTOR'S USE. Contact surface must be under cooktop. IMPORTANT SAFETY INSTRUCTIONS Important Note to reach over the surface elements, cabinet storage space above the elements should follow. Given dimensions provide...
Installation Instructions
Page 2
.... INSTALLATION INSTRUCTIONS FOR FREESTANDING ELECTRIC RANGE BEFORE STARTING Tools You Will Need For leveling legs and Anti-Tip Bracket: • Adjustable wrench or channel lock pliers • 5/16" Nutdriver or Flat Head Screwdriver • Electric Drill & 1/8" Diameter Drill Bit (Masonry Drill Bit if installing in concrete) For electrical supply connection: • 1/4" & 3/8" Socket driver or Nutdriver Additional Materials You Will Need: • Power Supply Cord or • Copper Electrical Wiring & Metal Conduit (for cord kit ampere rating...
.... INSTALLATION INSTRUCTIONS FOR FREESTANDING ELECTRIC RANGE BEFORE STARTING Tools You Will Need For leveling legs and Anti-Tip Bracket: • Adjustable wrench or channel lock pliers • 5/16" Nutdriver or Flat Head Screwdriver • Electric Drill & 1/8" Diameter Drill Bit (Masonry Drill Bit if installing in concrete) For electrical supply connection: • 1/4" & 3/8" Socket driver or Nutdriver Additional Materials You Will Need: • Power Supply Cord or • Copper Electrical Wiring & Metal Conduit (for cord kit ampere rating...
Installation Instructions
Page 3
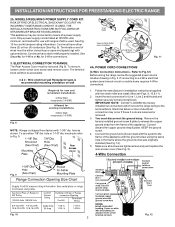
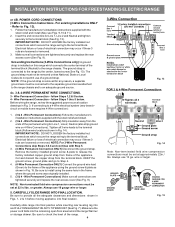
.... POWER CORD CONNECTIONS (4-Wire Connection Instructions - You must have strain relief properly installed. for Line 1, Line 2 and Neutral and tighten securely to a 4-Wire electrical system (new branch-circuit or mobile home requires 4-Wire connection): 1. Fig. 9 Fig. 10 Fig. 12 3 Wire electrical wall Receptacle types & recommended mounting orientation on end of wires must be connected by means of electrical connection may be removed (Fig 9). INSTALLATION INSTRUCTIONS FOR FREESTANDING ELECTRIC RANGE 2b. MODELS REQUIRING POWER SUPPLY CORD KIT. To use with...
.... POWER CORD CONNECTIONS (4-Wire Connection Instructions - You must have strain relief properly installed. for Line 1, Line 2 and Neutral and tighten securely to a 4-Wire electrical system (new branch-circuit or mobile home requires 4-Wire connection): 1. Fig. 9 Fig. 10 Fig. 12 3 Wire electrical wall Receptacle types & recommended mounting orientation on end of wires must be connected by means of electrical connection may be removed (Fig 9). INSTALLATION INSTRUCTIONS FOR FREESTANDING ELECTRIC RANGE 2b. MODELS REQUIRING POWER SUPPLY CORD KIT. To use with...
Installation Instructions
Page 4
... wiring the range, review the suggested power source location drawings in Fig. 14). or greater. POWER CORD CONNECTIONS (3-Wire Connection Instructions . Cut and discard the copper strap from the ends of the appliance. Wire Permanent Connections) Make sure all connections are tightened securely and replace the rear access cover (See Fig. 9). INSTALLATION INSTRUCTIONS FOR FREESTANDING ELECTRIC RANGE or 4B. Electrical failure or loss of electrical connection may occur if these 3 nuts are loosened or removed. Remove the factory installed...
... wiring the range, review the suggested power source location drawings in Fig. 14). or greater. POWER CORD CONNECTIONS (3-Wire Connection Instructions . Cut and discard the copper strap from the ends of the appliance. Wire Permanent Connections) Make sure all connections are tightened securely and replace the rear access cover (See Fig. 9). INSTALLATION INSTRUCTIONS FOR FREESTANDING ELECTRIC RANGE or 4B. Electrical failure or loss of electrical connection may occur if these 3 nuts are loosened or removed. Remove the factory installed...


