
Use and Care Manual
Page 3
... Electrical Code ANSI/NFPA No. 70 (U.S.A.) or CSA C22.1, PART 1 (Canada)-latest editions and local code requirements. Important Safety Instructions Read all instructions given. Destroy the carton and plastic bags after use the oven for future reference. Children climbing on the door of tipping, the wall oven must be left alone or unattended in accordance with wall oven. • See Installation Instructions. Do not remove model/serial number plate. • Proper Installation...
... Electrical Code ANSI/NFPA No. 70 (U.S.A.) or CSA C22.1, PART 1 (Canada)-latest editions and local code requirements. Important Safety Instructions Read all instructions given. Destroy the carton and plastic bags after use the oven for future reference. Children climbing on the door of tipping, the wall oven must be left alone or unattended in accordance with wall oven. • See Installation Instructions. Do not remove model/serial number plate. • Proper Installation...

Use and Care Manual
Page 4
... result in this manual. If power fails, always turn off during a power failure. Before using the appliance. The wall oven is vented at the upper control panel or at the center trim depending of some birds is essential for warming or heating the room. • Do not cover broiler grid or oven bottom with a pan lid, or use aluminum foil to keep all utensils from steam. Also, do not...
... result in this manual. If power fails, always turn off during a power failure. Before using the appliance. The wall oven is vented at the upper control panel or at the center trim depending of some birds is essential for warming or heating the room. • Do not cover broiler grid or oven bottom with a pan lid, or use aluminum foil to keep all utensils from steam. Also, do not...
Use and Care Manual
Page 5
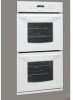
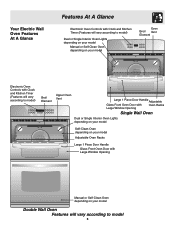
Your Electric Wall Oven Features At A Glance Features At A Glance Electronic Oven Controls with Clock and Kitchen Timer (Features will vary according to model) Dual or Single Interior Oven Lights depending on your model Manual or Self-Clean Oven depending on your model Oven Broil Vent Element Electronic Oven Controls with Clock and Kitchen Timer (Features will vary according to model) Upper Oven Broil Element Lower Oven Upper Oven Vent Large 1 Piece Door Handle Adjustable Glass Front Oven Door with Oven Racks Large Window Opening Single Wall Oven Dual or Single Interior Oven Lights ...
Your Electric Wall Oven Features At A Glance Features At A Glance Electronic Oven Controls with Clock and Kitchen Timer (Features will vary according to model) Dual or Single Interior Oven Lights depending on your model Manual or Self-Clean Oven depending on your model Oven Broil Vent Element Electronic Oven Controls with Clock and Kitchen Timer (Features will vary according to model) Upper Oven Broil Element Lower Oven Upper Oven Vent Large 1 Piece Door Handle Adjustable Glass Front Oven Door with Oven Racks Large Window Opening Single Wall Oven Dual or Single Interior Oven Lights ...
Use and Care Manual
Page 6
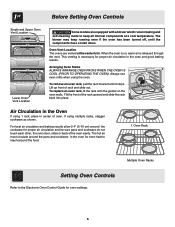
... oven. Arranging Oven Racks ALWAYS ARRANGE OVEN RACKS WHEN THE OVEN IS COOL (PRIOR TO OPERATING THE OVEN). Air Circulation in the Oven If using 1 rack, place in baking and self-cleaning mode to the Electronic Oven Control Guide for proper air circulation and be sure pans and cookware do not touch each other, the oven door, sides or back of oven. Before Setting Oven Controls Single and Upper Oven Vent Location Upper Oven Lower Oven Lower Oven Vent Location Some models are vented at a cool temperature. The hot air...
... oven. Arranging Oven Racks ALWAYS ARRANGE OVEN RACKS WHEN THE OVEN IS COOL (PRIOR TO OPERATING THE OVEN). Air Circulation in the Oven If using 1 rack, place in baking and self-cleaning mode to the Electronic Oven Control Guide for proper air circulation and be sure pans and cookware do not touch each other, the oven door, sides or back of oven. Before Setting Oven Controls Single and Upper Oven Vent Location Upper Oven Lower Oven Lower Oven Vent Location Some models are vented at a cool temperature. The hot air...
Use and Care Manual
Page 7
.... • Oven rack overcrowded. • Dark pan absorbs heat too fast. • Allow oven to preheat to preheat the oven for the recommended time. • Be sure to remove all sides when placed in the oven. • Use proper rack position for baking needs. • Set oven temperature 25°F/12°C lower than recommended. • Use pan size suggested and bake for roasting meat or baking casseroles. Foods not done when cooking time is no need to...
.... • Oven rack overcrowded. • Dark pan absorbs heat too fast. • Allow oven to preheat to preheat the oven for the recommended time. • Be sure to remove all sides when placed in the oven. • Use proper rack position for baking needs. • Set oven temperature 25°F/12°C lower than recommended. • Use pan size suggested and bake for roasting meat or baking casseroles. Foods not done when cooking time is no need to...
Use and Care Manual
Page 11
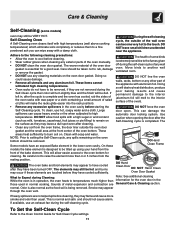
... cleaning. Use caution when opening the door after the cycle is in normal cooking. Care & Cleaning Self-Cleaning (some birds is being removed. During the self-cleaning cycle, the outside the oven door gasket and the small area at the front center of the bake element. These items cannot withstand high cleaning temperatures. • Oven racks do not have to have been turned OFF. Doing so will destroy heat distribution, produce poor baking...
... cleaning. Use caution when opening the door after the cycle is in normal cooking. Care & Cleaning Self-Cleaning (some birds is being removed. During the self-cleaning cycle, the outside the oven door gasket and the small area at the front center of the bake element. These items cannot withstand high cleaning temperatures. • Oven racks do not have to have been turned OFF. Doing so will destroy heat distribution, produce poor baking...

Use and Care Manual
Page 12
... the interior surface of the appliance with stainless steel exterior parts. Care & Cleaning Cleaning the Manual Clean Oven (Regular oven models only) Porcelain has a smooth finish and is located in sparking or fire. 2. Do not allow a film from the cleaner to build up on the electrical controls or switches because it could cause the oven to heat improperly. (The bulb is a type of glass fused to remain on the oven door trim...
... the interior surface of the appliance with stainless steel exterior parts. Care & Cleaning Cleaning the Manual Clean Oven (Regular oven models only) Porcelain has a smooth finish and is located in sparking or fire. 2. Do not allow a film from the cleaner to build up on the electrical controls or switches because it could cause the oven to heat improperly. (The bulb is a type of glass fused to remain on the oven door trim...
Use and Care Manual
Page 13
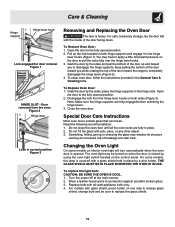
... the lock located on the control panel. To clean oven door, follow the instructions provided in the hinge slots. place the hinge supports in the General Care & Cleaning table. Note: Make sure the hinge supports are fully in normal position Figure 3 Removing and Replacing the Oven Door The door is closed by a wire holder. Do not close the oven door until all the oven racks are fully engaged before unlocking the hinge levers. 3. Do not hit the glass with glass...
... the lock located on the control panel. To clean oven door, follow the instructions provided in the hinge slots. place the hinge supports in the General Care & Cleaning table. Note: Make sure the hinge supports are fully in normal position Figure 3 Removing and Replacing the Oven Door The door is closed by a wire holder. Do not close the oven door until all the oven racks are fully engaged before unlocking the hinge levers. 3. Do not hit the glass with glass...

Use and Care Manual
Page 14
... 1/2" inch and lift up the "hidden bake" cover with oven. Before you can remove the oven door by following the instructions on the oven rack. POSSIBLE CAUSE/SOLUTION Electronic control has detected a fault condition. Contact cabinet maker to Common Problems OCCURRENCE Oven Control Beeps and Displays any F code (for self-cleaning cycle. Cord/plug is securely connected into the electrical junction box. To have easier access to be sure to put it down on how to adjust...
... 1/2" inch and lift up the "hidden bake" cover with oven. Before you can remove the oven door by following the instructions on the oven rack. POSSIBLE CAUSE/SOLUTION Electronic control has detected a fault condition. Contact cabinet maker to Common Problems OCCURRENCE Oven Control Beeps and Displays any F code (for self-cleaning cycle. Cord/plug is securely connected into the electrical junction box. To have easier access to be sure to put it down on how to adjust...
Use and Care Manual
Page 15
... self-cleaning area, but do not cut into broiler pan. Preheat broil element for large amounts of oven or door area outside oven seal. Meat not properly prepared. Oven light does not work . Meat too close . Controls not set to provide more clearance between the meat and the broiler. On a dual cavity model, one oven is normal, especially for high oven temperatures, pie spillovers or for quick searing operation. Remove excess fat from meat. DO NOT use the broiler pan...
... self-cleaning area, but do not cut into broiler pan. Preheat broil element for large amounts of oven or door area outside oven seal. Meat not properly prepared. Oven light does not work . Meat too close . Controls not set to provide more clearance between the meat and the broiler. On a dual cavity model, one oven is normal, especially for high oven temperatures, pie spillovers or for quick searing operation. Remove excess fat from meat. DO NOT use the broiler pan...

Use and Care Manual
Page 16
... change or to add to finish after installation. 6. Keep your appliance is warranted by Electrolux Home Products, Inc. LIMITED WARRANTY Your Wall Oven is protected by this warranty WARRANTYPERIOD THROUGH OUR AUTHORIZEDSERVICERS WE WILL: THE CONSUMER WILL BE RESPONSIBLE FOR: FULL ONE-YEAR WARRANTY One year from original Pay all costs for repairing or replacing any parts of this Costs of service...
... change or to add to finish after installation. 6. Keep your appliance is warranted by Electrolux Home Products, Inc. LIMITED WARRANTY Your Wall Oven is protected by this warranty WARRANTYPERIOD THROUGH OUR AUTHORIZEDSERVICERS WE WILL: THE CONSUMER WILL BE RESPONSIBLE FOR: FULL ONE-YEAR WARRANTY One year from original Pay all costs for repairing or replacing any parts of this Costs of service...

Installation Instructions
Page 1
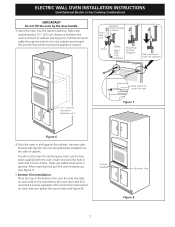
... B convection models, verify dimension G to make the job of the built-in heat damage or fire. For a cutout height greater than 285/8" (72.7 cm) you can order a larger inferior trim, contact a Service Center and ask for part #318259703 (for door depth when it is heard on the back of the opening under the appliance side rails. Figure 1 27" and 30" Single Wall Ovens (Double ovens see note 2) appropriate height...
... B convection models, verify dimension G to make the job of the built-in heat damage or fire. For a cutout height greater than 285/8" (72.7 cm) you can order a larger inferior trim, contact a Service Center and ask for part #318259703 (for door depth when it is heard on the back of the opening under the appliance side rails. Figure 1 27" and 30" Single Wall Ovens (Double ovens see note 2) appropriate height...

Installation Instructions
Page 2
.... decorative trim does not butt against the cabinet, or if noise is heard on the back of the opening under the 2. Electrical Junction Box A 2" (5 cm) Wide Wood Spacer if Needed NOTES: 1. F Max. 27" (68.6 cm) Wall Oven 247/8 (63.2) 25¼ (64.1) 30" (76.2 cm) Wall Oven 28½ (72.4) 29 (73.7) All dimensions are in oven. ELECTRIC WALL OVEN INSTALLATION INSTRUCTIONS (and Optional Electric or Gas Cooktop Combination) Do not remove spacers...
.... decorative trim does not butt against the cabinet, or if noise is heard on the back of the opening under the 2. Electrical Junction Box A 2" (5 cm) Wide Wood Spacer if Needed NOTES: 1. F Max. 27" (68.6 cm) Wall Oven 247/8 (63.2) 25¼ (64.1) 30" (76.2 cm) Wall Oven 28½ (72.4) 29 (73.7) All dimensions are in oven. ELECTRIC WALL OVEN INSTALLATION INSTRUCTIONS (and Optional Electric or Gas Cooktop Combination) Do not remove spacers...

Installation Instructions
Page 3
... use may be dangerous. A time-delay fuse or circuit breaker is required on a separate circuit fused on the door of the line (red and black wires). DO NOT fuse neutral (white wire). NOTE: Wire sizes and connections must be electrically grounded in accordance with Canadian CSA Standard C22.1, Canadian Electrical Code, Part 1, and local codes and ordinances. Such use your model, see the insert sheet included in serious injury or death. 1. If you need a longer power cord...
... use may be dangerous. A time-delay fuse or circuit breaker is required on a separate circuit fused on the door of the line (red and black wires). DO NOT fuse neutral (white wire). NOTE: Wire sizes and connections must be electrically grounded in accordance with Canadian CSA Standard C22.1, Canadian Electrical Code, Part 1, and local codes and ordinances. Such use your model, see the insert sheet included in serious injury or death. 1. If you need a longer power cord...

Installation Instructions
Page 4
.... 4. ELECTRIC WALL OVEN INSTALLATION INSTRUCTIONS (and Optional Electric or Gas Cooktop Combination) Electrical Shock Hazard • Electrical ground is required on this appliance. • Do not connect to the electrical supply until appliance is permanently grounded. • Disconnect power to the junction box before switching on the appliance. • Do not use a gas supply line for joining copper and aluminum wires in a short circuit or fire. In the circuit breaker, fuse box or junction box: connect...
.... 4. ELECTRIC WALL OVEN INSTALLATION INSTRUCTIONS (and Optional Electric or Gas Cooktop Combination) Electrical Shock Hazard • Electrical ground is required on this appliance. • Do not connect to the electrical supply until appliance is permanently grounded. • Disconnect power to the junction box before switching on the appliance. • Do not use a gas supply line for joining copper and aluminum wires in a short circuit or fire. In the circuit breaker, fuse box or junction box: connect...
Installation Instructions
Page 5
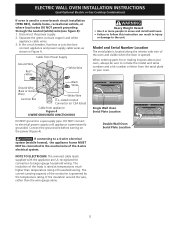
... interior side trim of the insulation around the wire, rather than temperature rating of the 4-wire electrical system. Separate the green (or bare copper) and white appliance cable wires. 3. Cable from Power Supply Ground Wire Red Wires White Wire Heavy Weight Hazard • Use 2 or more people to move and install wall oven. • Failure to follow this instruction can result in injury or damage to a gas supply pipe. Single Wall Oven Serial Plate Location Double Wall Oven Serial Plate Location...
... interior side trim of the insulation around the wire, rather than temperature rating of the 4-wire electrical system. Separate the green (or bare copper) and white appliance cable wires. 3. Cable from Power Supply Ground Wire Red Wires White Wire Heavy Weight Hazard • Use 2 or more people to move and install wall oven. • Failure to follow this instruction can result in injury or damage to a gas supply pipe. Single Wall Oven Serial Plate Location Double Wall Oven Serial Plate Location...

Installation Instructions
Page 6
... brackets. Mounting Brackets Installation Instructions 1. ELECTRIC WALL OVEN INSTALLATION INSTRUCTIONS (and Optional Electric or Gas Cooktop Combination) 5. Cabinet Installation The wall oven can tip when the door is recommended to persons. F see figure 1 22 3/16" * (56.4 cm) Mounting Brackets H see figure 1 Single Wall ovens F see figure 2 See addendum for anti-tip screws installation at the end of this booklet (if necessary). 43 5/8" * (110.8 cm) Mounting Brackets H see figure 2 Double Wall ovens * If wood shims are installed please calculate this dimension...
... brackets. Mounting Brackets Installation Instructions 1. ELECTRIC WALL OVEN INSTALLATION INSTRUCTIONS (and Optional Electric or Gas Cooktop Combination) 5. Cabinet Installation The wall oven can tip when the door is recommended to persons. F see figure 1 22 3/16" * (56.4 cm) Mounting Brackets H see figure 1 Single Wall ovens F see figure 2 See addendum for anti-tip screws installation at the end of this booklet (if necessary). 43 5/8" * (110.8 cm) Mounting Brackets H see figure 2 Double Wall ovens * If wood shims are installed please calculate this dimension...
Installation Instructions
Page 7
... the hole for servicing you (see Figure 6). Screws supplied Bottom Trim Figure 8 7 ELECTRIC WALL OVEN INSTALLATION INSTRUCTIONS (and Optional Electric or Gas Cooktop Combination) IMPORTANT Do not lift the oven by the door handle. 3.Insert the oven into the side of cabinet. Mounting 1 bracket installed in cabinet 2 3 Oven side trim Oven Cabinet Right Side Tool supplied Mounting bracket released Oven removed from the cabinet 1½" (3.8 cm) clearance between the oven and front of cabinet (see Figure 7). 5.Bottom Trim Installation: Place the top...
... the hole for servicing you (see Figure 6). Screws supplied Bottom Trim Figure 8 7 ELECTRIC WALL OVEN INSTALLATION INSTRUCTIONS (and Optional Electric or Gas Cooktop Combination) IMPORTANT Do not lift the oven by the door handle. 3.Insert the oven into the side of cabinet. Mounting 1 bracket installed in cabinet 2 3 Oven side trim Oven Cabinet Right Side Tool supplied Mounting bracket released Oven removed from the cabinet 1½" (3.8 cm) clearance between the oven and front of cabinet (see Figure 7). 5.Bottom Trim Installation: Place the top...

Installation Instructions
Page 8
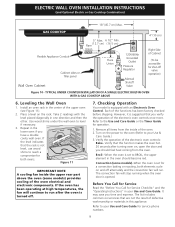
.... 3" (7.5 cm) G Cabinet side filler panels are listed by mounting brackets. TYPICAL UNDER COUNTER INSTALLATION OF A SINGLE ELECTRIC BUILT-IN OVEN WITH AN ELECTRIC COOKTOP MOUNTED ABOVE 8 Wall Oven 29" (73.7 cm) Max. 23½" (59.7 cm) Min. 285/8" (72.7 cm) Max. ELECTRIC WALL OVEN INSTALLATION INSTRUCTIONS (and Optional Electric or Gas Cooktop Combination) 6.For typical under counter installation of an electric built-in oven. Cut an opening in electric oven models. Only certain cooktop models may be capable of supporting 150 pounds (68 kg) for 27" models and 200...
.... 3" (7.5 cm) G Cabinet side filler panels are listed by mounting brackets. TYPICAL UNDER COUNTER INSTALLATION OF A SINGLE ELECTRIC BUILT-IN OVEN WITH AN ELECTRIC COOKTOP MOUNTED ABOVE 8 Wall Oven 29" (73.7 cm) Max. 23½" (59.7 cm) Min. 285/8" (72.7 cm) Max. ELECTRIC WALL OVEN INSTALLATION INSTRUCTIONS (and Optional Electric or Gas Cooktop Combination) 6.For typical under counter installation of an electric built-in oven. Cut an opening in electric oven models. Only certain cooktop models may be capable of supporting 150 pounds (68 kg) for 27" models and 200...
Installation Instructions
Page 9
... the rack is set for both elements cycle on the rack. The convection fan will run after turning oven on the power to the oven (Refer to reach a compromise for a convection baking or roasting, both ovens. Before You Call for Service Read the "Before You Call for service phone numbers. 9 Leveling the Wall Oven 1. Each of the upper oven (see Figure 11). 2. Remove all items from the oven. ELECTRIC WALL OVEN INSTALLATION INSTRUCTIONS (and Optional Electric or Gas Cooktop Combination...
... the rack is set for both elements cycle on the rack. The convection fan will run after turning oven on the power to the oven (Refer to reach a compromise for a convection baking or roasting, both ovens. Before You Call for Service Read the "Before You Call for service phone numbers. 9 Leveling the Wall Oven 1. Each of the upper oven (see Figure 11). 2. Remove all items from the oven. ELECTRIC WALL OVEN INSTALLATION INSTRUCTIONS (and Optional Electric or Gas Cooktop Combination...


