Owners Guide
Page 1
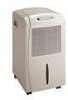
... PORTA NT: Keep a copy of this Owner's Guide. Contents 2 Warranty 3 Important Safety Instructions 3 Lo ca t i o n 3 How It Works 4 Operation & Features 5 Removing Collected W ater 5 Care and Cleaning 6 A void Service Checklist Operate dehumidifier only as instructed in this dehumidifier in space provided below. of your best interest to the Frigidaire Company. OWNER'S GUIDE READ AND SAVE THESE INSTRUCTIONS Record Model No. The date on the nameplate located behind the bucket. and Serial No.
... PORTA NT: Keep a copy of this Owner's Guide. Contents 2 Warranty 3 Important Safety Instructions 3 Lo ca t i o n 3 How It Works 4 Operation & Features 5 Removing Collected W ater 5 Care and Cleaning 6 A void Service Checklist Operate dehumidifier only as instructed in this dehumidifier in space provided below. of your best interest to the Frigidaire Company. OWNER'S GUIDE READ AND SAVE THESE INSTRUCTIONS Record Model No. The date on the nameplate located behind the bucket. and Serial No.
Owners Guide
Page 2
... in order: 1. DEHUMIDIFIER WARRANTY Your product is protected by this warranty Your appliance is warranted by Frigidaire Consumer Services or an authorized Frigidaire servicer. proves to change or add to any parts in workmanship or material, or for the items listed below apply. Costs for servicing, such as abuse, misuse, inadequate power supply or acts of service. Proper connection to products in ordinary household use of sale, delivery...
... in order: 1. DEHUMIDIFIER WARRANTY Your product is protected by this warranty Your appliance is warranted by Frigidaire Consumer Services or an authorized Frigidaire servicer. proves to change or add to any parts in workmanship or material, or for the items listed below apply. Costs for servicing, such as abuse, misuse, inadequate power supply or acts of service. Proper connection to products in ordinary household use of sale, delivery...
Owners Guide
Page 3
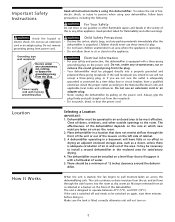
... outlet is switched off and needs to be most effective. Do not use an extension cord or an adapter plug. • Never unplug the dehumidifier by a time delay fuse or circuit breaker, have little or no effect in drying an adjacent enclosed storage area, such as dry, warm air. Place dehumidifier in the enclosed area for satisfactory drying. 4. Make sure the tank is...
... outlet is switched off and needs to be most effective. Do not use an extension cord or an adapter plug. • Never unplug the dehumidifier by a time delay fuse or circuit breaker, have little or no effect in drying an adjacent enclosed storage area, such as dry, warm air. Place dehumidifier in the enclosed area for satisfactory drying. 4. Make sure the tank is...
Owners Guide
Page 4
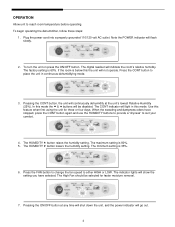
... place the unit in this feature when first using the unit for faster moisture removal. 52 5 Ñ 7. In this the unit will continuously dehumidify at any time will shut down the unit, and the power indicator will indicate the room's relative humidity. To begin operating the dehumidifier, follow these steps: 1. Press the FAN button to change the fan speed to reach room temperature before operating.
... place the unit in this feature when first using the unit for faster moisture removal. 52 5 Ñ 7. In this the unit will continuously dehumidify at any time will shut down the unit, and the power indicator will indicate the room's relative humidity. To begin operating the dehumidifier, follow these steps: 1. Press the FAN button to change the fan speed to reach room temperature before operating.
Owners Guide
Page 5
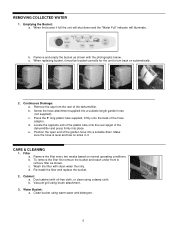
c. b. Screw the hose attachment supplied into a suitable drain. d. Filter a. Remove the filter every two weeks based on automatically. 2. Wash the filter with the photographs below. b. Vacuum grill using a damp cloth. Remove and empty the bucket as shown. e. To remove the filter first remove the bucket and reach under front to turn back on normal operating conditions. d. Dust cabinet with oil-free cloth, or clean using brush attachment. 3. Clean bucket using warm water and detergent. 5 c. c. Cabinet: a. Press...
c. b. Screw the hose attachment supplied into a suitable drain. d. Filter a. Remove the filter every two weeks based on automatically. 2. Wash the filter with the photographs below. b. Vacuum grill using a damp cloth. Remove and empty the bucket as shown. e. To remove the filter first remove the bucket and reach under front to turn back on normal operating conditions. d. Dust cabinet with oil-free cloth, or clean using brush attachment. 3. Clean bucket using warm water and detergent. 5 c. c. Cabinet: a. Press...

Owners Guide
Page 6
.... The dryness level you time and expense. Bucket not installed properly. Dehumidifier automatically turns off when selected amount of defective workman- Dehumidifier is blocked. Close all windows or doors to a lower setting. Air movement through dehumidifier is not turned on. Use brush attachment of the front grill. See " Care and Cleaning." Press the CONT button so the indicator light goes out. Press the down button to outside. Air flow to...
.... The dryness level you time and expense. Bucket not installed properly. Dehumidifier automatically turns off when selected amount of defective workman- Dehumidifier is blocked. Close all windows or doors to a lower setting. Air movement through dehumidifier is not turned on. Use brush attachment of the front grill. See " Care and Cleaning." Press the CONT button so the indicator light goes out. Press the down button to outside. Air flow to...


