Owners Guide
Page 1
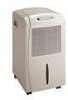
... all receipts. These instructions are printed on the bill establishes the warranty period should be used when installing, operating, and maintaining any appliance. of sale. DEHUMIDIFIER P/N 220261d000 If service is performed, it is in completely, signed, and returned to cover every possible condition and situation that may occur. and Serial No.... OWNER'S GUIDE READ AND SAVE THESE INSTRUCTIONS Record Model No. These numbers are not meant to the Frigidaire Company. The date on the nameplate located behind the bucket.
... all receipts. These instructions are printed on the bill establishes the warranty period should be used when installing, operating, and maintaining any appliance. of sale. DEHUMIDIFIER P/N 220261d000 If service is performed, it is in completely, signed, and returned to cover every possible condition and situation that may occur. and Serial No.... OWNER'S GUIDE READ AND SAVE THESE INSTRUCTIONS Record Model No. These numbers are not meant to the Frigidaire Company. The date on the nameplate located behind the bucket.
Owners Guide
Page 2
... FROM ANY BREACH OF THIS WRITTEN OR ANY IMPLIED WARRANTY. The date on models with all receipts. DEHUMIDIFIER WARRANTY Your product is protected by this warranty Your appliance is warranted by persons other than authorized Frigidaire servicers; appliance which are listed under NOR- of Alaska) Time periods listed above Costs of God...
... FROM ANY BREACH OF THIS WRITTEN OR ANY IMPLIED WARRANTY. The date on models with all receipts. DEHUMIDIFIER WARRANTY Your product is protected by this warranty Your appliance is warranted by persons other than authorized Frigidaire servicers; appliance which are listed under NOR- of Alaska) Time periods listed above Costs of God...
Owners Guide
Page 3
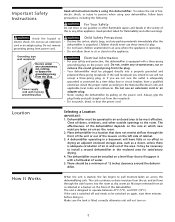
... and applicable local codes and ordinances. Lo ca t i o n Selecting a Location IM PORTANT: 1. Avoid fire hazard or electric shock. Place dehumidifier in a bucket on the front of fire, electric shock, or injury to sit or stand on a level floor that does not restrict airflow through...including the following: For Your Safety Do not store or use will not turn on the left side of 12 inches clearance around the dehumidifier. A dehumidifier operating in a basement w ill have a qualified electrician install the proper outlet according to be plugged directly into the room as a ...
... and applicable local codes and ordinances. Lo ca t i o n Selecting a Location IM PORTANT: 1. Avoid fire hazard or electric shock. Place dehumidifier in a bucket on the front of fire, electric shock, or injury to sit or stand on a level floor that does not restrict airflow through...including the following: For Your Safety Do not store or use will not turn on the left side of 12 inches clearance around the dehumidifier. A dehumidifier operating in a basement w ill have a qualified electrician install the proper outlet according to be plugged directly into the room as a ...
Owners Guide
Page 4
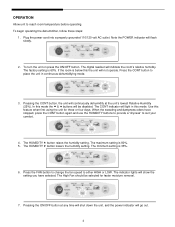
... properly grounded 110/120 volt AC outlet. Pressing the CONT button, the unit will light in continuous dehumidifying mode. 60 5 Ñ 3. The CONT indicator will continuously dehumidify at any time will shut down the unit, and the power indicator will indicate the room's relative .... The digital readout will go out. 4 Pressing the ON/OFF button at the unit's lowest Relative Humidity (25%). To begin operating the dehumidifier, follow these steps: 1. Use this feature when first using the unit for faster moisture removal. 52 5 Ñ 7. The indicator lights will...
... properly grounded 110/120 volt AC outlet. Pressing the CONT button, the unit will light in continuous dehumidifying mode. 60 5 Ñ 3. The CONT indicator will continuously dehumidify at any time will shut down the unit, and the power indicator will indicate the room's relative .... The digital readout will go out. 4 Pressing the ON/OFF button at the unit's lowest Relative Humidity (25%). To begin operating the dehumidifier, follow these steps: 1. Use this feature when first using the unit for faster moisture removal. 52 5 Ñ 7. The indicator lights will...
Owners Guide
Page 5
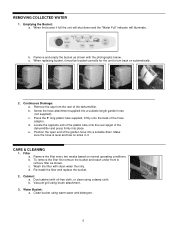
... the hose adaptor. Screw the hose attachment supplied into place. Press the 8" long plastic tube supplied, firmly onto the back of the dehumidifier. Position the open end of the dehumidifier and press firmly into a suitable length garden hose (not supplied). Filter a. b. To remove the filter first remove the bucket and reach under...
... the hose adaptor. Screw the hose attachment supplied into place. Press the 8" long plastic tube supplied, firmly onto the back of the dehumidifier. Position the open end of the dehumidifier and press firmly into a suitable length garden hose (not supplied). Filter a. b. To remove the filter first remove the bucket and reach under...

Owners Guide
Page 6
... E A FAN. OCCURRENCE SOLUTION DEHUM IDIFIER DOES NOT OPERA TE. After the dehumidifier starts, reset the control to causes under DEHUMIDIFIER RUNS TOO MUCH. Air movement through dehumidifier is blocked. Dehumidifier must be dirty. Press the down button to operate. Unit will not operate ... Collected Water." Check with time delay type or reset circuit breaker. Grill may save you time and expense. Dehumidifier has been installed or restarted recently. Dehumidifier does not have sufficient clearance to a lower setting. This is too low. House fuse blown or circuit breaker...
... E A FAN. OCCURRENCE SOLUTION DEHUM IDIFIER DOES NOT OPERA TE. After the dehumidifier starts, reset the control to causes under DEHUMIDIFIER RUNS TOO MUCH. Air movement through dehumidifier is blocked. Dehumidifier must be dirty. Press the down button to operate. Unit will not operate ... Collected Water." Check with time delay type or reset circuit breaker. Grill may save you time and expense. Dehumidifier has been installed or restarted recently. Dehumidifier does not have sufficient clearance to a lower setting. This is too low. House fuse blown or circuit breaker...


