
English Manual
Page 1
M61PML Series Motherboard User's Manual
M61PML Series Motherboard User's Manual

English Manual
Page 2
... product may exist. More information: If you want more detailed information about our products, please visit Foxconn's website: http://www.foxconnchannel.com © All rights reserved. Version: User's Manual V1.0 for the environment and human health, which could otherwise be caused by inappropriate waste handling of... disposal service or the shop where you purchased this symbol indicates that can help prevent potential negative consequences for M61PML Series motherboard. For more information about recycling of Foxconn, Inc. Although the information in this product.
... product may exist. More information: If you want more detailed information about our products, please visit Foxconn's website: http://www.foxconnchannel.com © All rights reserved. Version: User's Manual V1.0 for the environment and human health, which could otherwise be caused by inappropriate waste handling of... disposal service or the shop where you purchased this symbol indicates that can help prevent potential negative consequences for M61PML Series motherboard. For more information about recycling of Foxconn, Inc. Although the information in this product.

English Manual
Page 19
Carefully read the manual that supports your expansion card(s). 7. Make sure the metal contacts on the card are completely inserted into the PCI Express x16 slot. Turn on the ...
Carefully read the manual that supports your expansion card(s). 7. Make sure the metal contacts on the card are completely inserted into the PCI Express x16 slot. Turn on the ...

English Manual
Page 23
... to store the basic hardware information (such as "1". 2. Plug in next chapter. 1 Clear 2 3 WARNING! The following content carefully prior to modifying any jumper on this manual, pin 1 is recommended. This will clear CMOS data. 3. 2 2-5 Jumpers For some features needed, users can change the jumper settings on this motherboard by the bold...
... to store the basic hardware information (such as "1". 2. Plug in next chapter. 1 Clear 2 3 WARNING! The following content carefully prior to modifying any jumper on this manual, pin 1 is recommended. This will clear CMOS data. 3. 2 2-5 Jumpers For some features needed, users can change the jumper settings on this motherboard by the bold...

English Manual
Page 24
... parameters are also provided. You want to change the default CMOS settings. This chapter includes the following cases occur: 1. Detailed descriptions of this manual is available. This chapter tells how to change system settings through the BIOS Setup menus. Please visit our website for updated... manual if it is for reference only. You have to run the Setup Program when the following information : ■ Enter BIOS Setup ■ Main Menu ...
... parameters are also provided. You want to change the default CMOS settings. This chapter includes the following cases occur: 1. Detailed descriptions of this manual is available. This chapter tells how to change system settings through the BIOS Setup menus. Please visit our website for updated... manual if it is for reference only. You have to run the Setup Program when the following information : ■ Enter BIOS Setup ■ Main Menu ...
English Manual
Page 35
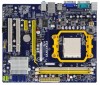
...can be ganged as two completely independent 64-bit channels (both chan- Setting values are :[Auto],[Limit],[Manual]. [Auto]: DRAM SPD profile1; [Limit]: DRAM SPD profile2; [Manual]: DRAM by Manual. ► DRAM Timing Mode When both DCTs are : [Auto], [DCT0], [DCT1], [Both...DRAM Timing Configuration DRAM Timing Configuration Help Item Memory Clock Mode [Auto] Options DRAM Timing Mode [Auto] Auto Limit Manual Move Enter:Select +/-/:Value F10:Save ESC:Exit F1:General Help F9:Optimized Defaults ► Memory Clock Mode This ...
...can be ganged as two completely independent 64-bit channels (both chan- Setting values are :[Auto],[Limit],[Manual]. [Auto]: DRAM SPD profile1; [Limit]: DRAM SPD profile2; [Manual]: DRAM by Manual. ► DRAM Timing Mode When both DCTs are : [Auto], [DCT0], [DCT1], [Both...DRAM Timing Configuration DRAM Timing Configuration Help Item Memory Clock Mode [Auto] Options DRAM Timing Mode [Auto] Auto Limit Manual Move Enter:Select +/-/:Value F10:Save ESC:Exit F1:General Help F9:Optimized Defaults ► Memory Clock Mode This ...

English Manual
Page 47
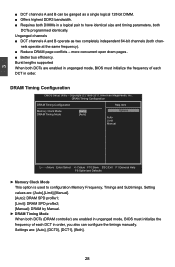
.... After that, you can click "One Click Setup" and then choose the items you want to install, or you want to install it manually. Manual Installation Step by Step Automatic Installation by One Click Drop to install it first. You must click "NVIDIA Chipset Driver" to System Tray Exit ...the program Visit Foxconn's Show Utilities Show Drivers Browse CD View the Us- 4 Install Driver and Utility This motherboard comes with one DVD, after installing the Operating ...
.... After that, you can click "One Click Setup" and then choose the items you want to install, or you want to install it manually. Manual Installation Step by Step Automatic Installation by One Click Drop to install it first. You must click "NVIDIA Chipset Driver" to System Tray Exit ...the program Visit Foxconn's Show Utilities Show Drivers Browse CD View the Us- 4 Install Driver and Utility This motherboard comes with one DVD, after installing the Operating ...

English Manual
Page 48
Install Utility Use these options to install additional software programs. And click "Use's Manual" button to Install (Windows 7) 2. 4 Choose the items you want to view the utility(FOX ONE, FOX LiveUpdate, FOX LOGO, FOX DMI) help manual. (Windows XP/Vista) (Windows 7) 41
Install Utility Use these options to install additional software programs. And click "Use's Manual" button to Install (Windows 7) 2. 4 Choose the items you want to view the utility(FOX ONE, FOX LiveUpdate, FOX LOGO, FOX DMI) help manual. (Windows XP/Vista) (Windows 7) 41

English Manual
Page 54
... different changes benchmarks A message informs you , click to restart the system. When system restarts, run FOX ONE again, it . Go to CPU page Adjust by manual Press Auto button to let FOX ONE check the highest CPU clock you can be calculated by FOX ONE automatically or... it hangs, you can press the up/down button to adjust your PC panel to apply it will raise the CPU clock step by yourselves. Manual : You can use . 4 2. Auto : Click this button to let FOX ONE check the highest CPU clock you select (or overclock) CPU clock to continue. 47...
... different changes benchmarks A message informs you , click to restart the system. When system restarts, run FOX ONE again, it . Go to CPU page Adjust by manual Press Auto button to let FOX ONE check the highest CPU clock you can be calculated by FOX ONE automatically or... it hangs, you can press the up/down button to adjust your PC panel to apply it will raise the CPU clock step by yourselves. Manual : You can use . 4 2. Auto : Click this button to let FOX ONE check the highest CPU clock you select (or overclock) CPU clock to continue. 47...
English Manual
Page 56
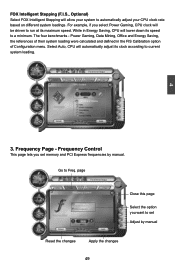
The four benchmarks - Frequency Control This page lets you set Adjust by manual. FOX Intelligent Stepping (F.I.S., Optional) Select FOX Intelligent Stepping will allow your CPU clock rate based on different system loadings. Frequency Page - page Close this page ... current system loading. 4 3. Select Auto, CPU will automatically adjust its clock according to run at its speed to set memory and PCI Express frequencies by manual Reset the changes Apply the changes 49 For example, if you want to a minimum. While in the FIS Calibration option of Configuration menu.
The four benchmarks - Frequency Control This page lets you set Adjust by manual. FOX Intelligent Stepping (F.I.S., Optional) Select FOX Intelligent Stepping will allow your CPU clock rate based on different system loadings. Frequency Page - page Close this page ... current system loading. 4 3. Select Auto, CPU will automatically adjust its clock according to run at its speed to set memory and PCI Express frequencies by manual Reset the changes Apply the changes 49 For example, if you want to a minimum. While in the FIS Calibration option of Configuration menu.
English Manual
Page 59
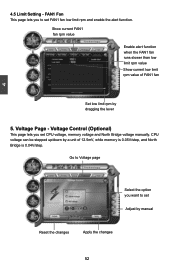
Voltage Page - Voltage Control (Optional) This page lets you to set Adjust by manual Reset the changes Apply the changes 52 4 4.5 Limit Setting - Show current FAN1 fan rpm value Enable alert function when the FAN1 fan runs slower than ... up/down by dragging the lever 5. Go to Voltage page Select the option you want to set CPU voltage, memory voltage and North Bridge voltage manually. FAN1 Fan This page lets you set FAN1 fan low limit rpm and enable the alert function.
Voltage Page - Voltage Control (Optional) This page lets you to set Adjust by manual Reset the changes Apply the changes 52 4 4.5 Limit Setting - Show current FAN1 fan rpm value Enable alert function when the FAN1 fan runs slower than ... up/down by dragging the lever 5. Go to Voltage page Select the option you want to set CPU voltage, memory voltage and North Bridge voltage manually. FAN1 Fan This page lets you set FAN1 fan low limit rpm and enable the alert function.
English Manual
Page 60
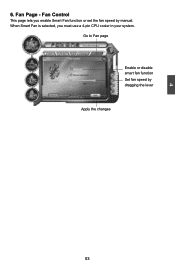
When Smart Fan is selected, you enable Smart Fan function or set the fan speed by dragging the lever Apply the changes 53 4 6. Fan Page - Go to Fan page Enable or disable smart fan function Set fan speed by manual. Fan Control This page lets you must use a 4-pin CPU cooler in your system.
When Smart Fan is selected, you enable Smart Fan function or set the fan speed by dragging the lever Apply the changes 53 4 6. Fan Page - Go to Fan page Enable or disable smart fan function Set fan speed by manual. Fan Control This page lets you must use a 4-pin CPU cooler in your system.

English Manual
Page 90
... device manufacturer, or do not want to specify additional mass storage devices for use with Windows, including those for the following picture appears, press [S] to manually specify an adapter. After some files are copied to insert the RAID driver diskette 1 into Drive A: * Press ENTER when ready Enter=Continue ESC=Cancel F3...
... device manufacturer, or do not want to specify additional mass storage devices for use with Windows, including those for the following picture appears, press [S] to manually specify an adapter. After some files are copied to insert the RAID driver diskette 1 into Drive A: * Press ENTER when ready Enter=Continue ESC=Cancel F3...


