English Manual.
Page 6
... Install the Memory 11 Install an Expansion Card 13 Install other Internal Connectors 14 Jumpers 18 Chapter 3 BIOS Setup Enter BIOS Setup 20 Main Menu 20 System Information 22 Advanced BIOS Features 24 Fox Central Control Unit 27 Advanced Chipset Features 31 Integrated Peripherals 35 Power Management Setup 39... PC Health Status 41 BIOS Security Features 42 Load Optimal Defaults 43 Save & Exit Setup 43 Exit Without Saving 43 Chapter 4 CD Instruction Utility CD ...
... Install the Memory 11 Install an Expansion Card 13 Install other Internal Connectors 14 Jumpers 18 Chapter 3 BIOS Setup Enter BIOS Setup 20 Main Menu 20 System Information 22 Advanced BIOS Features 24 Fox Central Control Unit 27 Advanced Chipset Features 31 Integrated Peripherals 35 Power Management Setup 39... PC Health Status 41 BIOS Security Features 42 Load Optimal Defaults 43 Save & Exit Setup 43 Exit Without Saving 43 Chapter 4 CD Instruction Utility CD ...

English Manual.
Page 15
... the CPU specifications. The CPU cannot be set the frequency beyond hardware specifications since it does not meet the standard requirements for HT Technology ■ A BIOS that the motherboard supports the CPU. ■ Always turn on the computer if the CPU cooler is not installed, otherwise overheating and damage of the...
... the CPU specifications. The CPU cannot be set the frequency beyond hardware specifications since it does not meet the standard requirements for HT Technology ■ A BIOS that the motherboard supports the CPU. ■ Always turn on the computer if the CPU cooler is not installed, otherwise overheating and damage of the...

English Manual.
Page 18
... off the computer and unplug the power cord from the power outlet before you are : Single Channel DIMM1 DS/SS DIMM2 - It is installed, the BIOS will automatically check the memory in only one direction. CAUTION 2 2-2 Install the Memory !
... off the computer and unplug the power cord from the power outlet before you are : Single Channel DIMM1 DS/SS DIMM2 - It is installed, the BIOS will automatically check the memory in only one direction. CAUTION 2 2-2 Install the Memory !
English Manual.
Page 20
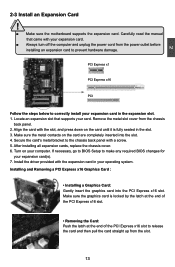
...that supports your expansion card in the expansion slot. 1. PCI Express x1 PCI Express x16 PCI Follow the steps below to make any required BIOS changes for your operating system. Make sure the metal contacts on your expansion card. ■ Always turn off the computer and unplug the... the power outlet before installing an expansion card to the chassis back panel with the expansion card in the slot. 3. If necessary, go to BIOS Setup to correctly install your card. Install the driver provided with a screw. 5. Make sure the graphics card is fully seated in your expansion card...
...that supports your expansion card in the expansion slot. 1. PCI Express x1 PCI Express x16 PCI Follow the steps below to make any required BIOS changes for your operating system. Make sure the metal contacts on your expansion card. ■ Always turn off the computer and unplug the... the power outlet before installing an expansion card to the chassis back panel with the expansion card in the slot. 3. If necessary, go to BIOS Setup to correctly install your card. Install the driver provided with a screw. 5. Make sure the graphics card is fully seated in your expansion card...
English Manual.
Page 24
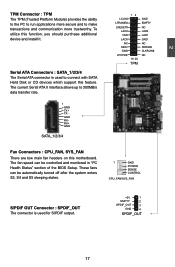
... SATA Hard Disk or CD devices which support this feature. The fan speed can be controlled and monitored in "PC Health Status" section of the BIOS Setup. 2 TPM Connector : TPM The TPM (Trusted Platform Module) provides the ability to the PC to run applications more trustworthy. These fans can be automatically...
... SATA Hard Disk or CD devices which support this feature. The fan speed can be controlled and monitored in "PC Health Status" section of the BIOS Setup. 2 TPM Connector : TPM The TPM (Trusted Platform Module) provides the ability to the PC to run applications more trustworthy. These fans can be automatically...
English Manual.
Page 25
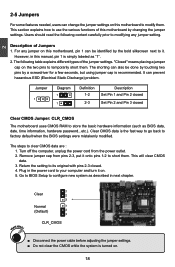
... 1 1 Definition 1-2 2-3 Description Set Pin 1 and Pin 2 closed Set Pin 2 and Pin 3 closed . 4. The steps to store the basic hardware information (such as BIOS data, date, time information, hardware password...etc.). WARNING! 1 Clear 2 3 Normal 1 (Default) 2 3 CLR_CMOS ■ Disconnect the power cable before adjusting the jumper settings... a few seconds, but using jumper cap is the fast way to go back to factory default when the BIOS settings were mistakenly modified. Clear CMOS data is recommended. Remove jumper cap from the power outlet. 2. Plug in next chapter. Go ...
... 1 1 Definition 1-2 2-3 Description Set Pin 1 and Pin 2 closed Set Pin 2 and Pin 3 closed . 4. The steps to store the basic hardware information (such as BIOS data, date, time information, hardware password...etc.). WARNING! 1 Clear 2 3 Normal 1 (Default) 2 3 CLR_CMOS ■ Disconnect the power cable before adjusting the jumper settings... a few seconds, but using jumper cap is the fast way to go back to factory default when the BIOS settings were mistakenly modified. Clear CMOS data is recommended. Remove jumper cap from the power outlet. 2. Plug in next chapter. Go ...
English Manual.
Page 26
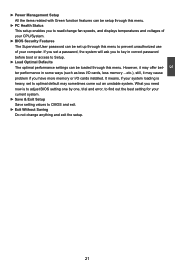
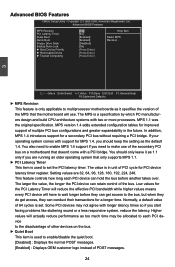
... Please visit our website for reference only. We do not guarantee the content of the BIOS parameters are also provided. This chapter tells how to change system settings through the BIOS Setup menus. You have to run the Setup Program when the following information : ■...; Enter BIOS Setup ■ Main Menu ■ System Information ■ Advanced BIOS Features ■ Fox Central Control Unit ■ Advanced Chipset...
... Please visit our website for reference only. We do not guarantee the content of the BIOS parameters are also provided. This chapter tells how to change system settings through the BIOS Setup menus. You have to run the Setup Program when the following information : ■...; Enter BIOS Setup ■ Main Menu ■ System Information ■ Advanced BIOS Features ■ Fox Central Control Unit ■ Advanced Chipset...

English Manual.
Page 27
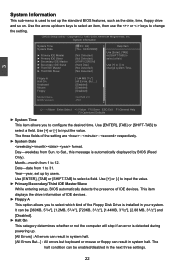
...Some special proprietary features (such as overclocking) can press key to maintain optimal system performance. 3 CAUTION Enter BIOS Setup The BIOS is the communication bridge between hardware and software, correctly setting up through this menu. Power on the computer,... etc. 20 Copyright (C) 1985-2008, American Megatrends, Inc. ► System Information ► PC Health Status ► Advanced BIOS Features ► BIOS Security Features ► Fox Central Control Unit Load Optimal Defaults ► Advanced Chipset Features Save & Exit Setup ► Integrated ...
...Some special proprietary features (such as overclocking) can press key to maintain optimal system performance. 3 CAUTION Enter BIOS Setup The BIOS is the communication bridge between hardware and software, correctly setting up through this menu. Power on the computer,... etc. 20 Copyright (C) 1985-2008, American Megatrends, Inc. ► System Information ► PC Health Status ► Advanced BIOS Features ► BIOS Security Features ► Fox Central Control Unit Load Optimal Defaults ► Advanced Chipset Features Save & Exit Setup ► Integrated ...
English Manual.
Page 28
... Setup. ► Load Optimal Defaults The optimal performance settings can be loaded through this menu. It means, if your system loading is to adjust BIOS setting one by one, trial and error, to find out the best setting for your current system. ► Save & Exit Setup Save setting... values to prevent unauthorized use of your CPU/System. ► BIOS Security Features The Supervisor/User password can be set a password, the system will ask you have more memory or I /O cards, less memory ...etc.), ...
... Setup. ► Load Optimal Defaults The optimal performance settings can be loaded through this menu. It means, if your system loading is to adjust BIOS setting one by one, trial and error, to find out the best setting for your current system. ► Save & Exit Setup Save setting... values to prevent unauthorized use of your CPU/System. ► BIOS Security Features The Supervisor/User password can be set a password, the system will ask you have more memory or I /O cards, less memory ...etc.), ...
English Manual.
Page 29
...system Time. ► Third IDE Slave [Not Detected] Floppy A Halt On Keyboard Mouse Floppy Model Name BIOS Version [1.44 MB 31/2"] [All Errors, But ...] [Disabled] [Disabled] [Disabled] :G41MX 2.0 :P01 Move Enter:Select +/-/:Value F10:Save ESC:Exit F1:General Help F9:Optimized Defaults ► System.... Use [ENTER], [TAB] or [SHIFT-TAB] to input the value. ► Primary/Secondary/Third IDE Master/Slave While entering setup, BIOS automatically detects the presence of IDE devices. This item displays the drive information of IDE devices. ► Floppy A This option allows you to...
...system Time. ► Third IDE Slave [Not Detected] Floppy A Halt On Keyboard Mouse Floppy Model Name BIOS Version [1.44 MB 31/2"] [All Errors, But ...] [Disabled] [Disabled] [Disabled] :G41MX 2.0 :P01 Move Enter:Select +/-/:Value F10:Save ESC:Exit F1:General Help F9:Optimized Defaults ► System.... Use [ENTER], [TAB] or [SHIFT-TAB] to input the value. ► Primary/Secondary/Third IDE Master/Slave While entering setup, BIOS automatically detects the presence of IDE devices. This item displays the drive information of IDE devices. ► Floppy A This option allows you to...
English Manual.
Page 30
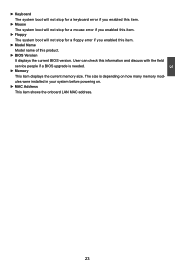
... stop for a floppy error if you enabled this item. ► Model Name Model name of this information and discuss with the field service people if a BIOS upgrade is depending on how many memory modules were installed in your system before powering on. ► MAC Address This item shows the onboard LAN... MAC address. 23 The size is needed. ► Memory This item displays the current memory size. User can check this product. ► BIOS Version It displays the current...
... stop for a floppy error if you enabled this item. ► Model Name Model name of this information and discuss with the field service people if a BIOS upgrade is depending on how many memory modules were installed in your system before powering on. ► MAC Address This item shows the onboard LAN... MAC address. 23 The size is needed. ► Memory This item displays the current memory size. User can check this product. ► BIOS Version It displays the current...
English Manual.
Page 31
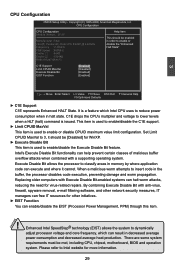
... item is in the future. In addition, MPS 1.4 introduces support for a longer time. Low values for PCI device latency timer register. Advanced BIOS Features CMOS Setup Utility - The MPS is used to the bus, but when they do get access, they can hold the bus before another takes.... If your operating system comes with a PCI bridge. The value is used to make use . Normally, a default value of the bus. Advanced BIOS Features MPS Revision PCI Latency Timer Quiet Boot Quick Boot Floppy Drive Seek Bootup Num-Lock ► Boot Device Priority ► Removable Drives ► Trusted...
... item is in the future. In addition, MPS 1.4 introduces support for a longer time. Low values for PCI device latency timer register. Advanced BIOS Features CMOS Setup Utility - The MPS is used to the bus, but when they do get access, they can hold the bus before another takes.... If your operating system comes with a PCI bridge. The value is used to make use . Normally, a default value of the bus. Advanced BIOS Features MPS Revision PCI Latency Timer Quiet Boot Quick Boot Floppy Drive Seek Bootup Num-Lock ► Boot Device Priority ► Removable Drives ► Trusted...

English Manual.
Page 32
...Setup Utility - Trusted Computing Trusted Computing Help Item TCG/TPM Support [No] Enable / Disable TPM TCG (TPM 1.1/1.2) support in BIOS Move Enter:Select +/-/:Value F10:Save ESC:Exit F1:General Help F9:Optimized Defaults ► TCG/TPM Support Trusted Computing Group (...-2008, American Megatrends, Inc. The TPM Work Group is started. 3 ► Quick Boot While Enabled, this option allows BIOS to skip certain tests while booting, this will shorten the time needed to improper configuration or physical unavailability), it will appear an...
...Setup Utility - Trusted Computing Trusted Computing Help Item TCG/TPM Support [No] Enable / Disable TPM TCG (TPM 1.1/1.2) support in BIOS Move Enter:Select +/-/:Value F10:Save ESC:Exit F1:General Help F9:Optimized Defaults ► TCG/TPM Support Trusted Computing Group (...-2008, American Megatrends, Inc. The TPM Work Group is started. 3 ► Quick Boot While Enabled, this option allows BIOS to skip certain tests while booting, this will shorten the time needed to improper configuration or physical unavailability), it will appear an...

English Manual.
Page 34
...[Enabled] [Enabled] [Enabled] [200] [100] Help Item Move Enter:Select +/-/:Value F10:Save ESC:Exit F1:General Help F9:Optimized Defaults ► Smart BIOS / CPU Configuration / Voltage Options Press to go to its submenu. ► Spread Spectrum If you can use the or keys to change the value, or...CLK This option is used to adjust the speed of the empty PCI slot to reduce EMI (Electromagnetic Interference). ► BIOS Write Protection To protect the system BIOS from being affected by using the numeric keypad. 27 When enabled, the system will turn off clock of PCI Express slot...
...[Enabled] [Enabled] [Enabled] [200] [100] Help Item Move Enter:Select +/-/:Value F10:Save ESC:Exit F1:General Help F9:Optimized Defaults ► Smart BIOS / CPU Configuration / Voltage Options Press to go to its submenu. ► Spread Spectrum If you can use the or keys to change the value, or...CLK This option is used to adjust the speed of the empty PCI slot to reduce EMI (Electromagnetic Interference). ► BIOS Write Protection To protect the system BIOS from being affected by using the numeric keypad. 27 When enabled, the system will turn off clock of PCI Express slot...

English Manual.
Page 35
... Fan Power LED Status Always On Continue blinking On (1sec.), Off (1sec.) Continue blinking On (2sec.), Off (2sec.) Quick blinking twice (1/3sec. On, 1/3sec. Smart BIOS Smart Power LED Smart Boot Menu Current CPU Speed Current FSB Speed Current CPU Multiplier Current DRAM Speed [Enabled] Help Item [Enabled] : 2.40GHz Options : 800MHz... Enter Setup or Skip Reboot & Fan OK ► Smart Boot Menu When PC starts, it displays POST state by different long-short blinking intervals. Smart BIOS CMOS Setup Utility -
... Fan Power LED Status Always On Continue blinking On (1sec.), Off (1sec.) Continue blinking On (2sec.), Off (2sec.) Quick blinking twice (1/3sec. On, 1/3sec. Smart BIOS Smart Power LED Smart Boot Menu Current CPU Speed Current FSB Speed Current CPU Multiplier Current DRAM Speed [Enabled] Help Item [Enabled] : 2.40GHz Options : 800MHz... Enter Setup or Skip Reboot & Fan OK ► Smart Boot Menu When PC starts, it displays POST state by different long-short blinking intervals. Smart BIOS CMOS Setup Utility -
English Manual.
Page 36
... worm attempts to reduce power consumption when in memory by where application code can execute and where it should be met, including CPU, chipset, motherboard, BIOS and operation system. It is used to classify areas in halt state. Intel's Execute Disable Bit functionality can result in the buffer, the processor disables...
... worm attempts to reduce power consumption when in memory by where application code can execute and where it should be met, including CPU, chipset, motherboard, BIOS and operation system. It is used to classify areas in halt state. Intel's Execute Disable Bit functionality can result in the buffer, the processor disables...

English Manual.
Page 40
... in the graphics driver allocates memory as video memory to the OS. When the memory is no longer be utilized by the operating system. This BIOS option allows you to the operating system for Fixed or DVMT usage. 33 The amount of memory available for other applications or system functions. If...
... in the graphics driver allocates memory as video memory to the OS. When the memory is no longer be utilized by the operating system. This BIOS option allows you to the operating system for Fixed or DVMT usage. 33 The amount of memory available for other applications or system functions. If...
English Manual.
Page 44
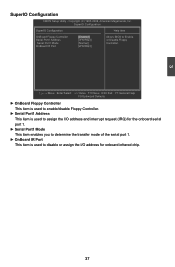
3 SuperIO Configuration CMOS Setup Utility - SuperIO Configuration SuperIO Configuration Help Item OnBoard Floppy Controller [Enabled] Allows BIOS to disable or assign the I/O address for the onboard serial port 1. ► Serial Port1 Mode This item enables you to determine the transfer mode of ...
3 SuperIO Configuration CMOS Setup Utility - SuperIO Configuration SuperIO Configuration Help Item OnBoard Floppy Controller [Enabled] Allows BIOS to disable or assign the I/O address for the onboard serial port 1. ► Serial Port1 Mode This item enables you to determine the transfer mode of ...

English Manual.
Page 46
... latency sleeping state supported by RTC [S3 (STR)] Help Item [Power Off] [Enabled] Select the ACPI [Enabled] state used for initial boot operations within the BIOS to a minimum, it wakes. The S3 sleeping state is a low wake latency sleeping state where all system context is assumed that the OS does not...
... latency sleeping state supported by RTC [S3 (STR)] Help Item [Power Off] [Enabled] Select the ACPI [Enabled] state used for initial boot operations within the BIOS to a minimum, it wakes. The S3 sleeping state is a low wake latency sleeping state where all system context is assumed that the OS does not...
English Manual.
Page 49
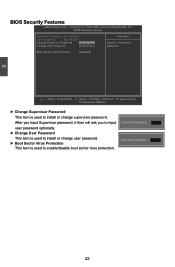
... F10:Save ESC:Exit F1:General Help F9:Optimized Defaults ► Change Supervisor Password This item is used to enable/disable boot sector virus protection. BIOS Security Features Supervisor Password : Not Installed Help Item User Password : Not Installed Change Supervisor Password [Press Enter] Install or change supervisor password. Copyright (C) 1985-2008...
... F10:Save ESC:Exit F1:General Help F9:Optimized Defaults ► Change Supervisor Password This item is used to enable/disable boot sector virus protection. BIOS Security Features Supervisor Password : Not Installed Help Item User Password : Not Installed Change Supervisor Password [Press Enter] Install or change supervisor password. Copyright (C) 1985-2008...


