
English Manual.
Page 1
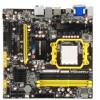
A88GMX Series Motherboard User's Manual
A88GMX Series Motherboard User's Manual

English Manual.
Page 2
... or physical injury may exist. By ensuring this product is the intellectual property of Foxconn, Inc. P/N: 3A222CR00-000-G Symbol description: ! All images are for reference only, please refer to the physical motherboard for A88GMX Series motherboard. Although the information in this manual may be treated as household waste. For more information about recycling of this...
... or physical injury may exist. By ensuring this product is the intellectual property of Foxconn, Inc. P/N: 3A222CR00-000-G Symbol description: ! All images are for reference only, please refer to the physical motherboard for A88GMX Series motherboard. Although the information in this manual may be treated as household waste. For more information about recycling of this...
English Manual.
Page 19
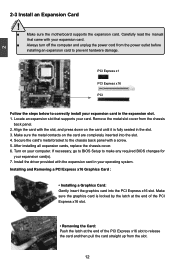
Carefully read the manual that supports your operating system. Remove the metal slot cover from the slot. 12 After installing all expansion cards, replace the chassis cover. 6. Make sure ... to release the card and then pull the card straight up from the chassis back panel. 2. 2 CAUTION 2-3 Install an Expansion Card ! ■ Make sure the motherboard supports the expansion card. Turn on the card are completely inserted into the PCI Express x16 slot. If necessary, go to BIOS Setup to the...
Carefully read the manual that supports your operating system. Remove the metal slot cover from the slot. 12 After installing all expansion cards, replace the chassis cover. 6. Make sure ... to release the card and then pull the card straight up from the chassis back panel. 2. 2 CAUTION 2-3 Install an Expansion Card ! ■ Make sure the motherboard supports the expansion card. Turn on the card are completely inserted into the PCI Express x16 slot. If necessary, go to BIOS Setup to the...
English Manual.
Page 24
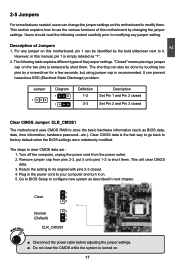
... of the jumper settings. For any jumper setting. The shorting can also be identified by the bold silkscreen next to modifying any jumper on this motherboard, pin 1 can be done by touching two pins by changing the jumper settings. Jumper 1 Diagram 1 1 Definition 1-2 2-3 Description Set Pin 1 and Pin 2 closed Set Pin 2 and... on the two pins to your computer and turn it onto pins 1-2 to modify them. Remove jumper cap from the power outlet. 2. However, in this manual, pin 1 is turned on. 17 2 2-5 Jumpers For some features needed, users can change the jumper settings on this...
... of the jumper settings. For any jumper setting. The shorting can also be identified by the bold silkscreen next to modifying any jumper on this motherboard, pin 1 can be done by touching two pins by changing the jumper settings. Jumper 1 Diagram 1 1 Definition 1-2 2-3 Description Set Pin 1 and Pin 2 closed Set Pin 2 and... on the two pins to your computer and turn it onto pins 1-2 to modify them. Remove jumper cap from the power outlet. 2. However, in this manual, pin 1 is turned on. 17 2 2-5 Jumpers For some features needed, users can change the jumper settings on this...


