
Product Manual
Page 1
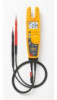
All rights reserved. MyFlukeStore Shop for Fluke products online at: www. .com 1.888.610.7664 All product names are subject to change without notice. Specifications are trademarks of their respective companies. T6-1000/T6-600 Electrical Tester Service Information February 2018 ©2018 Fluke Corporation.
All rights reserved. MyFlukeStore Shop for Fluke products online at: www. .com 1.888.610.7664 All product names are subject to change without notice. Specifications are trademarks of their respective companies. T6-1000/T6-600 Electrical Tester Service Information February 2018 ©2018 Fluke Corporation.
Product Manual
Page 2
... this warranty may be free from this warranty on new and unused products to end-user customers only but have no risk for repair in transit. Parts, product repairs, and services are permitted provided that it has been properly recorded on non-defective media. To obtain warranty service, contact your nearest Fluke authorized service center to obtain return authorization information, then send the...
... this warranty may be free from this warranty on new and unused products to end-user customers only but have no risk for repair in transit. Parts, product repairs, and services are permitted provided that it has been properly recorded on non-defective media. To obtain warranty service, contact your nearest Fluke authorized service center to obtain return authorization information, then send the...
Product Manual
Page 3
Table of Contents Title Page Safety Information 1 Specifications 4 Required Equipment 5 Performance Tests 5 Annunciator and Hazardous Voltage Indicator 5 Voltage Function 6 FieldSense Current Function 7 FieldSense Voltage Function 9 Resistance and Continuity Functions 9 Low Battery Indicator 10 Battery Door Circuit 10 Maintenance 11 How to Clean 11 Battery Replacement 11 Replacement Parts 12 i MyFlukeStore Shop for Fluke products online at: www. .com 1.888.610.7664
Table of Contents Title Page Safety Information 1 Specifications 4 Required Equipment 5 Performance Tests 5 Annunciator and Hazardous Voltage Indicator 5 Voltage Function 6 FieldSense Current Function 7 FieldSense Voltage Function 9 Resistance and Continuity Functions 9 Low Battery Indicator 10 Battery Door Circuit 10 Maintenance 11 How to Clean 11 Battery Replacement 11 Replacement Parts 12 i MyFlukeStore Shop for Fluke products online at: www. .com 1.888.610.7664
Product Manual
Page 4
...manual unless you use the Product. • Carefully read all instructions. • Do not alter the Product and use only as specified, or the protection supplied by the Product can cause damage to the user. The information provided in damp or wet environments. • Comply with local and national safety codes. Use... conductors are qualified to do not perform the calibration verification tests or calibration procedures described in this manual is for Fluke products online at: www. .com 1.888.610.7664 Safety Information A Warning identifies hazardous conditions and procedures that...
...manual unless you use the Product. • Carefully read all instructions. • Do not alter the Product and use only as specified, or the protection supplied by the Product can cause damage to the user. The information provided in damp or wet environments. • Comply with local and national safety codes. Use... conductors are qualified to do not perform the calibration verification tests or calibration procedures described in this manual is for Fluke products online at: www. .com 1.888.610.7664 Safety Information A Warning identifies hazardous conditions and procedures that...

Product Manual
Page 5
... test lead (black) is installed into the back case. • The battery door must be closed and locked before you use the Product. This insulator provides a means of a Product, probe, or accessory. • ...repair the Product. • Use only specified replacement parts. Examine the test leads for cracks or missing plastic. See the Quick Reference Guide for the FieldSense function. T6-1000/T6-600 Service Information • Examine the case before a FieldSense measurement. For safe operation and maintenance of delamination. test probe (BLACK) is damaged. • Do not use...
... test lead (black) is installed into the back case. • The battery door must be closed and locked before you use the Product. This insulator provides a means of a Product, probe, or accessory. • ...repair the Product. • Use only specified replacement parts. Examine the test leads for cracks or missing plastic. See the Quick Reference Guide for the FieldSense function. T6-1000/T6-600 Service Information • Examine the case before a FieldSense measurement. For safe operation and maintenance of delamination. test probe (BLACK) is damaged. • Do not use...
Product Manual
Page 6
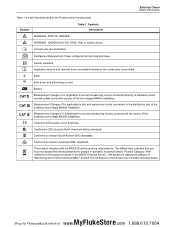
.... Consult user documentation. Electrical Tester Safety Information Table 1 is a list of symbols used on the Product and in this electrical/electronic product in the WEEE Directive Annex I, this product as category 9 "Monitoring and Control Instrumentation" product. RISK OF DANGER. Do not dispose of the building's low-voltage MAINS installation. HAZARDOUS VOLTAGE. MyFlukeStore Shop for Fluke products online at the...
.... Consult user documentation. Electrical Tester Safety Information Table 1 is a list of symbols used on the Product and in this electrical/electronic product in the WEEE Directive Annex I, this product as category 9 "Monitoring and Control Instrumentation" product. RISK OF DANGER. Do not dispose of the building's low-voltage MAINS installation. HAZARDOUS VOLTAGE. MyFlukeStore Shop for Fluke products online at the...
Product Manual
Page 7
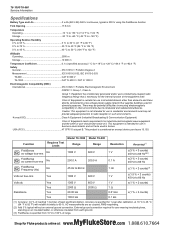
... 600 V / CAT III 1000 V Electromagnetic Compatibility (EMC) International IEC 61326-1: Portable Electromagnetic Environment CISPR 11: Group 1, Class A Group 1: Equipment has intentionally generated and/or uses conductively-coupled radio frequency energy that supplies buildings used in homes. There may not provide adequate protection to radio reception in other than domestic and those directly connected to a low-voltage power supply network that is specified for user...
... 600 V / CAT III 1000 V Electromagnetic Compatibility (EMC) International IEC 61326-1: Portable Electromagnetic Environment CISPR 11: Group 1, Class A Group 1: Equipment has intentionally generated and/or uses conductively-coupled radio frequency energy that supplies buildings used in homes. There may not provide adequate protection to radio reception in other than domestic and those directly connected to a low-voltage power supply network that is specified for user...
Product Manual
Page 8
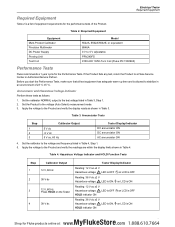
... frequency listed in Table 4. If the Product fails any test, return the Product to the voltage (Auto Select) measurement mode. 3. Set the Product to a Fluke Service Center or Authorized Service Partner. Table 2. Required Equipment Equipment Multi-Product Calibrator Precision Multimeter DC Power Supply Proving Unit Test Coil Model 5522A, 5502A/5502E, or equivalent 8846A 0 V to the Product and verify the display reads as follows: 1. Set...
... frequency listed in Table 4. If the Product fails any test, return the Product to the voltage (Auto Select) measurement mode. 3. Set the Product to a Fluke Service Center or Authorized Service Partner. Table 2. Required Equipment Equipment Multi-Product Calibrator Precision Multimeter DC Power Supply Proving Unit Test Coil Model 5522A, 5502A/5502E, or equivalent 8846A 0 V to the Product and verify the display reads as follows: 1. Set...
Product Manual
Page 9
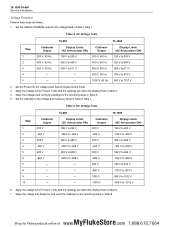
... the voltage to 1017 V 2. Table 5. Set the Product to the voltage listed in Table 5. 5. Table 6. Set the calibrator NORMAL output to the voltage (Auto Select) measurement mode. 3. Set the calibrator to the voltage and frequency listed in Table 6. MyFlukeStore 6 Shop for the remaining steps in Table 5, Step 1. Apply the voltages and verify the readings for Fluke products online at: www. .com 1.888.610...
... the voltage to 1017 V 2. Table 5. Set the Product to the voltage listed in Table 5. 5. Table 6. Set the calibrator NORMAL output to the voltage (Auto Select) measurement mode. 3. Set the calibrator to the voltage and frequency listed in Table 6. MyFlukeStore 6 Shop for the remaining steps in Table 5, Step 1. Apply the voltages and verify the readings for Fluke products online at: www. .com 1.888.610...
Product Manual
Page 10
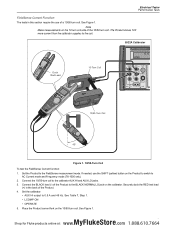
... on the calibrator. See Table 7, Step 1. • LCOMP ON • OPERATE 5. Electrical Tester Performance Tests FieldSense Current Function The tests in the back of the Product. 4. Set the Product to AC Current mode and Frequency mode (T6-1000 only). 2. Securely dock the RED test lead (+) in this section require the use the SHIFT (yellow) button on the 10/50-turn coil. Place...
... on the calibrator. See Table 7, Step 1. • LCOMP ON • OPERATE 5. Electrical Tester Performance Tests FieldSense Current Function The tests in the back of the Product. 4. Set the Product to AC Current mode and Frequency mode (T6-1000 only). 2. Securely dock the RED test lead (+) in this section require the use the SHIFT (yellow) button on the 10/50-turn coil. Place...
Product Manual
Page 11
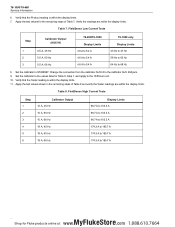
... the display limits. T6-1000/T6-600 Service Information 6. Change the connection from the calibrator AUX HI to 68 Hz 8. FieldSense Low Current Tests Step Calibrator Output (AUX HI) 1 0.5 A, 45 Hz 2 0.5 A, 60 Hz 3 0.5 A, 66 Hz T6-600/T6-1000 Display Limits 4.6 A to 5.4 A 4.6 A to 5.4 A 4.6 A to 5.4 A T6-1000 only Display Limits 43 Hz to 47 Hz 58 Hz to 62 Hz 64 Hz to the calibrator AUX 20A jack. 9. Set the calibrator to...
... the display limits. T6-1000/T6-600 Service Information 6. Change the connection from the calibrator AUX HI to 68 Hz 8. FieldSense Low Current Tests Step Calibrator Output (AUX HI) 1 0.5 A, 45 Hz 2 0.5 A, 60 Hz 3 0.5 A, 66 Hz T6-600/T6-1000 Display Limits 4.6 A to 5.4 A 4.6 A to 5.4 A 4.6 A to 5.4 A T6-1000 only Display Limits 43 Hz to 47 Hz 58 Hz to 62 Hz 64 Hz to the calibrator AUX 20A jack. 9. Set the calibrator to...

Product Manual
Page 12
... frequency. 6. Place the Product current fork into the Test Lead Ground Contact of a PRV240FS Proving Unit (Fluke P/N 4910310) and a Fluke 8846A Multimeter. 1. Set the T6 tester to the resistance measurement mode. 3. A green LED turns on when the output is activated. 4. Set the Product to the FieldSense measurement mode. Set the PRV240FS selector switch to the resistance listed in Table 9, Step 1. 2. For T6-1000 only: a. c. Set the calibrator...
... frequency. 6. Place the Product current fork into the Test Lead Ground Contact of a PRV240FS Proving Unit (Fluke P/N 4910310) and a Fluke 8846A Multimeter. 1. Set the T6 tester to the resistance measurement mode. 3. A green LED turns on when the output is activated. 4. Set the Product to the FieldSense measurement mode. Set the PRV240FS selector switch to the resistance listed in Table 9, Step 1. 2. For T6-1000 only: a. c. Set the calibrator...
Product Manual
Page 13
... the battery door probe dock spring. Change the calibrator frequency to the battery door pad. 5. T6-1000/T6-600 Service Information Low Battery Indicator To verify the correct operation of the low battery indicator: 1. Set the calibrator to LOW (MEAS SETUP > RESOLUTION > LOW). Set the 8846A resolution to 100 Ω. This hides the two least significant digits that 0 bars (empty battery) show inside the battery indicator on the Tester display. 5. Disconnect the battery...
... the battery door probe dock spring. Change the calibrator frequency to the battery door pad. 5. T6-1000/T6-600 Service Information Low Battery Indicator To verify the correct operation of the low battery indicator: 1. Set the calibrator to LOW (MEAS SETUP > RESOLUTION > LOW). Set the 8846A resolution to 100 Ω. This hides the two least significant digits that 0 bars (empty battery) show inside the battery indicator on the Tester display. 5. Disconnect the battery...
Product Manual
Page 14
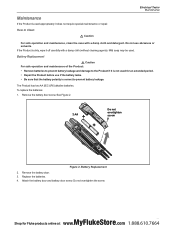
.... The Product has two AA (IEC LR6) alkaline batteries. See Figure 2. 2 AA Do not overtighten screw Figure 2. Replace the batteries. 4. Mild soap may be used appropriately it does not require special maintenance or repair. Battery Replacement W Caution For safe operation and maintenance of the Product: • Remove batteries to prevent battery leakage and damage to the Product if it is...
.... The Product has two AA (IEC LR6) alkaline batteries. See Figure 2. 2 AA Do not overtighten screw Figure 2. Replace the batteries. 4. Mild soap may be used appropriately it does not require special maintenance or repair. Battery Replacement W Caution For safe operation and maintenance of the Product: • Remove batteries to prevent battery leakage and damage to the Product if it is...
Product Manual
Page 15
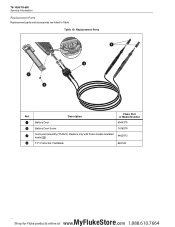
Replace only with Fluke double-insulated leads (T) 4462973 TP1 Probe Set, Flat-Blade 648128 MyFlukeStore 12 Shop for Fluke products online at: www. .com 1.888.610.7664 T6-1000/T6-600 Service Information Replacement Parts Replacement parts and accessories are listed in Table Table 10. Description or Model Number Battery Door 4944370 Battery Door Screw 1618579 Test Lead Assembly (T5-RLS). Replacement Parts 4 3 1 2 Fluke Part Ref.
Replace only with Fluke double-insulated leads (T) 4462973 TP1 Probe Set, Flat-Blade 648128 MyFlukeStore 12 Shop for Fluke products online at: www. .com 1.888.610.7664 T6-1000/T6-600 Service Information Replacement Parts Replacement parts and accessories are listed in Table Table 10. Description or Model Number Battery Door 4944370 Battery Door Screw 1618579 Test Lead Assembly (T5-RLS). Replacement Parts 4 3 1 2 Fluke Part Ref.


