FE 192,196,199 C Users Manual
Page 28
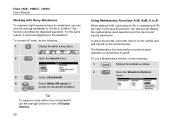
...do the following : 1 Display the SCOPE key labels. 2 Open the Waveform Options menu. The Mathematics functions perform a point-to-point operation on the horizontal axis. For the same reason, it improves triggering on waveforms, you can limit the working bandwidth to accept the bandwidth ...key labels. 2 Open the Input A menu. 3 Jump to Bandwidth. 4 Select 10kHz (HF reject) to 10 kHz or 20 MHz. Fluke 192B - 196B/C - 199B/C Users Manual Working with input A on the vertical axis and input B on waveforms A and B. To use the average function or turn off Display Glitches...
...do the following : 1 Display the SCOPE key labels. 2 Open the Waveform Options menu. The Mathematics functions perform a point-to-point operation on the horizontal axis. For the same reason, it improves triggering on waveforms, you can limit the working bandwidth to accept the bandwidth ...key labels. 2 Open the Input A menu. 3 Jump to Bandwidth. 4 Select 10kHz (HF reject) to 10 kHz or 20 MHz. Fluke 192B - 196B/C - 199B/C Users Manual Working with input A on the vertical axis and input B on waveforms A and B. To use the average function or turn off Display Glitches...
FE 192,196,199 C Users Manual
Page 76
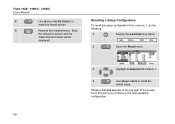
Recalling a Setup Configuration To recall the setup configuration from memory 1, do the following: 1 Display the SAVE/PRINT key labels. 2 Open the Recall menu. 3 Highlight SCREEN+SETUP location 1. 4 Use RECALL SETUP to recall the saved screen. 5 Resume the measurement. Both, the reference screen and the measurement screen will be displayed. Observe that RUN appears at the top right of the screen. Fluke 192B - 196B/C - 199B/C Users Manual 4 Use RECALL FOR REFERENCE to recall the saved setup. From this point you continue in the new operating configuration. 68
Recalling a Setup Configuration To recall the setup configuration from memory 1, do the following: 1 Display the SAVE/PRINT key labels. 2 Open the Recall menu. 3 Highlight SCREEN+SETUP location 1. 4 Use RECALL SETUP to recall the saved screen. 5 Resume the measurement. Both, the reference screen and the measurement screen will be displayed. Observe that RUN appears at the top right of the screen. Fluke 192B - 196B/C - 199B/C Users Manual 4 Use RECALL FOR REFERENCE to recall the saved setup. From this point you continue in the new operating configuration. 68

FE 192,196,199 C Users Manual
Page 86
... The high brightness intensity increases when you can select the language in economic brightness mode when operated on the battery. Fluke 192B - 196B/C - 199B/C Users Manual Changing the Information Language During operation of the test tool, messages may appear at the bottom of the screen. 4 Change the... Brightness To adjust the contrast and backlight brightness, do the following: 1 Display the USER key labels. 2 Enable the arrow keys for manual contrast and backlight adjustment. 3 Adjust the contrast of the screen. You can select English or French . To save battery power, the...
... The high brightness intensity increases when you can select the language in economic brightness mode when operated on the battery. Fluke 192B - 196B/C - 199B/C Users Manual Changing the Information Language During operation of the test tool, messages may appear at the bottom of the screen. 4 Change the... Brightness To adjust the contrast and backlight brightness, do the following: 1 Display the USER key labels. 2 Enable the arrow keys for manual contrast and backlight adjustment. 3 Adjust the contrast of the screen. You can select English or French . To save battery power, the...
FE 192,196,199 C Users Manual
Page 88
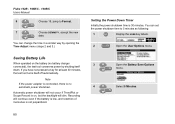
... down. You can change the time in a similar way by opening the Time Adjust menu (steps 2 and 3.) Saving Battery Life When operated on , but the backlight will continue even if the battery is low, and retention of memories is not jeopardized. Setting the Power Down ...Timer Initially the power shutdown time is no battery charger connected), the test tool conserves power by shutting itself off automatically. Fluke 192B - 196B/C - 199B/C Users Manual 6 Choose 19, jump to 5 minutes as following: 1 Display the USER key labels. 2 Open the User Options menu. 3 Open...
... down. You can change the time in a similar way by opening the Time Adjust menu (steps 2 and 3.) Saving Battery Life When operated on , but the backlight will continue even if the battery is low, and retention of memories is not jeopardized. Setting the Power Down ...Timer Initially the power shutdown time is no battery charger connected), the test tool conserves power by shutting itself off automatically. Fluke 192B - 196B/C - 199B/C Users Manual 6 Choose 19, jump to 5 minutes as following: 1 Display the USER key labels. 2 Open the User Options menu. 3 Open...

FE 192,196,199 C Users Manual
Page 92
... there are : . To charge the batteries more quickly, turn off ) to trickle charging. 84 Figure 47. Caution To avoid overheating of operating time left. When battery power is connected for 4 hours (with the test tool turned off the test tool. When fully charged, the batteries... to reach full charge. The battery symbols are typically five minutes of the batteries during the weekend. Charging the Batteries Fluke 192B - 196B/C - 199B/C Users Manual Charging the Batteries At delivery, the NiMH batteries may be empty and must be charged for long periods, e.g., during ...
... there are : . To charge the batteries more quickly, turn off ) to trickle charging. 84 Figure 47. Caution To avoid overheating of operating time left. When battery power is connected for 4 hours (with the test tool turned off the test tool. When fully charged, the batteries... to reach full charge. The battery symbols are typically five minutes of the batteries during the weekend. Charging the Batteries Fluke 192B - 196B/C - 199B/C Users Manual Charging the Batteries At delivery, the NiMH batteries may be empty and must be charged for long periods, e.g., during ...
FE 192,196,199 C Users Manual
Page 102
Battery Operated Fluke Accessories Do Not Function • When using battery operated Fluke accessories, always first check the battery condition of the accessory with a Fluke multimeter. 94 Fluke 192B - 196B/C - 199B/C Users Manual FlukeView Does Not Recognize The Test Tool • Make sure that the test tool is turned on. • Make sure that the interface cable is properly connected between the test tool and the PC. • Make sure that the correct COM port has been selected in FlukeView. If not, change the COM port setting or connect the interface cable to another COM port.
Battery Operated Fluke Accessories Do Not Function • When using battery operated Fluke accessories, always first check the battery condition of the accessory with a Fluke multimeter. 94 Fluke 192B - 196B/C - 199B/C Users Manual FlukeView Does Not Recognize The Test Tool • Make sure that the test tool is turned on. • Make sure that the interface cable is properly connected between the test tool and the PC. • Make sure that the correct COM port has been selected in FlukeView. If not, change the COM port setting or connect the interface cable to another COM port.
FE 192,196,199 C Users Manual
Page 103
Use of this manual are based on the results of identical ScopeMeter test tools. Chapter 9 Specifications Introduction Performance Characteristics FLUKE guarantees the properties expressed in a manner not specified by the manufacturer may impair protection provided by the user to ensure safe operation and to keep the instrument in accordance with the stated tolerance. Specifications...
Use of this manual are based on the results of identical ScopeMeter test tools. Chapter 9 Specifications Introduction Performance Characteristics FLUKE guarantees the properties expressed in a manner not specified by the manufacturer may impair protection provided by the user to ensure safe operation and to keep the instrument in accordance with the stated tolerance. Specifications...


