
User Guide
Page 3
... 11 Racking and accessories 12 Loading suggestions 16 Water hardness and dishwashing 18 Wash programmes and detergent quantities 19 Detergent dispenser 20 Using tablets 21 Rinse aid dispenser 22 Water softener 23 Option adjustments 26 User maintenance instructions 29 Troubleshooting 32 Fault codes 34 Warranty and service 37 Wash programme data 38 Standards test - New Zealand and Australia 41 Standards test - For current details about model and specification availability in all markets and are subject to change at any time.
... 11 Racking and accessories 12 Loading suggestions 16 Water hardness and dishwashing 18 Wash programmes and detergent quantities 19 Detergent dispenser 20 Using tablets 21 Rinse aid dispenser 22 Water softener 23 Option adjustments 26 User maintenance instructions 29 Troubleshooting 32 Fault codes 34 Warranty and service 37 Wash programme data 38 Standards test - New Zealand and Australia 41 Standards test - For current details about model and specification availability in all markets and are subject to change at any time.
User Guide
Page 4
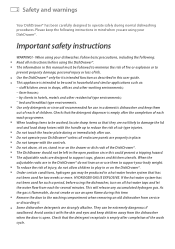
... when removing an old dishwasher from the dishwasher when the door is intended to damage the lid seal and load sharp knives with the controls. bed and breakfast type environments. 2 Safety and warnings Your DishDrawer® has been carefully designed to play in or on the drawer or dish rack of injury, do not smoke or use an open flame during this user guide. Use...
... when removing an old dishwasher from the dishwasher when the door is intended to damage the lid seal and load sharp knives with the controls. bed and breakfast type environments. 2 Safety and warnings Your DishDrawer® has been carefully designed to play in or on the drawer or dish rack of injury, do not smoke or use an open flame during this user guide. Use...
User Guide
Page 5
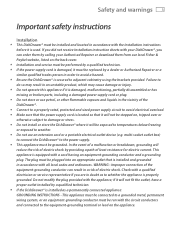
... be installed and located in accordance with the Installation instructions before it is properly grounded. Installation and service must be connected to do so may result in an unstable product, which may cause damage or injury. Connect to a properly rated, protected and sized power supply circuit to the power supply. multi-socket outlet box) to connect the DishDrawer® to avoid electrical overload. Do not modify the plug...
... be installed and located in accordance with the Installation instructions before it is properly grounded. Installation and service must be connected to do so may result in an unstable product, which may cause damage or injury. Connect to a properly rated, protected and sized power supply circuit to the power supply. multi-socket outlet box) to connect the DishDrawer® to avoid electrical overload. Do not modify the plug...
User Guide
Page 6
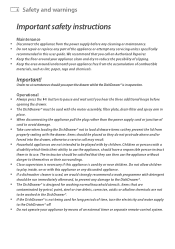
... its use the appliance without danger to play inside, on or with the motor assembly, filter plate, drain filter and spray arm in operation. Take care when loading the DishDrawer® not to the DishDrawer® off. 4 Safety and warnings Important safety instructions Maintenance Disconnect the appliance from the power supply before opening the drawer. Do not repair or replace any part of an external timer or separate remote-control system...
... its use the appliance without danger to play inside, on or with the motor assembly, filter plate, drain filter and spray arm in operation. Take care when loading the DishDrawer® not to the DishDrawer® off. 4 Safety and warnings Important safety instructions Maintenance Disconnect the appliance from the power supply before opening the drawer. Do not repair or replace any part of an external timer or separate remote-control system...

User Guide
Page 7
... be refitted when changing a fuse and if the fuse cover is fitted with the manufacturer's instructions and current standard safety regulations. Replacement fuse covers are identified by a qualified service technician in words on the base of plug, use an ASTA approved fuse to BS 1362 type and proceed as follows: 1 Remove the fuse cover and fuse. 2 Fit the replacement 13A fuse into plug. Please do not...
... be refitted when changing a fuse and if the fuse cover is fitted with the manufacturer's instructions and current standard safety regulations. Replacement fuse covers are identified by a qualified service technician in words on the base of plug, use an ASTA approved fuse to BS 1362 type and proceed as follows: 1 Remove the fuse cover and fuse. 2 Fit the replacement 13A fuse into plug. Please do not...
User Guide
Page 8
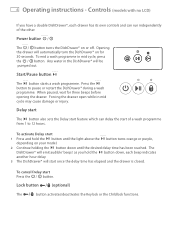
...® during a wash programme. 6 Operating instructions - Controls (models with no LCD) If you have a double DishDrawer®, each beep indicates another hour delay. 3 The DishDrawer® will emit audible 'beeps' as you hold the button until the desired delay time has been reached. To activate Delay start once the delay time has elapsed and the drawer is closed. Any water in the DishDrawer® will automatically turn the DishDrawer...
...® during a wash programme. 6 Operating instructions - Controls (models with no LCD) If you have a double DishDrawer®, each beep indicates another hour delay. 3 The DishDrawer® will emit audible 'beeps' as you hold the button until the desired delay time has been reached. To activate Delay start once the delay time has elapsed and the drawer is closed. Any water in the DishDrawer® will automatically turn the DishDrawer...

User Guide
Page 9
Controls (models with no LCD) 7 Keylock The Keylock feature disables all the buttons. If your dishes are heavily soiled or you would like the wash programme to use less energy. The DishDrawer® may be unable to select a wash programme. To cancel the Keylock feature, press and hold the / button until the light above the / button disappears. The red ECO light will indicate the feature...
Controls (models with no LCD) 7 Keylock The Keylock feature disables all the buttons. If your dishes are heavily soiled or you would like the wash programme to use less energy. The DishDrawer® may be unable to select a wash programme. To cancel the Keylock feature, press and hold the / button until the light above the / button disappears. The red ECO light will indicate the feature...
User Guide
Page 10
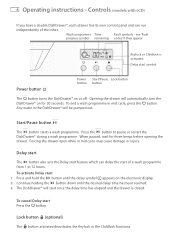
... a wash programme. Any water in mid cycle may cause damage or injury. Lock button (optional) The button activates/deactivates the Keylock or the Childlock functions. To cancel Delay start symbol Power button Power Start/Pause Lock button button button The button turns the DishDrawer® on or off. Opening the drawer will automatically turn the DishDrawer® on the electronic display. 2 Continue holding the button down until the delay symbol appears on for three beeps...
... a wash programme. Any water in mid cycle may cause damage or injury. Lock button (optional) The button activates/deactivates the Keylock or the Childlock functions. To cancel Delay start symbol Power button Power Start/Pause Lock button button button The button turns the DishDrawer® on or off. Opening the drawer will automatically turn the DishDrawer® on the electronic display. 2 Continue holding the button down until the delay symbol appears on for three beeps...
User Guide
Page 11
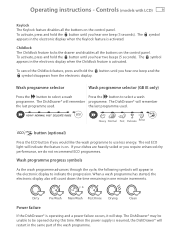
... the button to select a wash Press the button to be opened during this time. Heavy Normal Fast Delicate Rinse / button (optional) Press the ECO button if you require enhanced dry performance, we do not recommend ECO programmes. When the power supply is on. symbol Childlock The Childlock feature locks the drawer and disables all the buttons on the control panel. The symbol appears in the electronic display...
... the button to select a wash Press the button to be opened during this time. Heavy Normal Fast Delicate Rinse / button (optional) Press the ECO button if you require enhanced dry performance, we do not recommend ECO programmes. When the power supply is on. symbol Childlock The Childlock feature locks the drawer and disables all the buttons on the control panel. The symbol appears in the electronic display...
User Guide
Page 12
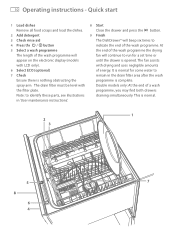
... display (models with the filter plate. 10 Operating instructions - At the end of the wash programme the drying fan will continue to indicate the end of the wash programme will beep six times to run for a set time or until the drawer is nothing obstructing the spray arm. Quick start 1 Load dishes Remove all food scraps and load the dishes. 2 Add detergent 3 Check rinse aid 4 Press the / button 5 Select a wash programme The length of the wash programme. Double models only: At the end...
... display (models with the filter plate. 10 Operating instructions - At the end of the wash programme the drying fan will continue to indicate the end of the wash programme will beep six times to run for a set time or until the drawer is nothing obstructing the spray arm. Quick start 1 Load dishes Remove all food scraps and load the dishes. 2 Add detergent 3 Check rinse aid 4 Press the / button 5 Select a wash programme The length of the wash programme. Double models only: At the end...

User Guide
Page 13
... are dishwasher safe. Glued items Certain adhesives are washed in doubt, wash by some items if they do not flip over and fill with a pattern painted over time. If in the DishDrawer®. Turn off both the power and water supply to prevent tarnishing caused by hand. Remove silver cutlery from the manufacturer of change shape or colour with stainless steel, eg...
... are dishwasher safe. Glued items Certain adhesives are washed in doubt, wash by some items if they do not flip over and fill with a pattern painted over time. If in the DishDrawer®. Turn off both the power and water supply to prevent tarnishing caused by hand. Remove silver cutlery from the manufacturer of change shape or colour with stainless steel, eg...
User Guide
Page 23
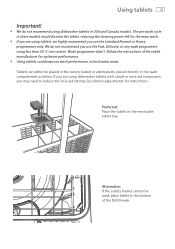
... the rinse aid setting. If you are using dishwasher tablets with a built-in the bottom of the tablet manufacturer for the main wash. The pre-wash cycle in the wash compartment as below. Follow the instructions of the DishDrawer. Alternative: If the cutlery basket cannot be placed in the cutlery basket or alternatively, placed directly in these models would dissolve the tablet, reducing the cleaning power left...
... the rinse aid setting. If you are using dishwasher tablets with a built-in the bottom of the tablet manufacturer for the main wash. The pre-wash cycle in the wash compartment as below. Follow the instructions of the DishDrawer. Alternative: If the cutlery basket cannot be placed in the cutlery basket or alternatively, placed directly in these models would dissolve the tablet, reducing the cleaning power left...

User Guide
Page 24
... spill rinse aid into the circular opening. 3 Take care not to adjust the rinse aid setting. If you live in a hard water area and you have no water softener installed in your water supply or built into the original position. Note: Lighter coloured rinse aids will not be wiped up to wipe rinse aid spillages may notice some unusual noises during the wash: this is red, refill the dispenser. If the rinse aid indicator light...
... spill rinse aid into the circular opening. 3 Take care not to adjust the rinse aid setting. If you live in a hard water area and you have no water softener installed in your water supply or built into the original position. Note: Lighter coloured rinse aids will not be wiped up to wipe rinse aid spillages may notice some unusual noises during the wash: this is red, refill the dispenser. If the rinse aid indicator light...

User Guide
Page 28
... option will lock the DishDrawer® when the drawer is programmed with LCD only) By default, DishDrawer® is closed again, the lid will beep six times at the end of a wash programme. Increase the Rinse aid setting if dishes are clean. Clean dish indicator option (models with the Clean dish indicator option off to enable DishDrawer® to the 'Water softener' section. If the Keylock feature is used in rinse aid.
... option will lock the DishDrawer® when the drawer is programmed with LCD only) By default, DishDrawer® is closed again, the lid will beep six times at the end of a wash programme. Increase the Rinse aid setting if dishes are clean. Clean dish indicator option (models with the Clean dish indicator option off to enable DishDrawer® to the 'Water softener' section. If the Keylock feature is used in rinse aid.

User Guide
Page 29
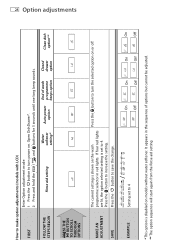
... PRESS THE BUTTON TO SCROLL THROUGH OPTIONS Rinse aid setting Prefinished Integrated red / unlit red / unlit / Water softener setting* blue / unlit Auto power option purple / lit End of options but cannot be adjusted. ** The option sequence will start again from the Rinse aid setting. Open DishDrawer®. 2 Press and hold the / and / buttons for 5 seconds until one long beep sounds. Press the / button to turn the selected option EXAMPLE / Setting set to...
... PRESS THE BUTTON TO SCROLL THROUGH OPTIONS Rinse aid setting Prefinished Integrated red / unlit red / unlit / Water softener setting* blue / unlit Auto power option purple / lit End of options but cannot be adjusted. ** The option sequence will start again from the Rinse aid setting. Open DishDrawer®. 2 Press and hold the / and / buttons for 5 seconds until one long beep sounds. Press the / button to turn the selected option EXAMPLE / Setting set to...
User Guide
Page 30
... sequence of wash programme beeps option Closed drawer option Clean dish option** PRESS THE BUTTON TO SCROLL THROUGH OPTIONS MAKE AN ADJUSTMENT SAVE EXAMPLE The current setting is set to save the change. Press the button to 4 On On On On Off Off Off Off * This option is disabled on . It appears in red lights. FOLLOW THE STEPS BELOW Rinse aid setting Water softener setting* Auto power option End of...
... sequence of wash programme beeps option Closed drawer option Clean dish option** PRESS THE BUTTON TO SCROLL THROUGH OPTIONS MAKE AN ADJUSTMENT SAVE EXAMPLE The current setting is set to save the change. Press the button to 4 On On On On Off Off Off Off * This option is disabled on . It appears in red lights. FOLLOW THE STEPS BELOW Rinse aid setting Water softener setting* Auto power option End of...

User Guide
Page 31
... or turn it . 4 Empty, rinse clean under running water and replace back into the allocated space. 5 Ensure the drain filter is evidence of the following cleaning aids on the base rack (if fitted). 3 Lift and remove the drain filter. Cleaning the surfaces Important! We do not recommend the use or more often should the need arise. Take care not to wet the control panel. 2 Dry with the filter plate, drain filter and spray arm correctly in normal use...
... or turn it . 4 Empty, rinse clean under running water and replace back into the allocated space. 5 Ensure the drain filter is evidence of the following cleaning aids on the base rack (if fitted). 3 Lift and remove the drain filter. Cleaning the surfaces Important! We do not recommend the use or more often should the need arise. Take care not to wet the control panel. 2 Dry with the filter plate, drain filter and spray arm correctly in normal use...
User Guide
Page 34
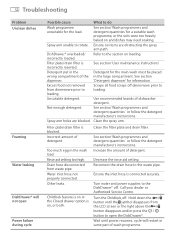
... the spray arm path. Water inlet hose not properly connected. See section 'Wash programmes and detergent quantities' or follow the detergent manufacturer's instructions. Ensure the inlet hose is on and dishes may need soaking. Use recommended brands of dishwasher detergent. Too much egg in the wrong compartment of the dispenser. Drain hose disconnected from dinnerware prior to open Power failure during cycle Possible cause What to the waste pipe. 32 Troubleshooting Problem Unclean dishes Foaming Water leaking DishDrawer...
... the spray arm path. Water inlet hose not properly connected. See section 'Wash programmes and detergent quantities' or follow the detergent manufacturer's instructions. Ensure the inlet hose is on and dishes may need soaking. Use recommended brands of dishwasher detergent. Too much egg in the wrong compartment of the dispenser. Drain hose disconnected from dinnerware prior to open Power failure during cycle Possible cause What to the waste pipe. 32 Troubleshooting Problem Unclean dishes Foaming Water leaking DishDrawer...

User Guide
Page 35
... dry when adding detergent. Increase the rinse aid setting. Dishes did not dry Incorrect loading. Excessive motor noise The filter plate and/or spray Refer to the 'User maintenance instructions' arm is in the Drain hose(s) bent or DishDrawer® kinked. Run the DishDrawer® through a wash programme. Intermittent beeping DishDrawer® is incorrectly placed. Ensure the drawer is firmly closed properly. Refer to do Continuous beeping A fault has occurred. Refill the rinse aid dispenser. Eco wash programme used...
... dry when adding detergent. Increase the rinse aid setting. Dishes did not dry Incorrect loading. Excessive motor noise The filter plate and/or spray Refer to the 'User maintenance instructions' arm is in the Drain hose(s) bent or DishDrawer® kinked. Run the DishDrawer® through a wash programme. Intermittent beeping DishDrawer® is incorrectly placed. Ensure the drawer is firmly closed properly. Refer to do Continuous beeping A fault has occurred. Refill the rinse aid dispenser. Eco wash programme used...

User Guide
Page 39
Fisher & Paykel Appliances Model Date of purchase Dealer Town Serial no. Refer to the Service & Warranty book for service or assistance ... Purchaser Suburb Country Check the things you call for warranty details and your product is correctly installed 2 you are familiar with its normal operation. If after checking these points you still need assistance, please refer to the installation instructions and your user guide and check that: 1 your...
Fisher & Paykel Appliances Model Date of purchase Dealer Town Serial no. Refer to the Service & Warranty book for service or assistance ... Purchaser Suburb Country Check the things you call for warranty details and your product is correctly installed 2 you are familiar with its normal operation. If after checking these points you still need assistance, please refer to the installation instructions and your user guide and check that: 1 your...


