

User Guide
Page 3
For operating instructions, see your 'Quick start guide' for information on the back cover. This user guide is included with your dishwasher. If you no longer have your 'Quick start guide', you can download it from our local website, listed on : ●● Starting a wash ●● Wash programs and when to use them ●● Controls ●● Dos and don'ts of loading ●● Preference options and how to your 'Quick start guide'. Refer to your 'Quick start guide' which is an accompaniment to change their settings
For operating instructions, see your 'Quick start guide' for information on the back cover. This user guide is included with your dishwasher. If you no longer have your 'Quick start guide', you can download it from our local website, listed on : ●● Starting a wash ●● Wash programs and when to use them ●● Controls ●● Dos and don'ts of loading ●● Preference options and how to your 'Quick start guide'. Refer to your 'Quick start guide' which is an accompaniment to change their settings
User Guide
Page 5
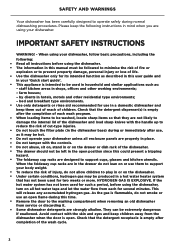
... 5 Operating instructions Racking features 6 Loading suggestions 10 Water hardness and dishwashing 11 Wash programs and detergent quantities 12 Adding detergent 13 Using rinse aid 17 User maintenance instructions 18 Troubleshooting 22 If there is a fault 27 How to attend to our website www.fisherpaykel.com or contact your country, please go to a fault 28 Warranty and service 30 Wash program data 32 Standards tests 34 IMPORTANT! For current details about model and specification availability...
... 5 Operating instructions Racking features 6 Loading suggestions 10 Water hardness and dishwashing 11 Wash programs and detergent quantities 12 Adding detergent 13 Using rinse aid 17 User maintenance instructions 18 Troubleshooting 22 If there is a fault 27 How to attend to our website www.fisherpaykel.com or contact your country, please go to a fault 28 Warranty and service 30 Wash program data 32 Standards tests 34 IMPORTANT! For current details about model and specification availability...
User Guide
Page 6
... the dishwasher and load sharp knives with the skin and eyes and keep them to support your 'Quick start guide'. ●● This appliance is empty after use an open flame during this could present a tripping hazard. ●● The foldaway cup racks are designed to the washing compartment when removing an old dishwasher from service or discarding it may be produced in a hot water...
... the dishwasher and load sharp knives with the skin and eyes and keep them to support your 'Quick start guide'. ●● This appliance is empty after use an open flame during this could present a tripping hazard. ●● The foldaway cup racks are designed to the washing compartment when removing an old dishwasher from service or discarding it may be produced in a hot water...
User Guide
Page 7
... a permanently connected appliance: GROUNDING INSTRUCTIONS - The plug must be plugged into an appropriate outlet that it will not be stepped on the back cover. ●● Installation and service must be grounded. Improper connection of the dishwasher. ●● Connect to a properly rated, protected and sized power supply circuit to avoid electrical overload. ●● Make sure that the power supply cord is located so that is installed and...
... a permanently connected appliance: GROUNDING INSTRUCTIONS - The plug must be plugged into an appropriate outlet that it will not be stepped on the back cover. ●● Installation and service must be grounded. Improper connection of the dishwasher. ●● Connect to a properly rated, protected and sized power supply circuit to avoid electrical overload. ●● Make sure that the power supply cord is located so that is installed and...
User Guide
Page 8
... the motor assembly, filter plate, drain filter and spray arm in a safe way and they understand the hazards involved. ●● Cleaning and user maintenance shall not be done by petrol, paint, steel or iron debris, corrosive, acidic or alkaline chemicals are , see drawings in this user guide. ●● Take care when loading the drawer not to the dishwasher. ●● The dishwasher is designed for washing normal...
... the motor assembly, filter plate, drain filter and spray arm in a safe way and they understand the hazards involved. ●● Cleaning and user maintenance shall not be done by petrol, paint, steel or iron debris, corrosive, acidic or alkaline chemicals are , see drawings in this user guide. ●● Take care when loading the drawer not to the dishwasher. ●● The dishwasher is designed for washing normal...

User Guide
Page 9
The Rinse wash program is dishwasher safe. Silver items should not come into contact with hot water. Mixing these items by hand. The degree of change shape or colour with stainless steel, eg other items. Copper, pewter and brass tend to prevent tarnishing caused by some items if they do not flip over time. Regular use to stain. Glassware Most everyday...
The Rinse wash program is dishwasher safe. Silver items should not come into contact with hot water. Mixing these items by hand. The degree of change shape or colour with stainless steel, eg other items. Copper, pewter and brass tend to prevent tarnishing caused by some items if they do not flip over time. Regular use to stain. Glassware Most everyday...

User Guide
Page 14
... rotating. How NOT to items on the foldaway cup racks so they do not become dislodged and stop spray arm rotation. 10 Ensure cutlery has not fallen through the base rack and stopped thheeasvpyrloaayd arms fTrhoemlarroghteaeatbvinyoglwo.aldis blocking wash water reaching the foldaway cup racks. LOADING SUGGESTIONS When loading your drawer, make sure that they do not accidentally topple and break during...
... rotating. How NOT to items on the foldaway cup racks so they do not become dislodged and stop spray arm rotation. 10 Ensure cutlery has not fallen through the base rack and stopped thheeasvpyrloaayd arms fTrhoemlarroghteaeatbvinyoglwo.aldis blocking wash water reaching the foldaway cup racks. LOADING SUGGESTIONS When loading your drawer, make sure that they do not accidentally topple and break during...

User Guide
Page 20
... location and water hardness level. Dishwasher detergents are using tablets, follow manufacturer instructions on using dishwasher tablets with a built-in your dishwasher! ●● Liquid detergents ●● Laundry detergents ●● Hand washing liquids ●● Soaps ●● Disinfectants How much detergent to use these in rinse aid component, we recommend turning off the rinse aid (rAo). See your 'Quick start guide' for all wash programs. ●● Using tablets could improve wash performance in hard water...
... location and water hardness level. Dishwasher detergents are using tablets, follow manufacturer instructions on using dishwasher tablets with a built-in your dishwasher! ●● Liquid detergents ●● Laundry detergents ●● Hand washing liquids ●● Soaps ●● Disinfectants How much detergent to use these in rinse aid component, we recommend turning off the rinse aid (rAo). See your 'Quick start guide' for all wash programs. ●● Using tablets could improve wash performance in hard water...
User Guide
Page 21
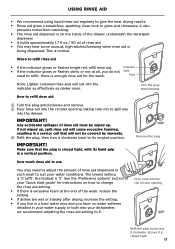
... the indicator glows or flashes dimly or not at the end of the wash, reduce the setting. ●● If dishes are wet or streaky after drying, increase the setting. ●● If you live in a hard water area and you do not light need to adjust the amount of rinse aid. ●● You may need to refill rinse aid 1 Turn the plug anticlockwise and remove. 2 Pour rinse aid into the...
... the indicator glows or flashes dimly or not at the end of the wash, reduce the setting. ●● If dishes are wet or streaky after drying, increase the setting. ●● If you live in a hard water area and you do not light need to adjust the amount of rinse aid. ●● You may need to refill rinse aid 1 Turn the plug anticlockwise and remove. 2 Pour rinse aid into the...

User Guide
Page 22
... allow all its parts to wet the control panel. 2 Dry with a clean damp cloth. Take care not to cool before loading and starting a wash. Turn off at the circuit breaker) and allow air to be used for the first time after a long period away, we recommend you leave it clean and empty. Cleaning the surfaces 1 Wipe with a clean lint-free cloth. Drain filter 18 Base Rack Fixed tine plate rack Spray arm Filter plate IMPORTANT...
... allow all its parts to wet the control panel. 2 Dry with a clean damp cloth. Take care not to cool before loading and starting a wash. Turn off at the circuit breaker) and allow air to be used for the first time after a long period away, we recommend you leave it clean and empty. Cleaning the surfaces 1 Wipe with a clean lint-free cloth. Drain filter 18 Base Rack Fixed tine plate rack Spray arm Filter plate IMPORTANT...

User Guide
Page 23
... plate rack and/or the base rack first 1 Unplug the dishwasher or turn it knocking against the detergent and rinse aid dispenser and lift out. 2 If the base rack is used, you always use the dishwasher with detergent immediately afterward to prevent any damage to remove the whole base rack first. Note: For ease of the rear anchoring loop and lift out. USER MAINTENANCE INSTRUCTIONS Cleaning the drain filter and filter plate...
... plate rack and/or the base rack first 1 Unplug the dishwasher or turn it knocking against the detergent and rinse aid dispenser and lift out. 2 If the base rack is used, you always use the dishwasher with detergent immediately afterward to prevent any damage to remove the whole base rack first. Note: For ease of the rear anchoring loop and lift out. USER MAINTENANCE INSTRUCTIONS Cleaning the drain filter and filter plate...

User Guide
Page 25
... off at the power supply. Rinse it clean under running water and wipe with a damp cloth. 5 Replace the spray arm back onto the impeller. 6 Replace the base rack, lowering its front edge into position first. 7 Plug the dishwasher back in the drawer, it must be carefully removed to prevent damage to the dishwasher. USER MAINTENANCE INSTRUCTIONS Cleaning the spray arm 1 Unplug the dishwasher or turn it on all upright and close to the top. 3 Remove the base rack carefully.
... off at the power supply. Rinse it clean under running water and wipe with a damp cloth. 5 Replace the spray arm back onto the impeller. 6 Replace the base rack, lowering its front edge into position first. 7 Plug the dishwasher back in the drawer, it must be carefully removed to prevent damage to the dishwasher. USER MAINTENANCE INSTRUCTIONS Cleaning the spray arm 1 Unplug the dishwasher or turn it on all upright and close to the top. 3 Remove the base rack carefully.
User Guide
Page 26
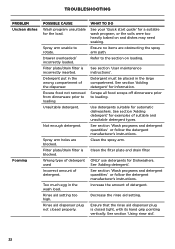
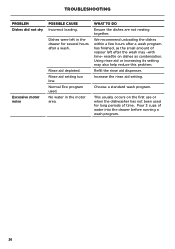
... removed from dinnerware prior to the section on and dishes may need soaking. Too much egg in the large compartment. Rinse aid setting too high. Detergent must be placed in the wash load. Clean the filter plate and drain filter. Decrease the rinse aid setting. TROUBLESHOOTING PROBLEM Unclean dishes Foaming POSSIBLE CAUSE Wash program unsuitable for examples of suitable and unsuitable detergent types. Rinse aid dispenser plug not closed tight, with its hand grip pointing vertically. Spray arm...
... removed from dinnerware prior to the section on and dishes may need soaking. Too much egg in the large compartment. Rinse aid setting too high. Detergent must be placed in the wash load. Clean the filter plate and drain filter. Decrease the rinse aid setting. TROUBLESHOOTING PROBLEM Unclean dishes Foaming POSSIBLE CAUSE Wash program unsuitable for examples of suitable and unsuitable detergent types. Rinse aid dispenser plug not closed tight, with its hand grip pointing vertically. Spray arm...
User Guide
Page 27
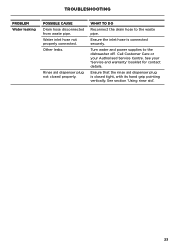
... the drain hose to the dishwasher off. Ensure the inlet hose is closed properly. Other leaks. Rinse aid dispenser plug not closed tight, with its hand grip pointing vertically. Call Customer Care or your 'Service and warranty' booklet for contact details. See section 'Using rinse aid'. 23 TROUBLESHOOTING PROBLEM Water leaking POSSIBLE CAUSE Drain hose disconnected from waste pipe. See your Authorised Service Centre. Water inlet hose not properly connected. Turn water and power supplies to the waste pipe. Ensure that the rinse aid dispenser plug is connected...
... the drain hose to the dishwasher off. Ensure the inlet hose is closed properly. Other leaks. Rinse aid dispenser plug not closed tight, with its hand grip pointing vertically. Call Customer Care or your 'Service and warranty' booklet for contact details. See section 'Using rinse aid'. 23 TROUBLESHOOTING PROBLEM Water leaking POSSIBLE CAUSE Drain hose disconnected from waste pipe. See your Authorised Service Centre. Water inlet hose not properly connected. Turn water and power supplies to the waste pipe. Ensure that the rinse aid dispenser plug is connected...
User Guide
Page 28
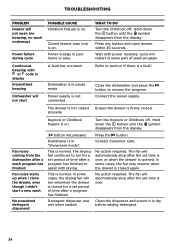
... button and open (no beeping, no wash underway) Power failure during cycle POSSIBLE CAUSE Childlock feature is a fault'. Continuous beeping with drying. Power supply is normal. Close the dishwasher and press the button to section 'If there is on. properly. This is not connected. In some cases, the drying fan will not start a new wash No powdered detergent dispensed button not pressed. Refer to resume the program. Turn the Keylock or Childlock off . Fan noise...
... button and open (no beeping, no wash underway) Power failure during cycle POSSIBLE CAUSE Childlock feature is a fault'. Continuous beeping with drying. Power supply is normal. Close the dishwasher and press the button to section 'If there is on. properly. This is not connected. In some cases, the drying fan will not start a new wash No powdered detergent dispensed button not pressed. Refer to resume the program. Turn the Keylock or Childlock off . Fan noise...
User Guide
Page 29
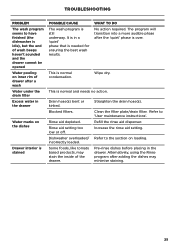
... normal and needs no action. This is normal condensation. Clean the filter plate/drain filter. Refer to 'User maintenance instructions'. Refill the rinse aid dispenser. It is needed for ensuring the best wash results. Rinse aid depleted. Straighten the drain hose(s). Increase the rinse aid setting. Blocked filters. Some foods, like tomato based products, may minimise staining. 25 Pre-rinse dishes before placing in a 'quiet' phase that is in the drawer. Rinse aid setting too low or off. Dishwasher overloaded/ incorrectly loaded...
... normal and needs no action. This is normal condensation. Clean the filter plate/drain filter. Refer to 'User maintenance instructions'. Refill the rinse aid dispenser. It is needed for ensuring the best wash results. Rinse aid depleted. Straighten the drain hose(s). Increase the rinse aid setting. Blocked filters. Some foods, like tomato based products, may minimise staining. 25 Pre-rinse dishes before placing in a 'quiet' phase that is in the drawer. Rinse aid setting too low or off. Dishwasher overloaded/ incorrectly loaded...
User Guide
Page 30
... the first use or when the dishwasher has not been used . Refill the rinse aid dispenser. Using rinse aid or increasing its setting may -with time- Pour 3 cups of water into the drawer before running a wash program. 26 No water in the drawer for several hours after the wash may also help reduce this problem. Increase the rinse aid setting. Rinse aid setting too low. TROUBLESHOOTING PROBLEM Dishes did not dry Excessive motor noise POSSIBLE CAUSE Incorrect loading. Rinse aid depleted. WHAT...
... the first use or when the dishwasher has not been used . Refill the rinse aid dispenser. Using rinse aid or increasing its setting may -with time- Pour 3 cups of water into the drawer before running a wash program. 26 No water in the drawer for several hours after the wash may also help reduce this problem. Increase the rinse aid setting. Rinse aid setting too low. TROUBLESHOOTING PROBLEM Dishes did not dry Excessive motor noise POSSIBLE CAUSE Incorrect loading. Rinse aid depleted. WHAT...
User Guide
Page 31
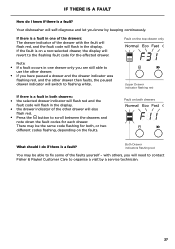
... able to fix some of the faults yourself - with the fault will flash red, and the fault code will need to contact Fisher & Paykel Customer Care to the flashing fault code for each drawer. There may be the same code flashing for both, or two different codes flashing, depending on both drawers: ●● the selected drawer indicator will flash red and the fault code will flash in one of the drawers...
... able to fix some of the faults yourself - with the fault will flash red, and the fault code will need to contact Fisher & Paykel Customer Care to the flashing fault code for each drawer. There may be the same code flashing for both, or two different codes flashing, depending on both drawers: ●● the selected drawer indicator will flash red and the fault code will flash in one of the drawers...

User Guide
Page 32
Has the dishwasher resumed normal operation? Wait a few seconds, then press again. NO Disconnect the dishwasher from the power supply (unplug or switch off at circuit breaker), turn off its water supply, then contact Customer Care with the fault will flash. Look up the fault in section 'User maintenance instructions', then close the drawer, press again, then press to resume the wash program. Has the spray arm loosened or come off its...
Has the dishwasher resumed normal operation? Wait a few seconds, then press again. NO Disconnect the dishwasher from the power supply (unplug or switch off at circuit breaker), turn off its water supply, then contact Customer Care with the fault will flash. Look up the fault in section 'User maintenance instructions', then close the drawer, press again, then press to resume the wash program. Has the spray arm loosened or come off its...
User Guide
Page 34
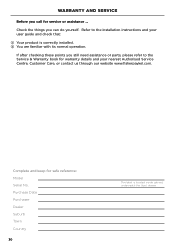
... you still need assistance or parts, please refer to the installation instructions and your nearest Authorised Service Centre, Customer Care, or contact us through our website www.fisherpaykel.com. Complete and keep for service or assistance ... WARRANTY AND SERVICE Before you call for safe reference: Model Serial No. Refer to the Service & Warranty book for warranty details and your user guide and check that: 1 Your product is located inside cabinet, underneath...
... you still need assistance or parts, please refer to the installation instructions and your nearest Authorised Service Centre, Customer Care, or contact us through our website www.fisherpaykel.com. Complete and keep for service or assistance ... WARRANTY AND SERVICE Before you call for safe reference: Model Serial No. Refer to the Service & Warranty book for warranty details and your user guide and check that: 1 Your product is located inside cabinet, underneath...


