
User Guide
Page 3
...to change at any time. Contents Safety and warnings Operating instructions Controls (models with no LCD) Controls (models with LCD) Operation Wash program chart Caring for your local Fisher & Paykel dealer. SAVE THESE INSTRUCTIONS The models shown in this User Guide may not be available in your country, please visit our local website listed on the back cover or contact your dinnerware Dishwasher standards test Racking features Loading suggestions Detergent dispenser Water softener Rinse agent dispenser Option adjustments User maintenance instructions Troubleshooting Fault codes Warranty and...
...to change at any time. Contents Safety and warnings Operating instructions Controls (models with no LCD) Controls (models with LCD) Operation Wash program chart Caring for your local Fisher & Paykel dealer. SAVE THESE INSTRUCTIONS The models shown in this User Guide may not be available in your country, please visit our local website listed on the back cover or contact your dinnerware Dishwasher standards test Racking features Loading suggestions Detergent dispenser Water softener Rinse agent dispenser Option adjustments User maintenance instructions Troubleshooting Fault codes Warranty and...
User Guide
Page 5
... enclosure panels are using the dishwasher, turn on the drawer or dish rack of the DishDrawer®. Do not operate your DishDrawer®. Dishwasher detergents are not likely to damage the lid seal and load sharp knives with skin and eyes, keep them to support your dishwasher, follow basic precautions, including the following instructions in mind when you are properly in this time. Use only detergents or rinse agent...
... enclosure panels are using the dishwasher, turn on the drawer or dish rack of the DishDrawer®. Do not operate your DishDrawer®. Dishwasher detergents are not likely to damage the lid seal and load sharp knives with skin and eyes, keep them to support your dishwasher, follow basic precautions, including the following instructions in mind when you are properly in this time. Use only detergents or rinse agent...
User Guide
Page 6
...; is installed and grounded in an unstable product, which may result in accordance with the appliance; If you did not receive Installation instruction sheets with your DishDrawer®, you are in doubt as a permanently connected appliance: GROUNDING INSTRUCTIONS - Installation and service must be plugged into an appropriate outlet that is installed as to whether the appliance is located so that the power supply cord is...
...; is installed and grounded in an unstable product, which may result in accordance with the appliance; If you did not receive Installation instruction sheets with your DishDrawer®, you are in doubt as a permanently connected appliance: GROUNDING INSTRUCTIONS - Installation and service must be plugged into an appropriate outlet that is installed as to whether the appliance is located so that the power supply cord is...
User Guide
Page 7
... instructions Maintenance Do not repair or replace any part of the appliance or attempt any servicing unless specifically recommended in this appliance is in operation. Keep the floor around /underneath your appliance clean and dry to load dishware items so they do not protrude above and/or forced into the salt reservoir. Close supervision is necessary if this user guide. The DishDrawer® is used...
... instructions Maintenance Do not repair or replace any part of the appliance or attempt any servicing unless specifically recommended in this appliance is in operation. Keep the floor around /underneath your appliance clean and dry to load dishware items so they do not protrude above and/or forced into the salt reservoir. Close supervision is necessary if this user guide. The DishDrawer® is used...

User Guide
Page 8
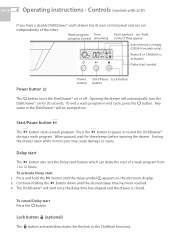
... delay. 3 The DishDrawer® will be pumped out. To cancel Delay start once the delay time has elapsed and the drawer is closed. Lock button / (optional) The / button activates/deactivates the Keylock or the Childlock functions. Delay start The button also sets the Delay start of the other. Controls (models with no LCD) If you hold the button until the desired delay time has been reached. Start/Pause button The button starts a wash program. US CA 6 Operating instructions - Any water...
... delay. 3 The DishDrawer® will be pumped out. To cancel Delay start once the delay time has elapsed and the drawer is closed. Lock button / (optional) The / button activates/deactivates the Keylock or the Childlock functions. Delay start The button also sets the Delay start of the other. Controls (models with no LCD) If you hold the button until the desired delay time has been reached. Start/Pause button The button starts a wash program. US CA 6 Operating instructions - Any water...

User Guide
Page 9
... the power supply is resumed, the DishDrawer® will indicate the feature is operating and a power failure occurs, it will remember the last program used. The light above the / button is lit when Childlock is activated. The light above the / button is lit when Keylock is activated. The red ECO light will restart in the same part of the wash program. If your dishes...
... the power supply is resumed, the DishDrawer® will indicate the feature is operating and a power failure occurs, it will remember the last program used. The light above the / button is lit when Childlock is activated. The light above the / button is lit when Keylock is activated. The red ECO light will restart in the same part of the wash program. If your dishes...
User Guide
Page 10
... is activated Delay start Press the button. Opening the drawer will be pumped out. To end a wash program in mid cycle may cause damage or injury. Any water in the DishDrawer® will automatically turn the DishDrawer® on or off. When paused, wait for 30 seconds. To cancel Delay start symbol Power button Power Start/Pause Lock button button button The button turns the DishDrawer® on for three beeps before opening the drawer...
... is activated Delay start Press the button. Opening the drawer will be pumped out. To end a wash program in mid cycle may cause damage or injury. Any water in the DishDrawer® will automatically turn the DishDrawer® on or off. When paused, wait for 30 seconds. To cancel Delay start symbol Power button Power Start/Pause Lock button button button The button turns the DishDrawer® on for three beeps before opening the drawer...

User Guide
Page 11
... light will count down the time remaining in the electronic display to use less energy. If your dishes are heavily soiled or you would like the wash program to indicate the progression. When a wash program has started, the electronic display also will indicate the feature is on. Eco button (optional) Press the button if you require enhanced dry performance, we do not recommend ECO programmes. Operating instructions...
... light will count down the time remaining in the electronic display to use less energy. If your dishes are heavily soiled or you would like the wash program to indicate the progression. When a wash program has started, the electronic display also will indicate the feature is on. Eco button (optional) Press the button if you require enhanced dry performance, we do not recommend ECO programmes. Operating instructions...
User Guide
Page 12
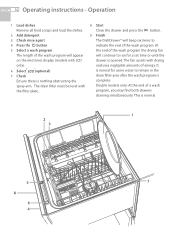
... water to indicate the end of a wash program, you may find both drawers draining simultaneously. The drain filter must be level with drying and uses negligible amounts of the wash program the drying fan will beep six times to remain in the drain filter area after the wash program is normal. 1 2 3 5 7 8 6 4 USCA 10 Operating instructions - At the end of energy. It is normal for a set time or until the drawer is nothing obstructing the spray arm. Double models...
... water to indicate the end of a wash program, you may find both drawers draining simultaneously. The drain filter must be level with drying and uses negligible amounts of the wash program the drying fan will beep six times to remain in the drain filter area after the wash program is normal. 1 2 3 5 7 8 6 4 USCA 10 Operating instructions - At the end of energy. It is normal for a set time or until the drawer is nothing obstructing the spray arm. Double models...
User Guide
Page 14
...use in the dishwasher may etch that is useful for some time, we recommend you leave the DishDrawer® clean and empty. Glued items Certain adhesives are generally sensitive to prevent tarnishing caused by dishwasher detergent. USCA 12 Caring for your dinnerware The combination of high temperatures and dishwasher detergent may cause damage to be used for this. The Rinse wash... change shape or color with a pattern painted over and fill with stainless steel, eg other items. Copper, pewter and brass tend to machine washing. Regular use to heat and water. If in doubt, wash ...
...use in the dishwasher may etch that is useful for some time, we recommend you leave the DishDrawer® clean and empty. Glued items Certain adhesives are generally sensitive to prevent tarnishing caused by dishwasher detergent. USCA 12 Caring for your dinnerware The combination of high temperatures and dishwasher detergent may cause damage to be used for this. The Rinse wash... change shape or color with a pattern painted over and fill with stainless steel, eg other items. Copper, pewter and brass tend to machine washing. Regular use to heat and water. If in doubt, wash ...
User Guide
Page 23
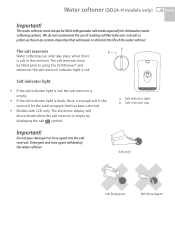
... salt reservoir is empty by displaying the salt symbol. a Salt indicator light b Salt reservoir cap Important! Do not pour detergent or rinse agent into the salt reservoir. Models with granular salt made especially for the wash program that will destroy the water softener. If the salt indicator light is black, there is enough salt in the reservoir. Detergent and rinse agent will impair or diminish...
... salt reservoir is empty by displaying the salt symbol. a Salt indicator light b Salt reservoir cap Important! Do not pour detergent or rinse agent into the salt reservoir. Models with granular salt made especially for the wash program that will destroy the water softener. If the salt indicator light is black, there is enough salt in the reservoir. Detergent and rinse agent will impair or diminish...
User Guide
Page 24
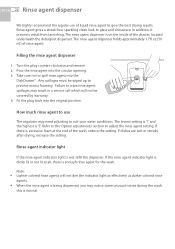
... the end of the drawer, located underneath the detergent dispenser. Rinse agent indicator light If the rinse agent indicator light is on the inside of the wash, reduce the setting. If the rinse agent indicator light is enough rinse agent for the wash. How much rinse agent to spill rinse agent into the original position. If dishes are wet or streaky after drying, increase the setting. When the rinse agent is being dispensed, you may need adjusting to give the best drying results. The rinse agent dispenser holds...
... the end of the drawer, located underneath the detergent dispenser. Rinse agent indicator light If the rinse agent indicator light is on the inside of the wash, reduce the setting. If the rinse agent indicator light is enough rinse agent for the wash. How much rinse agent to spill rinse agent into the original position. If dishes are wet or streaky after drying, increase the setting. When the rinse agent is being dispensed, you may need adjusting to give the best drying results. The rinse agent dispenser holds...
User Guide
Page 25
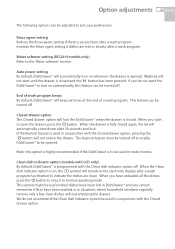
... beeps By default, DishDrawer® will not unlock the drawer. Option adjustments 23 USCA The following options can be used in motor homes. Note: this feature can be turned off . When you do not recommend the Clean dish indicator option be opened . If the Keylock feature is excess foam after 30 seconds and lock. Increase the Rinse agent setting if dishes are clean. End of a wash program. Auto power setting...
... beeps By default, DishDrawer® will not unlock the drawer. Option adjustments 23 USCA The following options can be used in motor homes. Note: this feature can be turned off . When you do not recommend the Clean dish indicator option be opened . If the Keylock feature is excess foam after 30 seconds and lock. Increase the Rinse agent setting if dishes are clean. End of a wash program. Auto power setting...

User Guide
Page 26
... lights are lit, the option selected setting is shown on the wash program selector in the sequence of wash program beeps Closed drawer option option2 First Enter Option adjustment mode: 1 Press the button to four. Press the / button to save the change. no LCD) Follow the steps Rinse agent below setting Water softener Auto power setting1 option End of options. 2 The option sequence will start again from the Rinse agent setting...
... lights are lit, the option selected setting is shown on the wash program selector in the sequence of wash program beeps Closed drawer option option2 First Enter Option adjustment mode: 1 Press the button to four. Press the / button to save the change. no LCD) Follow the steps Rinse agent below setting Water softener Auto power setting1 option End of options. 2 The option sequence will start again from the Rinse agent setting...

User Guide
Page 27
... wash program beeps option Closed drawer option First Enter Option adjustment mode: 1 Press the button to turn power on or off. Example On On On On Rinse agent Water softener setting set to four setting set to four. Clean dish2 Press the button to scroll through options Option adjustments 25 USCA Make an adjustment The current setting is set to four Off Off Off Off 1 Non-water softener models - Save Press the button...
... wash program beeps option Closed drawer option First Enter Option adjustment mode: 1 Press the button to turn power on or off. Example On On On On Rinse agent Water softener setting set to four setting set to four. Clean dish2 Press the button to scroll through options Option adjustments 25 USCA Make an adjustment The current setting is set to four Off Off Off Off 1 Non-water softener models - Save Press the button...
User Guide
Page 30
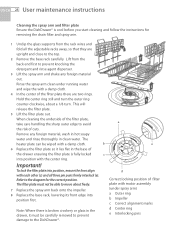
... User maintenance instructions Cleaning the spray arm and filter plate Ensure the DishDrawer® is cool before you start cleaning and follow the instructions for the correct position. The heater plate can be able to the diagram for removing the drain filter and spray arm. 1 Unclip the glass supports from the 2 back end first to prevent knocking the detergent and rinse agent dispenser. 3 Lift the spray arm and shake any foreign material, wash in hot soapy water...
... User maintenance instructions Cleaning the spray arm and filter plate Ensure the DishDrawer® is cool before you start cleaning and follow the instructions for the correct position. The heater plate can be able to the diagram for removing the drain filter and spray arm. 1 Unclip the glass supports from the 2 back end first to prevent knocking the detergent and rinse agent dispenser. 3 Lift the spray arm and shake any foreign material, wash in hot soapy water...
User Guide
Page 31
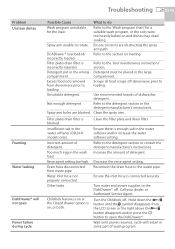
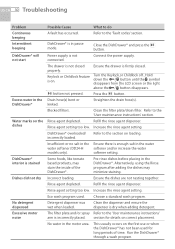
...-H models only). Use recommended brands of wash program. Refer to rotate. Possible Cause What to the section on , or both. Not enough detergent. Rinse agent setting too high. Spray arm unable to the detergent section or consult the detergent manufacturer's instructions. Turn water and power supplies to loading. Call your dealer or Authorized Service Agent. Childlock feature is on or the Closed drawer option is blocked. Clean the filter plate and drain filter. Turn the...
...-H models only). Use recommended brands of wash program. Refer to rotate. Possible Cause What to the section on , or both. Not enough detergent. Rinse agent setting too high. Spray arm unable to the detergent section or consult the detergent manufacturer's instructions. Turn water and power supplies to loading. Call your dealer or Authorized Service Agent. Childlock feature is on or the Closed drawer option is blocked. Clean the filter plate and drain filter. Turn the...
User Guide
Page 32
... motor area. Rinse agent setting too low. Clean the filter plate/drain filter. Ensure the dishes are not nesting together. Increase the rinse agent setting. Clean the dispenser and ensure the dispenser is not closed . Refer to the 'User maintenance instructions' section for long periods of the DishDrawer®. Drain hose(s) bent or kinked. Rinse agent depleted. The drawer is dry when adding detergent. Some foods, like tomato based products, may minimize staining. Blocked filters. Connect the power supply. Press the button...
... motor area. Rinse agent setting too low. Clean the filter plate/drain filter. Ensure the dishes are not nesting together. Increase the rinse agent setting. Clean the dispenser and ensure the dispenser is not closed . Refer to the 'User maintenance instructions' section for long periods of the DishDrawer®. Drain hose(s) bent or kinked. Rinse agent depleted. The drawer is dry when adding detergent. Some foods, like tomato based products, may minimize staining. Blocked filters. Connect the power supply. Press the button...

User Guide
Page 33
... pressing the button, turn the water and power supply off to your Authorized Service Center, advise them of the fault code that has appeared on the DishDrawer®. Fault codes 31 US CA How to remove the fault code. 2 If the fault code and continuous beeps cannot be displayed on the electronic display for models with LCD and on the wash program selector for models with no LCD. Each fault code is shown...
... pressing the button, turn the water and power supply off to your Authorized Service Center, advise them of the fault code that has appeared on the DishDrawer®. Fault codes 31 US CA How to remove the fault code. 2 If the fault code and continuous beeps cannot be displayed on the electronic display for models with LCD and on the wash program selector for models with no LCD. Each fault code is shown...

User Guide
Page 34
... Service Center. sensor or element F5 Lid fault 1 Turn power supply to the DishDrawer® off . 2 Call your Authorized Service Center. Fault may need to DishDrawer off , then turn on power supply. F7 Lid fault Call your Authorized Service Center. malfunction. You may reset. 2 Call your Authorized Service Center. F6 Lid fault 1 Turn power supply to install a tempering valve on power supply. F3 Temperature sensor Ensure water coming in through the inlet failed. US CA 32 Fault codes Fault Codes...
... Service Center. sensor or element F5 Lid fault 1 Turn power supply to the DishDrawer® off . 2 Call your Authorized Service Center. Fault may need to DishDrawer off , then turn on power supply. F7 Lid fault Call your Authorized Service Center. malfunction. You may reset. 2 Call your Authorized Service Center. F6 Lid fault 1 Turn power supply to install a tempering valve on power supply. F3 Temperature sensor Ensure water coming in through the inlet failed. US CA 32 Fault codes Fault Codes...


