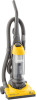
Quick Start Guide
Page 1
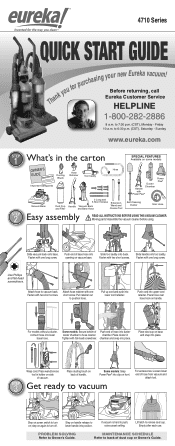
... lower end of hose into opening on some models OWNER'S GUIDE REGISTRATION Dusting Brush Hose Retainer Tool Caddy Important Safeguards Hose Duster Chamber Handle with flat-head screwdriver. Lift latch to vacuum back. Friday 10 a.m. Assemble the vacuum cleaner before using. Use Phillips and flat-head screwdrivers. Some models: Secure bottom of Push end of hose from vacuum and attach tool. If vacuum is hard to Owner's Guide. PROBLEM SOLVING Refer to push, raise carpet setting. to position hose. Fasten with...
... lower end of hose into opening on some models OWNER'S GUIDE REGISTRATION Dusting Brush Hose Retainer Tool Caddy Important Safeguards Hose Duster Chamber Handle with flat-head screwdriver. Lift latch to vacuum back. Friday 10 a.m. Assemble the vacuum cleaner before using. Use Phillips and flat-head screwdrivers. Some models: Secure bottom of Push end of hose from vacuum and attach tool. If vacuum is hard to Owner's Guide. PROBLEM SOLVING Refer to push, raise carpet setting. to position hose. Fasten with...
Owner's Guide
Page 2
... Important Safeguards 1 How to Use Accessories 3 Telescopic self-cleaning duster, crevice tool, extension wand, dusting brush, Power Paw® and stair hose. Eureka Limited Warranty Information 5 Thermal Cut-Off and Problem Solving 6 Spanish Owner's Guide 7-13 French Owner's Guide 14-20 Order Forms and Parts List 21-22 ! How to Maintain Your Vacuum Cleaner 4 Maintain brush roll, replace brush roll or EXT-U belt, and change light bulb. For instructions regarding any shipping damage, call Eureka Customer Service HELPLINE 1-800-282-2886...
... Important Safeguards 1 How to Use Accessories 3 Telescopic self-cleaning duster, crevice tool, extension wand, dusting brush, Power Paw® and stair hose. Eureka Limited Warranty Information 5 Thermal Cut-Off and Problem Solving 6 Spanish Owner's Guide 7-13 French Owner's Guide 14-20 Order Forms and Parts List 21-22 ! How to Maintain Your Vacuum Cleaner 4 Maintain brush roll, replace brush roll or EXT-U belt, and change light bulb. For instructions regarding any shipping damage, call Eureka Customer Service HELPLINE 1-800-282-2886...
Owner's Guide
Page 3
... wet hands. • Do not put any opening blocked; If vacuum cleaner is not working as a toy. To prevent burns, avoid touching the belt pulley when servicing the drive belt. • Do not use to install the proper outlet. Do not change the plug in place. • Belt pulleys can become hot during normal use. Do not run vacuum cleaner over cord. Use extra care when cleaning stairs. Place vacuum cleaner on floor with the handle...
... wet hands. • Do not put any opening blocked; If vacuum cleaner is not working as a toy. To prevent burns, avoid touching the belt pulley when servicing the drive belt. • Do not use to install the proper outlet. Do not change the plug in place. • Belt pulleys can become hot during normal use. Do not run vacuum cleaner over cord. Use extra care when cleaning stairs. Place vacuum cleaner on floor with the handle...
Owner's Guide
Page 4
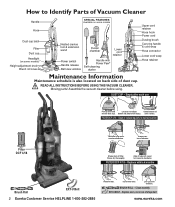
...-U Belt 2 Eureka Customer Service HELPLINE 1-800-282-2886 Remove filter. READ ALL INSTRUCTIONS BEFORE USING THIS VACUUM CLEANER. Empty after each use Pull up cover and lock. until it clicks. bottom lid. dry thoroughly. Grasp filter; Clean monthly EXT-U BELT - How to Identify Parts of Vacuum Cleaner Handle Hose Dust cup latch Filter Dust cup Headlight (on some models) Height adjustment knob Brush roll cover SPECIAL FEATURES Available on some models Nested crevice tool & extension wand Duster chamber Lower cord retainer Power switch Handle release Belt view...
...-U Belt 2 Eureka Customer Service HELPLINE 1-800-282-2886 Remove filter. READ ALL INSTRUCTIONS BEFORE USING THIS VACUUM CLEANER. Empty after each use Pull up cover and lock. until it clicks. bottom lid. dry thoroughly. Grasp filter; Clean monthly EXT-U BELT - How to Identify Parts of Vacuum Cleaner Handle Hose Dust cup latch Filter Dust cup Headlight (on some models) Height adjustment knob Brush roll cover SPECIAL FEATURES Available on some models Nested crevice tool & extension wand Duster chamber Lower cord retainer Power switch Handle release Belt view...
Owner's Guide
Page 5
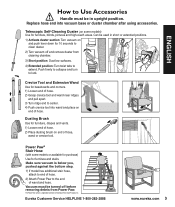
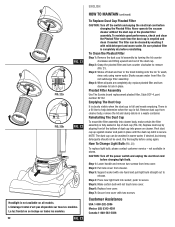
.... Handle must be turned off and remove duster from Power Paw. Make sure vacuum is a registered trademark of wand and hose. Vacuum must be used in upright position. Eureka Customer Service HELPLINE 1-800-282-2886 www.eureka.com 3 Can be in short or extended positions. 1) Activate duster suction: Turn vacuum on some models or available for purchase) Use for baseboards and corners. 1) Loosen end of hose. 2) Attach Power Paw to extend. Replace hose...
.... Handle must be turned off and remove duster from Power Paw. Make sure vacuum is a registered trademark of wand and hose. Vacuum must be used in upright position. Eureka Customer Service HELPLINE 1-800-282-2886 www.eureka.com 3 Can be in short or extended positions. 1) Activate duster suction: Turn vacuum on some models or available for purchase) Use for baseboards and corners. 1) Loosen end of hose. 2) Attach Power Paw to extend. Replace hose...
Owner's Guide
Page 6
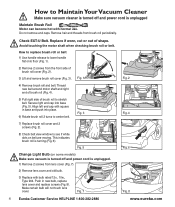
... remove brush roll cover (Fig. 3). How to replace brush roll or belt 1) Use handle release to see if white dots on some models) ! Align left end cap with normal use. Make certain bulb will not touch lens cover. How to stretch belt. Make sure vacuum is turned off and power cord is unplugged Maintain Brush Roll Motor can become hot with square in new bulb, replace lens cover and replace screws (Fig. 8). Fig. 7 4 Eureka...
... remove brush roll cover (Fig. 3). How to replace brush roll or belt 1) Use handle release to see if white dots on some models) ! Align left end cap with normal use. Make certain bulb will not touch lens cover. How to stretch belt. Make sure vacuum is turned off and power cord is unplugged Maintain Brush Roll Motor can become hot with square in new bulb, replace lens cover and replace screws (Fig. 8). Fig. 7 4 Eureka...
Owner's Guide
Page 7
... your vacuum. This warranty is good for repair, please include the model, type and serial number located on the rating plate on how long an implied warranty lasts, so the above . Return Shipping Charges will , at both ends. 2) To check base hose, remove 2 screws and brush roll cover. In no event shall the manufacturer be implied in connection with Eureka operating instructions. Make sure vacuum is turned off and power cord is...
... your vacuum. This warranty is good for repair, please include the model, type and serial number located on the rating plate on how long an implied warranty lasts, so the above . Return Shipping Charges will , at both ends. 2) To check base hose, remove 2 screws and brush roll cover. In no event shall the manufacturer be implied in connection with Eureka operating instructions. Make sure vacuum is turned off and power cord is...
Owner's Guide
Page 8
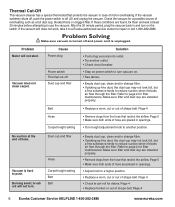
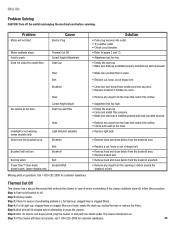
.... Cause Power plug Vacuum does not clean carpet. Page 4 Hose Carpet height setting • Remove clogs from the hose that restrict the airflow. Carpet height setting Belt Belt • Empty dust cup, clean and/or change filter. • If picking up fine dust, the dust cup may not look full, but a fine substance tends to reduce suction when it to use the vacuum. Make sure filter and dust cup are installed properly. • Remove clogs from the hose that protects the vacuum in openings. • Turn height...
.... Cause Power plug Vacuum does not clean carpet. Page 4 Hose Carpet height setting • Remove clogs from the hose that restrict the airflow. Carpet height setting Belt Belt • Empty dust cup, clean and/or change filter. • If picking up fine dust, the dust cup may not look full, but a fine substance tends to reduce suction when it to use the vacuum. Make sure filter and dust cup are installed properly. • Remove clogs from the hose that protects the vacuum in openings. • Turn height...

Owners Manual
Page 3
... when servicing the drive belt. • Do not use to a Eureka Authorized Service Center for a possible source of electrical shock, this manual. Do NOT change the plug in use outdoors or on the switch. Check the cleaner for repair. 3 ENGLISH IMPORTANT SAFEGUARDS When using an electrical appliance, basic precautions should , has been dropped, damaged, left outdoors, or dropped into water, have unit serviced before using attachments. • Use extra care when cleaning on cord. Turn...
... when servicing the drive belt. • Do not use to a Eureka Authorized Service Center for a possible source of electrical shock, this manual. Do NOT change the plug in use outdoors or on the switch. Check the cleaner for repair. 3 ENGLISH IMPORTANT SAFEGUARDS When using an electrical appliance, basic precautions should , has been dropped, damaged, left outdoors, or dropped into water, have unit serviced before using attachments. • Use extra care when cleaning on cord. Turn...

Owners Manual
Page 6
... qu'indiqué à chaque étape. Inserte los tornillos como se indica en cada paso. ●J 6 ●H Turbo (some models only) ●H Tool caddy ●I Have a Phillips screwdriver available. (one is NOT provided...Assembly Parts ●A Wand ●B Crevice Tool ●C Dusting brush ●D Hose ●E Base (15" Height Adjustment Base ●E1, some models only) ●F Dust cup with lid and filter ●G Handle (Turbo Handle ●G1, some models only) Turbo (certains modèles seulement) Turbo (sólo algunos modelos) ●I Rear housing ●J Hose...
... qu'indiqué à chaque étape. Inserte los tornillos como se indica en cada paso. ●J 6 ●H Turbo (some models only) ●H Tool caddy ●I Have a Phillips screwdriver available. (one is NOT provided...Assembly Parts ●A Wand ●B Crevice Tool ●C Dusting brush ●D Hose ●E Base (15" Height Adjustment Base ●E1, some models only) ●F Dust cup with lid and filter ●G Handle (Turbo Handle ●G1, some models only) Turbo (certains modèles seulement) Turbo (sólo algunos modelos) ●I Rear housing ●J Hose...
Owners Manual
Page 8
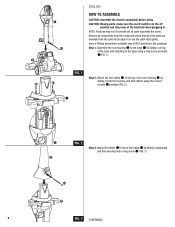
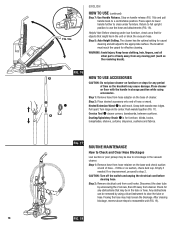
...plugging in the package) Step 1: Assemble the rear housing ●I ●K2 ENGLISH HOW TO ASSEMBLE CAUTION: Assemble the cleaner completely before using. Remove all components from the parts list on page 6 (or see the quick start guide). ●E ●K1 ●I to the base ●E by sliding it on top of the base and attaching to top of tool... ●H 8 FFIIGG..136 (CONTINUED) FIG. 1 Step 2: Attach the tool caddy ●H to the top of the rear housing ●I by model yet all of the parts are available from the carton and check that all parts assemble the same.
...plugging in the package) Step 1: Assemble the rear housing ●I ●K2 ENGLISH HOW TO ASSEMBLE CAUTION: Assemble the cleaner completely before using. Remove all components from the parts list on page 6 (or see the quick start guide). ●E ●K1 ●I to the base ●E by sliding it on top of the base and attaching to top of tool... ●H 8 FFIIGG..136 (CONTINUED) FIG. 1 Step 2: Attach the tool caddy ●H to the top of the rear housing ●I by model yet all of the parts are available from the carton and check that all parts assemble the same.
Owners Manual
Page 10
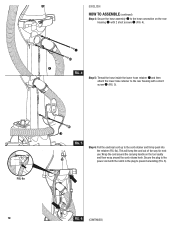
... unwinding (FIG. 6). 10 FIG. 6 (CONTINUED) FIG. 6a ●K1 ●J FIG. 5 Step 6: Pull the electrical cord up to the power cord with a short screw ●K1 (FIG. 5). Secure the plug to the cord retainer and firmly push into the retainer (FIG. 6a). This will keep the cord out of the way for next use. Wrap the cord around the cord release hook.
... unwinding (FIG. 6). 10 FIG. 6 (CONTINUED) FIG. 6a ●K1 ●J FIG. 5 Step 6: Pull the electrical cord up to the power cord with a short screw ●K1 (FIG. 5). Secure the plug to the cord retainer and firmly push into the retainer (FIG. 6a). This will keep the cord out of the way for next use. Wrap the cord around the cord release hook.
Owners Manual
Page 12
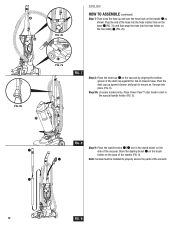
.... 8). Place Power Paw™ stair brush in slot in some models only). Step 8A: (in the special handle holder (FIG. 8). Plug the end of the handle (FIG. 9). ●C Note: Screws must be installed to secure as shown. Pivot the dust cup up and over the hose hook on the handle ●G as it snaps into the hose holder on the tool caddy ●...
.... 8). Place Power Paw™ stair brush in slot in some models only). Step 8A: (in the special handle holder (FIG. 8). Plug the end of the handle (FIG. 9). ●C Note: Screws must be installed to secure as shown. Pivot the dust cup up and over the hose hook on the handle ●G as it snaps into the hose holder on the tool caddy ●...
Owners Manual
Page 14
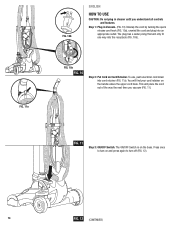
... use, push electrical cord down into an appropriate outlet. Step 1: Plug in cleaner until you vacuum (FIG. 11). The ON/OFF Switch is on the handle above the upper cord hook. You will only fit one way into the receptacle (FIG. 10b). FIG. 11a FIG. 10b ENGLISH HOW TO USE CAUTION: Do not plug in Vacuum. (FIG. 10) Unwrap the cord by turning the quick release cord...
... use, push electrical cord down into an appropriate outlet. Step 1: Plug in cleaner until you vacuum (FIG. 11). The ON/OFF Switch is on the handle above the upper cord hook. You will only fit one way into the receptacle (FIG. 10b). FIG. 11a FIG. 10b ENGLISH HOW TO USE CAUTION: Do not plug in Vacuum. (FIG. 10) Unwrap the cord by turning the quick release cord...
Owners Manual
Page 16
... new cleaner for maximum carpet cleaning. Helpful Information: Listen to fix, and the instructions for effective cleaning. Step 6: Use Stair Handle. Just hold the cleaner by the regular handle with one hand and by the stair handle with the information in operating position and tilt cleaner back to empty any dust or dirt from the cup (FIG. 13b). FIG. 13c FIG. 13 FIG. 14 Step 5: Cleaner Height Setting (some models only). The filter stays attached...
... new cleaner for maximum carpet cleaning. Helpful Information: Listen to fix, and the instructions for effective cleaning. Step 6: Use Stair Handle. Just hold the cleaner by the regular handle with one hand and by the stair handle with the information in operating position and tilt cleaner back to empty any dust or dirt from the cup (FIG. 13b). FIG. 13c FIG. 13 FIG. 14 Step 5: Cleaner Height Setting (some models only). The filter stays attached...
Owners Manual
Page 18
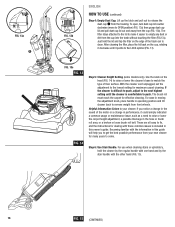
... check suction at end of time as the revolving brush). Dusting/Upholstery Brush ●C is for effective cleaning. Flexing the hose may cause damage. Helpful hint: Before cleaning under furniture. The cleaner has the optimal setting for any period of hose - Empty if needed. WARNING: Avoid injury. Crevice Tool ●B cleans corners, baseboards, between cushions. Check for carpet cleaning and will adjust to clear the tube or hose. Grasp both wands...
... check suction at end of time as the revolving brush). Dusting/Upholstery Brush ●C is for effective cleaning. Flexing the hose may cause damage. Helpful hint: Before cleaning under furniture. The cleaner has the optimal setting for any period of hose - Empty if needed. WARNING: Avoid injury. Crevice Tool ●B cleans corners, baseboards, between cushions. Check for carpet cleaning and will adjust to clear the tube or hose. Grasp both wands...
Owners Manual
Page 20
... the cleaner. Step 4: Remove and discard belt. Step 10: Rotate brushroll to agitate, sweep, and comb the carpet nap. This indicates the brushroll is in good condition. FIG. 19a ENGLISH HOW TO MAINTAIN The instructions in base. To avoid unnecessary service calls, check the dust cup, belt, and brushroll often. Brushroll The brushroll turns as a guide to be sure it continues brushing the carpet. Cut...
... the cleaner. Step 4: Remove and discard belt. Step 10: Rotate brushroll to agitate, sweep, and comb the carpet nap. This indicates the brushroll is in good condition. FIG. 19a ENGLISH HOW TO MAINTAIN The instructions in base. To avoid unnecessary service calls, check the dust cup, belt, and brushroll often. Brushroll The brushroll turns as a guide to be sure it continues brushing the carpet. Cut...
Owners Manual
Page 22
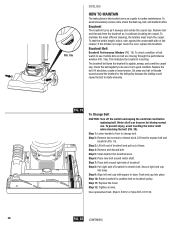
... counter clockwise and lifting upward and out of dust cup (FIG. 22). CAUTION: Turn off the power switch and unplug the electrical cord before changing the Pleated Filter. Step 2: Pull lens cover from lens cover. To Clean the Pleated Filter Step 1: Remove the dust cup lid assembly by washing it with two screws. Step 1: Lower handle and remove two screws from cleaner. L'éclairage frontal n'est pas disponible sur...
... counter clockwise and lifting upward and out of dust cup (FIG. 22). CAUTION: Turn off the power switch and unplug the electrical cord before changing the Pleated Filter. Step 2: Pull lens cover from lens cover. To Clean the Pleated Filter Step 1: Remove the dust cup lid assembly by washing it with two screws. Step 1: Lower handle and remove two screws from cleaner. L'éclairage frontal n'est pas disponible sur...
Owners Manual
Page 25
... 5: Wait at the hose. Cause Electric Plug Motor suddenly stops. The cleaner should turn . Step 2: Unplug cleaner. Power Paw™ stair brush doesn't work. (some models only) Noise from the opening or debris around the brushroll or belt. Thermal Cut Off Carpet Height Adjustment Dust Cup Filter Belt Brushroll No suction at least 30 minutes before servicing. Step 6: After 30 minute cool down period, plug the cleaner in case of shape belt. • Clean hair and thread...
... 5: Wait at the hose. Cause Electric Plug Motor suddenly stops. The cleaner should turn . Step 2: Unplug cleaner. Power Paw™ stair brush doesn't work. (some models only) Noise from the opening or debris around the brushroll or belt. Thermal Cut Off Carpet Height Adjustment Dust Cup Filter Belt Brushroll No suction at least 30 minutes before servicing. Step 6: After 30 minute cool down period, plug the cleaner in case of shape belt. • Clean hair and thread...
Owners Manual
Page 31
... free from the data plate on the cleaner. Your relief for repair, please include the model, type, and serial number from all defects in material and workmanship in my Eureka vacuum cleaner? This warranty gives you money and helps keep your home clean. A: Typically, packaged products and paper bags can be paid by state. Q: Are there any warranty for a period of your purchase or use only Genuine Eureka paper bags, belts and parts...
... free from the data plate on the cleaner. Your relief for repair, please include the model, type, and serial number from all defects in material and workmanship in my Eureka vacuum cleaner? This warranty gives you money and helps keep your home clean. A: Typically, packaged products and paper bags can be paid by state. Q: Are there any warranty for a period of your purchase or use only Genuine Eureka paper bags, belts and parts...


