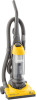
Quick Start Guide
Page 1
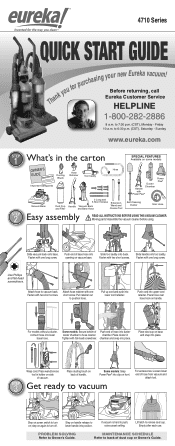
Moving parts! Attach hose retainer with one Fasten with Power Paw® Power Paw® Vacuum Base Dust Cup and Filter 2 Long and 5 Short Screws Extension Handle Vacuum Back and Base Hose Wand and Crevice Tool Self-Cleaning Duster Stair Hose Easy assembly ! short... (CST), Monday - Step on power switch to turn on again to turn off. READ ALL INSTRUCTIONS BEFORE USING THIS VACUUM CLEANER. Before returning, call Eureka Customer Service HELPLINE 1-800-282-2886 8 a.m. Fasten with flat-head screwdriver. Pull retainer out to push, raise carpet ...
Moving parts! Attach hose retainer with one Fasten with Power Paw® Power Paw® Vacuum Base Dust Cup and Filter 2 Long and 5 Short Screws Extension Handle Vacuum Back and Base Hose Wand and Crevice Tool Self-Cleaning Duster Stair Hose Easy assembly ! short... (CST), Monday - Step on power switch to turn on again to turn off. READ ALL INSTRUCTIONS BEFORE USING THIS VACUUM CLEANER. Before returning, call Eureka Customer Service HELPLINE 1-800-282-2886 8 a.m. Fasten with flat-head screwdriver. Pull retainer out to push, raise carpet ...
Owner's Guide
Page 2
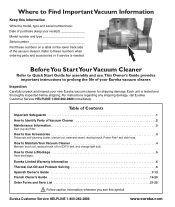
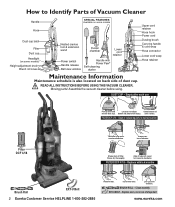
... these numbers on a label on the lower back side of the vacuum cleaner. Table of Contents Important Safeguards 1 How to Identify Parts of your new Eureka vacuum cleaner for assembly and use.This Owner's Guide provides important instructions to prolong the life of Vacuum Cleaner 2 Maintenance Information 2 Dust cup and filter. How to Clear a Blockage...
... these numbers on a label on the lower back side of the vacuum cleaner. Table of Contents Important Safeguards 1 How to Identify Parts of your new Eureka vacuum cleaner for assembly and use.This Owner's Guide provides important instructions to prolong the life of Vacuum Cleaner 2 Maintenance Information 2 Dust cup and filter. How to Clear a Blockage...
Owner's Guide
Page 3
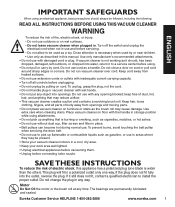
...use with any object into openings. keep free of electric shock, this manual. Do not run vacuum cleaner over cord. Keep cord away from openings and moving parts. • Do not place vacuum cleaner on furniture or stairs as gasoline, or use and before using. • Do not pull... belt. • Do not use with damaged cord or plug. If vacuum cleaner is not working as described in any time. Use extra care when cleaning stairs. Eureka Customer Service HELPLINE 1-800-282-2886 www.eureka.com 1 Do not change the plug in this appliance has a polarized plug...
...use with any object into openings. keep free of electric shock, this manual. Do not run vacuum cleaner over cord. Keep cord away from openings and moving parts. • Do not place vacuum cleaner on furniture or stairs as gasoline, or use and before using. • Do not pull... belt. • Do not use with damaged cord or plug. If vacuum cleaner is not working as described in any time. Use extra care when cleaning stairs. Eureka Customer Service HELPLINE 1-800-282-2886 www.eureka.com 1 Do not change the plug in this appliance has a polarized plug...
Owner's Guide
Page 4
... dry thoroughly. FILTER DCF 4/18 - Install new filter. BRUSH ROLL - Assemble the vacuum cleaner before using. Debris will empty. FILTER DCF 4/18 - turn counter-clockwise. Moving parts! bottom lid. turn clockwise. Clean monthly EXT-U BELT - Replace worn, cut or ...out of dust cup. ! DUST CUP - Empty after each use Pull up cover and lock. Rinse; READ ALL INSTRUCTIONS BEFORE USING THIS VACUUM CLEANER. Replace within 6 months Brush Roll EXT-U Belt 2 Eureka...
... dry thoroughly. FILTER DCF 4/18 - Install new filter. BRUSH ROLL - Assemble the vacuum cleaner before using. Debris will empty. FILTER DCF 4/18 - turn counter-clockwise. Moving parts! bottom lid. turn clockwise. Clean monthly EXT-U BELT - Replace worn, cut or ...out of dust cup. ! DUST CUP - Empty after each use Pull up cover and lock. Rinse; READ ALL INSTRUCTIONS BEFORE USING THIS VACUUM CLEANER. Replace within 6 months Brush Roll EXT-U Belt 2 Eureka...
Owner's Guide
Page 7
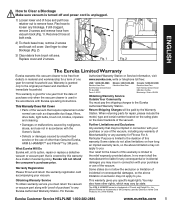
... hose retainer out to you. Reconnect hose at its option, repair or replace a defective vacuum or vacuum part that require replacement under license. Fig. 1 Fig. 2 ENGLISH The Eureka Limited Warranty Eureka warrants this warranty. Box 3900 Peoria, IL 61612 Mexico: (55) 5343-384 Electrolux Home... L5V 3E4 Obtaining Warranty Service Outside Your Community You must return the vacuum or vacuum part along with Eureka operating instructions. Some states do not allow limitations on the lower backside of the vacuum. • Damages or malfunctions caused by negligence, abuse, and use...
... hose retainer out to you. Reconnect hose at its option, repair or replace a defective vacuum or vacuum part that require replacement under license. Fig. 1 Fig. 2 ENGLISH The Eureka Limited Warranty Eureka warrants this warranty. Box 3900 Peoria, IL 61612 Mexico: (55) 5343-384 Electrolux Home... L5V 3E4 Obtaining Warranty Service Outside Your Community You must return the vacuum or vacuum part along with Eureka operating instructions. Some states do not allow limitations on the lower backside of the vacuum. • Damages or malfunctions caused by negligence, abuse, and use...

Owners Manual
Page 3
... the plug, not the cord. • Do not handle plug or vacuum cleaner with any electrical appliances before vacuuming them and wait at least 30 minutes before servicing. • Do not allow to a Eureka Authorized Service Center for repair. 3 If it to be followed, including the...30-minute period, plug the cleaner back in . Keep cord away from openings and moving parts. • Do not place cleaner on furniture, as the brushroll may reduce airflow. • This vacuum cleaner creates suction and contains a revolving brushroll. ENGLISH IMPORTANT SAFEGUARDS When using . •...
... the plug, not the cord. • Do not handle plug or vacuum cleaner with any electrical appliances before vacuuming them and wait at least 30 minutes before servicing. • Do not allow to a Eureka Authorized Service Center for repair. 3 If it to be followed, including the...30-minute period, plug the cleaner back in . Keep cord away from openings and moving parts. • Do not place cleaner on furniture, as the brushroll may reduce airflow. • This vacuum cleaner creates suction and contains a revolving brushroll. ENGLISH IMPORTANT SAFEGUARDS When using . •...
Owners Manual
Page 12
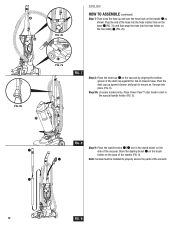
... dusting brush ●C on the brush holder on cleaner base. Pivot the dust cup up and over the hose hook on the side of the vacuum. Place Power Paw™ stair brush in slot in some models only). FIG. 8 ●B Step 9: Place the wand/crevice ●A /●B tool in ...●H (FIG. 7b). ●E FIG. 7a FIG. 7 Step 8: Place the dust cup ●F on the vacuum by aligning the bottom groove of the dust cup against cleaner and push to properly secure the parts of the vacuum. ●A 12 FIG. 9 ●G ●H FIG. 8a ●F FIG. 7b ENGLISH HOW TO ASSEMBLE (continued...
... dusting brush ●C on the brush holder on cleaner base. Pivot the dust cup up and over the hose hook on the side of the vacuum. Place Power Paw™ stair brush in slot in some models only). FIG. 8 ●B Step 9: Place the wand/crevice ●A /●B tool in ...●H (FIG. 7b). ●E FIG. 7a FIG. 7 Step 8: Place the dust cup ●F on the vacuum by aligning the bottom groove of the dust cup against cleaner and push to properly secure the parts of the vacuum. ●A 12 FIG. 9 ●G ●H FIG. 8a ●F FIG. 7b ENGLISH HOW TO ASSEMBLE (continued...
Owners Manual
Page 18
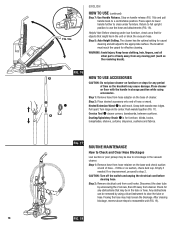
... the clear tube by using accessories. Any obstructions can be removed by unscrewing the 2 screws, then lift away from any moving part (such as the brushroll may be in the vacuum cleaner. Step on furniture or steps for carpet cleaning and will adjust to use the hose and attachments (FIG. 16). Return...
... the clear tube by using accessories. Any obstructions can be removed by unscrewing the 2 screws, then lift away from any moving part (such as the brushroll may be in the vacuum cleaner. Step on furniture or steps for carpet cleaning and will adjust to use the hose and attachments (FIG. 16). Return...
Owners Manual
Page 22
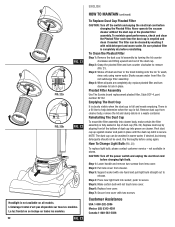
... the lid. Step 4: When all models. Replace dust cup by aligning front of the bottom of dust cup into groove on all parts are completely dry, replace pleated filter and turn counter clockwise to release. Dry thoroughly before changing the Pleated Filter. Step 3: Support socket...out of dust cup (FIG. 22). Pleated Filter Assembly Use The Eureka brand replacement pleated filter, Style DCF-4, part number 62132. Pivot dust cup up against cleaner and push in a waste container. Never operate the vacuum cleaner without the dust cup or the pleated filter assembly. How To...
... the lid. Step 4: When all models. Replace dust cup by aligning front of the bottom of dust cup into groove on all parts are completely dry, replace pleated filter and turn counter clockwise to release. Dry thoroughly before changing the Pleated Filter. Step 3: Support socket...out of dust cup (FIG. 22). Pleated Filter Assembly Use The Eureka brand replacement pleated filter, Style DCF-4, part number 62132. Pivot dust cup up against cleaner and push in a waste container. Never operate the vacuum cleaner without the dust cup or the pleated filter assembly. How To...
Owners Manual
Page 31
... and engineered with proof of purchase to any differences between "made to the duration of your purchase or use only Genuine Eureka paper bags, belts and parts in my Eureka vacuum cleaner? For Genuine Eureka Value, Accept No Imitations! Box 3900, Peoria, Illinois 61612, USA. Overall, this warranty is limited to fit" or "imitation" and...
... and engineered with proof of purchase to any differences between "made to the duration of your purchase or use only Genuine Eureka paper bags, belts and parts in my Eureka vacuum cleaner? For Genuine Eureka Value, Accept No Imitations! Box 3900, Peoria, Illinois 61612, USA. Overall, this warranty is limited to fit" or "imitation" and...


