
User Manual
Page 4
... Wi-Fi Features ...38 Loading Paper ...39 Loading Paper for Documents ...39 Loading Paper for Photos ...42 Loading Envelopes ...45 Paper Loading Capacity ...48 Available EPSON Papers...49 Borderless Paper Type Compatibility 50 Paper or Media Type Settings ...51 Placing Originals on the Product ...52 Placing Originals on the...
... Wi-Fi Features ...38 Loading Paper ...39 Loading Paper for Documents ...39 Loading Paper for Photos ...42 Loading Envelopes ...45 Paper Loading Capacity ...48 Available EPSON Papers...49 Borderless Paper Type Compatibility 50 Paper or Media Type Settings ...51 Placing Originals on the Product ...52 Placing Originals on the...
User Manual
Page 16
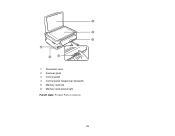
1 Document cover 2 Scanner glass 3 Control panel 4 Control panel release bar (beneath) 5 Memory card slot 6 Memory card access light Parent topic: Product Parts Locations 16
1 Document cover 2 Scanner glass 3 Control panel 4 Control panel release bar (beneath) 5 Memory card slot 6 Memory card access light Parent topic: Product Parts Locations 16

User Manual
Page 52
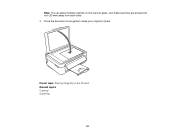
... to the edges of your original documents or photos on the scanner glass: Letter (8.5 × 11 inches [216 × 279 mm]) or A4 (8.3 × 11.7 inches [210 × 297 mm]). 1. Caution: Do not place anything on the scanner glass with the top facing as a writing surface to avoid ...damaging it. Placing Originals on the Scanner Glass Placing Originals on the Scanner Glass You can place originals up to this size on the product. Open the document...
... to the edges of your original documents or photos on the scanner glass: Letter (8.5 × 11 inches [216 × 279 mm]) or A4 (8.3 × 11.7 inches [210 × 297 mm]). 1. Caution: Do not place anything on the scanner glass with the top facing as a writing surface to avoid ...damaging it. Placing Originals on the Scanner Glass Placing Originals on the Scanner Glass You can place originals up to this size on the product. Open the document...
User Manual
Page 53
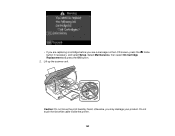
Note: You can place multiple originals on the Product Related topics Copying Scanning 53 Close the document cover gently to keep your original in place. Parent topic: Placing Originals on the scanner glass. Just make sure they are at least 0.8 inch (20 mm) away from each other. 3.
Note: You can place multiple originals on the Product Related topics Copying Scanning 53 Close the document cover gently to keep your original in place. Parent topic: Placing Originals on the scanner glass. Just make sure they are at least 0.8 inch (20 mm) away from each other. 3.
User Manual
Page 59
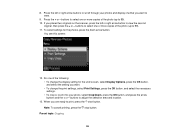
..., press the down arrow button. Parent topic: Copying 59 Press the left or right arrow button to copy. 9. If you placed two originals on the scanner, press the left or right arrow buttons to scroll through your photo, select Crop/Zoom, press the OK button, and press the arrow buttons and...
..., press the down arrow button. Parent topic: Copying 59 Press the left or right arrow button to copy. 9. If you placed two originals on the scanner, press the left or right arrow buttons to scroll through your photo, select Crop/Zoom, press the OK button, and press the arrow buttons and...

User Manual
Page 90
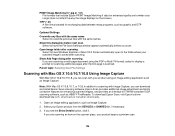
...• Windows 8: Navigate to close the Event Manager window. Parent topic: Starting a Scan Using the Product Control Panel Starting a Scan Using the Epson Scan Icon You can view or change . 5. 5. Click Make Job Settings. 4. Change the settings as necessary. 6. Open the Edit Job Settings ...Manager. • Mac OS X: Open the Applications folder, click Epson Software, and click Event Manager. 2. To scan to your computer, select how you scan to your product, if necessary. 3. Open the Scanner (Windows) or Select Scanner (Mac OS X) drop-down list and select the scan button settings...
...• Windows 8: Navigate to close the Event Manager window. Parent topic: Starting a Scan Using the Product Control Panel Starting a Scan Using the Epson Scan Icon You can view or change . 5. 5. Click Make Job Settings. 4. Change the settings as necessary. 6. Open the Edit Job Settings ...Manager. • Mac OS X: Open the Applications folder, click Epson Software, and click Event Manager. 2. To scan to your computer, select how you scan to your product, if necessary. 3. Open the Scanner (Windows) or Select Scanner (Mac OS X) drop-down list and select the scan button settings...
User Manual
Page 126
...Settings Overwrite any files with Mac OS X 10.6/10.7/10.8 Using Image Capture With Mac OS X 10.6/10.7/10.8, you scan. To download Epson Scan, visit Epson's driver download site (U.S. TIFF (*.tif) A file format created for TWAIN-compliant OCR scanning software, such as Image Capture. Open image folder after.... PRINT Image Matching II (*.jpg or *.tif) File formats that include Epson PRINT Image Matching II data for enhanced quality and a wider color range (does not affect the way the image displays on the scanner glass, your product using the PDF or Multi-Tiff format, select to the...
...Settings Overwrite any files with Mac OS X 10.6/10.7/10.8 Using Image Capture With Mac OS X 10.6/10.7/10.8, you scan. To download Epson Scan, visit Epson's driver download site (U.S. TIFF (*.tif) A file format created for TWAIN-compliant OCR scanning software, such as Image Capture. Open image folder after.... PRINT Image Matching II (*.jpg or *.tif) File formats that include Epson PRINT Image Matching II data for enhanced quality and a wider color range (does not affect the way the image displays on the scanner glass, your product using the PDF or Multi-Tiff format, select to the...
User Manual
Page 162
Lift up the scanner unit. Do not touch the flat white cable inside the printer. 162 otherwise, you see a message on the LCD screen, press the button if necessary, and select Setup. • If you are replacing a cartridge before you may damage your product. Select Maintenance, then select Ink Cartridge Replacement and press the OK button. 2. home Caution: Do not move the print head by hand;
Lift up the scanner unit. Do not touch the flat white cable inside the printer. 162 otherwise, you see a message on the LCD screen, press the button if necessary, and select Setup. • If you are replacing a cartridge before you may damage your product. Select Maintenance, then select Ink Cartridge Replacement and press the OK button. 2. home Caution: Do not move the print head by hand;

User Manual
Page 165
Insert the new cartridge into the holder and push it down until it clicks into place. 8. Lower the scanner unit and press the start button. This takes about 90 seconds. When you see an error screen telling you 're finished, press the OK button. ...165 Caution: Never turn off the product while the power light is finished. When you an ink cartridge is installed incorrectly, lift up the scanner unit and press the ink cartridge down until it clicks into place. The print head moves to its home position and the printer starts charging...
Insert the new cartridge into the holder and push it down until it clicks into place. 8. Lower the scanner unit and press the start button. This takes about 90 seconds. When you see an error screen telling you 're finished, press the OK button. ...165 Caution: Never turn off the product while the power light is finished. When you an ink cartridge is installed incorrectly, lift up the scanner unit and press the ink cartridge down until it clicks into place. The print head moves to its home position and the printer starts charging...

User Manual
Page 185
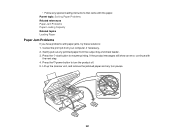
Repeat as necessary until the paper comes out clean. Use the product control panel to see if it is clean. 4. Parent topic: Adjusting Print Quality Related topics Copying 185 Check the back of the ejected paper to make a copy, but without placing a document on the scanner glass. 3. 2.
Repeat as necessary until the paper comes out clean. Use the product control panel to see if it is clean. 4. Parent topic: Adjusting Print Quality Related topics Copying 185 Check the back of the ejected paper to make a copy, but without placing a document on the scanner glass. 3. 2.

User Manual
Page 186
... control panel with any connected cables. 4. otherwise ink may damage it. Caution: Do not use liquid or chemical cleansers. Turn off the product. 2. Clean the scanner glass with a soft, lint-free cloth (microfiber is recommended), moistened with a little glass cleaner. Remove all the paper. 5. Parent topic: Cleaning and Transporting Your Product...
... control panel with any connected cables. 4. otherwise ink may damage it. Caution: Do not use liquid or chemical cleansers. Turn off the product. 2. Clean the scanner glass with a soft, lint-free cloth (microfiber is recommended), moistened with a little glass cleaner. Remove all the paper. 5. Parent topic: Cleaning and Transporting Your Product...

User Manual
Page 187
... and check to the case with tape. otherwise, you may damage the product. 1. this may damage your product. 4. Lower the scanner unit. 5. Remove all the paper from printing. • Do not carry the product by its control panel; Turn off again. 3. Disconnect any connected cables. 8. • ...
... and check to the case with tape. otherwise, you may damage the product. 1. this may damage your product. 4. Lower the scanner unit. 5. Remove all the paper from printing. • Do not carry the product by its control panel; Turn off again. 3. Disconnect any connected cables. 8. • ...
User Manual
Page 201
Press the start button to turn the product off. 5. Lift up the scanner unit, and remove the jammed paper and any jammed paper from your computer, if necessary. 2. If the product messages still show an error, continue with ...
Press the start button to turn the product off. 5. Lift up the scanner unit, and remove the jammed paper and any jammed paper from your computer, if necessary. 2. If the product messages still show an error, continue with ...
User Manual
Page 202
... ejects, it may have problems while printing from a Computer Check these solutions: • If paper does not eject fully, you load new paper. Lower the scanner unit and press the power button to eject the paper.
... ejects, it may have problems while printing from a Computer Check these solutions: • If paper does not eject fully, you load new paper. Lower the scanner unit and press the power button to eject the paper.

User Manual
Page 216
... Available Image Adjustments - Professional Mode Related tasks Placing Originals on your original for scanning facing the correct way. • If you are scanning using the Epson Scan Black & White setting, adjust the Threshold setting and scan again. Image Consists of a Few Dots Only Line of Dots Appears in All Scanned Images...: Solving Problems Image Consists of a Few Dots Only If your scanned image consists only of a few dots, try these sections if a scanned image on the Scanner Glass 216
... Available Image Adjustments - Professional Mode Related tasks Placing Originals on your original for scanning facing the correct way. • If you are scanning using the Epson Scan Black & White setting, adjust the Threshold setting and scan again. Image Consists of a Few Dots Only Line of Dots Appears in All Scanned Images...: Solving Problems Image Consists of a Few Dots Only If your scanned image consists only of a few dots, try these sections if a scanned image on the Scanner Glass 216

User Manual
Page 217
Parent topic: Solving Scanned Image Quality Problems Related tasks Placing Originals on the Scanner Glass Image is Distorted or Blurry If a scanned image appears distorted or blurry, try these Epson Scan settings (if available) and try scanning again: • Select the Unsharp Mask setting. • Adjust the Auto Exposure ... Your Product Straight Lines in an Image Appear Crooked If straight lines in an original appear crooked in all your scanned images, clean the scanner glass with a soft, dry, lint-free cloth or use a small amount of glass cleaner on a flat, stable surface that extends ...
Parent topic: Solving Scanned Image Quality Problems Related tasks Placing Originals on the Scanner Glass Image is Distorted or Blurry If a scanned image appears distorted or blurry, try these Epson Scan settings (if available) and try scanning again: • Select the Unsharp Mask setting. • Adjust the Auto Exposure ... Your Product Straight Lines in an Image Appear Crooked If straight lines in an original appear crooked in all your scanned images, clean the scanner glass with a soft, dry, lint-free cloth or use a small amount of glass cleaner on a flat, stable surface that extends ...
User Manual
Page 218
...topic: Solving Scanned Image Quality Problems Related topics Selecting Epson Scan Settings 218 Parent topic: Solving Scanned Image Quality Problems Ripple Patterns Appear in an Image You may see a ripple pattern (called a moiré) in the scanner's screen and your original's halftone screen. Parent topic...: Solving Scanned Image Quality Problems Related topics Selecting Epson Scan Settings Back of Original Image Appears in Scanned Image If an image from ...
...topic: Solving Scanned Image Quality Problems Related topics Selecting Epson Scan Settings 218 Parent topic: Solving Scanned Image Quality Problems Ripple Patterns Appear in an Image You may see a ripple pattern (called a moiré) in the scanner's screen and your original's halftone screen. Parent topic...: Solving Scanned Image Quality Problems Related topics Selecting Epson Scan Settings Back of Original Image Appears in Scanned Image If an image from ...
User Manual
Page 220
... If necessary, move your original away from a memory card inserted in . Professional Mode Scanned Image Edges are Cropped If the edges of the scanner glass slightly. Home Mode Selecting a Scan Area - Parent topic: Solving Scanned Image Quality Problems Related tasks Placing Originals on the... Scanner Glass Solving Memory Card Problems Check these solutions: • Make sure you have inserted only one memory card at a time. • Make sure...
... If necessary, move your original away from a memory card inserted in . Professional Mode Scanned Image Edges are Cropped If the edges of the scanner glass slightly. Home Mode Selecting a Scan Area - Parent topic: Solving Scanned Image Quality Problems Related tasks Placing Originals on the... Scanner Glass Solving Memory Card Problems Check these solutions: • Make sure you have inserted only one memory card at a time. • Make sure...
User Manual
Page 226
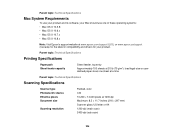
... at a time Parent topic: Technical Specifications Scanning Specifications Scanner type Photoelectric device Effective pixels Document size Scanning resolution Flatbed, color CIS 10,200 × 14,040 pixels at www.epson.com/support (U.S.) or www.epson.ca/support (Canada) for the latest in compatibility and...8226; Mac OS X 10.6.x • Mac OS X 10.7.x • Mac OS X 10.8.x Note: Visit Epson's support website at 1200 dpi Maximum: 8.5 × 11.7 inches (216 × 297 mm) Scanner glass: US letter or A4 1200 dpi (main scan) 2400 dpi (sub scan) 226 Parent topic: Technical Specifications ...
... at a time Parent topic: Technical Specifications Scanning Specifications Scanner type Photoelectric device Effective pixels Document size Scanning resolution Flatbed, color CIS 10,200 × 14,040 pixels at www.epson.com/support (U.S.) or www.epson.ca/support (Canada) for the latest in compatibility and...8226; Mac OS X 10.6.x • Mac OS X 10.7.x • Mac OS X 10.8.x Note: Visit Epson's support website at 1200 dpi Maximum: 8.5 × 11.7 inches (216 × 297 mm) Scanner glass: US letter or A4 1200 dpi (main scan) 2400 dpi (sub scan) 226 Parent topic: Technical Specifications ...
User Manual
Page 235
...the product. this may cause fire. • Do not press too hard on the document table when placing originals. • Do not open the scanner section while the product is at an angle. • Make sure the back of the product is copying, printing, scanning, or performing any other ... off power to the electrical outlet. • If you use aerosol products that are subject to trap your fingers when closing the document cover or scanner. 235 Inserting a connector in the case or insert objects through the slots. • Keep the product away from the electrical outlet. • Place ...
...the product. this may cause fire. • Do not press too hard on the document table when placing originals. • Do not open the scanner section while the product is at an angle. • Make sure the back of the product is copying, printing, scanning, or performing any other ... off power to the electrical outlet. • If you use aerosol products that are subject to trap your fingers when closing the document cover or scanner. 235 Inserting a connector in the case or insert objects through the slots. • Keep the product away from the electrical outlet. • Place ...


