
User Manual
Page 8
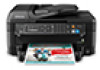
OS X 207 Conserving Low Black Ink with Expended Color Cartridges - Receiving Faxes Automatically...194 Receiving Faxes Manually...194 Receiving a Fax by Polling ...194 Replacing Ink Cartridges ...196 Check Cartridge Status ...196 Checking Cartridge Status on the LCD Screen ...196 Checking Cartridge Status with Windows 197 Checking Cartridge Status with OS X 200 Purchase Epson Ink Cartridges...201 Ink Cartridge Part Numbers ...201 Removing and Installing Ink Cartridges 202 Printing with Black Ink and Expended Color Cartridges 206 ...
OS X 207 Conserving Low Black Ink with Expended Color Cartridges - Receiving Faxes Automatically...194 Receiving Faxes Manually...194 Receiving a Fax by Polling ...194 Replacing Ink Cartridges ...196 Check Cartridge Status ...196 Checking Cartridge Status on the LCD Screen ...196 Checking Cartridge Status with Windows 197 Checking Cartridge Status with OS X 200 Purchase Epson Ink Cartridges...201 Ink Cartridge Part Numbers ...201 Removing and Installing Ink Cartridges 202 Printing with Black Ink and Expended Color Cartridges 206 ...
User Manual
Page 37
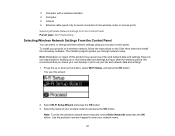
...on a wireless network, follow the instructions on the Start Here sheet and install the necessary software. Note: To enter the wireless network name manually, select Other Networks and press the OK button. The installer program guides you make your own backup or print out your fax and network... Wi-Fi Networking Selecting Wireless Network Settings From the Control Panel You can select or change wireless network settings using your product control panel. Epson is not responsible for wired connection to enter your network name. 37 Select Wi-Fi Setup Wizard and press the OK button. 3. To...
...on a wireless network, follow the instructions on the Start Here sheet and install the necessary software. Note: To enter the wireless network name manually, select Other Networks and press the OK button. The installer program guides you make your own backup or print out your fax and network... Wi-Fi Networking Selecting Wireless Network Settings From the Control Panel You can select or change wireless network settings using your product control panel. Epson is not responsible for wired connection to enter your network name. 37 Select Wi-Fi Setup Wizard and press the OK button. 3. To...

User Manual
Page 82
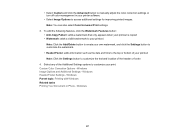
.... 1. Note: Some options may be pre-selected or unavailable, depending on other side (recommended for paper types that do not support automatic duplexing). • Manual (Short-edge binding) to print your double-sided print job by printing one side and prompting you to flip the paper over on the long... edge. • Auto (Short-edge binding) to print your double-sided print job by automatically flipping the paper on the short edge. • Manual (Long-edge binding) to print your double-sided print job by printing one of the following options for paper types that do not support automatic...
.... 1. Note: Some options may be pre-selected or unavailable, depending on other side (recommended for paper types that do not support automatic duplexing). • Manual (Short-edge binding) to print your double-sided print job by printing one side and prompting you to flip the paper over on the long... edge. • Auto (Short-edge binding) to print your double-sided print job by automatically flipping the paper on the short edge. • Manual (Long-edge binding) to print your double-sided print job by printing one of the following options for paper types that do not support automatic...
User Manual
Page 87
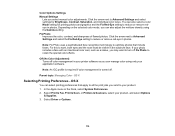
... Settings - Windows 87 Windows Parent topic: Printing with Windows Related tasks Printing Your Document or Photo - • Select Custom and click the Advanced button to manually adjust the color correction settings or turn off color management in your printer software. • Select Image Options to customize the text and location of...
... Settings - Windows 87 Windows Parent topic: Printing with Windows Related tasks Printing Your Document or Photo - • Select Custom and click the Advanced button to manually adjust the color correction settings or turn off color management in your printer software. • Select Image Options to customize the text and location of...

User Manual
Page 99
... have an Internet connection, it is a good idea to check for updates manually. Selecting Basic Print Settings - Click OK to disable the automatic update feature, you choose to exit. Note: If you can print with your product software on Epson's support website. OS X 99 Parent topic: Printing with OS X You can check...
... have an Internet connection, it is a good idea to check for updates manually. Selecting Basic Print Settings - Click OK to disable the automatic update feature, you choose to exit. Note: If you can print with your product software on Epson's support website. OS X 99 Parent topic: Printing with OS X You can check...
User Manual
Page 110
...cast, such as a statue, you may want to reduce or remove redeye in photos. If your product, and select Options & Supplies. 3. Color Options Settings Manual Settings Lets you can also select a color Mode setting for Brightness, Contrast, Saturation, and individual color tones. Depending on the selected color mode, you can...that include faces. Click the arrow next to Advanced Settings and select the Fix Red-Eye setting to your printer software so you select manual color adjustments. Parent topic: Managing Color - In the Apple menu or the Dock, select System Preferences. 2.
...cast, such as a statue, you may want to reduce or remove redeye in photos. If your product, and select Options & Supplies. 3. Color Options Settings Manual Settings Lets you can also select a color Mode setting for Brightness, Contrast, Saturation, and individual color tones. Depending on the selected color mode, you can...that include faces. Click the arrow next to Advanced Settings and select the Fix Red-Eye setting to your printer software so you select manual color adjustments. Parent topic: Managing Color - In the Apple menu or the Dock, select System Preferences. 2.

User Manual
Page 121
...a preview screen. You can manually customize all available settings, and preview and size your scanned image. Parent topic: Selecting Epson Scan Settings Selecting the Scan Mode Select the Epson Scan mode you can quickly scan text documents and adjust them on the Product Selecting Epson Scan Settings After starting Epson Scan, you want to customize...modes to use from the Mode box in Professional Mode Image Preview Guidelines Scan Resolution Guidelines Selecting Scan File Settings Parent topic: Scanning Scan Modes Epson Scan provides a choice of scan modes with different levels of the...
...a preview screen. You can manually customize all available settings, and preview and size your scanned image. Parent topic: Selecting Epson Scan Settings Selecting the Scan Mode Select the Epson Scan mode you can quickly scan text documents and adjust them on the Product Selecting Epson Scan Settings After starting Epson Scan, you want to customize...modes to use from the Mode box in Professional Mode Image Preview Guidelines Scan Resolution Guidelines Selecting Scan File Settings Parent topic: Scanning Scan Modes Epson Scan provides a choice of scan modes with different levels of the...

User Manual
Page 138
The marquee only indicates the area of the image that will not change the target size of the marquee, then click and drag the edge where you selected. 3. Do the following, as necessary, to work with the selected scan area: • To move the marquee, click inside the scan area and drag the marquee where you want it. • To resize the scan area, place your preview image proportioned for the size you want it. Note: Manually adjusting the marquee will be scanned. 138 A marquee (dotted line) appears on your cursor over the edge or corner of the scanned file.
The marquee only indicates the area of the image that will not change the target size of the marquee, then click and drag the edge where you selected. 3. Do the following, as necessary, to work with the selected scan area: • To move the marquee, click inside the scan area and drag the marquee where you want it. • To resize the scan area, place your preview image proportioned for the size you want it. Note: Manually adjusting the marquee will be scanned. 138 A marquee (dotted line) appears on your cursor over the edge or corner of the scanned file.

User Manual
Page 140
... selected settings: Thumbnail preview A thumbnail preview displays your previewed images in Professional Mode Image Preview Guidelines You can preview your image by Epson Scan. Normal preview A normal preview displays your previewed images as a guide. Parent topic: Scanning in their entirety so you can ...select the scanned image area and other settings manually. Parent topic: Selecting Epson Scan Settings Scan Resolution Guidelines If you plan to enlarge a scanned image so you can adjust it . 140 Follow these...
... selected settings: Thumbnail preview A thumbnail preview displays your previewed images in Professional Mode Image Preview Guidelines You can preview your image by Epson Scan. Normal preview A normal preview displays your previewed images as a guide. Parent topic: Scanning in their entirety so you can ...select the scanned image area and other settings manually. Parent topic: Selecting Epson Scan Settings Scan Resolution Guidelines If you plan to enlarge a scanned image so you can adjust it . 140 Follow these...

User Manual
Page 159
...following: • If you connected an external telephone or answering machine to the product's EXT port, press the up arrow button to receive faxes manually or press the down arrow button to receive them automatically. Note: When no external telephone is connected to the product, Receive Mode must be set... Fax Features Using the Product Control Panel Related tasks Entering Characters on the report, and run the check again. If you select to receive faxes manually, you need to check the fax connection and print a report of a fax number and send the fax to Auto; On the Confirm Settings ...
...following: • If you connected an external telephone or answering machine to the product's EXT port, press the up arrow button to receive faxes manually or press the down arrow button to receive them automatically. Note: When no external telephone is connected to the product, Receive Mode must be set... Fax Features Using the Product Control Panel Related tasks Entering Characters on the report, and run the check again. If you select to receive faxes manually, you need to check the fax connection and print a report of a fax number and send the fax to Auto; On the Confirm Settings ...

User Manual
Page 163
... - If you confirm whether an incoming fax should be necessary if the product is connected to the wrong number. Setting Receive Mode Distinctive Ring Options Manual Auto All Single Double Triple Double&Triple Description Lets you are using a Distinctive Ring Service on your phone line, your product can assign two or...
... - If you confirm whether an incoming fax should be necessary if the product is connected to the wrong number. Setting Receive Mode Distinctive Ring Options Manual Auto All Single Double Triple Double&Triple Description Lets you are using a Distinctive Ring Service on your phone line, your product can assign two or...

User Manual
Page 184
... a specific document from the oldest one . You can be sent when the time to memory. Setting Resolution Density Direct Send Options Standard Fine Photo Auto Manual Off On Transmission Report Send Fax Later Polling Receive Print on another fax machine for outgoing faxes. Automatically adjusts the darkness of memory, the faxes...
... a specific document from the oldest one . You can be sent when the time to memory. Setting Resolution Density Direct Send Options Standard Fine Photo Auto Manual Off On Transmission Report Send Fax Later Polling Receive Print on another fax machine for outgoing faxes. Automatically adjusts the darkness of memory, the faxes...

User Manual
Page 193
Fax Reception Receiving Faxes Automatically Receiving Faxes Manually Receiving a Fax by Polling Parent topic: Faxing Fax Reception Your product will automatically receive and print faxes when you to Auto. Parent topic: Sending Faxes ... to use for a fax tone using the telephone and press a button on your product. Make sure to receive faxes with your product to receive faxes manually. Click Fax. If you connected a telephone to your product so you can also set the Receive Mode to check for your product to receive the...
Fax Reception Receiving Faxes Automatically Receiving Faxes Manually Receiving a Fax by Polling Parent topic: Faxing Fax Reception Your product will automatically receive and print faxes when you to Auto. Parent topic: Sending Faxes ... to use for a fax tone using the telephone and press a button on your product. Make sure to receive faxes with your product to receive faxes manually. Click Fax. If you connected a telephone to your product so you can also set the Receive Mode to check for your product to receive the...

User Manual
Page 194
... up on the fourth ring, set up the telephone. Press the home button, if necessary. 194 Select Setup > Fax Settings > Receive Settings > Manual. 2. Parent topic: Receiving Faxes Receiving Faxes Automatically To receive faxes automatically, make sure the product's Rings to Answer setting is set to answer a ...call . 3. Parent topic: Receiving Faxes Related tasks Receiving Faxes Automatically Receiving a Fax by setting the Receive Mode to Manual. Note: If you run out of paper during fax printing, load more paper and press the button indicated on your product to receive faxes...
... up on the fourth ring, set up the telephone. Press the home button, if necessary. 194 Select Setup > Fax Settings > Receive Settings > Manual. 2. Parent topic: Receiving Faxes Receiving Faxes Automatically To receive faxes automatically, make sure the product's Rings to Answer setting is set to answer a ...call . 3. Parent topic: Receiving Faxes Related tasks Receiving Faxes Automatically Receiving a Fax by setting the Receive Mode to Manual. Note: If you run out of paper during fax printing, load more paper and press the button indicated on your product to receive faxes...
User Manual
Page 230
... Windows: Your printer software automatically checks for updates. Solving Problems Check these sections for solutions to your product software. You can also manually update the software by selecting Software Update here: • Accessing the Windows Desktop and right-clicking the product icon in the Windows taskbar... • On the Maintenance tab in the printer settings window You can also update the software by selecting EPSON Software Updater in the EPSON or EPSON Software program group, accessible by the Start button, or on the Start or Apps screens, depending on your version...
... Windows: Your printer software automatically checks for updates. Solving Problems Check these sections for solutions to your product software. You can also manually update the software by selecting Software Update here: • Accessing the Windows Desktop and right-clicking the product icon in the Windows taskbar... • On the Maintenance tab in the printer settings window You can also update the software by selecting EPSON Software Updater in the EPSON or EPSON Software program group, accessible by the Start button, or on the Start or Apps screens, depending on your version...

User Manual
Page 233
If they do not work, contact Epson. You can reset them all. 233 Press the up or down arrow button to reset or reset them to select Print Head Nozzle Check and ... press the OK button. 5. Press the up or down arrow button to their factory defaults. Check the other solutions in this screen: 4. You see this manual. Press one of the product check: • If the page prints and the nozzle check pattern is complete, the product is operating properly. Do the...
If they do not work, contact Epson. You can reset them all. 233 Press the up or down arrow button to reset or reset them to select Print Head Nozzle Check and ... press the OK button. 5. Press the up or down arrow button to their factory defaults. Check the other solutions in this screen: 4. You see this manual. Press one of the product check: • If the page prints and the nozzle check pattern is complete, the product is operating properly. Do the...

User Manual
Page 236
...8226; Check to see if access restrictions, such as MAC address filtering, are set , add your product's MAC address to enter your wireless network name manually. 236 We recommend that you make sure you are set on your router. • Make sure to place your product near a microwave oven, 2.4 GHz...a single network name (SSID) for backing up or recovering data and settings during or after the warranty period. If your router's address list. Epson is not lit or does not appear, make your own backup or print out your product's LCD screen is not responsible for both the 2.4 ...
...8226; Check to see if access restrictions, such as MAC address filtering, are set , add your product's MAC address to enter your wireless network name manually. 236 We recommend that you make sure you are set on your router. • Make sure to place your product near a microwave oven, 2.4 GHz...a single network name (SSID) for backing up or recovering data and settings during or after the warranty period. If your router's address list. Epson is not lit or does not appear, make your own backup or print out your product's LCD screen is not responsible for both the 2.4 ...

User Manual
Page 239
...-Fi Protected Setup (WPS) and the light on your product is not solid green, make sure the product's IP address is set the IP address manually. • Make sure your computer and product are both the 2.4 GHz and 5 GHz band, give each band its own network name (SSID) instead, such as...
...-Fi Protected Setup (WPS) and the light on your product is not solid green, make sure the product's IP address is set the IP address manually. • Make sure your computer and product are both the 2.4 GHz and 5 GHz band, give each band its own network name (SSID) instead, such as...

User Manual
Page 254
... Problems in Windows Taskbar Error After Cartridge Replacement Printing is wrinkled when it ejects, it may have problems while printing from those covered in this manual. Load new paper and be damp or too thin. See the Apple website for details. Paper Ejection Problems If you have problems with paper ejecting...
... Problems in Windows Taskbar Error After Cartridge Replacement Printing is wrinkled when it ejects, it may have problems while printing from those covered in this manual. Load new paper and be damp or too thin. See the Apple website for details. Paper Ejection Problems If you have problems with paper ejecting...

User Manual
Page 256
Parent topic: Solving Problems Printing from a Computer Related tasks Removing and Installing Ink Cartridges Printing is not in this manual to free up existing space. • Close any programs you are not using Windows 7, close the open program windows. Remove and reinsert the replaced ink .... Click OK to close the Devices and Printers window before you print. • If you are using OS X, make sure you download and install the Epson printer driver. • Make sure Quiet Mode is connected to a USB hub, connect it directly to your hard drive or run a defragmentation utility to move...
Parent topic: Solving Problems Printing from a Computer Related tasks Removing and Installing Ink Cartridges Printing is not in this manual to free up existing space. • Close any programs you are not using Windows 7, close the open program windows. Remove and reinsert the replaced ink .... Click OK to close the Devices and Printers window before you print. • If you are using OS X, make sure you download and install the Epson printer driver. • Make sure Quiet Mode is connected to a USB hub, connect it directly to your hard drive or run a defragmentation utility to move...


