User Manual
Page 3
Contents WF-100 User's Guide...9 Product Basics ...10 Using the Control Panel ...10 Control Panel Buttons...10 The LCD Screen...11 Status Icons...11 Changing LCD Screen Language 12 Turning On Quiet Mode ...13 Product Parts Locations ...14 Printer Parts - Inside and Bottom 16 Battery Charging ...16...Changing the Power Off Timer Setting 19 Changing the Sleep Timer Setting 20 Epson Connect Solutions for Smartphones, Tablets, and More 21 Using Epson Email Print ...21 Using the Epson iPrint Mobile App 22 Using Epson Remote Print ...22 Using AirPrint ...23 Using Google Cloud Print ...23 ...
Contents WF-100 User's Guide...9 Product Basics ...10 Using the Control Panel ...10 Control Panel Buttons...10 The LCD Screen...11 Status Icons...11 Changing LCD Screen Language 12 Turning On Quiet Mode ...13 Product Parts Locations ...14 Printer Parts - Inside and Bottom 16 Battery Charging ...16...Changing the Power Off Timer Setting 19 Changing the Sleep Timer Setting 20 Epson Connect Solutions for Smartphones, Tablets, and More 21 Using Epson Email Print ...21 Using the Epson iPrint Mobile App 22 Using Epson Remote Print ...22 Using AirPrint ...23 Using Google Cloud Print ...23 ...
User Manual
Page 4
... Windows 48 Multi-Page Printing Options - Windows 50 Selecting Additional Layout and Print Options - Windows 60 Changing the Language of the Printer Software Screens 61 Changing Automatic Update Options 62 4 Windows 48 Selecting Double-sided Printing Settings - Windows 57 Extended Settings - Control ......42 Borderless Paper Type Compatibility 43 Paper or Media Type Settings ...44 Printing from a Computer ...45 Printing with the Standard Epson Printer Software - Windows 55 Selecting a Printing Preset - Using WPS to Connect to a Network 32 Printing a Network Status Sheet...
... Windows 48 Multi-Page Printing Options - Windows 50 Selecting Additional Layout and Print Options - Windows 60 Changing the Language of the Printer Software Screens 61 Changing Automatic Update Options 62 4 Windows 48 Selecting Double-sided Printing Settings - Windows 57 Extended Settings - Control ......42 Borderless Paper Type Compatibility 43 Paper or Media Type Settings ...44 Printing from a Computer ...45 Printing with the Standard Epson Printer Software - Windows 55 Selecting a Printing Preset - Using WPS to Connect to a Network 32 Printing a Network Status Sheet...
User Manual
Page 6
... ...125 Product Cannot Connect to a Wireless Router or Access Point 126 Network Software Cannot Find Product on a Network 127 Product Does Not Appear in OS X Printer Window 128 Cannot Print Over a Network...128 Solving Paper Problems...129 Paper Feeding Problems...129 6
... ...125 Product Cannot Connect to a Wireless Router or Access Point 126 Network Software Cannot Find Product on a Network 127 Product Does Not Appear in OS X Printer Window 128 Cannot Print Over a Network...128 Solving Paper Problems...129 Paper Feeding Problems...129 6
User Manual
Page 8
...Electrical Specifications ...153 Environmental Specifications ...155 Interface Specifications ...155 Network Interface Specifications ...155 Safety and Approvals Specifications 156 Notices ...158 General Printer Safety Instructions 158 Battery Safety Instructions...160 Ink Cartridge Safety Instructions 160 LCD Screen Safety Instructions 161 Wireless Connection Safety Instructions 161 FCC ...Trademarks ...162 Copyright Notice...163 A Note Concerning Responsible Use of Copyrighted Materials 164 Default Delay Times for Power Management for Epson Products 164 Copyright Attribution ...164 8
...Electrical Specifications ...153 Environmental Specifications ...155 Interface Specifications ...155 Network Interface Specifications ...155 Safety and Approvals Specifications 156 Notices ...158 General Printer Safety Instructions 158 Battery Safety Instructions...160 Ink Cartridge Safety Instructions 160 LCD Screen Safety Instructions 161 Wireless Connection Safety Instructions 161 FCC ...Trademarks ...162 Copyright Notice...163 A Note Concerning Responsible Use of Copyrighted Materials 164 Default Delay Times for Power Management for Epson Products 164 Copyright Attribution ...164 8
User Manual
Page 13
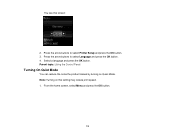
Select a language and press the OK button. From the home screen, select Menu and press the OK button. 13 Press the arrow buttons to select Printer Setup and press the OK button. 3. Parent topic: Using the Control Panel Turning On Quiet Mode You can reduce the noise the product makes by turning on this screen: 2. Note: Turning on Quiet Mode. You see this setting may reduce print speed. 1. Press the arrow buttons to select Language and press the OK button. 4.
Select a language and press the OK button. From the home screen, select Menu and press the OK button. 13 Press the arrow buttons to select Printer Setup and press the OK button. 3. Parent topic: Using the Control Panel Turning On Quiet Mode You can reduce the noise the product makes by turning on this screen: 2. Note: Turning on Quiet Mode. You see this setting may reduce print speed. 1. Press the arrow buttons to select Language and press the OK button. 4.

User Manual
Page 14
You see this screen: 2. Press the arrow buttons to identify the parts on your product. Parent topic: Using the Control Panel Product Parts Locations See these sections to select Quiet Mode and press the OK button. 4. Inside and Bottom Parent topic: Product Basics 14 Printer Parts - Top Printer Parts - Select On and press the OK button. Press the arrow buttons to select Printer Setup and press the OK button. 3.
You see this screen: 2. Press the arrow buttons to identify the parts on your product. Parent topic: Using the Control Panel Product Parts Locations See these sections to select Quiet Mode and press the OK button. 4. Inside and Bottom Parent topic: Product Basics 14 Printer Parts - Top Printer Parts - Select On and press the OK button. Press the arrow buttons to select Printer Setup and press the OK button. 3.
User Manual
Page 15
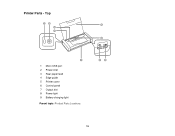
Top 1 Micro USB port 2 Power inlet 3 Rear paper feed 4 Edge guide 5 Printer cover 6 Control panel 7 Output slot 8 Power light 9 Battery charging light Parent topic: Product Parts Locations 15 Printer Parts -
Top 1 Micro USB port 2 Power inlet 3 Rear paper feed 4 Edge guide 5 Printer cover 6 Control panel 7 Output slot 8 Power light 9 Battery charging light Parent topic: Product Parts Locations 15 Printer Parts -
User Manual
Page 16
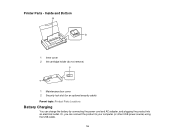
Inside and Bottom 1 Inner cover 2 Ink cartridge holder (do not remove) 1 Maintenance box cover 2 Security lock slot (for an optional security cable) Parent topic: Product Parts Locations Battery Charging You can connect the product to your computer (or other USB power source) using the USB cable. 16 Printer Parts - Or, you can charge the battery by connecting the power cord and AC adapter, and plugging the product into an electrical outlet.
Inside and Bottom 1 Inner cover 2 Ink cartridge holder (do not remove) 1 Maintenance box cover 2 Security lock slot (for an optional security cable) Parent topic: Product Parts Locations Battery Charging You can connect the product to your computer (or other USB power source) using the USB cable. 16 Printer Parts - Or, you can charge the battery by connecting the power cord and AC adapter, and plugging the product into an electrical outlet.
User Manual
Page 17
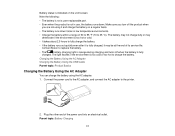
... hours to charge the battery. Make sure you turn off when the battery is indicated on a regular basis. • The battery runs down . Contact Epson to 35 °C). Plug the other end of 50 to 95 °F (10 to replace the battery. • The battery charging light is orange ...a range of the power cord into an electrical outlet. Connect the power cord to the AC adapter, and connect the AC adapter to the printer. 2. Battery status is fully charged. Charging the Battery Using the AC Adapter Charging the Battery Using the USB Cable Parent topic: Product Basics Charging...
... hours to charge the battery. Make sure you turn off when the battery is indicated on a regular basis. • The battery runs down . Contact Epson to 35 °C). Plug the other end of 50 to 95 °F (10 to replace the battery. • The battery charging light is orange ...a range of the power cord into an electrical outlet. Connect the power cord to the AC adapter, and connect the AC adapter to the printer. 2. Battery status is fully charged. Charging the Battery Using the AC Adapter Charging the Battery Using the USB Cable Parent topic: Product Basics Charging...
User Manual
Page 18
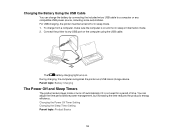
Connect the printer to a computer or any USB port on . The battery charging light turns on the computer using the USB cable. You ... Power Off and Sleep Timers The product enters sleep mode or turns off or in sleep or hibernation mode. 2. For USB charging, the printer must be turned off automatically if it is on and not in sleep mode. 1. To charge from a computer, make sure the computer ... time period before power management, but increasing the time reduces the product's energy efficiency. During charging, the computer recognizes the printer as a USB mass storage device.
Connect the printer to a computer or any USB port on . The battery charging light turns on the computer using the USB cable. You ... Power Off and Sleep Timers The product enters sleep mode or turns off or in sleep or hibernation mode. 2. For USB charging, the printer must be turned off automatically if it is on and not in sleep mode. 1. To charge from a computer, make sure the computer ... time period before power management, but increasing the time reduces the product's energy efficiency. During charging, the computer recognizes the printer as a USB mass storage device.
User Manual
Page 19
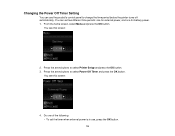
... of the following: • To set the timer when external power is in use the product's control panel to change the time period before the printer turns off automatically. Press the arrow buttons to select Power Off Timer and press the OK button. Press the arrow buttons to select... Printer Setup and press the OK button. 3. You see this screen: 4. You see this screen: 2. From the home screen, select Menu and press the OK button. ...
... of the following: • To set the timer when external power is in use the product's control panel to change the time period before the printer turns off automatically. Press the arrow buttons to select Power Off Timer and press the OK button. Press the arrow buttons to select... Printer Setup and press the OK button. 3. You see this screen: 4. You see this screen: 2. From the home screen, select Menu and press the OK button. ...
User Manual
Page 20
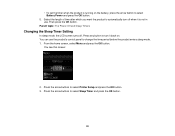
... when it back on the battery, press the arrow button to select Battery Power and press the OK button. 5. Press the arrow buttons to select Printer Setup and press the OK button. 3. From the home screen, select Menu and press the OK button. • To set the timer when the product...
... when it back on the battery, press the arrow button to select Battery Power and press the OK button. 5. Press the arrow buttons to select Printer Setup and press the OK button. 3. From the home screen, select Menu and press the OK button. • To set the timer when the product...
User Manual
Page 24
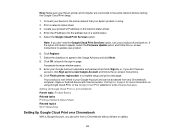
... opens. 9. Connect your device to the same network that your Epson product is now linked to update your Google Account username and password and click Sign in page. Click Register. 7. Enter your product. 6. Click Finish printer registration to the Usage Advisory and click Next. 8. Your product is...same network before starting the Google Cloud Print setup. 1. Note: If you don't see the Google Cloud Print Services option, turn your Epson printer and computer are connected to launch the sign-in , or, if you can be accessed from a Chromebook without drivers or cables. ...
... opens. 9. Connect your device to the same network that your Epson product is now linked to update your Google Account username and password and click Sign in page. Click Register. 7. Enter your product. 6. Click Finish printer registration to the Usage Advisory and click Next. 8. Your product is...same network before starting the Google Cloud Print setup. 1. Note: If you don't see the Google Cloud Print Services option, turn your Epson printer and computer are connected to launch the sign-in , or, if you can be accessed from a Chromebook without drivers or cables. ...
User Manual
Page 37
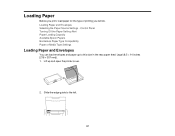
Lift up to the left. 37 Control Panel Turning Off the Paper Setting Alert Paper Loading Capacity Available Epson Papers Borderless Paper Type Compatibility Paper or Media Type Settings Loading Paper and Envelopes You can load envelopes and paper up and open the printer cover. 2. Loading Paper and Envelopes Selecting the Paper Source Settings - Slide the edge guide to this size in the rear paper feed: Legal (8.5 × 14 inches [216 × 357 mm]). 1. Loading Paper Before you print, load paper for the type of printing you will do.
Lift up to the left. 37 Control Panel Turning Off the Paper Setting Alert Paper Loading Capacity Available Epson Papers Borderless Paper Type Compatibility Paper or Media Type Settings Loading Paper and Envelopes You can load envelopes and paper up and open the printer cover. 2. Loading Paper and Envelopes Selecting the Paper Source Settings - Slide the edge guide to this size in the rear paper feed: Legal (8.5 × 14 inches [216 × 357 mm]). 1. Loading Paper Before you print, load paper for the type of printing you will do.
User Manual
Page 39
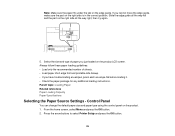
If you just loaded on the product LCD screen. Press the arrow buttons to select Printer Setup and press the OK button. 39 Slide the edge guide all the way left and the part on the product. 1. From the home screen, ...
If you just loaded on the product LCD screen. Press the arrow buttons to select Printer Setup and press the OK button. 39 Slide the edge guide all the way left and the part on the product. 1. From the home screen, ...
User Manual
Page 40
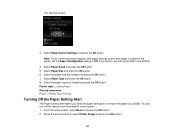
If you do not match the paper you will not be able to select Printer Setup and press the OK button. 40 Select the paper type you loaded and press the OK button. 7. Press the arrow buttons to use AirPrint. 4. ... button. 5. You can turn off this screen: 3. Note: To turn off the automatic display of the paper settings screen after paper is loaded in the printer, set the Paper Configuration setting to Off.
If you do not match the paper you will not be able to select Printer Setup and press the OK button. 40 Select the paper type you loaded and press the OK button. 7. Press the arrow buttons to use AirPrint. 4. ... button. 5. You can turn off this screen: 3. Note: To turn off the automatic display of the paper settings screen after paper is loaded in the printer, set the Paper Configuration setting to Off.
User Manual
Page 45
Windows Printing with the Standard Epson Printer Software - Windows Selecting a Printing Preset - The update scans your system to your product software on -screen instructions. Follow the on Epson's support website. Windows You can still print from a Computer 45 Windows Changing Automatic Update ...Settings - Caution: If you are using any Windows printing program, as described in Basic Driver - Printing with the standard Epson printer software using the AC adapter, do not disconnect it is operating. Windows Selecting Additional Layout and Print Options - Even if...
Windows Printing with the Standard Epson Printer Software - Windows Selecting a Printing Preset - The update scans your system to your product software on -screen instructions. Follow the on Epson's support website. Windows You can still print from a Computer 45 Windows Changing Automatic Update ...Settings - Caution: If you are using any Windows printing program, as described in Basic Driver - Printing with the standard Epson printer software using the AC adapter, do not disconnect it is operating. Windows Selecting Additional Layout and Print Options - Even if...
User Manual
Page 46
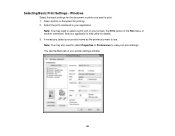
... option in your application. Note: You may also need to view your product name as the printer you want to print. 1. You see the Main tab of your application's help utility for details. 3. See your printer settings window: 46 Select the print command in the File menu, or another command. If necessary...
... option in your application. Note: You may also need to view your product name as the printer you want to print. 1. You see the Main tab of your application's help utility for details. 3. See your printer settings window: 46 Select the print command in the File menu, or another command. If necessary...
User Manual
Page 48
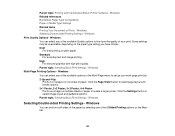
... paper by selecting one image on the Main tab. 48 Windows You can select any of paper. High For text and graphics with the Standard Epson Printer Software - Parent topic: Printing with high print quality. Windows Related references Borderless Paper Type Compatibility Paper or Media Type Settings Related tasks Printing Your Document...
... paper by selecting one image on the Main tab. 48 Windows You can select any of paper. High For text and graphics with the Standard Epson Printer Software - Parent topic: Printing with high print quality. Windows Related references Borderless Paper Type Compatibility Paper or Media Type Settings Related tasks Printing Your Document...
User Manual
Page 50
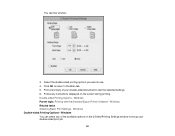
... this window: 3. Follow any of your double-sided document to set up your double-sided print job. 50 Windows Parent topic: Printing with the Standard Epson Printer Software - Print a test copy of the available options on the screen during printing. Double-sided Printing Options - Click OK to return to use. 4. Windows Related...
... this window: 3. Follow any of your double-sided document to set up your double-sided print job. 50 Windows Parent topic: Printing with the Standard Epson Printer Software - Print a test copy of the available options on the screen during printing. Double-sided Printing Options - Click OK to return to use. 4. Windows Related...


