
Network Installation Guide
Page 4
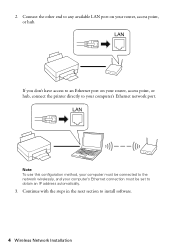
Continue with the steps in the next section to the network wirelessly, and your computer's Ethernet network port. 2. Note: To use this configuration method, your computer must be set to an Ethernet port on your router, access point, or hub. If you don't have access to obtain an IP address automatically. 3. Connect the other end to any available LAN port on your router, access point, or hub, connect the printer directly to your computer's Ethernet connection must be connected to install software. 4 Wireless Network Installation
Continue with the steps in the next section to the network wirelessly, and your computer's Ethernet network port. 2. Note: To use this configuration method, your computer must be set to an Ethernet port on your router, access point, or hub. If you don't have access to obtain an IP address automatically. 3. Connect the other end to any available LAN port on your router, access point, or hub, connect the printer directly to your computer's Ethernet connection must be connected to install software. 4 Wireless Network Installation

Network Installation Guide
Page 5
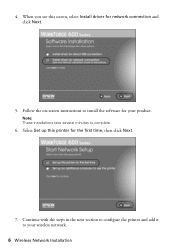
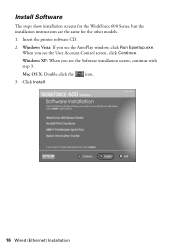
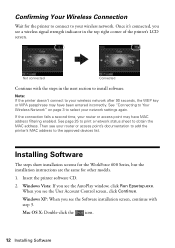
Windows Vista®: If you see the Software installation screen, continue with step 3. Install Software The steps show installation screens for the WorkForce™ 600 Series, but the installation instructions are the same for the other models. 1. Wireless Network Installation 5 Click Install. Mac OS® X: Double-click the icon. 3. Windows® XP: When you see the User Account Control screen, click Continue. When you see the AutoPlay window, click Run Epsetup.exe. Insert the printer software CD. 2.
Windows Vista®: If you see the Software installation screen, continue with step 3. Install Software The steps show installation screens for the WorkForce™ 600 Series, but the installation instructions are the same for the other models. 1. Wireless Network Installation 5 Click Install. Mac OS® X: Double-click the icon. 3. Windows® XP: When you see the User Account Control screen, click Continue. When you see the AutoPlay window, click Run Epsetup.exe. Insert the printer software CD. 2.
Network Installation Guide
Page 6
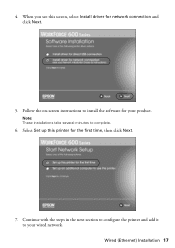
Select Set up this screen, select Install driver for the first time, then click Next. 7. Continue with the steps in the next section to configure the printer and add it to your product. Note: These installations take several minutes to install the software for your wireless network. 6 Wireless Network Installation When you see this printer for network connection and click Next. 5. Follow the on-screen instructions to complete. 6. 4.
Select Set up this screen, select Install driver for the first time, then click Next. 7. Continue with the steps in the next section to configure the printer and add it to your product. Note: These installations take several minutes to install the software for your wireless network. 6 Wireless Network Installation When you see this printer for network connection and click Next. 5. Follow the on-screen instructions to complete. 6. 4.
Network Installation Guide
Page 8
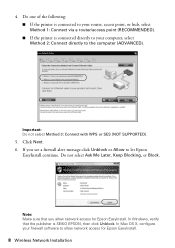
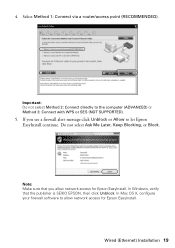
...one of the following: ■ If the printer is connected to allow network access for Epson EasyInstall. 8 Wireless Network Installation Note: Make sure that the publisher is connected directly to your firewall software to your router, access point, or hub, select Method 1: Connect via a router/access point (RECOMMENDED). ■ If the printer is SEIKO EPSON..., then click Unblock. If you allow network access for Epson ...
...one of the following: ■ If the printer is connected to allow network access for Epson EasyInstall. 8 Wireless Network Installation Note: Make sure that the publisher is connected directly to your firewall software to your router, access point, or hub, select Method 1: Connect via a router/access point (RECOMMENDED). ■ If the printer is SEIKO EPSON..., then click Unblock. If you allow network access for Epson ...
Network Installation Guide
Page 15
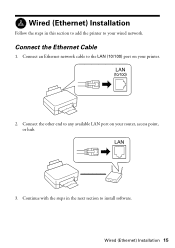
Wired (Ethernet) Installation Follow the steps in the next section to install software. Connect the Ethernet Cable 1. Wired (Ethernet) Installation 15 Connect the other end to any available LAN port on your printer. 2. Connect an Ethernet network cable to your router, access point, or hub. 3. Continue with the steps in this section to add the printer to the LAN (10/100) port on your wired network.
Wired (Ethernet) Installation Follow the steps in the next section to install software. Connect the Ethernet Cable 1. Wired (Ethernet) Installation 15 Connect the other end to any available LAN port on your printer. 2. Connect an Ethernet network cable to your router, access point, or hub. 3. Continue with the steps in this section to add the printer to the LAN (10/100) port on your wired network.
Network Installation Guide
Page 16
Windows XP: When you see the AutoPlay window, click Run Epsetup.exe. Click Install. 16 Wired (Ethernet) Installation Windows Vista: If you see the User Account Control screen, click Continue. When you see the Software installation screen, continue with step 3. Mac OS X: Double-click the icon. 3. Insert the printer software CD. 2. Install Software The steps show installation screens for the WorkForce 600 Series, but the installation instructions are the same for the other models. 1.
Windows XP: When you see the AutoPlay window, click Run Epsetup.exe. Click Install. 16 Wired (Ethernet) Installation Windows Vista: If you see the User Account Control screen, click Continue. When you see the Software installation screen, continue with step 3. Mac OS X: Double-click the icon. 3. Insert the printer software CD. 2. Install Software The steps show installation screens for the WorkForce 600 Series, but the installation instructions are the same for the other models. 1.
Network Installation Guide
Page 17
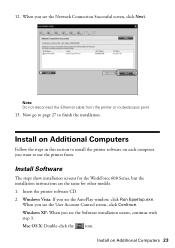
Select Set up this screen, select Install driver for the first time, then click Next. 7. Wired (Ethernet) Installation 17 4. Note: These installations take several minutes to install the software for your wired network. Continue with the steps in the next section to configure the printer and add it to your product. When you see this printer for network connection and click Next. 5. Follow the on-screen instructions to complete. 6.
Select Set up this screen, select Install driver for the first time, then click Next. 7. Wired (Ethernet) Installation 17 4. Note: These installations take several minutes to install the software for your wired network. Continue with the steps in the next section to configure the printer and add it to your product. When you see this printer for network connection and click Next. 5. Follow the on-screen instructions to complete. 6.
Network Installation Guide
Page 19
Do not select Ask Me Later, Keep Blocking, or Block. Note: Make sure that the publisher is SEIKO EPSON, then click Unblock. If you allow network access for Epson EasyInstall. In Mac OS X, configure your firewall software to the computer (ADVANCED) or Method 3: Connect with WPS or SES (NOT SUPPORTED). 5. Wired (Ethernet) Installation 19...
Do not select Ask Me Later, Keep Blocking, or Block. Note: Make sure that the publisher is SEIKO EPSON, then click Unblock. If you allow network access for Epson EasyInstall. In Mac OS X, configure your firewall software to the computer (ADVANCED) or Method 3: Connect with WPS or SES (NOT SUPPORTED). 5. Wired (Ethernet) Installation 19...
Network Installation Guide
Page 23
... Computers Follow the steps in this section to finish the installation. Now go to page 27 to install the printer software on Additional Computers 23 12. Install Software The steps show installation screens for the WorkForce 600 Series, but the installation instructions are the same for other models. 1. Note: Do not disconnect the Ethernet cable...
... Computers Follow the steps in this section to finish the installation. Now go to page 27 to install the printer software on Additional Computers 23 12. Install Software The steps show installation screens for the WorkForce 600 Series, but the installation instructions are the same for other models. 1. Note: Do not disconnect the Ethernet cable...
Network Installation Guide
Page 24
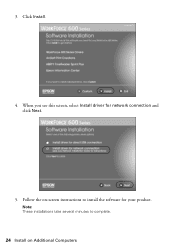
When you see this screen, select Install driver for your product. Note: These installations take several minutes to complete. 24 Install on -screen instructions to install the software for network connection and click Next. 5. 3. Click Install. 4. Follow the on Additional Computers
When you see this screen, select Install driver for your product. Note: These installations take several minutes to complete. 24 Install on -screen instructions to install the software for network connection and click Next. 5. 3. Click Install. 4. Follow the on Additional Computers

Network Installation Guide
Page 26
...In Windows, verify that the publisher is turned on and connected to let Epson EasyInstall continue. Now go to page 27 to find the printer on Additional Computers Note: Make sure that the printer is SEIKO EPSON, then click Unblock. Then click the refresh button. 11. Note: ... Select the printer you want to allow network access for Epson EasyInstall. 10. 9. In Mac OS X, configure your printer doesn't appear in the list after 90 seconds, make sure that you see a firewall alert message click Unblock or Allow to the network. If your firewall software to install, ...
...In Windows, verify that the publisher is turned on and connected to let Epson EasyInstall continue. Now go to page 27 to find the printer on Additional Computers Note: Make sure that the printer is SEIKO EPSON, then click Unblock. Then click the refresh button. 11. Note: ... Select the printer you want to allow network access for Epson EasyInstall. 10. 9. In Mac OS X, configure your printer doesn't appear in the list after 90 seconds, make sure that you see a firewall alert message click Unblock or Allow to the network. If your firewall software to install, ...

Network Installation Guide
Page 27
See your printed documentation and on-screen Epson Information Center for your default printer (optional) 2. When installation is complete, you can do the following: ■ Enter a new name for the software installation to scan and print. Finish the Installation 27 Finish the Installation Follow the steps for details. When you see the screen below...
See your printed documentation and on-screen Epson Information Center for your default printer (optional) 2. When installation is complete, you can do the following: ■ Enter a new name for the software installation to scan and print. Finish the Installation 27 Finish the Installation Follow the steps for details. When you see the screen below...
Network Installation Guide
Page 29
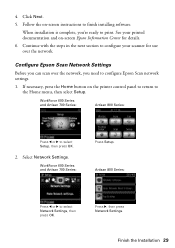
... the Home menu, then select Setup. Select Network Settings. See your scanner for details. 6. Press r, then press Network Settings. WorkForce 600 Series and Artisan 700 Series: Press Setup. Finish the Installation 29 Continue with the steps in the next section to configure your printed... to select Network Settings, then press OK. Configure Epson Scan Network Settings Before you can scan over the network. Artisan 800 Series: Press l or r to finish installing software. 4. Click Next. 5. Follow the on the printer control panel to return to select Setup, then press...
... the Home menu, then select Setup. Select Network Settings. See your scanner for details. 6. Press r, then press Network Settings. WorkForce 600 Series and Artisan 700 Series: Press Setup. Finish the Installation 29 Continue with the steps in the next section to configure your printed... to select Network Settings, then press OK. Configure Epson Scan Network Settings Before you can scan over the network. Artisan 800 Series: Press l or r to finish installing software. 4. Click Next. 5. Follow the on the printer control panel to return to select Setup, then press...
Network Installation Guide
Page 32
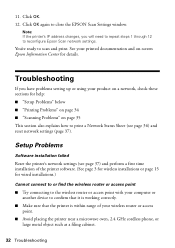
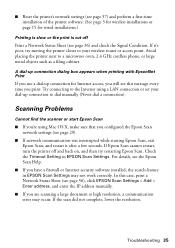
...Try connecting to the wireless router or access point with your computer or another device to close the EPSON Scan Settings window. Setup Problems Software installation failed Reset the printer's network settings (see page 36) and reset network settings (page 37). Click OK. 12. See... your wireless router or access point. ■ Avoid placing the printer near a microwave oven, 2.4 GHz cordless phone, or large metal...
...Try connecting to the wireless router or access point with your computer or another device to close the EPSON Scan Settings window. Setup Problems Software installation failed Reset the printer's network settings (see page 36) and reset network settings (page 37). Click OK. 12. See... your wireless router or access point. ■ Avoid placing the printer near a microwave oven, 2.4 GHz cordless phone, or large metal...
Network Installation Guide
Page 33
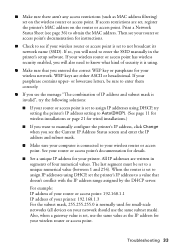
...router or access point's documentation for your wireless network. WEP keys are set, register the printer's MAC address on the wireless router or access point. All IP addresses are written in the printer's setup software. If so, you will also need to enter the SSID manually in segments of IP ...address and subnet mask is normally used for your printer. If your wireless router or access point has wireless security enabled,...
...router or access point's documentation for your wireless network. WEP keys are set, register the printer's MAC address on the wireless router or access point. All IP addresses are written in the printer's setup software. If so, you will also need to enter the SSID manually in segments of IP ...address and subnet mask is normally used for your printer. If your wireless router or access point has wireless security enabled,...
Network Installation Guide
Page 35
...on, and then try moving the printer closer to your dial-up connection dialog box appears when printing with EpsonNet Print If you have a firewall or Internet security software installed, the search feature in EPSON Scan Settings. ■ Reset the printer's network settings (see page 37...) and perform a first-time installation of the printer software. (See page 3 for wireless installations or page 15 for...
...on, and then try moving the printer closer to your dial-up connection dialog box appears when printing with EpsonNet Print If you have a firewall or Internet security software installed, the search feature in EPSON Scan Settings. ■ Reset the printer's network settings (see page 37...) and perform a first-time installation of the printer software. (See page 3 for wireless installations or page 15 for...
Network Installation Guide
Page 39
...any options or any form or by Seiko Epson Corporation. See the "Software Notices" section in the online Epson Information Center for any damages or problems arising from the use of Seiko Epson Corporation. Seiko Epson Corporation shall not be liable to the ... information as a result of: accident, misuse, or abuse of their respective owners. Epson is designed only for damages, losses, costs, or expenses incurred by Seiko Epson Corporation, this printer. WorkForce and Artisan are for any means, electronic, mechanical, photocopying, recording, or otherwise, without...
...any options or any form or by Seiko Epson Corporation. See the "Software Notices" section in the online Epson Information Center for any damages or problems arising from the use of Seiko Epson Corporation. Seiko Epson Corporation shall not be liable to the ... information as a result of: accident, misuse, or abuse of their respective owners. Epson is designed only for damages, losses, costs, or expenses incurred by Seiko Epson Corporation, this printer. WorkForce and Artisan are for any means, electronic, mechanical, photocopying, recording, or otherwise, without...
Using the Control Panel for Wireless Network Installation
Page 2
... network. ■ If you installed ink cartridges and loaded paper in "Installing Software" on the Start Here sheet. Do one of the following: ■ If you're installing the printer for the first time, see the next section to connect the printer to your wireless router or access point is set up and working...
... network. ■ If you installed ink cartridges and loaded paper in "Installing Software" on the Start Here sheet. Do one of the following: ■ If you're installing the printer for the first time, see the next section to connect the printer to your wireless router or access point is set up and working...
Using the Control Panel for Wireless Network Installation
Page 12
... router or access point's documentation to add the printer's MAC address to your network settings again. See page 25 to print a network status sheet to install software. Installing Software The steps show installation screens for the WorkForce 600 Series, but the installation instructions are the same... for the printer to connect to the approved devices list. Windows Vista: If you ...
... router or access point's documentation to add the printer's MAC address to your network settings again. See page 25 to print a network status sheet to install software. Installing Software The steps show installation screens for the WorkForce 600 Series, but the installation instructions are the same... for the printer to connect to the approved devices list. Windows Vista: If you ...
Using the Control Panel for Wireless Network Installation
Page 13
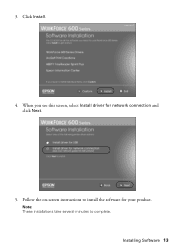
Click Install. 4. Note: These installations take several minutes to install the software for network connection and click Next. 5. Installing Software 13 When you see this screen, select Install driver for your product. Follow the on-screen instructions to complete. 3.
Click Install. 4. Note: These installations take several minutes to install the software for network connection and click Next. 5. Installing Software 13 When you see this screen, select Install driver for your product. Follow the on-screen instructions to complete. 3.


