
Network Installation Guide
Page 29
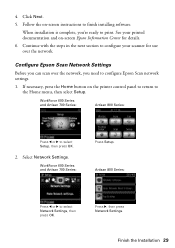
... to finish installing software. Continue with the steps in the next section to configure your printed documentation and on -screen instructions to configure Epson Scan network settings. 1. If necessary, press the Home button on the printer control panel to return to print. WorkForce 600 Series and Artisan 700 Series: Press Setup. Finish the Installation 29
... to finish installing software. Continue with the steps in the next section to configure your printed documentation and on -screen instructions to configure Epson Scan network settings. 1. If necessary, press the Home button on the printer control panel to return to print. WorkForce 600 Series and Artisan 700 Series: Press Setup. Finish the Installation 29
Network Installation Guide
Page 32
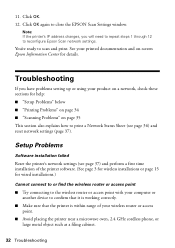
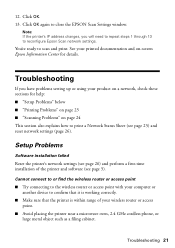
11. Click OK. 12. You're ready to close the EPSON Scan Settings window. Setup Problems Software installation failed Reset the printer's network settings (see page 37) and perform a first time installation of the printer software. (See page 3 for wireless installations or page 15 for wired installations...reset network settings (page 37). Click OK again to scan and print. See your printed documentation and on-screen Epson Information Center for help: ■ "Setup Problems" below ■ "Printing Problems" on page 34 ■ "Scanning Problems" on a network, check these sections for ...
11. Click OK. 12. You're ready to close the EPSON Scan Settings window. Setup Problems Software installation failed Reset the printer's network settings (see page 37) and perform a first time installation of the printer software. (See page 3 for wireless installations or page 15 for wired installations...reset network settings (page 37). Click OK again to scan and print. See your printed documentation and on-screen Epson Information Center for help: ■ "Setup Problems" below ■ "Printing Problems" on page 34 ■ "Scanning Problems" on a network, check these sections for ...
Network Installation Guide
Page 33
WEP keys are written in the printer's setup software. When the router is normally used for small-scale networks (all devices on your passphrase contains upper- If your network should use the same value as MAC address filtering) set the printer's IP address to a unique numerical value (between ... page 11 for wireless installations or page 21 for your wireless router or access point. or lowercase letters, be set , register the printer's MAC address on the wireless router or access point. All IP addresses are either ASCII or hexadecimal. Print a Network Status Sheet ...
WEP keys are written in the printer's setup software. When the router is normally used for small-scale networks (all devices on your passphrase contains upper- If your network should use the same value as MAC address filtering) set the printer's IP address to a unique numerical value (between ... page 11 for wireless installations or page 21 for your wireless router or access point. or lowercase letters, be set , register the printer's MAC address on the wireless router or access point. All IP addresses are either ASCII or hexadecimal. Print a Network Status Sheet ...
Network Installation Guide
Page 34
...Network Status Sheet (see page 36). If the Link Status says Disconnect, make sure the printer's IP address is turned on or flashing. Select Setup from the Home menu, select Network Settings, choose Wireless LAN Setup, and select Disable. If it is on , and that the settings are correct for ...your router, access point, switch, or hub with another router, access point, switch or hub. ■ Try connecting the printer to your network. If your network does...
...Network Status Sheet (see page 36). If the Link Status says Disconnect, make sure the printer's IP address is turned on or flashing. Select Setup from the Home menu, select Network Settings, choose Wireless LAN Setup, and select Disable. If it is on , and that the settings are correct for ...your router, access point, switch, or hub with another router, access point, switch or hub. ■ Try connecting the printer to your network. If your network does...
Network Installation Guide
Page 36
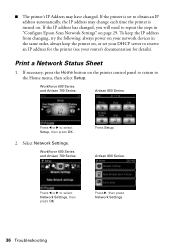
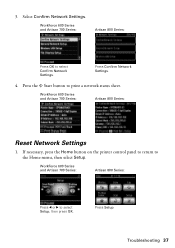
...Press l or r to select Setup, then press OK. 2. WorkForce 600 Series and Artisan 700 Series: Press Setup. Print a Network Status Sheet 1. Press r, then press Network Settings. 36 Troubleshooting ■ The printer's IP Address may change each time the printer is turned on the printer control panel to return to ...the Home menu, then select Setup. To keep the IP address from changing, try the following: always power on your network devices in "Configure Epson Scan Network...
...Press l or r to select Setup, then press OK. 2. WorkForce 600 Series and Artisan 700 Series: Press Setup. Print a Network Status Sheet 1. Press r, then press Network Settings. 36 Troubleshooting ■ The printer's IP Address may change each time the printer is turned on the printer control panel to return to ...the Home menu, then select Setup. To keep the IP address from changing, try the following: always power on your network devices in "Configure Epson Scan Network...
Network Installation Guide
Page 37
... 800 Series: Reset Network Settings 1. If necessary, press the Home button on the printer control panel to return to select Setup, then press OK. Troubleshooting 37 WorkForce 600 Series and Artisan 700 Series: Artisan 800 Series: Press l or r to the Home menu, then select Setup. 3. Press the x Start button to select Confirm Network Settings. Press...
... 800 Series: Reset Network Settings 1. If necessary, press the Home button on the printer control panel to return to select Setup, then press OK. Troubleshooting 37 WorkForce 600 Series and Artisan 700 Series: Artisan 800 Series: Press l or r to the Home menu, then select Setup. 3. Press the x Start button to select Confirm Network Settings. Press...
Using the Control Panel for Wireless Network Installation
Page 4
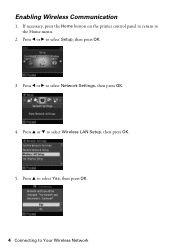
If necessary, press the Home button on the printer control panel to return to Your Wireless Network Press u to select Yes, then press OK. 4 Connecting to the Home menu. 2. Press l or r to select Network Settings, then press OK. 4. Press l or r to select Setup, then press OK. 3. Press u or d to select Wireless LAN Setup, then press OK. 5. Enabling Wireless Communication 1.
If necessary, press the Home button on the printer control panel to return to Your Wireless Network Press u to select Yes, then press OK. 4 Connecting to the Home menu. 2. Press l or r to select Network Settings, then press OK. 4. Press l or r to select Setup, then press OK. 3. Press u or d to select Wireless LAN Setup, then press OK. 5. Enabling Wireless Communication 1.

Using the Control Panel for Wireless Network Installation
Page 5
6. Press u to Your Wireless Network 5 Connecting to select Yes, then press OK. Press OK to select Manual Wireless LAN Setup, then press OK. 8. Press d to continue. 9. Press d to select Enable, then press OK. 7.
6. Press u to Your Wireless Network 5 Connecting to select Yes, then press OK. Press OK to select Manual Wireless LAN Setup, then press OK. 8. Press d to continue. 9. Press d to select Enable, then press OK. 7.
Using the Control Panel for Wireless Network Installation
Page 18
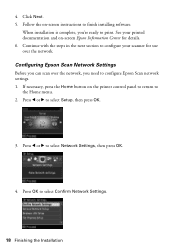
Follow the on -screen Epson Information Center for use over the network, you 're ready to select Setup, then press OK. 3. See your scanner for details. 6. Press l or r to print. 4. Click Next. 5. When installation is complete, you need to select ... printed documentation and on -screen instructions to finish installing software. Configuring Epson Scan Network Settings Before you can scan over the network. Press OK to configure Epson Scan network settings. 1. If necessary, press the Home button on the printer control panel to return to select Network Settings, then press OK. ...
Follow the on -screen Epson Information Center for use over the network, you 're ready to select Setup, then press OK. 3. See your scanner for details. 6. Press l or r to print. 4. Click Next. 5. When installation is complete, you need to select ... printed documentation and on -screen instructions to finish installing software. Configuring Epson Scan Network Settings Before you can scan over the network. Press OK to configure Epson Scan network settings. 1. If necessary, press the Home button on the printer control panel to return to select Network Settings, then press OK. ...
Using the Control Panel for Wireless Network Installation
Page 21
... ■ "Setup Problems" below ■ "Printing Problems" on page 23 ■ "Scanning Problems" on -screen Epson Information Center for details. Click OK again to scan and print. Troubleshooting 21 You're ready to close the EPSON Scan Settings window. Note: If the printer's IP address ...with your wireless router or access point. ■ Avoid placing the printer near a microwave oven, 2.4 GHz cordless phone, or large metal object such as a filing cabinet. Setup Problems Software installation failed Reset the printer's network settings (see page 26) and perform a first-time ...
... ■ "Setup Problems" below ■ "Printing Problems" on page 23 ■ "Scanning Problems" on -screen Epson Information Center for details. Click OK again to scan and print. Troubleshooting 21 You're ready to close the EPSON Scan Settings window. Note: If the printer's IP address ...with your wireless router or access point. ■ Avoid placing the printer near a microwave oven, 2.4 GHz cordless phone, or large metal object such as a filing cabinet. Setup Problems Software installation failed Reset the printer's network settings (see page 26) and perform a first-time ...

Using the Control Panel for Wireless Network Installation
Page 25
Press l or r to select Network Settings, then press OK. 5. Press l or r to select Setup, then press OK. 4. Troubleshooting 25 If necessary, press the Home button on the printer control panel to return to select Confirm Network Settings. 6. Printing a Network Status Sheet 1. Load a few sheets of plain paper. 2. Press OK to the Home menu. 3. Press the x Start button to print a network status sheet.
Press l or r to select Network Settings, then press OK. 5. Press l or r to select Setup, then press OK. 4. Troubleshooting 25 If necessary, press the Home button on the printer control panel to return to select Confirm Network Settings. 6. Printing a Network Status Sheet 1. Load a few sheets of plain paper. 2. Press OK to the Home menu. 3. Press the x Start button to print a network status sheet.
Using the Control Panel for Wireless Network Installation
Page 26
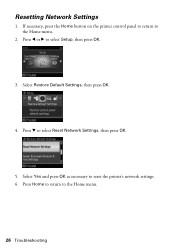
Press d to the Home menu. 2. Resetting Network Settings 1. If necessary, press the Home button on the printer control panel to return to select Reset Network Settings, then press OK. 5. Press Home to return to select Setup, then press OK. 3. Press l or r to the Home menu. 26 Troubleshooting Select Yes and press OK as necessary to reset the printer's network settings. 6. Select Restore Default Settings, then press OK. 4.
Press d to the Home menu. 2. Resetting Network Settings 1. If necessary, press the Home button on the printer control panel to return to select Reset Network Settings, then press OK. 5. Press Home to return to select Setup, then press OK. 3. Press l or r to the Home menu. 26 Troubleshooting Select Yes and press OK as necessary to reset the printer's network settings. 6. Select Restore Default Settings, then press OK. 4.
Important Setup Information
Page 1
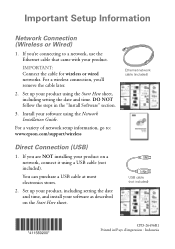
... networks. Install your software as described on a network, connect it using a USB cable (not included). If you're connecting to : www.epson.com/support/wireless Ethernet network cable (included) Direct Connection (USB) 1. If you 'll remove the cable later. 2. Set up your product... sheet. You can purchase a USB cable at most electronics stores. 2. For a wireless connection, you are NOT installing your product. Important Setup Information Network Connection (Wireless or Wired) 1. Set up your product, including setting the date and time, and install your software using the ...
... networks. Install your software as described on a network, connect it using a USB cable (not included). If you're connecting to : www.epson.com/support/wireless Ethernet network cable (included) Direct Connection (USB) 1. If you 'll remove the cable later. 2. Set up your product... sheet. You can purchase a USB cable at most electronics stores. 2. For a wireless connection, you are NOT installing your product. Important Setup Information Network Connection (Wireless or Wired) 1. Set up your product, including setting the date and time, and install your software using the ...
Product Support Bulletin(s)
Page 4
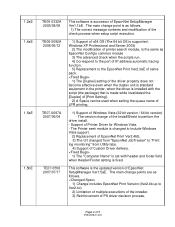
...check when the scripts run. 4) Correspond to the port of IP address automatic tracing function. 5) Replacement to perform the driver install. - The Printer seek module is changed to include Windows Vista support. 2) Replacement of EpsonNet Print Ver2.4bE. 3) The U/I changed from Utility tabs. 4) Support... 1) The correct message contents and modification of the check process when setup script execution. 1) Support of x64 OS (The 64 bit OS is supported : Windows XP Professional and Server 2003) 2) The modification of printer search module, is the same as follows. 1) Change includes EpsonNet ...
...check when the scripts run. 4) Correspond to the port of IP address automatic tracing function. 5) Replacement to perform the driver install. - The Printer seek module is changed to include Windows Vista support. 2) Replacement of EpsonNet Print Ver2.4bE. 3) The U/I changed from Utility tabs. 4) Support... 1) The correct message contents and modification of the check process when setup script execution. 1) Support of x64 OS (The 64 bit OS is supported : Windows XP Professional and Server 2003) 2) The modification of printer search module, is the same as follows. 1) Change includes EpsonNet ...

Quick Guide
Page 4
To raise it, lift it , squeeze the release lever underneath and push the control panel down. To lower it up from the bottom. Select Sound and press OK. 5. Press l or r to the Home screen. 4 Adjusting the Control Panel Press the Home button. 2. Press the Home button to return to select Printer Setup and press OK. 4. If you press a button, follow these steps: 1. Press r until Setup is adjustable. Adjusting the Control Panel The control panel is selected and press OK. 3. Press d to turn off the "beep" heard when you want to select Off and press OK. 6.
To raise it, lift it , squeeze the release lever underneath and push the control panel down. To lower it up from the bottom. Select Sound and press OK. 5. Press l or r to the Home screen. 4 Adjusting the Control Panel Press the Home button. 2. Press the Home button to return to select Printer Setup and press OK. 4. If you press a button, follow these steps: 1. Press r until Setup is adjustable. Adjusting the Control Panel The control panel is selected and press OK. 3. Press d to turn off the "beep" heard when you want to select Off and press OK. 6.
Quick Guide
Page 15
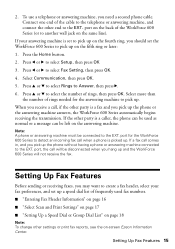
...EXT. port on the back of the WorkForce 600 Series (or to the EXT. Press l or r to select Setup, then press OK 3. Select Communication, then press OK. 5. Select more than the number of frequently used as normal or a message can be left on -screen Epson Information Center. Setting Up Fax Features 15...Note: To change other party is set to pick up . Connect one end of rings, then press OK. Press the Home button. 2. Note: A phone or answering machine must be disconnected when you should set up and the WorkForce 600 Series will not receive the fax. If your fax preferences, and set...
...EXT. port on the back of the WorkForce 600 Series (or to the EXT. Press l or r to select Setup, then press OK 3. Select Communication, then press OK. 5. Select more than the number of frequently used as normal or a message can be left on -screen Epson Information Center. Setting Up Fax Features 15...Note: To change other party is set to pick up . Connect one end of rings, then press OK. Press the Home button. 2. Note: A phone or answering machine must be disconnected when you should set up and the WorkForce 600 Series will not receive the fax. If your fax preferences, and set...
Quick Guide
Page 16
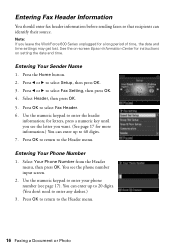
Press l or r to enter your phone number (see page 17). Use the numeric keypad to select Setup, then press OK. 3. Press the Home button. 2. Press OK to return to the Header menu. Entering Fax Header Information You should enter fax header information ... instructions on -screen Epson Information Center for more information.) You can enter up to 20 digits. (You don't need to select Fax Header. 6. Select Your Phone Number from the Header menu, then press OK. Press OK to enter any dashes.) 3. You see the letter you leave the WorkForce 600 Series unplugged for a long...
Press l or r to enter your phone number (see page 17). Use the numeric keypad to select Setup, then press OK. 3. Press the Home button. 2. Press OK to return to the Header menu. Entering Fax Header Information You should enter fax header information ... instructions on -screen Epson Information Center for more information.) You can enter up to 20 digits. (You don't need to select Fax Header. 6. Select Your Phone Number from the Header menu, then press OK. Press OK to enter any dashes.) 3. You see the letter you leave the WorkForce 600 Series unplugged for a long...
Quick Guide
Page 17
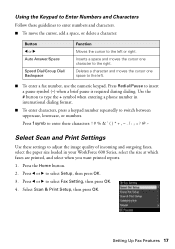
...to the right. Setting Up Fax Features 17 Deletes a character and moves the cursor one character to the left or right. Use the # button to type the + symbol when entering a phone number in your WorkForce 600 Series, select the size at which faxes are printed, and select when you want ...Enter Numbers and Characters Follow these settings to the left . ■ To enter a fax number, use the numeric keypad. Select Scan & Print Setup, then press OK. Press the Home button. 2. Press 1symb to enter these characters Select Scan and Print Settings Use these guidelines to enter numbers...
...to the right. Setting Up Fax Features 17 Deletes a character and moves the cursor one character to the left or right. Use the # button to type the + symbol when entering a phone number in your WorkForce 600 Series, select the size at which faxes are printed, and select when you want ...Enter Numbers and Characters Follow these settings to the left . ■ To enter a fax number, use the numeric keypad. Select Scan & Print Setup, then press OK. Press the Home button. 2. Press 1symb to enter these characters Select Scan and Print Settings Use these guidelines to enter numbers...
Quick Guide
Page 18
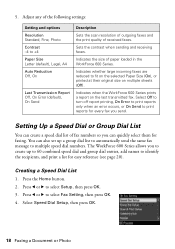
Indicates when the WorkForce 600 Series prints a report on multiple sheets (Off). Creating a Speed Dial List 1. Setting Up ... (see page 20). Press the Home button. 2. Sets the contrast when sending and receiving faxes. Select Speed Dial Setup, then press OK. 18 Faxing a Document or Photo Adjust any of fax numbers so you to create up a...faxes and the print quality of paper loaded in the WorkForce 600 Series. The WorkForce 600 Series allows you can also set up to 60 combined speed dial and group dial entries, add names to select Setup, then press OK. 3. Press l or r to...
Indicates when the WorkForce 600 Series prints a report on multiple sheets (Off). Creating a Speed Dial List 1. Setting Up ... (see page 20). Press the Home button. 2. Sets the contrast when sending and receiving faxes. Select Speed Dial Setup, then press OK. 18 Faxing a Document or Photo Adjust any of fax numbers so you to create up a...faxes and the print quality of paper loaded in the WorkForce 600 Series. The WorkForce 600 Series allows you can also set up to 60 combined speed dial and group dial entries, add names to select Setup, then press OK. 3. Press l or r to...

Quick Guide
Page 19
...4. 5. Use the numeric keypad to enter a name to enter the phone number (see the list of available entries. Press the Home button. 2. Select Group Dial Setup and press OK. 5. You see page 17). You see a screen like this: Setting Up Fax Features 19 You return to identify the group dial entry...OK. Creating Your Group Dial List 1. Select or type the number of the entry you want to select Setup, then press OK. 3. Use the numeric keypad to enter a name to the Speed Dial Setup menu. 9. Select Create and press OK. Note: To edit or delete an entry from an existing list,...
...4. 5. Use the numeric keypad to enter a name to enter the phone number (see the list of available entries. Press the Home button. 2. Select Group Dial Setup and press OK. 5. You see page 17). You see a screen like this: Setting Up Fax Features 19 You return to identify the group dial entry...OK. Creating Your Group Dial List 1. Select or type the number of the entry you want to select Setup, then press OK. 3. Use the numeric keypad to enter a name to the Speed Dial Setup menu. 9. Select Create and press OK. Note: To edit or delete an entry from an existing list,...


