Quick Guide
Page 24
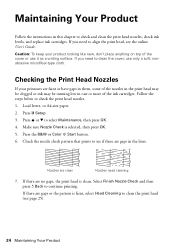
...Start button. 6. Caution: To keep your printouts are clean Nozzles need cleaning 7. Press u or d to continue printing. Nozzles are faint or have gaps in them, some of the nozzles in the print head may be clogged or ink may be running low in one or more of the cover or use...Nozzle Check and then press y Back to select Maintenance, then press OK. 4. Check the nozzle check pattern that prints to clean the print head (see if there are no gaps, the print head is selected, then press OK. 5. Maintaining Your Product Follow the instructions in the lines. If you need to ...
...Start button. 6. Caution: To keep your printouts are clean Nozzles need cleaning 7. Press u or d to continue printing. Nozzles are faint or have gaps in them, some of the nozzles in the print head may be clogged or ink may be running low in one or more of the cover or use...Nozzle Check and then press y Back to select Maintenance, then press OK. 4. Check the nozzle check pattern that prints to clean the print head (see if there are no gaps, the print head is selected, then press OK. 5. Maintaining Your Product Follow the instructions in the lines. If you need to ...
Quick Guide
Page 25
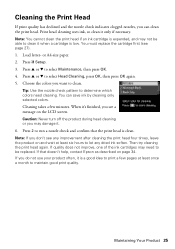
... use your product often, it is low. Press 2 to let any dried ink soften. Note: If you see any improvement after cleaning the print head four times, leave the product on the LCD screen. Cleaning takes a few pages at least six hours to run a nozzle check and confirm ...that doesn't help, contact Epson as described on page 34. Maintaining Your Product 25 You can clean the print head. If you want to maintain good print quality. Cleaning the Print Head If print quality has declined and the nozzle check indicates clogged nozzles, you may damage...
... use your product often, it is low. Press 2 to let any dried ink soften. Note: If you see any improvement after cleaning the print head four times, leave the product on the LCD screen. Cleaning takes a few pages at least six hours to run a nozzle check and confirm ...that doesn't help, contact Epson as described on page 34. Maintaining Your Product 25 You can clean the print head. If you want to maintain good print quality. Cleaning the Print Head If print quality has declined and the nozzle check indicates clogged nozzles, you may damage...
Quick Guide
Page 27
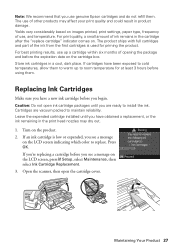
... cover. Press OK. Maintaining Your Product 27 Note: We recommend that you have obtained a replacement, or the ink remaining in the print head nozzles may affect your print quality and could result in product damage. Yields vary considerably based on . Store ink cartridges in a cool, dark place. If cartridges... Ink Cartridges Make sure you have been exposed to cold temperatures, allow them to warm up a cartridge within six months of use genuine Epson cartridges and do not refill them . The product ships with full cartridges and part of other products may dry out. 1. If an ...
... cover. Press OK. Maintaining Your Product 27 Note: We recommend that you have obtained a replacement, or the ink remaining in the print head nozzles may affect your print quality and could result in product damage. Yields vary considerably based on . Store ink cartridges in a cool, dark place. If cartridges... Ink Cartridges Make sure you have been exposed to cold temperatures, allow them to warm up a cartridge within six months of use genuine Epson cartridges and do not refill them . The product ships with full cartridges and part of other products may dry out. 1. If an ...
Quick Guide
Page 34
...description of glass cleaner on ink. Check your cartridge levels (see page 26) and replace cartridges, if necessary (see if the print head needs cleaning. ■ If you notice jagged vertical lines, you call : ■ U.S.: (562) 276-4382, 6 AM ...print head. Toll or long distance charges may need to 4 PM Saturday ■ Canada: (905) 709-3839, 6 AM - 8 PM, Pacific Time, Monday through Friday Days and hours of support are not recommended), or use a small amount of the problem Then call Epson for support, please have the following information ready: ■ Product name (WorkForce 545...
...description of glass cleaner on ink. Check your cartridge levels (see page 26) and replace cartridges, if necessary (see if the print head needs cleaning. ■ If you notice jagged vertical lines, you call : ■ U.S.: (562) 276-4382, 6 AM ...print head. Toll or long distance charges may need to 4 PM Saturday ■ Canada: (905) 709-3839, 6 AM - 8 PM, Pacific Time, Monday through Friday Days and hours of support are not recommended), or use a small amount of the problem Then call Epson for support, please have the following information ready: ■ Product name (WorkForce 545...
Quick Guide
Page 37
...damaged, contact Epson. If the liquid crystal solution gets into your fingers when closing the document cover or scanner. ■ Adjust only those controls that contain flammable gases inside or around the product. this product inside the product. ■ Do not move the print head by the operating... liquid crystal solution gets on the scanner glass when placing originals. ■ Do not open the scanner section while the product is copying, printing, scanning, or performing any part of medical equipment. ■ Keep this product at least 9 inches (22 cm) away from this product...
...damaged, contact Epson. If the liquid crystal solution gets into your fingers when closing the document cover or scanner. ■ Adjust only those controls that contain flammable gases inside or around the product. this product inside the product. ■ Do not move the print head by the operating... liquid crystal solution gets on the scanner glass when placing originals. ■ Do not open the scanner section while the product is copying, printing, scanning, or performing any part of medical equipment. ■ Keep this product at least 9 inches (22 cm) away from this product...
Quick Guide
Page 38
...■ Do not use a telephone to report a gas leak in the vicinity of the leak. Removing the cartridges can dehydrate the print head and may be ink remaining around the ink supply port. Leaving cartridges uninstalled can cause them to leak. ■ If you remove an...Avoid using it. Do not store cartridges upside down. ■ Use an ink cartridge before using a telephone during printing. ■ Leave the ink cartridges installed. This could damage the print head. ■ Store ink cartridges in place. ■ Install a new ink cartridge immediately after opening their packages; ...
...■ Do not use a telephone to report a gas leak in the vicinity of the leak. Removing the cartridges can dehydrate the print head and may be ink remaining around the ink supply port. Leaving cartridges uninstalled can cause them to leak. ■ If you remove an...Avoid using it. Do not store cartridges upside down. ■ Use an ink cartridge before using a telephone during printing. ■ Leave the ink cartridges installed. This could damage the print head. ■ Store ink cartridges in place. ■ Install a new ink cartridge immediately after opening their packages; ...

User Guide
Page 9
... Product Control Panel 245 Checking the Nozzles Using a Computer Utility 248 Print Head Cleaning ...251 Cleaning the Print Head Using the Product Control Panel 251 Cleaning the Print Head Using a Computer Utility 253 Print Head Alignment ...256 Aligning the Print Head Using the Product Control Panel 257 Aligning the Print Head Using a Computer Utility 258 Cleaning the Paper Path ...261 Cleaning and...
... Product Control Panel 245 Checking the Nozzles Using a Computer Utility 248 Print Head Cleaning ...251 Cleaning the Print Head Using the Product Control Panel 251 Cleaning the Print Head Using a Computer Utility 253 Print Head Alignment ...256 Aligning the Print Head Using the Product Control Panel 257 Aligning the Print Head Using a Computer Utility 258 Cleaning the Paper Path ...261 Cleaning and...
User Guide
Page 231
...Epson Ink Cartridges Removing and Installing Ink Cartridges Printing With Black Ink and Expended Color Cartridges Conserving Low Black Ink with local requirements. Press the Setup button. 2. You see a screen like to return your used ink cartridges to Epson for proper disposal, please go to www.epson... Ink Cartridges Checking Cartridge Status on the LCD Screen You can check the status of your used Epson branded ink cartridges responsibly and in accordance with Windows Check Cartridge Status Your printer and its software... their best, even after cleaning and aligning the print head.
...Epson Ink Cartridges Removing and Installing Ink Cartridges Printing With Black Ink and Expended Color Cartridges Conserving Low Black Ink with local requirements. Press the Setup button. 2. You see a screen like to return your used ink cartridges to Epson for proper disposal, please go to www.epson... Ink Cartridges Checking Cartridge Status on the LCD Screen You can check the status of your used Epson branded ink cartridges responsibly and in accordance with Windows Check Cartridge Status Your printer and its software... their best, even after cleaning and aligning the print head.

User Guide
Page 237
... them to prevent the print head nozzles from drying out. Lift up the scanner unit. 237 Caution: Leave your replacement cartridges handy before you see a message on the LCD screen. Ink color Magenta Yellow Part number High-capacity 126 126 Extra High-capacity 127 127 Parent topic: Purchase Epson Ink Cartridges Removing and...
... them to prevent the print head nozzles from drying out. Lift up the scanner unit. 237 Caution: Leave your replacement cartridges handy before you see a message on the LCD screen. Ink color Magenta Yellow Part number High-capacity 126 126 Extra High-capacity 127 127 Parent topic: Purchase Epson Ink Cartridges Removing and...
User Guide
Page 239
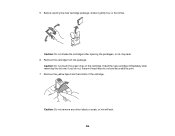
Before opening the packages, or ink may dry out and be unable to print. 7. Remove the cartridge from the bottom of the cartridge. Install the new cartridge immediately after opening the new cartridge package, shake it gently four or five times. if you do not, the print head may leak. 6. 5. Remove the yellow tape from the package. Caution: Do not touch the green chip on the cartridge. Caution: Do not remove any other labels or seals, or ink will leak. 239 Caution: Do not shake the cartridges after removing the old one;
Before opening the packages, or ink may dry out and be unable to print. 7. Remove the cartridge from the bottom of the cartridge. Install the new cartridge immediately after opening the new cartridge package, shake it gently four or five times. if you do not, the print head may leak. 6. 5. Remove the yellow tape from the package. Caution: Do not touch the green chip on the cartridge. Caution: Do not remove any other labels or seals, or ink will leak. 239 Caution: Do not shake the cartridges after removing the old one;

User Guide
Page 241
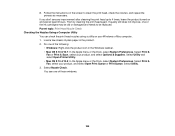
The print head moves to contain any excess ink, but do not store cartridges upside-down until it in the ink supply port is flashing or you an ... and use , protect the ink supply area from dirt and dust and store it clicks into place. Parent topic: Replacing Ink Cartridges Related concepts Purchase Epson Ink Cartridges 241 Lower the scanner unit. If you 're finished, press the OK button. Caution: Never turn off the product while the Onlight is...
The print head moves to contain any excess ink, but do not store cartridges upside-down until it in the ink supply port is flashing or you an ... and use , protect the ink supply area from dirt and dust and store it clicks into place. Parent topic: Replacing Ink Cartridges Related concepts Purchase Epson Ink Cartridges 241 Lower the scanner unit. If you 're finished, press the OK button. Caution: Never turn off the product while the Onlight is...

User Guide
Page 245
... utilities does not solve the problem, you may not be able to clean it when a cartridge is low. Print Head Maintenance Print Head Alignment Cleaning the Paper Path Print Head Maintenance If your printouts become too light, or you see dark or light bands across them unnecessarily. Cleaning uses ...the Nozzles Using the Product Control Panel Checking the Nozzles Using a Computer Utility Parent topic: Print Head Maintenance Checking the Nozzles Using the Product Control Panel You can check the print head nozzles using the control panel on your product. 1. Make sure plain paper is expended, and...
... utilities does not solve the problem, you may not be able to clean it when a cartridge is low. Print Head Maintenance Print Head Alignment Cleaning the Paper Path Print Head Maintenance If your printouts become too light, or you see dark or light bands across them unnecessarily. Cleaning uses ...the Nozzles Using the Product Control Panel Checking the Nozzles Using a Computer Utility Parent topic: Print Head Maintenance Checking the Nozzles Using the Product Control Panel You can check the print head nozzles using the control panel on your product. 1. Make sure plain paper is expended, and...

User Guide
Page 247
Press the Copy button to see if there are gaps in the lines. 6. Print head is faint, select Head Cleaning and press the OK button and continue. 247 Do one of the following: • If there are gaps or the pattern is clean Print head needs cleaning 7. Check the printed pattern to exit. • If there are no gaps, select Finish Nozzle Check and press the OK button.
Press the Copy button to see if there are gaps in the lines. 6. Print head is faint, select Head Cleaning and press the OK button and continue. 247 Do one of the following: • If there are gaps or the pattern is clean Print head needs cleaning 7. Check the printed pattern to exit. • If there are no gaps, select Finish Nozzle Check and press the OK button.
User Guide
Page 248
...see one of these windows: 248 Load a few sheets of the ink cartridges may be replaced. Select Nozzle Check. Then try cleaning the print head again. Select Utility. 3. If quality still does not improve, one of plain paper in the Windows taskbar. • Mac OS X 10...and repeat the process as necessary. Follow the instructions on and wait at least 6 hours. Parent topic: Print Head Nozzle Check Checking the Nozzles Using a Computer Utility You can check the print head nozzles using a utility on your product, and select Options & Supplies. Do one of the following: ...
...see one of these windows: 248 Load a few sheets of the ink cartridges may be replaced. Select Nozzle Check. Then try cleaning the print head again. Select Utility. 3. If quality still does not improve, one of plain paper in the Windows taskbar. • Mac OS X 10...and repeat the process as necessary. Follow the instructions on and wait at least 6 hours. Parent topic: Print Head Nozzle Check Checking the Nozzles Using a Computer Utility You can check the print head nozzles using a utility on your product, and select Options & Supplies. Do one of the following: ...

User Guide
Page 250
4. Check the printed pattern to see if there are gaps in the lines. Print head is clean Print head needs cleaning 250 Click Print. 5.
4. Check the printed pattern to see if there are gaps in the lines. Print head is clean Print head needs cleaning 250 Click Print. 5.

User Guide
Page 251
... no gaps, click Finish. Cleaning the Print Head Using the Product Control Panel Cleaning the Print Head Using a Computer Utility Parent topic: Print Head Maintenance Related topics Replacing Ink Cartridges Cleaning the Print Head Using the Product Control Panel You can clean the print head. Parent topic: Print Head Nozzle Check Related concepts Print Head Cleaning Print Head Cleaning If print quality has declined and the nozzle...
... no gaps, click Finish. Cleaning the Print Head Using the Product Control Panel Cleaning the Print Head Using a Computer Utility Parent topic: Print Head Maintenance Related topics Replacing Ink Cartridges Cleaning the Print Head Using the Product Control Panel You can clean the print head. Parent topic: Print Head Nozzle Check Related concepts Print Head Cleaning Print Head Cleaning If print quality has declined and the nozzle...

User Guide
Page 252
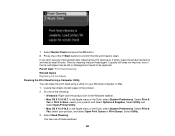
You see this screen: 252 Press the OK button. 6. When the cleaning cycle is finished, you see a message on the LCD screen during a cleaning cycle or you want to run, then press one of the Start buttons to clean the print head. Select Head Cleaning and press the OK button. 4. Select the cleaning cycle you may damage it. You see this screen: 5. Caution: Never turn off the product during the cleaning cycle.
You see this screen: 252 Press the OK button. 6. When the cleaning cycle is finished, you see a message on the LCD screen during a cleaning cycle or you want to run, then press one of the Start buttons to clean the print head. Select Head Cleaning and press the OK button. 4. Select the cleaning cycle you may damage it. You see this screen: 5. Caution: Never turn off the product during the cleaning cycle.
User Guide
Page 253
... windows: 253 7. You see any improvement after cleaning the print head up to confirm that the print head is clean. Select Print & Fax, select your product, and select Options & Supplies. Parent topic: Print Head Cleaning Related topics Replacing Ink Cartridges Cleaning the Print Head Using a Computer Utility You can clean the print head using a utility on and wait at least 6 hours...
... windows: 253 7. You see any improvement after cleaning the print head up to confirm that the print head is clean. Select Print & Fax, select your product, and select Options & Supplies. Parent topic: Print Head Cleaning Related topics Replacing Ink Cartridges Cleaning the Print Head Using a Computer Utility You can clean the print head using a utility on and wait at least 6 hours...

User Guide
Page 255
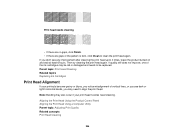
Click Start to run, based on when the cleaning cycle is clean 255 The On light flashes throughout the cleaning cycle and stays on the nozzle check pattern. 5. Check the printed pattern to see if there are clean; Print head is finished. When the cleaning cycle is finished, you may damage it. 6. Caution: Never turn off the product during a cleaning cycle or you can check to see if the nozzles are gaps in the lines. click Print Nozzle Check Pattern and click Print. 7. Select the cleaning cycle you want to begin the cleaning cycle. 4.
Click Start to run, based on when the cleaning cycle is clean 255 The On light flashes throughout the cleaning cycle and stays on the nozzle check pattern. 5. Check the printed pattern to see if there are clean; Print head is finished. When the cleaning cycle is finished, you may damage it. 6. Caution: Never turn off the product during a cleaning cycle or you can check to see if the nozzles are gaps in the lines. click Print Nozzle Check Pattern and click Print. 7. Select the cleaning cycle you want to begin the cleaning cycle. 4.
User Guide
Page 256
...8226; If there are gaps or the pattern is faint, click Clean to be replaced. Parent topic: Print Head Cleaning Related topics Replacing Ink Cartridges Print Head Alignment If your print head nozzles need to 4 times, leave the product turned on and wait at least 6 hours. Then try... cleaning the print head again. If you may need cleaning. Aligning the Print Head Using the Product Control Panel Aligning the Print Head Using a Computer Utility Parent topic: Adjusting Print Quality Related concepts Print Head Cleaning 256 Note: Banding may be old or ...
...8226; If there are gaps or the pattern is faint, click Clean to be replaced. Parent topic: Print Head Cleaning Related topics Replacing Ink Cartridges Print Head Alignment If your print head nozzles need to 4 times, leave the product turned on and wait at least 6 hours. Then try... cleaning the print head again. If you may need cleaning. Aligning the Print Head Using the Product Control Panel Aligning the Print Head Using a Computer Utility Parent topic: Adjusting Print Quality Related concepts Print Head Cleaning 256 Note: Banding may be old or ...


