Brochure
Page 2
...text in default, single-side mode, in accordance with ISO/IEC 24734. Telephone toll charges may not be installed for printer startup and a variable amount of Epson America, Inc. Actual yields will vary by product model and usage. 6 Some applications and/or functions, ... (Canada) Weight and Dimensions (W x D x H) Printing: 18.1" x 21.3" x 11.9" Storage: 18.1" x 15.9" x 9.3" Weight: 16.3 lb What's In The Box WorkForce 520 all-in-one, instruction manual, CD-ROM with drivers and bonus software, power cord, telephone cord, five DURABrite® Ultra Ink cartridges8 (two 125-series...
...text in default, single-side mode, in accordance with ISO/IEC 24734. Telephone toll charges may not be installed for printer startup and a variable amount of Epson America, Inc. Actual yields will vary by product model and usage. 6 Some applications and/or functions, ... (Canada) Weight and Dimensions (W x D x H) Printing: 18.1" x 21.3" x 11.9" Storage: 18.1" x 15.9" x 9.3" Weight: 16.3 lb What's In The Box WorkForce 520 all-in-one, instruction manual, CD-ROM with drivers and bonus software, power cord, telephone cord, five DURABrite® Ultra Ink cartridges8 (two 125-series...
Quick Guide
Page 4
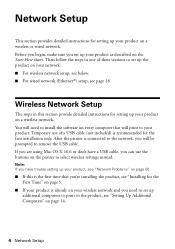
... "Setting Up Additional Computers" on a wireless or wired network. You will be prompted to the network, you have a USB cable, you 're installing the product, see "Network Problems" on page 50. ■ If this section provide detailed instructions for setting up the product on your wireless network ...and you need to install the software on every computer that you can use of a USB cable (not included) is recommended for the First Time" on a wireless ...
... "Setting Up Additional Computers" on a wireless or wired network. You will be prompted to the network, you have a USB cable, you 're installing the product, see "Network Problems" on page 50. ■ If this section provide detailed instructions for setting up the product on your wireless network ...and you need to install the software on every computer that you can use of a USB cable (not included) is recommended for the First Time" on a wireless ...

Quick Guide
Page 5
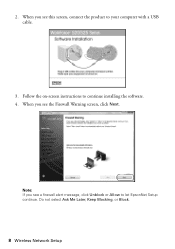
Insert the product software CD. 3. Mac OS® X: Double-click the Epson icon. 4. Wireless Network Setup 5 Make sure your network password contains uppercase (ABC) or lowercase (abc) letters, be sure to note them correctly. Windows® 7 and ....exe. When you see the User Account Control screen, click Yes or Continue. Windows XP: When you see the Software Installation screen, continue with step 4. When you see this screen, click Install. Installing for the First Time Before you begin, make sure that you don't know your network name (SSID) or network password...
Insert the product software CD. 3. Mac OS® X: Double-click the Epson icon. 4. Wireless Network Setup 5 Make sure your network password contains uppercase (ABC) or lowercase (abc) letters, be sure to note them correctly. Windows® 7 and ....exe. When you see the User Account Control screen, click Yes or Continue. Windows XP: When you see the Software Installation screen, continue with step 4. When you see this screen, click Install. Installing for the First Time Before you begin, make sure that you don't know your network name (SSID) or network password...
Quick Guide
Page 7
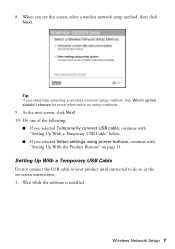
... the next screen, click Next. 10. 8. Tip: If you see this screen, select a wireless network setup method, then click Next. Wait while the software is installed. Wireless Network Setup 7 Setting Up With a Temporary USB Cable Do not connect the USB cable to your product until instructed to do so in the...
... the next screen, click Next. 10. 8. Tip: If you see this screen, select a wireless network setup method, then click Next. Wait while the software is installed. Wireless Network Setup 7 Setting Up With a Temporary USB Cable Do not connect the USB cable to your product until instructed to do so in the...
Quick Guide
Page 8
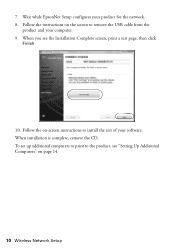
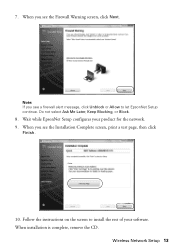
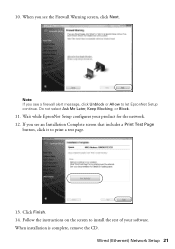
When you see the Firewall Warning screen, click Next. When you see a firewall alert message, click Unblock or Allow to let EpsonNet Setup continue. 2. Note: If you see this screen, connect the product to continue installing the software. 4. Do not select Ask Me Later, Keep Blocking, or Block. 8 Wireless Network Setup Follow the on-screen instructions to your computer with a USB cable. 3.
When you see the Firewall Warning screen, click Next. When you see a firewall alert message, click Unblock or Allow to let EpsonNet Setup continue. 2. Note: If you see this screen, connect the product to continue installing the software. 4. Do not select Ask Me Later, Keep Blocking, or Block. 8 Wireless Network Setup Follow the on-screen instructions to your computer with a USB cable. 3.
Quick Guide
Page 10
Wait while EpsonNet Setup configures your software. Follow the on the screen to remove the USB cable from the product and your computer. 9. When installation is complete, remove the CD. When you see "Setting Up Additional Computers" on page 14. 10 Wireless Network Setup Follow the instructions on -screen instructions to the product, see the Installation Complete screen, print a test page, then click Finish. 10. 7. To set up additional computers to print to install the rest of your product for the network. 8.
Wait while EpsonNet Setup configures your software. Follow the on the screen to remove the USB cable from the product and your computer. 9. When installation is complete, remove the CD. When you see "Setting Up Additional Computers" on page 14. 10 Wireless Network Setup Follow the instructions on -screen instructions to the product, see the Installation Complete screen, print a test page, then click Finish. 10. 7. To set up additional computers to print to install the rest of your product for the network. 8.
Quick Guide
Page 12
... them correctly. 3. If you 're having trouble entering your network password, click Watch video overview to finish selecting network settings. Wait while the software is installed. 12 Wireless Network Setup If your password has uppercase or lowercase letters, be sure to enter your network password. Then click Next and go to...
... them correctly. 3. If you 're having trouble entering your network password, click Watch video overview to finish selecting network settings. Wait while the software is installed. 12 Wireless Network Setup If your password has uppercase or lowercase letters, be sure to enter your network password. Then click Next and go to...
Quick Guide
Page 13
Do not select Ask Me Later, Keep Blocking, or Block. 8. Wait while EpsonNet Setup configures your software. Wireless Network Setup 13 Follow the instructions on the screen to let EpsonNet Setup continue. When installation is complete, remove the CD. When you see the Installation Complete screen, print a test page, then click Finish. 10. Note: If you see the Firewall Warning screen, click Next. 7. When you see a firewall alert message, click Unblock or Allow to install the rest of your product for the network. 9.
Do not select Ask Me Later, Keep Blocking, or Block. 8. Wait while EpsonNet Setup configures your software. Wireless Network Setup 13 Follow the instructions on the screen to let EpsonNet Setup continue. When installation is complete, remove the CD. When you see the Installation Complete screen, print a test page, then click Finish. 10. Note: If you see the Firewall Warning screen, click Next. 7. When you see a firewall alert message, click Unblock or Allow to install the rest of your product for the network. 9.
Quick Guide
Page 14
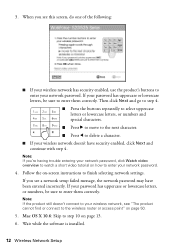
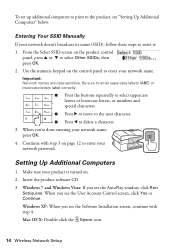
...exe. Use the numeric keypad on the product control panel, press u or d to enter it: 1. Windows XP: When you see the Software Installation screen, continue with step 3 on . 2. When you see the User Account Control screen, click Yes or Continue. Entering Your SSID Manually If ...your network password. Important: Network names are case-sensitive. Mac OS X: Double-click the Epson icon. 14 Wireless Network Setup To set up additional computers to print to delete a character. 3. Continue with step 4. Make sure your product...
...exe. Use the numeric keypad on the product control panel, press u or d to enter it: 1. Windows XP: When you see the Software Installation screen, continue with step 3 on . 2. When you see the User Account Control screen, click Yes or Continue. Entering Your SSID Manually If ...your network password. Important: Network names are case-sensitive. Mac OS X: Double-click the Epson icon. 14 Wireless Network Setup To set up additional computers to print to delete a character. 3. Continue with step 4. Make sure your product...

Quick Guide
Page 15
When you see this screen, click Install. 5. Wireless Network Setup 15 4. When you see this screen, select Wireless connection and click Next.
When you see this screen, click Install. 5. Wireless Network Setup 15 4. When you see this screen, select Wireless connection and click Next.
Quick Guide
Page 16
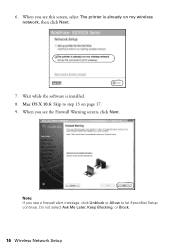
Wait while the software is already on page 17. 9. Mac OS X 10.6: Skip to let EpsonNet Setup continue. Note: If you see the Firewall Warning screen, click Next. Do not select Ask Me Later, Keep Blocking, or Block. 16 Wireless Network Setup When you see this screen, select The printer is installed. 8. 6. When you see a firewall alert message, click Unblock or Allow to step 13 on my wireless network, then click Next. 7.
Wait while the software is already on page 17. 9. Mac OS X 10.6: Skip to let EpsonNet Setup continue. Note: If you see the Firewall Warning screen, click Next. Do not select Ask Me Later, Keep Blocking, or Block. 16 Wireless Network Setup When you see this screen, select The printer is installed. 8. 6. When you see a firewall alert message, click Unblock or Allow to step 13 on my wireless network, then click Next. 7.

Quick Guide
Page 17
When installation is complete, remove the CD. When you see a screen like to install the rest of your product for the network. 12. Wireless Network Setup 17 Follow the instructions on the screen to set up, then click Next. 11. 10. Wait while EpsonNet Setup configures your software. If you would like this one, select the product you see the Installation Complete screen, print a test page, then click Finish. 13.
When installation is complete, remove the CD. When you see a screen like to install the rest of your product for the network. 12. Wireless Network Setup 17 Follow the instructions on the screen to set up, then click Next. 11. 10. Wait while EpsonNet Setup configures your software. If you would like this one, select the product you see the Installation Complete screen, print a test page, then click Finish. 13.
Quick Guide
Page 18
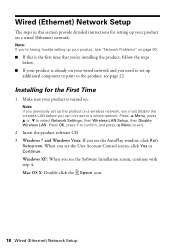
... 7 and Windows Vista: If you see page 22. Mac OS X: Double-click the Epson icon. 18 Wired (Ethernet) Network Setup Wired (Ethernet) Network Setup The steps in this is the first time that you're installing the product, follow the steps below. ■ If your product is turned on...1 to confirm, and press x Menu to the product, see the User Account Control screen, click Yes or Continue. When you see the Software Installation screen, continue with step 4. Windows XP: When you can connect to select Network Settings, then Wireless LAN Setup, then Disable Wireless LAN. Note: ...
... 7 and Windows Vista: If you see page 22. Mac OS X: Double-click the Epson icon. 18 Wired (Ethernet) Network Setup Wired (Ethernet) Network Setup The steps in this is the first time that you're installing the product, follow the steps below. ■ If your product is turned on...1 to confirm, and press x Menu to the product, see the User Account Control screen, click Yes or Continue. When you see the Software Installation screen, continue with step 4. Windows XP: When you can connect to select Network Settings, then Wireless LAN Setup, then Disable Wireless LAN. Note: ...
Quick Guide
Page 19
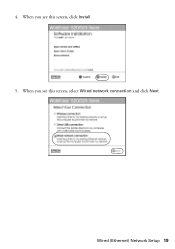
When you see this screen, click Install. 5. 4. Wired (Ethernet) Network Setup 19 When you see this screen, select Wired network connection and click Next.
When you see this screen, click Install. 5. 4. Wired (Ethernet) Network Setup 19 When you see this screen, select Wired network connection and click Next.

Quick Guide
Page 20
6. When you see this screen, connect the product to your router, access point, or hub with an Ethernet network cable, then click Next. 8. Mac OS X 10.6: Skip to start network installation. 20 Wired (Ethernet) Network Setup Wait while the software is installed, then click Next to step 14 on page 21. 9. When you see this screen, select Set up printer for the first time, then click Next. 7.
6. When you see this screen, connect the product to your router, access point, or hub with an Ethernet network cable, then click Next. 8. Mac OS X 10.6: Skip to start network installation. 20 Wired (Ethernet) Network Setup Wait while the software is installed, then click Next to step 14 on page 21. 9. When you see this screen, select Set up printer for the first time, then click Next. 7.
Quick Guide
Page 21
... screen to let EpsonNet Setup continue. 10. When you see a firewall alert message, click Unblock or Allow to install the rest of your product for the network. 12. When installation is complete, remove the CD. Wired (Ethernet) Network Setup 21 Do not select Ask Me Later, Keep Blocking,... or Block. 11. Note: If you see an Installation Complete screen that includes a Print Test Page button, click it to print...
... screen to let EpsonNet Setup continue. 10. When you see a firewall alert message, click Unblock or Allow to install the rest of your product for the network. 12. When installation is complete, remove the CD. Wired (Ethernet) Network Setup 21 Do not select Ask Me Later, Keep Blocking,... or Block. 11. Note: If you see an Installation Complete screen that includes a Print Test Page button, click it to print...

Quick Guide
Page 22
Make sure your product is turned on. 2. Windows 7 and Windows Vista: If you see this screen, select Wired network connection and click Next. 22 Wired (Ethernet) Network Setup When you see the User Account Control screen, click Yes or Continue. Windows XP: When you see the AutoPlay window, click Run Setup.exe. Mac OS X: Double-click the Epson icon. 4. Setting Up Additional Computers 1. When you see this screen, click Install. 5. When you see the Software Installation screen, continue with step 4. Insert the product software CD. 3.
Make sure your product is turned on. 2. Windows 7 and Windows Vista: If you see this screen, select Wired network connection and click Next. 22 Wired (Ethernet) Network Setup When you see the User Account Control screen, click Yes or Continue. Windows XP: When you see the AutoPlay window, click Run Setup.exe. Mac OS X: Double-click the Epson icon. 4. Setting Up Additional Computers 1. When you see this screen, click Install. 5. When you see the Software Installation screen, continue with step 4. Insert the product software CD. 3.

Quick Guide
Page 23
Mac OS X 10.6: Skip to step 14 on my Ethernet network, then click Next. 7. Do not select Ask Me Later, Keep Blocking, or Block. 6. Note: If you see a firewall alert message, click Unblock or Allow to start network installation. 9. Wired (Ethernet) Network Setup 23 When you see the Firewall Warning screen, click Next. Wait while the software is already on page 24. 8. When you see this screen, select The printer is installed, then click Next to let EpsonNet Setup continue.
Mac OS X 10.6: Skip to step 14 on my Ethernet network, then click Next. 7. Do not select Ask Me Later, Keep Blocking, or Block. 6. Note: If you see a firewall alert message, click Unblock or Allow to start network installation. 9. Wired (Ethernet) Network Setup 23 When you see the Firewall Warning screen, click Next. Wait while the software is already on page 24. 8. When you see this screen, select The printer is installed, then click Next to let EpsonNet Setup continue.

Quick Guide
Page 24
Wait while EpsonNet Setup configures your software. When installation is complete, remove the CD. 24 Wired (Ethernet) Network Setup Click Finish. 14. If you would like this one, select the product you see an Installation Complete screen that includes a Print Test Page button, click it to install the rest of your product for the network. 12. 10. Follow the instructions on the screen to print a test page. 13. If you see a screen like to set up, then click Next. 11.
Wait while EpsonNet Setup configures your software. When installation is complete, remove the CD. 24 Wired (Ethernet) Network Setup Click Finish. 14. If you would like this one, select the product you see an Installation Complete screen that includes a Print Test Page button, click it to install the rest of your product for the network. 12. 10. Follow the instructions on the screen to print a test page. 13. If you see a screen like to set up, then click Next. 11.
Quick Guide
Page 47
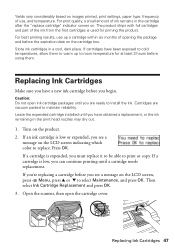
...cartridge" indicator comes on the LCD screen, press x Menu, press u or d to select Maintenance, and press OK. Leave the expended cartridge installed until you must replace it to be able to cold temperatures, allow them . If a cartridge is expended, you are vacuum packed to room ...maintain reliability. Replacing Ink Cartridges Make sure you begin. Cartridges are ready to replace. Turn on the LCD screen indicating which color to install the ink. Yields vary considerably based on the cartridge box. Caution: Do not open the cartridge cover. If you're replacing a ...
...cartridge" indicator comes on the LCD screen, press x Menu, press u or d to select Maintenance, and press OK. Leave the expended cartridge installed until you must replace it to be able to cold temperatures, allow them . If a cartridge is expended, you are vacuum packed to room ...maintain reliability. Replacing Ink Cartridges Make sure you begin. Cartridges are ready to replace. Turn on the LCD screen indicating which color to install the ink. Yields vary considerably based on the cartridge box. Caution: Do not open the cartridge cover. If you're replacing a ...


