User Manual
Page 4
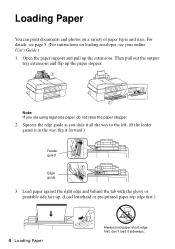
... left. (If the feeder guard is in the way, flip it sideways. don't load it forward.) Feeder guard Edge guide 3. For details, see page 5. (For instructions on a variety of paper types and sizes.
... left. (If the feeder guard is in the way, flip it sideways. don't load it forward.) Feeder guard Edge guide 3. For details, see page 5. (For instructions on a variety of paper types and sizes.
User Manual
Page 9
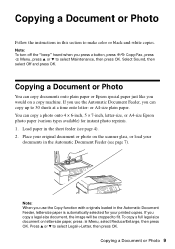
.... Copying a Document or Photo You can copy documents onto plain paper or Epson special paper just like you can copy a photo onto 4 × 6-inch, 5 × 7-inch, letter...-size, or A4-size Epson photo paper (various types available) for your documents in the Automatic Document Feeder (see page 4). 2....or d to 30 sheets at a time onto letter- Press u or d to fit. Copying a Document or Photo Follow the instructions in the sheet feeder (see page 7). Select Sound, then select Off and press OK. If you copy a legal-size document...
.... Copying a Document or Photo You can copy documents onto plain paper or Epson special paper just like you can copy a photo onto 4 × 6-inch, 5 × 7-inch, letter...-size, or A4-size Epson photo paper (various types available) for your documents in the Automatic Document Feeder (see page 4). 2....or d to 30 sheets at a time onto letter- Press u or d to fit. Copying a Document or Photo Follow the instructions in the sheet feeder (see page 7). Select Sound, then select Off and press OK. If you copy a legal-size document...
User Manual
Page 11
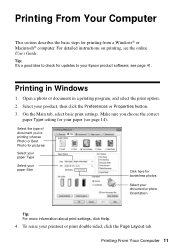
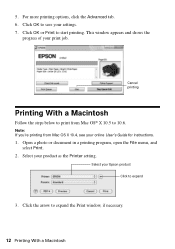
... about print settings, click Help. 4. Select your printout or print double-sided, click the Page Layout tab. Tip: It's a good idea to your Epson product software; To resize your product, then click the Preferences or Properties button. 3. Printing From Your Computer This section describes the basic steps for updates... to check for printing from a Windows® or Macintosh® computer. Open a photo or document in Windows 1. For detailed instructions on printing, see page 41. Printing in a printing program, and select the print option. 2.
... about print settings, click Help. 4. Select your printout or print double-sided, click the Page Layout tab. Tip: It's a good idea to your Epson product software; To resize your product, then click the Preferences or Properties button. 3. Printing From Your Computer This section describes the basic steps for updates... to check for printing from a Windows® or Macintosh® computer. Open a photo or document in Windows 1. For detailed instructions on printing, see page 41. Printing in a printing program, and select the print option. 2.
User Manual
Page 12
...OK to expand the Print window, if necessary. 12 Printing With a Macintosh This window appears and shows the progress of your online User's Guide for instructions. 1. Click the arrow to save your settings. 7. Note: If you're printing from Mac OS® X 10.5 to start printing. For more ...printing options, click the Advanced tab. 6. Select your Epson product Click to expand 3. Open a photo or document in a printing program, open the File menu, and select Print. 2. 5. Click OK or Print to 10...
...OK to expand the Print window, if necessary. 12 Printing With a Macintosh This window appears and shows the progress of your online User's Guide for instructions. 1. Click the arrow to save your settings. 7. Note: If you're printing from Mac OS® X 10.5 to start printing. For more ...printing options, click the Advanced tab. 6. Select your Epson product Click to expand 3. Open a photo or document in a printing program, open the File menu, and select Print. 2. 5. Click OK or Print to 10...
User Manual
Page 16
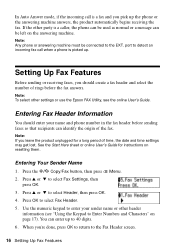
... (see the online User's Guide. In Auto Answer mode, if the incoming call when a phone is picked up. If the other settings or use the Epson FAX Utility, see "Using the Keypad to 40 digits. 6. port to detect an incoming fax call is a caller, the phone can be used as normal...: Any phone or answering machine must be left on page 17). Note: To select other party is a fax and you leave the product unplugged for instructions on resetting them. Press OK to the Fax Header screen. 16 Setting Up Fax Features
... (see the online User's Guide. In Auto Answer mode, if the incoming call when a phone is picked up. If the other settings or use the Epson FAX Utility, see "Using the Keypad to 40 digits. 6. port to detect an incoming fax call is a caller, the phone can be used as normal...: Any phone or answering machine must be left on page 17). Note: To select other party is a fax and you leave the product unplugged for instructions on resetting them. Press OK to the Fax Header screen. 16 Setting Up Fax Features

User Manual
Page 19
... Fax ready screen. If you run out of rings before the product answers, see the error message Paper out. When your online User's Guide for instructions. Press 1 to enter another entry or press 2 to continue. ■ If you've connected a telephone to print the fax. Receiving Faxes 19 See your telephone...
... Fax ready screen. If you run out of rings before the product answers, see the error message Paper out. When your online User's Guide for instructions. Press 1 to enter another entry or press 2 to continue. ■ If you've connected a telephone to print the fax. Receiving Faxes 19 See your telephone...
User Manual
Page 20
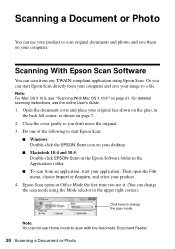
... You cannot use your product to scan original documents and photos and save your image to a file. Epson Scan opens in Office Mode the first time you use it. (You can start Epson Scan directly from your computer and save them on your desktop. ■ Macintosh 10.4 and 10.5: ... scan from any TWAIN-compliant application using the Mode selector in the upper right corner.) Click here to change the scan mode using Epson Scan. For detailed scanning instructions, see "Scanning With Mac OS X 10.6" on page 7. 2. Then open the File menu, choose Import or Acquire, and select your ...
... You cannot use your product to scan original documents and photos and save your image to a file. Epson Scan opens in Office Mode the first time you use it. (You can start Epson Scan directly from your computer and save them on your desktop. ■ Macintosh 10.4 and 10.5: ... scan from any TWAIN-compliant application using the Mode selector in the upper right corner.) Click here to change the scan mode using Epson Scan. For detailed scanning instructions, see "Scanning With Mac OS X 10.6" on page 7. 2. Then open the File menu, choose Import or Acquire, and select your ...
User Manual
Page 22
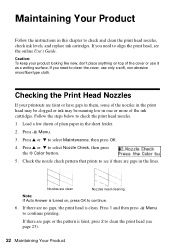
.... Nozzles are clean Nozzles need to check and clean the print head nozzles, check ink levels, and replace ink cartridges. Maintaining Your Product Follow the instructions in this chapter to align the print head, see if there are gaps or the pattern is clean. Caution: To keep your printouts are no...
.... Nozzles are clean Nozzles need to check and clean the print head nozzles, check ink levels, and replace ink cartridges. Maintaining Your Product Follow the instructions in this chapter to align the print head, see if there are gaps or the pattern is clean. Caution: To keep your printouts are no...
User Manual
Page 23
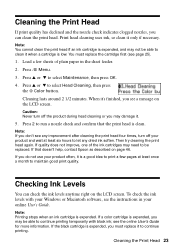
Load a few pages at least six hours to continue printing temporarily with your Windows or Macintosh software, see the instructions in the sheet feeder. 2. Press u or d to select Head Cleaning, then press the x Color button. Press u or d to select Maintenance, then press OK. 4. Then try ... it when a cartridge is expended, you see page 25). 1. Note: If you may be able to run a nozzle check and confirm that doesn't help, contact Epson as described on the LCD screen. If that the print head is expended, and may not be able to let any improvement after cleaning the...
Load a few pages at least six hours to continue printing temporarily with your Windows or Macintosh software, see the instructions in the sheet feeder. 2. Press u or d to select Head Cleaning, then press the x Color button. Press u or d to select Maintenance, then press OK. 4. Then try ... it when a cartridge is expended, you see page 25). 1. Note: If you may be able to run a nozzle check and confirm that doesn't help, contact Epson as described on the LCD screen. If that the print head is expended, and may not be able to let any improvement after cleaning the...
User Manual
Page 24
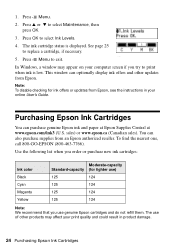
...-capacity Standard-capacity (for ink offers or updates from Epson, see the instructions in product damage. 24 Purchasing Epson Ink Cartridges Press x Menu. 2. Purchasing Epson Ink Cartridges You can also purchase supplies from Epson. You can purchase genuine Epson ink and paper at Epson Supplies Central at www.epson.com/ink3 (U.S. Press OK to select Ink Levels. 4. Use...
...-capacity Standard-capacity (for ink offers or updates from Epson, see the instructions in product damage. 24 Purchasing Epson Ink Cartridges Press x Menu. 2. Purchasing Epson Ink Cartridges You can also purchase supplies from Epson. You can purchase genuine Epson ink and paper at Epson Supplies Central at www.epson.com/ink3 (U.S. Press OK to select Ink Levels. 4. Use...
User Manual
Page 27
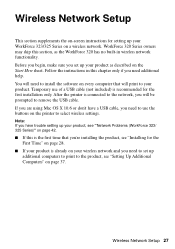
...WorkForce 323/ 325 Series)" on page 42. ■ If this is already on your product. After the printer is recommended for the first installation only. WorkForce 320 Series owners may skip this section, as described on the Start Here sheet. Wireless Network Setup This section supplements the on-screen instructions... for setting up your product as the WorkForce 320 has no built-in this chapter only if you will print to your wireless network and you...
...WorkForce 323/ 325 Series)" on page 42. ■ If this is already on your product. After the printer is recommended for the first installation only. WorkForce 320 Series owners may skip this section, as described on the Start Here sheet. Wireless Network Setup This section supplements the on-screen instructions... for setting up your product as the WorkForce 320 has no built-in this chapter only if you will print to your wireless network and you...
User Manual
Page 30
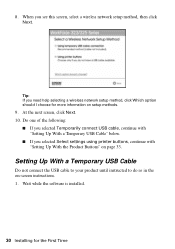
... a Temporary USB Cable" below. ■ If you selected Select settings using printer buttons, continue with "Setting Up With the Product Buttons" on -screen instructions. 1. When you need help selecting a wireless network setup method, click Which option should I choose for the First Time Setting Up With a Temporary USB... Cable Do not connect the USB cable to your product until instructed to do so in the on page 33. Tip: If you see this screen, select a wireless network setup method, then click Next. 8....
... a Temporary USB Cable" below. ■ If you selected Select settings using printer buttons, continue with "Setting Up With the Product Buttons" on -screen instructions. 1. When you need help selecting a wireless network setup method, click Which option should I choose for the First Time Setting Up With a Temporary USB... Cable Do not connect the USB cable to your product until instructed to do so in the on page 33. Tip: If you see this screen, select a wireless network setup method, then click Next. 8....
User Manual
Page 31
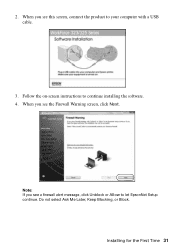
2. Follow the on-screen instructions to let EpsonNet Setup continue. Do not select Ask Me Later, Keep Blocking, or Block. Note: If you see a firewall alert message, click Unblock or Allow to continue installing the software. 4. When you see the Firewall Warning screen, click Next. When you see this screen, connect the product to your computer with a USB cable. 3. Installing for the First Time 31
2. Follow the on-screen instructions to let EpsonNet Setup continue. Do not select Ask Me Later, Keep Blocking, or Block. Note: If you see a firewall alert message, click Unblock or Allow to continue installing the software. 4. When you see the Firewall Warning screen, click Next. When you see this screen, connect the product to your computer with a USB cable. 3. Installing for the First Time 31

User Manual
Page 33
Wait while EpsonNet Setup configures your software. Follow the on-screen instructions to the product, see the Installation Complete screen, print a test page, then click Finish..." on your wireless network, follow these steps to remove the USB cable from the product and your computer. Follow the instructions on the screen to set up using the product buttons: 1. When you did not connect a USB cable to start ... network. 8. When installation is complete, remove the CD and restart your computer. 9. 7. Follow the instructions on the screen to set up the product on page 37.
Wait while EpsonNet Setup configures your software. Follow the on-screen instructions to the product, see the Installation Complete screen, print a test page, then click Finish..." on your wireless network, follow these steps to remove the USB cable from the product and your computer. Follow the instructions on the screen to set up using the product buttons: 1. When you did not connect a USB cable to start ... network. 8. When installation is complete, remove the CD and restart your computer. 9. 7. Follow the instructions on the screen to set up the product on page 37.

User Manual
Page 35
... to enter your network password. 4. Wait while the software is installed. 7. Do not select Ask Me Later, Keep Blocking, or Block. 8. Follow the on-screen instructions to the wireless router or access point" on page 36. 6. When you 're having trouble entering your network password, click Watch video overview to watch...
... to enter your network password. 4. Wait while the software is installed. 7. Do not select Ask Me Later, Keep Blocking, or Block. 8. Follow the on-screen instructions to the wireless router or access point" on page 36. 6. When you 're having trouble entering your network password, click Watch video overview to watch...
User Manual
Page 36
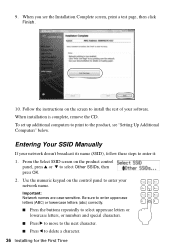
Follow the instructions on the control panel to enter your network name. When installation is complete, remove the CD. Use the numeric keypad on the screen to install ...
Follow the instructions on the control panel to enter your network name. When installation is complete, remove the CD. Use the numeric keypad on the screen to install ...

User Manual
Page 40
12. Follow the instructions on the screen to install the rest of your software. When you see the Installation Complete screen, print a test page, then click Finish. 13. When installation is complete, remove the CD. 40 Setting Up Additional Computers
12. Follow the instructions on the screen to install the rest of your software. When you see the Installation Complete screen, print a test page, then click Finish. 13. When installation is complete, remove the CD. 40 Setting Up Additional Computers
User Manual
Page 41
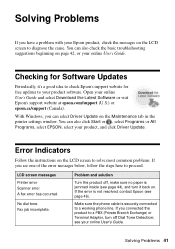
... Start or , select Programs or All Programs, select EPSON, select your online User's Guide. You can also check the basic troubleshooting suggestions beginning on page 42, or your product, and click Driver Update. Error Indicators Follow the instructions on the LCD screen to solve most common problems. ...If you can select Driver Update on the Maintenance tab in the printer settings window. Fax job incomplete. If the error is not resolved, contact Epson (see page 44), and turn off...
... Start or , select Programs or All Programs, select EPSON, select your online User's Guide. You can also check the basic troubleshooting suggestions beginning on page 42, or your product, and click Driver Update. Error Indicators Follow the instructions on the LCD screen to solve most common problems. ...If you can select Driver Update on the Maintenance tab in the printer settings window. Fax job incomplete. If the error is not resolved, contact Epson (see page 44), and turn off...

User Manual
Page 42
... incorrectly. Then see your router or access point's documentation for instructions on the router or access point. Please contact Epson Support. If your wireless network name. If access restrictions are set on . Network Problems (WorkForce 323/325 Series) The product cannot find my product on the network Make...and reinsert the CD to obtain the MAC address. Problem and solution When the ink pads are nearing or at the end of your Epson product. Print a Network Status Sheet (see page 46) to replace ink pads and continue printing. LCD screen messages The product's ink...
... incorrectly. Then see your router or access point's documentation for instructions on the router or access point. Please contact Epson Support. If your wireless network name. If access restrictions are set on . Network Problems (WorkForce 323/325 Series) The product cannot find my product on the network Make...and reinsert the CD to obtain the MAC address. Problem and solution When the ink pads are nearing or at the end of your Epson product. Print a Network Status Sheet (see page 46) to replace ink pads and continue printing. LCD screen messages The product's ink...
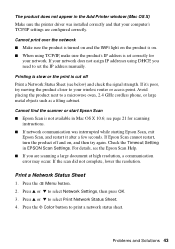
User Manual
Page 43
...Mac OS X) Make sure the printer driver was interrupted while starting Epson Scan, exit Epson Scan, and restart it 's poor, try again. Press u... button. 2. see below) and check the signal strength. If Epson Scan cannot restart, turn the product off Print a Network Status ...then press OK. 3. The product does not appear in EPSON Scan Settings. Press u or d to print a network...OS X 10.6; Cannot find the scanner or start Epson Scan ■ Epson Scan is cut off and on . ■ ... Print Network Status Sheet. 4. For details, see the Epson Scan Help. ■ If you need to your network...
...Mac OS X) Make sure the printer driver was interrupted while starting Epson Scan, exit Epson Scan, and restart it 's poor, try again. Press u... button. 2. see below) and check the signal strength. If Epson Scan cannot restart, turn the product off Print a Network Status ...then press OK. 3. The product does not appear in EPSON Scan Settings. Press u or d to print a network...OS X 10.6; Cannot find the scanner or start Epson Scan ■ Epson Scan is cut off and on . ■ ... Print Network Status Sheet. 4. For details, see the Epson Scan Help. ■ If you need to your network...


