User Manual
Page 3
Replacing Ink Cartridges 25 Wireless Network Setup 27 Installing for the First Time 28 Setting Up Additional Computers 37 Solving Problems 41 Checking for Software Updates 41 Error Indicators 41 Problems and Solutions 42 Where to Get Help 46 Notices 47 Contents 3
Replacing Ink Cartridges 25 Wireless Network Setup 27 Installing for the First Time 28 Setting Up Additional Computers 37 Solving Problems 41 Checking for Software Updates 41 Error Indicators 41 Problems and Solutions 42 Where to Get Help 46 Notices 47 Contents 3
User Manual
Page 27
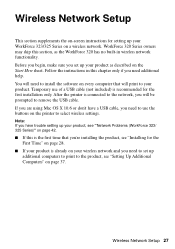
... the first installation only. After the printer is already on the printer to your product. Wireless Network Setup This section supplements the on-screen instructions for setting up your WorkForce 323/325 Series on the Start Here sheet. Before you begin, make sure you need ... print to remove the USB cable. Temporary use the buttons on your product as the WorkForce 320 has no built-in this section, as described on a wireless network. Follow the instructions in wireless network functionality. WorkForce 320 Series owners may skip this chapter only if you need additional help...
... the first installation only. After the printer is already on the printer to your product. Wireless Network Setup This section supplements the on-screen instructions for setting up your WorkForce 323/325 Series on the Start Here sheet. Before you begin, make sure you need ... print to remove the USB cable. Temporary use the buttons on your product as the WorkForce 320 has no built-in this section, as described on a wireless network. Follow the instructions in wireless network functionality. WorkForce 320 Series owners may skip this chapter only if you need additional help...
User Manual
Page 28
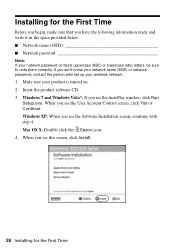
Make sure your wireless network. 1. When you see the User Account Control screen, click Yes or Continue. Windows XP: When you see the Software Installation screen, continue with step 4. Mac OS X: Double-click the Epson icon. 4. Insert the product software CD. 3. Windows 7 and Windows Vista®: If you see the AutoPlay window, click...
Make sure your wireless network. 1. When you see the User Account Control screen, click Yes or Continue. Windows XP: When you see the Software Installation screen, continue with step 4. Mac OS X: Double-click the Epson icon. 4. Insert the product software CD. 3. Windows 7 and Windows Vista®: If you see the AutoPlay window, click...
User Manual
Page 29
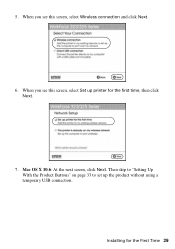
Then skip to "Setting Up With the Product Buttons" on page 33 to set up printer for the First Time 29 Mac OS X 10.6: At the next screen, click Next. 5. Installing for the first time, then click Next. 7. When you see this screen, select Wireless connection and click Next. 6. When you see this screen, select Set up the product without using a temporary USB connection.
Then skip to "Setting Up With the Product Buttons" on page 33 to set up printer for the First Time 29 Mac OS X 10.6: At the next screen, click Next. 5. Installing for the first time, then click Next. 7. When you see this screen, select Wireless connection and click Next. 6. When you see this screen, select Set up the product without using a temporary USB connection.
User Manual
Page 30
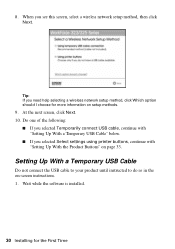
... Select settings using printer buttons, continue with "Setting Up With a Temporary USB Cable" below. ■ If you see this screen, select a wireless network setup method, then click Next. Do one of the following: ■ If you selected Temporarily connect USB cable, continue with "Setting Up ...With the Product Buttons" on page 33. Tip: If you need help selecting a wireless network setup method, click Which option should I choose for the First Time Setting Up With a Temporary USB Cable Do not connect the USB cable ...
... Select settings using printer buttons, continue with "Setting Up With a Temporary USB Cable" below. ■ If you see this screen, select a wireless network setup method, then click Next. Do one of the following: ■ If you selected Temporarily connect USB cable, continue with "Setting Up ...With the Product Buttons" on page 33. Tip: If you need help selecting a wireless network setup method, click Which option should I choose for the First Time Setting Up With a Temporary USB Cable Do not connect the USB cable ...

User Manual
Page 33
... the screen to install the rest of your computer. 9. Follow the instructions on -screen instructions to start the product's wireless Setup Wizard. When you see "Setting Up Additional Computers" on your wireless network, follow these steps to remove the USB cable from the product and your software. Installing for the network. 8. Follow...
... the screen to install the rest of your computer. 9. Follow the instructions on -screen instructions to start the product's wireless Setup Wizard. When you see "Setting Up Additional Computers" on your wireless network, follow these steps to remove the USB cable from the product and your software. Installing for the network. 8. Follow...
User Manual
Page 34
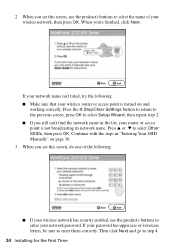
... screen, do one of the following : ■ Make sure that your network password. When you see this screen, use the product's buttons to enter your wireless router or access point is not broadcasting its network name. If your network name isn't listed, try the following : ■ If your... wireless network has security enabled, use the product's buttons to select the name of your password has uppercase or lowercase letters, be sure to select Setup ...
... screen, do one of the following : ■ Make sure that your network password. When you see this screen, use the product's buttons to enter your wireless router or access point is not broadcasting its network name. If your network name isn't listed, try the following : ■ If your... wireless network has security enabled, use the product's buttons to select the name of your password has uppercase or lowercase letters, be sure to select Setup ...

User Manual
Page 35
Follow the on page 42. 5. If your wireless network doesn't have been entered incorrectly. Installing for the network. ■ If your password has uppercase or lowercase letters, or numbers, be sure to enter ... have security enabled, click Next and continue with step 4. If you see "The product cannot find or connect to the wireless router or access point" on -screen instructions to enter your wireless network, see the Firewall Warning screen, click Next. When you see a firewall alert message, click Unblock or Allow to watch...
Follow the on page 42. 5. If your wireless network doesn't have been entered incorrectly. Installing for the network. ■ If your password has uppercase or lowercase letters, or numbers, be sure to enter ... have security enabled, click Next and continue with step 4. If you see "The product cannot find or connect to the wireless router or access point" on -screen instructions to enter your wireless network, see the Firewall Warning screen, click Next. When you see a firewall alert message, click Unblock or Allow to watch...
User Manual
Page 38
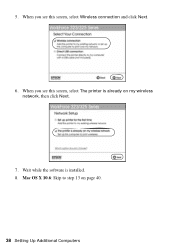
Wait while the software is already on page 40. 38 Setting Up Additional Computers Mac OS X 10.6: Skip to step 13 on my wireless network, then click Next. 7. 5. When you see this screen, select Wireless connection and click Next. 6. When you see this screen, select The printer is installed. 8.
Wait while the software is already on page 40. 38 Setting Up Additional Computers Mac OS X 10.6: Skip to step 13 on my wireless network, then click Next. 7. 5. When you see this screen, select Wireless connection and click Next. 6. When you see this screen, select The printer is installed. 8.

User Manual
Page 42
... router or access point's documentation for instructions. ■ If your Epson product. Please contact Epson Support. Problems and Solutions Check the solutions below if you're having trouble using . ■ If the product doesn't connect to the wireless router or access point ■ Make sure that the product is turned... on and the WiFi light on the product is on the wireless router or access point. Network Problems (WorkForce 323/325 Series) The product cannot find my product on the network Make sure the product is turned on and the...
... router or access point's documentation for instructions. ■ If your Epson product. Please contact Epson Support. Problems and Solutions Check the solutions below if you're having trouble using . ■ If the product doesn't connect to the wireless router or access point ■ Make sure that the product is turned... on and the WiFi light on the product is on the wireless router or access point. Network Problems (WorkForce 323/325 Series) The product cannot find my product on the network Make sure the product is turned on and the...
User Manual
Page 43
...Avoid placing the product next to select Network Settings, then press OK. 3. see below) and check the signal strength. For details, see the Epson Scan Help. ■ If you need to your computer's TCP/IP settings are scanning a large document at high resolution, a communication error ... closer to set correctly for scanning instructions. ■ If network communication was installed correctly and that your wireless router or access point. Cannot find the scanner or start Epson Scan ■ Epson Scan is set the IP address manually. Problems and Solutions 43
...Avoid placing the product next to select Network Settings, then press OK. 3. see below) and check the signal strength. For details, see the Epson Scan Help. ■ If you need to your computer's TCP/IP settings are scanning a large document at high resolution, a communication error ... closer to set correctly for scanning instructions. ■ If network communication was installed correctly and that your wireless router or access point. Cannot find the scanner or start Epson Scan ■ Epson Scan is set the IP address manually. Problems and Solutions 43


