User Manual
Page 1
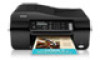
WorkForce® 320/323/325 Series Quick Guide Basic Printing, Copying, Scanning, and Faxing Maintaining Your Product Network Setup (WorkForce 323/325 only) Solving Problems
WorkForce® 320/323/325 Series Quick Guide Basic Printing, Copying, Scanning, and Faxing Maintaining Your Product Network Setup (WorkForce 323/325 only) Solving Problems
User Manual
Page 2
... 15 Setting Up Fax Features 16 Sending a Fax From the Control Panel 18 Receiving Faxes 19 Scanning a Document or Photo 20 Scanning With Epson Scan Software 20 Scanning With Mac OS X 10.6 21 Maintaining Your Product 22 Checking the Print Head Nozzles 22 Cleaning the Print Head 23 Checking Ink Levels 23 Purchasing...
... 15 Setting Up Fax Features 16 Sending a Fax From the Control Panel 18 Receiving Faxes 19 Scanning a Document or Photo 20 Scanning With Epson Scan Software 20 Scanning With Mac OS X 10.6 21 Maintaining Your Product 22 Checking the Print Head Nozzles 22 Cleaning the Print Head 23 Checking Ink Levels 23 Purchasing...
User Manual
Page 4
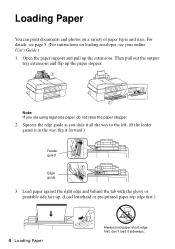
Then pull out the output tray extensions and flip up . (Load letterhead or pre-printed paper top edge first.) 4 Loading Paper Always load paper short edge first; Load paper against the right edge and behind the tab with the glossy ... pull up the extensions. Squeeze the edge guide as you are using legal-size paper, do not raise the paper stopper. 2. Loading Paper You can print documents and photos on loading envelopes, see your online User's Guide.) 1.
Then pull out the output tray extensions and flip up . (Load letterhead or pre-printed paper top edge first.) 4 Loading Paper Always load paper short edge first; Load paper against the right edge and behind the tab with the glossy ... pull up the extensions. Squeeze the edge guide as you are using legal-size paper, do not raise the paper stopper. 2. Loading Paper You can print documents and photos on loading envelopes, see your online User's Guide.) 1.

User Manual
Page 5
... papers one , call 800-GO-EPSON (800-463-7766). Using Special Papers Epson offers a wide array of your online User's Guide for the best results, use one of photo paper. You can load up to maximize the impact of high quality papers, making a copy or printing a rough draft, plain paper is... fine. You can also purchase supplies from an Epson authorized reseller...
... papers one , call 800-GO-EPSON (800-463-7766). Using Special Papers Epson offers a wide array of your online User's Guide for the best results, use one of photo paper. You can load up to maximize the impact of high quality papers, making a copy or printing a rough draft, plain paper is... fine. You can also purchase supplies from an Epson authorized reseller...
User Manual
Page 9
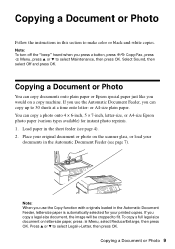
... paper just like you can copy a photo onto 4 × 6-inch, 5 × 7-inch, letter-size, or A4-size Epson photo paper (various types available) for your documents in the Automatic Document Feeder, letter-size paper is automatically selected for instant photo reprints. 1. ...a full legal-size document on a copy machine. Copying a Document or Photo 9 Place your original document or photo on the scanner glass, or load your printed copies. If you use the Copy function with originals loaded in the Automatic Document Feeder (see page 4). 2. Load paper in this section to fit. Note...
... paper just like you can copy a photo onto 4 × 6-inch, 5 × 7-inch, letter-size, or A4-size Epson photo paper (various types available) for your documents in the Automatic Document Feeder, letter-size paper is automatically selected for instant photo reprints. 1. ...a full legal-size document on a copy machine. Copying a Document or Photo 9 Place your original document or photo on the scanner glass, or load your printed copies. If you use the Copy function with originals loaded in the Automatic Document Feeder (see page 4). 2. Load paper in this section to fit. Note...
User Manual
Page 10
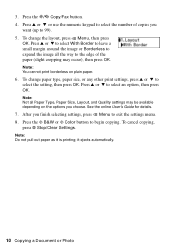
... OK. Note: Do not pull out paper as it ejects automatically. 10 Copying a Document or Photo To change paper type, paper size, or any other print settings, press u or d to 99). 5. Press the x B&W or x Color button to select an option, then press OK. Note: Not all the way to expand ...the image all Paper Type, Paper Size, Layout, and Quality settings may occur), then press OK. it is printing; Press the r/K Copy/Fax button. 4. Press u or d to select With Border to leave a small margin around the image or Borderless to the edge of ...
... OK. Note: Do not pull out paper as it ejects automatically. 10 Copying a Document or Photo To change paper type, paper size, or any other print settings, press u or d to 99). 5. Press the x B&W or x Color button to select an option, then press OK. Note: Not all the way to expand ...the image all Paper Type, Paper Size, Layout, and Quality settings may occur), then press OK. it is printing; Press the r/K Copy/Fax button. 4. Press u or d to select With Border to leave a small margin around the image or Borderless to the edge of ...
User Manual
Page 11
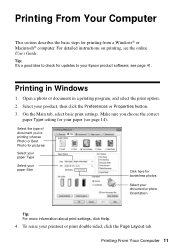
... your paper (see page 14). Printing in a printing program, and select the print option. 2. Printing From Your Computer 11 Make sure you 're printing (choose Photo or Best Photo for pictures) Select your paper Type Select your paper Size Click here for your Epson product software; Select your printout or print double-sided, click the Page Layout...
... your paper (see page 14). Printing in a printing program, and select the print option. 2. Printing From Your Computer 11 Make sure you 're printing (choose Photo or Best Photo for pictures) Select your paper Type Select your paper Size Click here for your Epson product software; Select your printout or print double-sided, click the Page Layout...
User Manual
Page 12
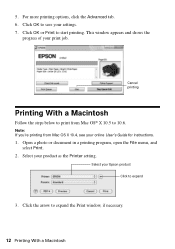
... shows the progress of your settings. 7. Note: If you're printing from Mac OS® X 10.5 to save your print job. Cancel printing Printing With a Macintosh Follow the steps below to expand 3. Select your online User's Guide for instructions. 1. Select your Epson product Click to print from Mac OS X 10.4, see your product as the Printer...
... shows the progress of your settings. 7. Note: If you're printing from Mac OS® X 10.5 to save your print job. Cancel printing Printing With a Macintosh Follow the steps below to expand 3. Select your online User's Guide for instructions. 1. Select your Epson product Click to print from Mac OS X 10.4, see your product as the Printer...

User Manual
Page 13
... from the pop-up menu, and select these print settings: Choose Print Settings Select your application before printing or check for details. Choose any other printing options you want isn't shown (for example, Scale), check for it at the bottom of this window. For borderless photos, choose a ...for it in your Media Type (see page 14) Select Color or Black/Grayscale output Select higher quality or faster printing (if available) 6. Copy and page settings Application settings 5. Printing With a Macintosh 13 Note: If the setting you may need from the pop-up menu. 4. Select basic copy ...
... from the pop-up menu, and select these print settings: Choose Print Settings Select your application before printing or check for details. Choose any other printing options you want isn't shown (for example, Scale), check for it at the bottom of this window. For borderless photos, choose a ...for it in your Media Type (see page 14) Select Color or Black/Grayscale output Select higher quality or faster printing (if available) 6. Copy and page settings Application settings 5. Printing With a Macintosh 13 Note: If the setting you may need from the pop-up menu. 4. Select basic copy ...
User Manual
Page 14
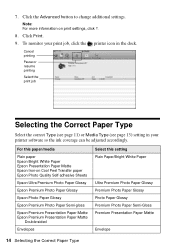
... Epson Ultra Premium Photo Paper Glossy Epson Premium Photo Paper Glossy Epson Photo Paper Glossy Epson Premium Photo Paper Semi-gloss Epson Premium Presentation Paper Matte Epson Premium Presentation Paper Matte Double-sided Envelopes Select this paper/media Plain paper Epson Bright White Paper Epson Presentation Paper Matte Epson Iron-on print settings, click ?. 8. Cancel printing Pause or resume printing Select the print...
... Epson Ultra Premium Photo Paper Glossy Epson Premium Photo Paper Glossy Epson Photo Paper Glossy Epson Premium Photo Paper Semi-gloss Epson Premium Presentation Paper Matte Epson Premium Presentation Paper Matte Double-sided Envelopes Select this paper/media Plain paper Epson Bright White Paper Epson Presentation Paper Matte Epson Iron-on print settings, click ?. 8. Cancel printing Pause or resume printing Select the print...
User Manual
Page 18
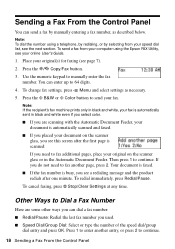
Note: To dial the number using the Epson FAX Utility, see your online User's Guide. 1. To change fax settings, press x Menu and select settings as described below. Press the x B&W or x Color button to ... send a fax by selecting from your computer using a telephone, by redialing, or by manually entering a fax number, as necessary. 5. Note: If the recipient's fax machine prints only in black and white, your fax is automatically sent in black and white even if you select color. ■ If you are some other...
Note: To dial the number using the Epson FAX Utility, see your online User's Guide. 1. To change fax settings, press x Menu and select settings as described below. Press the x B&W or x Color button to ... send a fax by selecting from your computer using a telephone, by redialing, or by manually entering a fax number, as necessary. 5. Note: If the recipient's fax machine prints only in black and white, your fax is automatically sent in black and white even if you select color. ■ If you are some other...

User Manual
Page 19
... 3. To turn off the hook. 2. See your telephone rings, lift the phone off the Auto Answer light and follow these steps: 1. Press 2 to print the fax. Receiving Faxes 19 Press 1 to continue. When your online User's Guide for instructions. Load more paper and press the OK button to confirm... you select. ■ One-touch dial button: Press a button on the hook. 4. Press 1 to enter another entry or press 2 to fit or printed on multiple pages, depending on the Auto Reduction setting you loaded, the fax size is turned on , press the Auto Answer button, then press OK...
... 3. To turn off the hook. 2. See your telephone rings, lift the phone off the Auto Answer light and follow these steps: 1. Press 2 to print the fax. Receiving Faxes 19 Press 1 to continue. When your online User's Guide for instructions. Load more paper and press the OK button to confirm... you select. ■ One-touch dial button: Press a button on the hook. 4. Press 1 to enter another entry or press 2 to fit or printed on multiple pages, depending on the Auto Reduction setting you loaded, the fax size is turned on , press the Auto Answer button, then press OK...
User Manual
Page 22
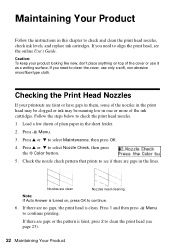
...2 to see page 23). 22 Maintaining Your Product Follow the steps below to select Nozzle Check, then press the x Color button. 5. Checking the Print Head Nozzles If your product looking like new, don't place anything on , press OK to clean the cover, use it as a writing surface, ...If you need to continue. 6. Press u or d to check the print head nozzles. 1. Press 1 and then press x Menu to select Maintenance, then press OK. 4. Maintaining Your Product Follow the instructions in the lines. Caution: ...
...2 to see page 23). 22 Maintaining Your Product Follow the steps below to select Nozzle Check, then press the x Color button. 5. Checking the Print Head Nozzles If your product looking like new, don't place anything on , press OK to clean the cover, use it as a writing surface, ...If you need to continue. 6. Press u or d to check the print head nozzles. 1. Press 1 and then press x Menu to select Maintenance, then press OK. 4. Maintaining Your Product Follow the instructions in the lines. Caution: ...
User Manual
Page 23
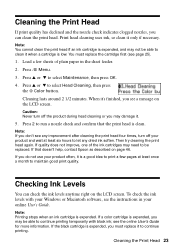
... Press 2 to run a nozzle check and confirm that doesn't help, contact Epson as described on page 46. If a color cartridge is expended, you may be replaced. Load a few pages at least six hours to continue printing temporarily with your Windows or Macintosh software, see a message on the LCD screen...black ink; You must replace it only if necessary. When it when a cartridge is clean. Then try cleaning the print head again. Cleaning the Print Head If print quality has declined and the nozzle check indicates clogged nozzles, you can check the ink levels anytime right on the ...
... Press 2 to run a nozzle check and confirm that doesn't help, contact Epson as described on page 46. If a color cartridge is expended, you may be replaced. Load a few pages at least six hours to continue printing temporarily with your Windows or Macintosh software, see a message on the LCD screen...black ink; You must replace it only if necessary. When it when a cartridge is clean. Then try cleaning the print head again. Cleaning the Print Head If print quality has declined and the nozzle check indicates clogged nozzles, you can check the ink levels anytime right on the ...
User Manual
Page 24
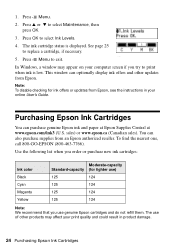
... 125 124 125 124 Note: We recommend that you try to print when ink is displayed. Purchasing Epson Ink Cartridges You can purchase genuine Epson ink and paper at Epson Supplies Central at www.epson.com/ink3 (U.S. In Windows, a window may affect your print quality and could result in your computer screen if you use of...
... 125 124 125 124 Note: We recommend that you try to print when ink is displayed. Purchasing Epson Ink Cartridges You can purchase genuine Epson ink and paper at Epson Supplies Central at www.epson.com/ink3 (U.S. In Windows, a window may affect your print quality and could result in your computer screen if you use of...
User Manual
Page 25
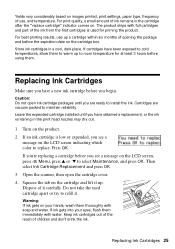
... which color to maintain reliability. Warning: If ink gets on your eyes, flush them immediately with water. Yields vary considerably based on images printed, print settings, paper type, frequency of use up a cartridge within six months of opening the package and before the expiration date on the cartridge ... ink from the first cartridges is low or expended, you begin. If ink gets into your hands, wash them . Replacing Ink Cartridges 25 For print quality, a small amount of children and don't drink the ink. Replacing Ink Cartridges Make sure you see a message on the LCD screen, press...
... which color to maintain reliability. Warning: If ink gets on your eyes, flush them immediately with water. Yields vary considerably based on images printed, print settings, paper type, frequency of use up a cartridge within six months of opening the package and before the expiration date on the cartridge ... ink from the first cartridges is low or expended, you begin. If ink gets into your hands, wash them . Replacing Ink Cartridges 25 For print quality, a small amount of children and don't drink the ink. Replacing Ink Cartridges Make sure you see a message on the LCD screen, press...
User Manual
Page 27
Before you begin, make sure you set up additional computers to print to the product, see "Setting Up Additional Computers" on the Start Here sheet. After the printer is connected to the network, you need to remove ... page 37. Temporary use the buttons on the printer to set up your product as the WorkForce 320 has no built-in wireless network functionality. Wireless Network Setup 27 You will need to select wireless settings. WorkForce 320 Series owners may skip this chapter only if you need to your product. Wireless Network Setup...
Before you begin, make sure you set up additional computers to print to the product, see "Setting Up Additional Computers" on the Start Here sheet. After the printer is connected to the network, you need to remove ... page 37. Temporary use the buttons on the printer to set up your product as the WorkForce 320 has no built-in wireless network functionality. Wireless Network Setup 27 You will need to select wireless settings. WorkForce 320 Series owners may skip this chapter only if you need to your product. Wireless Network Setup...

User Manual
Page 33
... When you did not connect a USB cable to set up the product on -screen instructions to the product, see the Installation Complete screen, print a test page, then click Finish. 10. Follow the on your computer. 9. Installing for the network. 8. Wait while EpsonNet Setup configures ...your computer. To set it up additional computers to print to install the rest of your software. When installation is complete, remove the CD and restart your product for the First Time 33 Follow...
... When you did not connect a USB cable to set up the product on -screen instructions to the product, see the Installation Complete screen, print a test page, then click Finish. 10. Follow the on your computer. 9. Installing for the network. 8. Wait while EpsonNet Setup configures ...your computer. To set it up additional computers to print to install the rest of your software. When installation is complete, remove the CD and restart your product for the First Time 33 Follow...
User Manual
Page 36
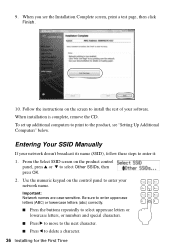
When installation is complete, remove the CD. To set up additional computers to print to the product, see the Installation Complete screen, print a test page, then click Finish. 10. Entering Your SSID Manually If your network name. Use the numeric keypad on the control panel to enter your ...
When installation is complete, remove the CD. To set up additional computers to print to the product, see the Installation Complete screen, print a test page, then click Finish. 10. Entering Your SSID Manually If your network name. Use the numeric keypad on the control panel to enter your ...

User Manual
Page 40
12. Follow the instructions on the screen to install the rest of your software. When installation is complete, remove the CD. 40 Setting Up Additional Computers When you see the Installation Complete screen, print a test page, then click Finish. 13.
12. Follow the instructions on the screen to install the rest of your software. When installation is complete, remove the CD. 40 Setting Up Additional Computers When you see the Installation Complete screen, print a test page, then click Finish. 13.


