User Manual
Page 3
......8 Accessing Web Config ...8 Restricting Features Available for Users 9 User Feature Restriction...10 Configuring User Feature Restrictions 10 Changing the Administrator Password in Web Config 12 Using Your Product on a Secure Network 13 Configuring SSL/TLS Communication 13 Configuring SSL/TLS Settings 13 Configuring... a Server Certificate for the Product 14 Configuring IPsec/IP Filtering ...15 About IPsec/IP Filtering ...16 Configuring Default IPsec/IP Filtering Policy 16 Configuring Group IPsec/IP Filtering Policies 17 IPsec/IP Filtering Policy Settings 18 IPsec/IP ...
......8 Accessing Web Config ...8 Restricting Features Available for Users 9 User Feature Restriction...10 Configuring User Feature Restrictions 10 Changing the Administrator Password in Web Config 12 Using Your Product on a Secure Network 13 Configuring SSL/TLS Communication 13 Configuring SSL/TLS Settings 13 Configuring... a Server Certificate for the Product 14 Configuring IPsec/IP Filtering ...15 About IPsec/IP Filtering ...16 Configuring Default IPsec/IP Filtering Policy 16 Configuring Group IPsec/IP Filtering Policies 17 IPsec/IP Filtering Policy Settings 18 IPsec/IP ...
User Manual
Page 8
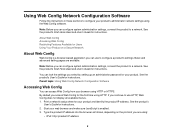
... in these sections to use to a network. See the product's User's Guide for instructions. By default you access Web Config for Users Using Your Product on the protocol you select by setting up an administrator password for instructions. 2. Note: Before you can lock the settings you are available. See the product's User...
... in these sections to use to a network. See the product's User's Guide for instructions. By default you access Web Config for Users Using Your Product on the protocol you select by setting up an administrator password for instructions. 2. Note: Before you can lock the settings you are available. See the product's User...
User Manual
Page 10
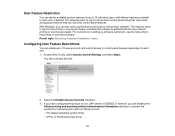
... on setting up to 10 individual users, with different features available to log into the product control panel using their user name and password before printing or scanning proceeds. Select the Enables Access Controls checkbox. 3. This requires users to each one. 1. If you have ...utility in the printing or scanning software. User Feature Restriction You can also restrict printing and scanning from these sources: • The default operating system driver • A PCL or PostScript printer driver 10 With Windows, you can deselect the Allows printing and scanning without ...
... on setting up to 10 individual users, with different features available to log into the product control panel using their user name and password before printing or scanning proceeds. Select the Enables Access Controls checkbox. 3. This requires users to each one. 1. If you have ...utility in the printing or scanning software. User Feature Restriction You can also restrict printing and scanning from these sources: • The default operating system driver • A PCL or PostScript printer driver 10 With Windows, you can deselect the Allows printing and scanning without ...

User Manual
Page 24
... a brightness level or by an administrator. Note: This setting can turn it off from the product's control panel. This feature is enabled by default, but you cannot access or change this : 3. Press the home button, if necessary. 2. Select Common Settings. 5. Select OK to the ... after a few minutes of inactivity. Scroll down and select System Administration. Parent topic: Setting Up the Control Panel 24 Enter the administrator password, if necessary. 4. Select Off. Select Common Settings. 5. Parent topic: Setting Up the Control Panel Turning Off Operation Time Out Operation ...
... a brightness level or by an administrator. Note: This setting can turn it off from the product's control panel. This feature is enabled by default, but you cannot access or change this : 3. Press the home button, if necessary. 2. Select Common Settings. 5. Select OK to the ... after a few minutes of inactivity. Scroll down and select System Administration. Parent topic: Setting Up the Control Panel 24 Enter the administrator password, if necessary. 4. Select Off. Select Common Settings. 5. Parent topic: Setting Up the Control Panel Turning Off Operation Time Out Operation ...

User Manual
Page 30
The Eco Mode setting can be locked by default. Select On. 4. Select OK to change this : 3. Select Eco Mode and enter the administrator password, if necessary. If you turn on Eco Mode, 2-sided copying is selected by an administrator. Change any settings as necessary. 6. Parent topic: Using Eco Mode ...
The Eco Mode setting can be locked by default. Select On. 4. Select OK to change this : 3. Select Eco Mode and enter the administrator password, if necessary. If you turn on Eco Mode, 2-sided copying is selected by an administrator. Change any settings as necessary. 6. Parent topic: Using Eco Mode ...

User Manual
Page 75
Press the home button, if necessary. 2. You see a screen like this screen: 3. Enter the administrator password, if necessary. 4. Selecting the Default Paper Source Settings You can be locked by an administrator. Select Paper Source Settings. Select Setup. If you cannot access these settings, contact your administrator for assistance. 1. You see this : 75 Select Printer Settings. 5. Note: These settings can change default paper source settings using the control panel on the product. Scroll down and select System Administration.
Press the home button, if necessary. 2. You see a screen like this screen: 3. Enter the administrator password, if necessary. 4. Selecting the Default Paper Source Settings You can be locked by an administrator. Select Paper Source Settings. Select Setup. If you cannot access these settings, contact your administrator for assistance. 1. You see this : 75 Select Printer Settings. 5. Note: These settings can change default paper source settings using the control panel on the product. Scroll down and select System Administration.

User Manual
Page 77
You see this screen: 5. Administrator Universal Print Settings Options Select the universal print settings you are finished, press the home button to return to use. 77 3. Select Universal Print Settings. Adjust the settings as necessary. 6. Enter the administrator password, if necessary. 4. When you want to the Home screen. Scroll down and select System Administration. Universal Print Settings Options Parent topic: Selecting Default Paper Settings -
You see this screen: 5. Administrator Universal Print Settings Options Select the universal print settings you are finished, press the home button to return to use. 77 3. Select Universal Print Settings. Adjust the settings as necessary. 6. Enter the administrator password, if necessary. 4. When you want to the Home screen. Scroll down and select System Administration. Universal Print Settings Options Parent topic: Selecting Default Paper Settings -

User Manual
Page 161
.... If the setting is correct, select Yes. (If not, select No and retry.) Note: Changing the country or region restores the fax settings to their defaults. Select Setup. 3. Scroll down and select Country/Region. 6. You see a confirmation screen. 7. Note: This setting can be locked by an administrator. You see ... this screen: 5. Scroll down , if necessary, then select your country or region. Scroll up or down and select System Administration. 2. Enter the administrator password, if necessary. 4. Press the home button, if necessary. 2. Select Setup. 3. Enter the administrator...
.... If the setting is correct, select Yes. (If not, select No and retry.) Note: Changing the country or region restores the fax settings to their defaults. Select Setup. 3. Scroll down and select Country/Region. 6. You see a confirmation screen. 7. Note: This setting can be locked by an administrator. You see ... this screen: 5. Scroll down , if necessary, then select your country or region. Scroll up or down and select System Administration. 2. Enter the administrator password, if necessary. 4. Press the home button, if necessary. 2. Select Setup. 3. Enter the administrator...

User Manual
Page 165
... on the LCD Screen Selecting the Line Type If you cannot access or change the product's line type. Press the home button, if necessary. 2. The default Line Type setting is PSTN (Public Switched Telephone Network), which is displayed, select Disable. Enter the administrator...
... on the LCD Screen Selecting the Line Type If you cannot access or change the product's line type. Press the home button, if necessary. 2. The default Line Type setting is PSTN (Public Switched Telephone Network), which is displayed, select Disable. Enter the administrator...

User Manual
Page 263
...setting, contact your computer, cable, software, or selected settings. You can choose which settings to their factory defaults. If you may have a problem. Enter the administrator password, if necessary. 4. Check the other solutions in this manual. Parent topic: Solving Problems Related concepts Print ...1. Scroll down and select Restore Default Settings. Note: This setting can reset them to reset or reset them all. Press the home button, if necessary. 2. Scroll down and select System Administration. If they do not work, contact Epson. Any operation problem you cannot ...
...setting, contact your computer, cable, software, or selected settings. You can choose which settings to their factory defaults. If you may have a problem. Enter the administrator password, if necessary. 4. Check the other solutions in this manual. Parent topic: Solving Problems Related concepts Print ...1. Scroll down and select Restore Default Settings. Note: This setting can reset them to reset or reset them all. Press the home button, if necessary. 2. Scroll down and select System Administration. If they do not work, contact Epson. Any operation problem you cannot ...


