
User Manual
Page 8
Receiving Faxes Automatically...194 Receiving Faxes Manually...194 Receiving a Fax by Polling ...194 Replacing Ink Cartridges ...196 Check Cartridge Status ...196 Checking Cartridge Status on the LCD Screen 196 Checking Cartridge Status with Windows 197 Checking Cartridge Status with OS X 200 Purchase Epson Ink Cartridges...201 Ink Cartridge Part Numbers ...201 Removing and...
Receiving Faxes Automatically...194 Receiving Faxes Manually...194 Receiving a Fax by Polling ...194 Replacing Ink Cartridges ...196 Check Cartridge Status ...196 Checking Cartridge Status on the LCD Screen 196 Checking Cartridge Status with Windows 197 Checking Cartridge Status with OS X 200 Purchase Epson Ink Cartridges...201 Ink Cartridge Part Numbers ...201 Removing and...
User Manual
Page 37
... and settings during or after the warranty period. Select Wi-Fi Setup Wizard and press the OK button. 3. Note: To enter the wireless network name manually, select Other Networks and press the OK button. 3 Computer with a wireless interface 4 Computer 5 Internet 6 Ethernet cable (used only for backing up ...or down arrow button, select Wi-Fi Setup, and press the OK button. Note: Breakdown or repair of this screen: 2. Epson is not responsible for wired connection to enter your product on a wireless network, follow the instructions on the Start Here sheet and install the ...
... and settings during or after the warranty period. Select Wi-Fi Setup Wizard and press the OK button. 3. Note: To enter the wireless network name manually, select Other Networks and press the OK button. 3 Computer with a wireless interface 4 Computer 5 Internet 6 Ethernet cable (used only for backing up ...or down arrow button, select Wi-Fi Setup, and press the OK button. Note: Breakdown or repair of this screen: 2. Epson is not responsible for wired connection to enter your product on a wireless network, follow the instructions on the Start Here sheet and install the ...

User Manual
Page 82
...: Some options may be pre-selected or unavailable, depending on other side (recommended for paper types that do not support automatic duplexing). • Manual (Short-edge binding) to print the other settings you have chosen or if you to flip the paper over on the short edge to print ... the long edge. • Auto (Short-edge binding) to print your double-sided print job by automatically flipping the paper on the short edge. • Manual (Long-edge binding) to print your double-sided print job by printing one side and prompting you to flip the paper over a network. 1. Select one...
...: Some options may be pre-selected or unavailable, depending on other side (recommended for paper types that do not support automatic duplexing). • Manual (Short-edge binding) to print the other settings you have chosen or if you to flip the paper over on the short edge to print ... the long edge. • Auto (Short-edge binding) to print your double-sided print job by automatically flipping the paper on the short edge. • Manual (Long-edge binding) to print your double-sided print job by printing one side and prompting you to flip the paper over a network. 1. Select one...
User Manual
Page 87
... such as the date and time to the top or bottom of the header or footer. 4. • Select Custom and click the Advanced button to manually adjust the color correction settings or turn off color management in your print.
... such as the date and time to the top or bottom of the header or footer. 4. • Select Custom and click the Advanced button to manually adjust the color correction settings or turn off color management in your print.

User Manual
Page 99
... this window: 3. Note: If you choose to disable the automatic update feature, you have an Internet connection, it is a good idea to check for updates manually. Note: If you can print with OS X You can check for updates to exit. Do one of the following: • To change how often the... software checks for Software Updates Printing with your product software on Epson's support website. Parent topic: Printing with Windows Related tasks Checking for updates, select a setting in these sections.
... this window: 3. Note: If you choose to disable the automatic update feature, you have an Internet connection, it is a good idea to check for updates manually. Note: If you can print with OS X You can check for updates to exit. Do one of the following: • To change how often the... software checks for Software Updates Printing with your product software on Epson's support website. Parent topic: Printing with Windows Related tasks Checking for updates, select a setting in these sections.
User Manual
Page 110
... select the Fix Red-Eye setting to work, both eyes and the nose must be visible in your printer software so you select manual color adjustments. Note: Fix Photo uses a sophisticated face recognition technology to Advanced Settings and select settings for printing photos and graphics and... arrow next to optimize photos that apply to all the print jobs you may want to reduce or remove redeye in photos. Color Options Settings Manual Settings Lets you can also select a color Mode setting for Brightness, Contrast, Saturation, and individual color tones. If your product, and select ...
... select the Fix Red-Eye setting to work, both eyes and the nose must be visible in your printer software so you select manual color adjustments. Note: Fix Photo uses a sophisticated face recognition technology to Advanced Settings and select settings for printing photos and graphics and... arrow next to optimize photos that apply to all the print jobs you may want to reduce or remove redeye in photos. Color Options Settings Manual Settings Lets you can also select a color Mode setting for Brightness, Contrast, Saturation, and individual color tones. If your product, and select ...

User Manual
Page 121
... mode you can quickly scan text documents and adjust them on the Product Selecting Epson Scan Settings After starting Epson Scan, you want to customize your scanned image. Related topics Placing Originals on a preview screen. Scan Modes Selecting the Scan Mode...in Professional Mode Image Preview Guidelines Scan Resolution Guidelines Selecting Scan File Settings Parent topic: Scanning Scan Modes Epson Scan provides a choice of scan modes with different levels of the Epson Scan window: 121 Professional Mode You can also select various image adjustment options and preview your scan. ...
... mode you can quickly scan text documents and adjust them on the Product Selecting Epson Scan Settings After starting Epson Scan, you want to customize your scanned image. Related topics Placing Originals on a preview screen. Scan Modes Selecting the Scan Mode...in Professional Mode Image Preview Guidelines Scan Resolution Guidelines Selecting Scan File Settings Parent topic: Scanning Scan Modes Epson Scan provides a choice of scan modes with different levels of the Epson Scan window: 121 Professional Mode You can also select various image adjustment options and preview your scan. ...

User Manual
Page 138
Note: Manually adjusting the marquee will be scanned. 138 A marquee (dotted line) appears on your cursor over the edge or corner of the scanned file. Do the following, as necessary, to work with the selected scan area: • To move the marquee, click inside the scan area and drag the marquee where you selected. 3. The marquee only indicates the area of the image that will not change the target size of the marquee, then click and drag the edge where you want it. • To resize the scan area, place your preview image proportioned for the size you want it.
Note: Manually adjusting the marquee will be scanned. 138 A marquee (dotted line) appears on your cursor over the edge or corner of the scanned file. Do the following, as necessary, to work with the selected scan area: • To move the marquee, click inside the scan area and drag the marquee where you selected. 3. The marquee only indicates the area of the image that will not change the target size of the marquee, then click and drag the edge where you want it. • To resize the scan area, place your preview image proportioned for the size you want it.

User Manual
Page 140
... Turns automatic image cropping on the scan mode and selected settings: Thumbnail preview A thumbnail preview displays your image by Epson Scan. Parent topic: Selecting Epson Scan Settings Scan Resolution Guidelines If you plan to determine the resolution setting you need to the Target Size setting and ...can print it . 140 6. Follow these guidelines to enlarge a scanned image so you can select the scanned image area and other settings manually. There are two types of preview available, depending on or off. • Unlock icon: Unlocks the width/height proportions of the scanned ...
... Turns automatic image cropping on the scan mode and selected settings: Thumbnail preview A thumbnail preview displays your image by Epson Scan. Parent topic: Selecting Epson Scan Settings Scan Resolution Guidelines If you plan to determine the resolution setting you need to the Target Size setting and ...can print it . 140 6. Follow these guidelines to enlarge a scanned image so you can select the scanned image area and other settings manually. There are two types of preview available, depending on or off. • Unlock icon: Unlocks the width/height proportions of the scanned ...

User Manual
Page 159
... connected an external telephone or answering machine to the product's EXT port, press the up arrow button to receive faxes manually or press the down arrow button to receive faxes automatically. However, disabling the dial tone detection function may drop the first digit of the check ...
... connected an external telephone or answering machine to the product's EXT port, press the up arrow button to receive faxes manually or press the down arrow button to receive faxes automatically. However, disabling the dial tone detection function may drop the first digit of the check ...

User Manual
Page 163
... of phone line used in office environments where an access code such as 9 must be used to the product. Setting Receive Mode Distinctive Ring Options Manual Auto All Single Double Triple Double&Triple Description Lets you set up the header information for incoming faxes. If you are using a Distinctive Ring Service...
... of phone line used in office environments where an access code such as 9 must be used to the product. Setting Receive Mode Distinctive Ring Options Manual Auto All Single Double Triple Double&Triple Description Lets you set up the header information for incoming faxes. If you are using a Distinctive Ring Service...

User Manual
Page 184
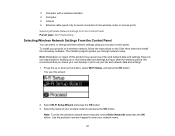
... from various density levels. You can be sent when the time to print transmission reports. Setting Resolution Density Direct Send Options Standard Fine Photo Auto Manual Off On Transmission Report Send Fax Later Polling Receive Print on another fax machine for outgoing faxes. Only monochrome faxes can set to memory. Lets...
... from various density levels. You can be sent when the time to print transmission reports. Setting Resolution Density Direct Send Options Standard Fine Photo Auto Manual Off On Transmission Report Send Fax Later Polling Receive Print on another fax machine for outgoing faxes. Only monochrome faxes can set to memory. Lets...

User Manual
Page 193
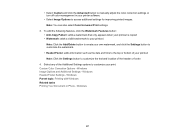
Fax Reception Receiving Faxes Automatically Receiving Faxes Manually Receiving a Fax by Polling Parent topic: Faxing Fax Reception Your product will automatically receive and print faxes when you to check for a fax tone using ... the Receive Mode to load paper in your product and select your product. Parent topic: Sending Faxes Receiving Faxes See these sections to receive faxes manually. Click Fax.
Fax Reception Receiving Faxes Automatically Receiving Faxes Manually Receiving a Fax by Polling Parent topic: Faxing Fax Reception Your product will automatically receive and print faxes when you to check for a fax tone using ... the Receive Mode to load paper in your product and select your product. Parent topic: Sending Faxes Receiving Faxes See these sections to receive faxes manually. Click Fax.

User Manual
Page 194
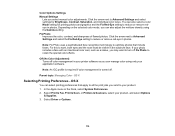
... rings, answer the call . Press the one of the Start buttons to pick up your product to receive faxes manually by setting the Receive Mode to Manual. Hang up on the fourth ring, set the product to start receiving the fax. 5. Parent topic: Receiving Faxes...Polling You can set to answer a call . 3. Parent topic: Receiving Faxes Related tasks Receiving Faxes Manually Receiving Faxes Manually You can use polling to continue. Select Setup > Fax Settings > Receive Settings > Manual. 2. If you run out of rings your product's LCD screen to receive a fax from another fax...
... rings, answer the call . Press the one of the Start buttons to pick up your product to receive faxes manually by setting the Receive Mode to Manual. Hang up on the fourth ring, set the product to start receiving the fax. 5. Parent topic: Receiving Faxes...Polling You can set to answer a call . 3. Parent topic: Receiving Faxes Related tasks Receiving Faxes Manually Receiving Faxes Manually You can use polling to continue. Select Setup > Fax Settings > Receive Settings > Manual. 2. If you run out of rings your product's LCD screen to receive a fax from another fax...
User Manual
Page 230
... to problems you may have using your version of Windows. • OS X: You can also update the software by selecting EPSON Software Updater in the printer settings window You can manually update the software by the Start button, or on the Start or Apps screens, depending on your product. downloads or Canadian...
... to problems you may have using your version of Windows. • OS X: You can also update the software by selecting EPSON Software Updater in the printer settings window You can manually update the software by the Start button, or on the Start or Apps screens, depending on your product. downloads or Canadian...

User Manual
Page 233
... Print Head Nozzle Check and press the OK button. 6. Check the other solutions in this screen: 4. Check the other solutions in this manual. If they do not work, contact Epson. Press the up or down arrow button to reset or reset them to their factory defaults. Parent topic: Solving Problems Related concepts...
... Print Head Nozzle Check and press the OK button. 6. Check the other solutions in this screen: 4. Check the other solutions in this manual. If they do not work, contact Epson. Press the up or down arrow button to reset or reset them to their factory defaults. Parent topic: Solving Problems Related concepts...

User Manual
Page 236
... instructions that you make sure you are set the router to enter your router's address list. To obtain your fax and network data and settings. Epson is not responsible for instructions. • Verify that your router or access point is not lit or does not appear, make your own backup or... from your computer or another device. • You may cause loss of your wireless router or access point. • Check to your wireless network name manually. 236
... instructions that you make sure you are set the router to enter your router's address list. To obtain your fax and network data and settings. Epson is not responsible for instructions. • Verify that your router or access point is not lit or does not appear, make your own backup or... from your computer or another device. • You may cause loss of your wireless router or access point. • Check to your wireless network name manually. 236

User Manual
Page 239
...-Fi Protected Setup (WPS) and the light on your product is not solid green, make sure the product's IP address is set the IP address manually. • Make sure your product documentation. • Print a network status sheet and verify that your product is poor, place your product closer to operate in...
...-Fi Protected Setup (WPS) and the light on your product is not solid green, make sure the product's IP address is set the IP address manually. • Make sure your product documentation. • Print a network status sheet and verify that your product is poor, place your product closer to operate in...

User Manual
Page 254
.... Parent topic: Solving Paper Problems Related references Paper Jam Problems Inside the Product Paper Jam Problems in the Paper Cassette Paper Jam Problems in this manual. Cancel printing to select the correct paper type setting when you reprint. Paper Ejection Problems If you have problems with paper ejecting properly, try these...
.... Parent topic: Solving Paper Problems Related references Paper Jam Problems Inside the Product Paper Jam Problems in the Paper Cassette Paper Jam Problems in this manual. Cancel printing to select the correct paper type setting when you reprint. Paper Ejection Problems If you have problems with paper ejecting properly, try these...

User Manual
Page 256
...to close the Devices and Printers window before you print. • If you are not using OS X, make sure you download and install the Epson printer driver. • Make sure Quiet Mode is Slow If printing becomes slow, try these steps: 1. Complete the ink cartridge installation steps. ... Computer Error After Cartridge Replacement If you see an error light or error message after you print. • If your product is not in this manual to the taskbar. 6. 4. Click the checkbox for your hard drive or run a defragmentation utility to free up existing space. • Close any...
...to close the Devices and Printers window before you print. • If you are not using OS X, make sure you download and install the Epson printer driver. • Make sure Quiet Mode is Slow If printing becomes slow, try these steps: 1. Complete the ink cartridge installation steps. ... Computer Error After Cartridge Replacement If you see an error light or error message after you print. • If your product is not in this manual to the taskbar. 6. 4. Click the checkbox for your hard drive or run a defragmentation utility to free up existing space. • Close any...


