
User Manual
Page 20
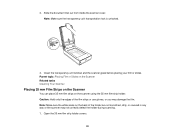
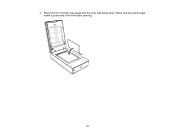
... sure the white areas on the scanner using the 35 mm film strip holder. Caution: Hold only the edges of the holder are not scratched, dirty, or covered in any way or the scanner may damage the film. Parent topic: Placing Film or Slides on the Scanner Related tasks Cleaning Your Scanner Placing 35... mm Film Strips on the Scanner You can place 35 mm film strips on the back of the film strips or use gloves, or you may not correctly detect the holder during scanning. 1. 3. Clean the transparency unit window and the ...
... sure the white areas on the scanner using the 35 mm film strip holder. Caution: Hold only the edges of the holder are not scratched, dirty, or covered in any way or the scanner may damage the film. Parent topic: Placing Film or Slides on the Scanner Related tasks Cleaning Your Scanner Placing 35... mm Film Strips on the Scanner You can place 35 mm film strips on the back of the film strips or use gloves, or you may not correctly detect the holder during scanning. 1. 3. Clean the transparency unit window and the ...
User Manual
Page 21
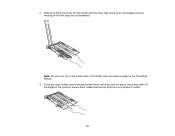
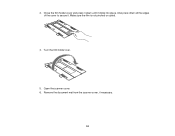
2. Also press down until they are not pinched or curled. 21 Make sure the film strips are used as guides in the holder; Note: Do not cover any open holder covers and press them . they click into the holder with the shiny side facing up to secure them down all the edges of the small holes in the Thumbnail feature. 3. Slide up so that images and any wording on the film strips are not backward. Close any of the covers to three film strips into place.
2. Also press down until they are not pinched or curled. 21 Make sure the film strips are used as guides in the holder; Note: Do not cover any open holder covers and press them . they click into the holder with the shiny side facing up to secure them down all the edges of the small holes in the Thumbnail feature. 3. Slide up so that images and any wording on the film strips are not backward. Close any of the covers to three film strips into place.
User Manual
Page 22
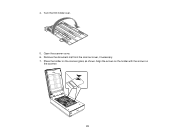
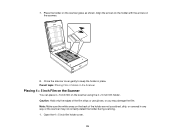
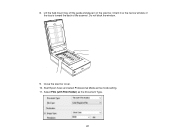
Open the scanner cover. 6. Align the arrows on the holder with the arrows on the scanner glass as shown. Turn the film holder over. 5. Remove the document mat from the scanner cover, if necessary. 7. 4. Place the holder on the scanner. 22
Open the scanner cover. 6. Align the arrows on the holder with the arrows on the scanner glass as shown. Turn the film holder over. 5. Remove the document mat from the scanner cover, if necessary. 7. 4. Place the holder on the scanner. 22
User Manual
Page 23
... cover gently to keep the holder in the film holder opening. Note: You cannot use gloves, or you may not correctly detect the holder during scanning. 1. Slide the medium format film into the holder with the shiny side facing up so that images and any way or the scanner may damage the film. Caution: Hold only the...
... cover gently to keep the holder in the film holder opening. Note: You cannot use gloves, or you may not correctly detect the holder during scanning. 1. Slide the medium format film into the holder with the shiny side facing up so that images and any way or the scanner may damage the film. Caution: Hold only the...
User Manual
Page 24
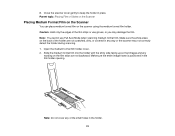
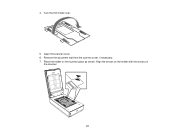
Open the scanner cover. 6. Remove the document mat from the scanner cover, if necessary. 24 Turn the film holder over. 5. Make sure the film is not pinched or curled. 4. Close the film holder cover and press it down all the edges of the cover to secure it clicks into place. Also press down until it . 3.
Open the scanner cover. 6. Remove the document mat from the scanner cover, if necessary. 24 Turn the film holder over. 5. Make sure the film is not pinched or curled. 4. Close the film holder cover and press it down all the edges of the cover to secure it clicks into place. Also press down until it . 3.
User Manual
Page 25
...the Scanner Placing 4 × 5 inch Film on the Scanner You can place 4 × 5 inch film on the scanner. 8. Close the scanner cover gently to keep the holder in any way or the scanner may damage the film. Caution: Hold only the edges of the holder are not scratched, dirty, or covered ... white areas on the scanner glass as shown. 7. Align the arrows on the holder with the arrows on the scanner using the 4 × 5 inch film holder. Open the 4 × 5 inch film holder cover. 25 Place the holder on the back of the film strips or use gloves, or you may not correctly detect the...
...the Scanner Placing 4 × 5 inch Film on the Scanner You can place 4 × 5 inch film on the scanner. 8. Close the scanner cover gently to keep the holder in any way or the scanner may damage the film. Caution: Hold only the edges of the holder are not scratched, dirty, or covered ... white areas on the scanner glass as shown. 7. Align the arrows on the holder with the arrows on the scanner using the 4 × 5 inch film holder. Open the 4 × 5 inch film holder cover. 25 Place the holder on the back of the film strips or use gloves, or you may not correctly detect the...

User Manual
Page 26
2. Slide the 4 × 5 inch film into place. Note: You may need to secure it clicks into the holder with the shiny side facing up so that it sits properly in the film holder opening. Make sure the entire image frame is positioned in the film holder without bending or warping. Do not cover any of the film so that images and any wording on the film strips are not backward. Close the film holder cover and press it down all the edges of the cover to trim the edges of the small holes in the holder. 3. Also press down until it . 26
2. Slide the 4 × 5 inch film into place. Note: You may need to secure it clicks into the holder with the shiny side facing up so that it sits properly in the film holder opening. Make sure the entire image frame is positioned in the film holder without bending or warping. Do not cover any of the film so that images and any wording on the film strips are not backward. Close the film holder cover and press it down all the edges of the cover to trim the edges of the small holes in the holder. 3. Also press down until it . 26
User Manual
Page 27
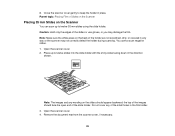
4. Place the holder on the scanner. 27 Open the scanner cover. 6. Turn the film holder over. 5. Remove the document mat from the scanner cover, if necessary. 7. Align the arrows on the holder with the arrows on the scanner glass as shown.
4. Place the holder on the scanner. 27 Open the scanner cover. 6. Turn the film holder over. 5. Remove the document mat from the scanner cover, if necessary. 7. Align the arrows on the holder with the arrows on the scanner glass as shown.
User Manual
Page 28
.... Note: The images and any way or the scanner may damage the film. You cannot scan negative slides. 1. the top of the images should appear backward; Note: Make sure the white areas on the back of the slide holder. Open the scanner cover. 4. Do not cover any of the slides... the slide holder. Place up to twelve slides into the slide holder with the shiny sides facing down in place. Parent topic: Placing Film or Slides on the Scanner Placing 35 mm Slides on the slides should face the open end of the holder are not scratched, dirty, or covered in the film holder. 3.
.... Note: The images and any way or the scanner may damage the film. You cannot scan negative slides. 1. the top of the images should appear backward; Note: Make sure the white areas on the back of the slide holder. Open the scanner cover. 4. Do not cover any of the slides... the slide holder. Place up to twelve slides into the slide holder with the shiny sides facing down in place. Parent topic: Placing Film or Slides on the Scanner Placing 35 mm Slides on the slides should face the open end of the holder are not scratched, dirty, or covered in the film holder. 3.

User Manual
Page 29
... not save it in place. You cannot use DIGITAL ICE Technology when using Epson Scan Professional Mode and select Film (with the arrows on the Scanner Placing Film in the Film Area Guide You can scan oversized film up to keep the film holder in BMP, Tiff, or JPEG format. 29 5. Caution: Hold only the edges of...
... not save it in place. You cannot use DIGITAL ICE Technology when using Epson Scan Professional Mode and select Film (with the arrows on the Scanner Placing Film in the Film Area Guide You can scan oversized film up to keep the film holder in BMP, Tiff, or JPEG format. 29 5. Caution: Hold only the edges of...
User Manual
Page 31
4. Place the film in the film holder opening. 31 Make sure the entire image frame is positioned in the film area guide with the shiny side facing down.
4. Place the film in the film holder opening. 31 Make sure the entire image frame is positioned in the film area guide with the shiny side facing down.
User Manual
Page 37
Orient it on the scanner. Lift the fluid mount tray off the guide and place it so the narrow window of the tray is toward the back of the scanner. Close the scanner cover. 10. Start Epson Scan and select Professional Mode as the Document Type. 37 Select Film (with Film Holder) as the mode setting. 11. 8. Do not block the window. 9.
Orient it on the scanner. Lift the fluid mount tray off the guide and place it so the narrow window of the tray is toward the back of the scanner. Close the scanner cover. 10. Start Epson Scan and select Professional Mode as the Document Type. 37 Select Film (with Film Holder) as the mode setting. 11. 8. Do not block the window. 9.
User Manual
Page 92
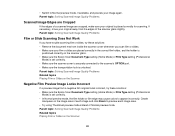
... Scanned Image Quality Problems Related topics Placing Film or Slides on the scanner glass. • Make sure the Epson Scan Document Type setting (Home Mode) or Film Type setting (Professional Mode) is set correctly. • In Normal preview mode, the film holder or film edge may cause colors to the scanner's... try these solutions: • Remove the document mat from the edges of a scanned image are placed correctly in the correct film holder, and the holder is positioned correctly on the Scanner 92 • Switch to preview each image and click Zoom to Normal preview mode, if ...
... Scanned Image Quality Problems Related topics Placing Film or Slides on the scanner glass. • Make sure the Epson Scan Document Type setting (Home Mode) or Film Type setting (Professional Mode) is set correctly. • In Normal preview mode, the film holder or film edge may cause colors to the scanner's... try these solutions: • Remove the document mat from the edges of a scanned image are placed correctly in the correct film holder, and the holder is positioned correctly on the Scanner 92 • Switch to preview each image and click Zoom to Normal preview mode, if ...
User Manual
Page 93
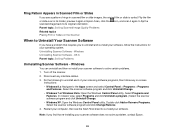
... following to uninstall each of rings in scanned film or slide images, the original film or slide is curled. Windows Uninstalling Scanner Software - Windows You can uninstall and then re-install your scanner software to its holder, preview it again in Epson Scan, click the icon, and scan it ...again to flip the scanned image back to solve certain problems. 1. Flip the film or slide over in its original orientation. Restart your computer, then...
... following to uninstall each of rings in scanned film or slide images, the original film or slide is curled. Windows Uninstalling Scanner Software - Windows You can uninstall and then re-install your scanner software to its holder, preview it again in Epson Scan, click the icon, and scan it ...again to flip the scanned image back to solve certain problems. 1. Flip the film or slide over in its original orientation. Restart your computer, then...

User Manual
Page 97
... frame 4800 dpi (main scan; optical resolution by 6 line CCD with Micro Step 25 to 12,800 dpi in film holders) 9600 dpi with 122,400 pixels) (for photos and film area guide) 6400 dpi (main scan; Maximum: 8.5 × 11.7 inches (216 × 297 mm); Display Color monitor with up to 6 frames ...at 6400 dpi Scanning area may be restricted if resolution setting is available only on a disk or in a partition that does not use UFS. Install Epson Scan on the Intel application. optical resolution by 6 line CCD with 113,280 pixels) (for OS X. US letter or A4 Transparencies: 35 mm...
... frame 4800 dpi (main scan; optical resolution by 6 line CCD with Micro Step 25 to 12,800 dpi in film holders) 9600 dpi with 122,400 pixels) (for photos and film area guide) 6400 dpi (main scan; Maximum: 8.5 × 11.7 inches (216 × 297 mm); Display Color monitor with up to 6 frames ...at 6400 dpi Scanning area may be restricted if resolution setting is available only on a disk or in a partition that does not use UFS. Install Epson Scan on the Intel application. optical resolution by 6 line CCD with 113,280 pixels) (for OS X. US letter or A4 Transparencies: 35 mm...


