User Manual
Page 3
Contents Perfection V800 Photo/V850 Pro User's Guide 7 Scanner Basics...8 Scanner Parts Locations ...8 Scanner Parts...8 Scanner Buttons and Lights...11 Changing the Power Off Setting ...11 Placing Originals ... 4 × 5 inch Film on the Scanner 25 Placing 35 mm Slides on the Scanner 28 Placing Film in the Film Area Guide 29 Epson Fluid Mount Option ...32 Using the Epson Fluid Mount Option 33 Replacing the Document Mat ...38 Scanning ...40 Starting a Scan...40 Starting a Scan from the Start Button 40 Changing...
Contents Perfection V800 Photo/V850 Pro User's Guide 7 Scanner Basics...8 Scanner Parts Locations ...8 Scanner Parts...8 Scanner Buttons and Lights...11 Changing the Power Off Setting ...11 Placing Originals ... 4 × 5 inch Film on the Scanner 25 Placing 35 mm Slides on the Scanner 28 Placing Film in the Film Area Guide 29 Epson Fluid Mount Option ...32 Using the Epson Fluid Mount Option 33 Replacing the Document Mat ...38 Scanning ...40 Starting a Scan...40 Starting a Scan from the Start Button 40 Changing...
User Manual
Page 4
...Professional Mode ...57 Available Image Types - Professional Mode 59 Available Image Adjustments - Scan to PDF Settings 76 Using the Scanner as You Scan 69 Removing Dust and Scratch Marks Using DIGITAL ICE Technology 70 DIGITAL ICE Technology Specifications 71 Scanning to a PDF File...73 Available Image Adjustments - Home... On or Turns Off Unexpectedly 85 Start Button Does Not Work as Expected 86 Scanning Software Does Not Operate Correctly 86 Cannot Start Epson Scan ...87 Scanning is Slow ...87 Solving Scanned Image Quality Problems 88 Image Consists of a Few Dots Only 89 Line of ...
...Professional Mode ...57 Available Image Types - Professional Mode 59 Available Image Adjustments - Scan to PDF Settings 76 Using the Scanner as You Scan 69 Removing Dust and Scratch Marks Using DIGITAL ICE Technology 70 DIGITAL ICE Technology Specifications 71 Scanning to a PDF File...73 Available Image Adjustments - Home... On or Turns Off Unexpectedly 85 Start Button Does Not Work as Expected 86 Scanning Software Does Not Operate Correctly 86 Cannot Start Epson Scan ...87 Scanning is Slow ...87 Solving Scanned Image Quality Problems 88 Image Consists of a Few Dots Only 89 Line of ...

User Manual
Page 6
A Note Concerning Responsible Use of Copyrighted Materials 105 Copyright Attribution ...105 6
A Note Concerning Responsible Use of Copyrighted Materials 105 Copyright Attribution ...105 6
User Manual
Page 11
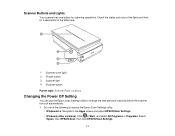
Scanner Buttons and Lights Your scanner has one of the following to access the Epson Scan Settings utility: • Windows 8.x: Navigate to change the time period of the lights and look for scanning operations. Do one button for a description ...Scanner Parts Locations Changing the Power Off Setting You can use the Epson Scan Settings utility to the Apps screen and select EPSON Scan Settings. • Windows (other versions): Click or Start, and select All Programs or Programs. Select Epson, then EPSON Scan, then click EPSON Scan Settings. 11 Check the status and color of inactivity...
Scanner Buttons and Lights Your scanner has one of the following to access the Epson Scan Settings utility: • Windows 8.x: Navigate to change the time period of the lights and look for scanning operations. Do one button for a description ...Scanner Parts Locations Changing the Power Off Setting You can use the Epson Scan Settings utility to the Apps screen and select EPSON Scan Settings. • Windows (other versions): Click or Start, and select All Programs or Programs. Select Epson, then EPSON Scan, then click EPSON Scan Settings. 11 Check the status and color of inactivity...

User Manual
Page 13
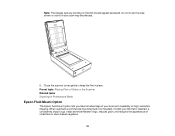
... glass for an extended period, or they may damage the scanner. Placing Originals on the Scanner Follow the instructions here to place your scanner or use its cover as a writing surface to avoid damaging it may stick to the glass. 13
... glass for an extended period, or they may damage the scanner. Placing Originals on the Scanner Follow the instructions here to place your scanner or use its cover as a writing surface to avoid damaging it may stick to the glass. 13
User Manual
Page 20
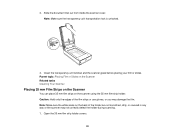
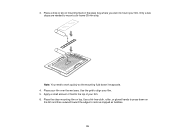
... transparency unit transportation lock is unlocked. 4. Slide the document mat out from inside the scanner cover. Note: Make sure the white areas on the scanner using the 35 mm film strip holder. Caution: Hold only the edges of the holder are not scratched, dirty, or covered in any way or the... Your Scanner Placing 35 mm Film Strips on the Scanner You can place 35 mm film strips on the back of the film strips or use gloves, or you may not correctly detect the holder during scanning. 1. Clean the transparency unit window and the scanner glass before placing your film or...
... transparency unit transportation lock is unlocked. 4. Slide the document mat out from inside the scanner cover. Note: Make sure the white areas on the scanner using the 35 mm film strip holder. Caution: Hold only the edges of the holder are not scratched, dirty, or covered in any way or the... Your Scanner Placing 35 mm Film Strips on the Scanner You can place 35 mm film strips on the back of the film strips or use gloves, or you may not correctly detect the holder during scanning. 1. Clean the transparency unit window and the scanner glass before placing your film or...
User Manual
Page 21
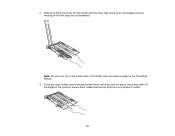
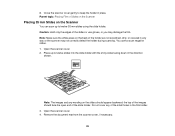
Close any open holder covers and press them . they click into the holder with the shiny side facing up to secure them down all the edges of the small holes in the Thumbnail feature. 3. Slide up so that images and any of the covers to three film strips into place. Also press down until they are used as guides in the holder; 2. Note: Do not cover any wording on the film strips are not pinched or curled. 21 Make sure the film strips are not backward.
Close any open holder covers and press them . they click into the holder with the shiny side facing up to secure them down all the edges of the small holes in the Thumbnail feature. 3. Slide up so that images and any of the covers to three film strips into place. Also press down until they are used as guides in the holder; 2. Note: Do not cover any wording on the film strips are not pinched or curled. 21 Make sure the film strips are not backward.
User Manual
Page 23
... entire image frame is positioned in place. 8. Make sure the white areas on the back of the film strips or use Full Auto Mode when scanning medium format film. Note: You cannot use gloves, or you may not correctly detect the holder during scanning. 1. Caution: Hold only the edges of the holder... and any of the small holes in any way or the scanner may damage the film. Note: Do not cover any wording on the scanner using the medium format film holder. Open the medium format film holder cover. 2.
... entire image frame is positioned in place. 8. Make sure the white areas on the back of the film strips or use Full Auto Mode when scanning medium format film. Note: You cannot use gloves, or you may not correctly detect the holder during scanning. 1. Caution: Hold only the edges of the holder... and any of the small holes in any way or the scanner may damage the film. Note: Do not cover any wording on the scanner using the medium format film holder. Open the medium format film holder cover. 2.
User Manual
Page 25
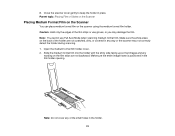
... Film on the Scanner You can place 4 × 5 inch film on the scanner. 8. Align the arrows on the holder with the arrows on the scanner using the 4 × 5 inch film holder. Close the scanner cover gently to keep the holder in any way or the scanner may damage the film. Caution... on the scanner glass as shown. Open the 4 × 5 inch film holder cover. 25 Place the holder on the back of the film strips or use gloves, or you may not correctly detect the holder during scanning. 1. 7.
... Film on the Scanner You can place 4 × 5 inch film on the scanner. 8. Align the arrows on the holder with the arrows on the scanner using the 4 × 5 inch film holder. Close the scanner cover gently to keep the holder in any way or the scanner may damage the film. Caution... on the scanner glass as shown. Open the 4 × 5 inch film holder cover. 25 Place the holder on the back of the film strips or use gloves, or you may not correctly detect the holder during scanning. 1. 7.
User Manual
Page 28
... slide holder. the top of the images should appear backward; Do not cover any of the slides or use gloves, or you may not correctly detect the holder during scanning. Remove the document mat from the scanner cover, if necessary. 28 Note: Make sure ...
... slide holder. the top of the images should appear backward; Do not cover any of the slides or use gloves, or you may not correctly detect the holder during scanning. Remove the document mat from the scanner cover, if necessary. 28 Note: Make sure ...

User Manual
Page 29
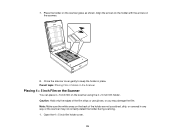
... the scanner cover gently to 8 × 10 inch (203 × 254 mm) using the film area guide. If you may damage the film. Parent topic: Placing Film or Slides on the scanner. 6. Scan using Epson Scan Professional Mode and select Film (with Film Area Guide) as shown. Note: You ...cannot use DIGITAL ICE Technology when using the film area guide. Align the arrows on the holder with the film area guide....
... the scanner cover gently to 8 × 10 inch (203 × 254 mm) using the film area guide. If you may damage the film. Parent topic: Placing Film or Slides on the scanner. 6. Scan using Epson Scan Professional Mode and select Film (with Film Area Guide) as shown. Note: You ...cannot use DIGITAL ICE Technology when using the film area guide. Align the arrows on the holder with the film area guide....
User Manual
Page 32
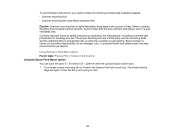
When used with a commercial mounting fluid (not included), it holds your film flat to keep the film in your scanner's capability for high-resolution imaging. Parent topic: ... sharp focus, helps eliminate Newton rings, reduces grain, and reduces the appearance of scratches on the Scanner Related tasks Scanning in Professional Mode Epson Fluid Mount Option The Epson fluid mount option lets you take full advantage of your scan may be affected. 5. Do not cover the area shown or colors in...
When used with a commercial mounting fluid (not included), it holds your film flat to keep the film in your scanner's capability for high-resolution imaging. Parent topic: ... sharp focus, helps eliminate Newton rings, reduces grain, and reduces the appearance of scratches on the Scanner Related tasks Scanning in Professional Mode Epson Fluid Mount Option The Epson fluid mount option lets you take full advantage of your scan may be affected. 5. Do not cover the area shown or colors in...
User Manual
Page 33
... risks is highly flammable; Mounting fluid contains harmful solvents. Epson makes no claims nor assumes responsibility for handling and use. Using the Epson Fluid Mount Option Parent topic: Placing Film or Slides on the Scanner Using the Epson Fluid Mount Option You can scan film up to fit... 229 mm) with the eyes and skin and always work in a wellventilated area. Avoid contact with the optional Epson fluid mount. 1. keep away from the use thereof. To use the Epson fluid mount, you 're going to obtain the following commercially available supplies: • Scanner mounting fluid •...
... risks is highly flammable; Mounting fluid contains harmful solvents. Epson makes no claims nor assumes responsibility for handling and use. Using the Epson Fluid Mount Option Parent topic: Placing Film or Slides on the Scanner Using the Epson Fluid Mount Option You can scan film up to fit... 229 mm) with the eyes and skin and always work in a wellventilated area. Avoid contact with the optional Epson fluid mount. 1. keep away from the use thereof. To use the Epson fluid mount, you 're going to obtain the following commercially available supplies: • Scanner mounting fluid •...
User Manual
Page 34
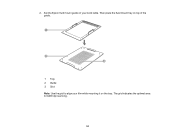
Then place the fluid mount tray on the tray. The grid indicates the optimal area for 6400 dpi scanning. 34 Set the Epson fluid mount guide on your film while mounting it on top of the guide. 1 Tray 2 Guide 3 Grid Note: Use the grid to align your work table. 2.
Then place the fluid mount tray on the tray. The grid indicates the optimal area for 6400 dpi scanning. 34 Set the Epson fluid mount guide on your film while mounting it on top of the guide. 1 Tray 2 Guide 3 Grid Note: Use the grid to align your work table. 2.
User Manual
Page 35
Note: You need to remove trapped air bubbles. 35 Apply a small amount of fluid to the top of mounting fluid on the glass tray where you want to mount your film. 5. Place your film. 6. Place the clear mounting film on the film and then outward toward the edges to work quickly so the mounting fluid doesn't evaporate. 4. Use a lint-free cloth, roller, or gloved hands to press down on top. Only a few drops are needed to align your film. Use the grid to mount a six-frame 35-mm strip. 3. Place a drop or two of your film over the wet area.
Note: You need to remove trapped air bubbles. 35 Apply a small amount of fluid to the top of mounting fluid on the glass tray where you want to mount your film. 5. Place your film. 6. Place the clear mounting film on the film and then outward toward the edges to work quickly so the mounting fluid doesn't evaporate. 4. Use a lint-free cloth, roller, or gloved hands to press down on top. Only a few drops are needed to align your film. Use the grid to mount a six-frame 35-mm strip. 3. Place a drop or two of your film over the wet area.

User Manual
Page 38
Parent topic: Epson Fluid Mount Option Related references Available Image Adjustments - Note: You can select up to select only the image itself and not the surrounding area. Select the scan area for each photo individually, being careful to 6400 dpi for the best image quality. 13. Click the Preview button to use. Open...
Parent topic: Epson Fluid Mount Option Related references Available Image Adjustments - Note: You can select up to select only the image itself and not the surrounding area. Select the scan area for each photo individually, being careful to 6400 dpi for the best image quality. 13. Click the Preview button to use. Open...
User Manual
Page 40
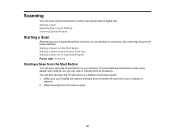
...but you installed the scanner software and connected the scanner to your product for scanning, start scanning using the start button to a different scanning program. 1. Starting a Scan Selecting Epson Scan Settings Scanning Special Projects Starting a Scan After placing your original documents or photos on your... Scanning You can also reassign the start button on the scanner glass. 40 Starting a Scan from the Start Button Starting a Scan Using the Epson Scan Icon Starting a Scan from a Scanning Program Parent topic: Scanning Starting a Scan from the Start Button You can view or change...
...but you installed the scanner software and connected the scanner to your product for scanning, start scanning using the start button to a different scanning program. 1. Starting a Scan Selecting Epson Scan Settings Scanning Special Projects Starting a Scan After placing your original documents or photos on your... Scanning You can also reassign the start button on the scanner glass. 40 Starting a Scan from the Start Button Starting a Scan Using the Epson Scan Icon Starting a Scan from a Scanning Program Parent topic: Scanning Starting a Scan from the Start Button You can view or change...
User Manual
Page 41
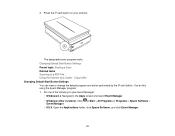
...8.x: Navigate to a PDF File Using the Scanner as a Copier - Changing Default Start Button Settings Parent topic: Starting a Scan Related tasks Scanning to the Apps screen and select Event Manager. • Windows (other versions): Click or Start > All Programs or Programs > Epson Software > Event Manager. •...Open the Applications folder, click Epson Software, and click Event Manager. 41 Copy Utility Changing Default Start Button Settings You can view or change the default program and action performed by the start button on your scanner. You do this using the Event Manager program. 1....
...8.x: Navigate to a PDF File Using the Scanner as a Copier - Changing Default Start Button Settings Parent topic: Starting a Scan Related tasks Scanning to the Apps screen and select Event Manager. • Windows (other versions): Click or Start > All Programs or Programs > Epson Software > Event Manager. •...Open the Applications folder, click Epson Software, and click Event Manager. 41 Copy Utility Changing Default Start Button Settings You can view or change the default program and action performed by the start button on your scanner. You do this using the Event Manager program. 1....
User Manual
Page 43
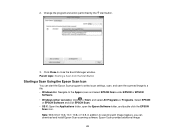
... or 10.9, in addition to scanning with Image Capture, you can start button. 3. Change the program and action performed by the start the Epson Scan program to select scan settings, scan, and save the scanned image to a file. • Windows 8.x: Navigate to close the Event ...: Starting a Scan from the Start Button Starting a Scan Using the Epson Scan Icon You can download and install Epson Scan scanning software. Epson Scan provides additional image 43 Click Close to the Apps screen and select EPSON Scan under EPSON or EPSON Software. • Windows (other versions): Click or Start,...
... or 10.9, in addition to scanning with Image Capture, you can start button. 3. Change the program and action performed by the start the Epson Scan program to select scan settings, scan, and save the scanned image to a file. • Windows 8.x: Navigate to close the Event ...: Starting a Scan from the Start Button Starting a Scan Using the Epson Scan Icon You can download and install Epson Scan scanning software. Epson Scan provides additional image 43 Click Close to the Apps screen and select EPSON Scan under EPSON or EPSON Software. • Windows (other versions): Click or Start,...
User Manual
Page 48
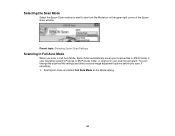
Start Epson Scan and select Full Auto Mode as the Mode setting. 48 Selecting the Scan Mode Select the Epson Scan mode you want to use from the Mode box in the upper right corner of the Epson Scan window: Parent topic: Selecting Epson Scan Settings Scanning in your scanning program. You can change the scanned file settings and select various image adjustment options before you scan in Full Auto Mode, Epson Scan automatically saves your scanned file in JPEG format in your operating system's Pictures or My Pictures folder, or opens it in Full Auto Mode When you scan, if necessary. 1.
Start Epson Scan and select Full Auto Mode as the Mode setting. 48 Selecting the Scan Mode Select the Epson Scan mode you want to use from the Mode box in the upper right corner of the Epson Scan window: Parent topic: Selecting Epson Scan Settings Scanning in your scanning program. You can change the scanned file settings and select various image adjustment options before you scan in Full Auto Mode, Epson Scan automatically saves your scanned file in JPEG format in your operating system's Pictures or My Pictures folder, or opens it in Full Auto Mode When you scan, if necessary. 1.


