
User Manual
Page 1
TM-U300C/U300D TM-U300PC/U300PD User's Manual 400204507
TM-U300C/U300D TM-U300PC/U300PD User's Manual 400204507
User Manual
Page 3
...accordance with the instruction manual, may cause harmful interference to operate the equipment. You are cautioned that are so labeled. (EMC is tested using the Epson power supplies.) Europe: CE marking North America: EMI: FCC/ICES-003 Class A Japan: EMI: VCCI Class A Oceania: EMC: AS/NZS ...a residential area is operated in which case the user will be required to this device. English EMC and Safety Standards Applied Printer Product Name: TM-U300C/D, TM-U300PC/PD Model Name: M51JC/D, M51PC/PD The following Directives and Norms: Directive 89/336/EEC EN 55022 Class B EN 55024 ...
...accordance with the instruction manual, may cause harmful interference to operate the equipment. You are cautioned that are so labeled. (EMC is tested using the Epson power supplies.) Europe: CE marking North America: EMI: FCC/ICES-003 Class A Japan: EMI: VCCI Class A Oceania: EMC: AS/NZS ...a residential area is operated in which case the user will be required to this device. English EMC and Safety Standards Applied Printer Product Name: TM-U300C/D, TM-U300PC/PD Model Name: M51JC/D, M51PC/PD The following Directives and Norms: Directive 89/336/EEC EN 55022 Class B EN 55024 ...

User Manual
Page 4
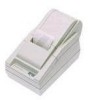
ii INTRODUCTION The TM-U300C-U300D and TM-U300PC/U300PD are as follows: Compact size and light weight High-speed printing using your new Epson printer. The main features of the printers are compact, light-weight printers, designed to provide the highest possible performance to read the instructions in this...X 9 or 9 X 9) Semi-automatic paper loading Compact AC adapter 1 line validation printing Roll paper take-up device (for the TM-U300C and the TM-U300PC) The table below describes the differences between the TM-U300C/U300D and TM-U300PC/U300PD printers. Please be sure to cost ratio.
ii INTRODUCTION The TM-U300C-U300D and TM-U300PC/U300PD are as follows: Compact size and light weight High-speed printing using your new Epson printer. The main features of the printers are compact, light-weight printers, designed to provide the highest possible performance to read the instructions in this...X 9 or 9 X 9) Semi-automatic paper loading Compact AC adapter 1 line validation printing Roll paper take-up device (for the TM-U300C and the TM-U300PC) The table below describes the differences between the TM-U300C/U300D and TM-U300PC/U300PD printers. Please be sure to cost ratio.
User Manual
Page 6
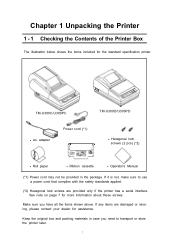
... The illustration below shows the items included for more information about these screws. If it is not, make sure to transport or store the printer later. 1 TM-U300C/U300PC TM-U300D/U300PD AC adapter Power cord (*1) Hexagonal lock screws (2 pcs) (*2) Roll paper Ribbon cassette Operator's Manual (*1) Power cord may not be provided in case...
... The illustration below shows the items included for more information about these screws. If it is not, make sure to transport or store the printer later. 1 TM-U300C/U300PC TM-U300D/U300PD AC adapter Power cord (*1) Hexagonal lock screws (2 pcs) (*2) Roll paper Ribbon cassette Operator's Manual (*1) Power cord may not be provided in case...
User Manual
Page 8
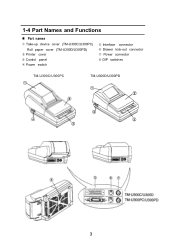
1-4 Part Names and Functions Part names ➀ Take-up device cover (TM-U300C/U300PC) Roll paper cover (TM-U300D/U300PD) ➁ Printer cover ➂ Control panel ➃ Power switch ➄ Interface connector ➅ Drawer kick-out connector ➆ Power connector ➇ DIP switches TM-U300C/U300PC TM-U300D/U300PD 3
1-4 Part Names and Functions Part names ➀ Take-up device cover (TM-U300C/U300PC) Roll paper cover (TM-U300D/U300PD) ➁ Printer cover ➂ Control panel ➃ Power switch ➄ Interface connector ➅ Drawer kick-out connector ➆ Power connector ➇ DIP switches TM-U300C/U300PC TM-U300D/U300PD 3

User Manual
Page 11
...type 6 Millimeter-type If you plan to use a drawer that matches the printer's specifications. ■ Connecting the host computer to the TM-U300C/U300D Connect the interface cable as follows: ➀ Turn off the printer and the host ECR (host computer). ➁ Plug the serial interface cable ...connector into the printer's interface connector: then tighten the screws on both sides of ...
...type 6 Millimeter-type If you plan to use a drawer that matches the printer's specifications. ■ Connecting the host computer to the TM-U300C/U300D Connect the interface cable as follows: ➀ Turn off the printer and the host ECR (host computer). ➁ Plug the serial interface cable ...connector into the printer's interface connector: then tighten the screws on both sides of ...

User Manual
Page 16
.... Correct Incorrect Incorrect ➁ Open the take-up device cover and remove the take-up spool from the printer. ➂ Load the paper roll while lightly pressing the left paper roll holder outward. Correct 11 Release the holder after fitting the roll paper core ... roll turns freely and be sure to load the paper roll so that it is perpendicular to use roll paper that it rotates in the TM-U300C/U300PC Be sure to the paper feed direction.
.... Correct Incorrect Incorrect ➁ Open the take-up device cover and remove the take-up spool from the printer. ➂ Load the paper roll while lightly pressing the left paper roll holder outward. Correct 11 Release the holder after fitting the roll paper core ... roll turns freely and be sure to load the paper roll so that it is perpendicular to use roll paper that it rotates in the TM-U300C/U300PC Be sure to the paper feed direction.
User Manual
Page 19
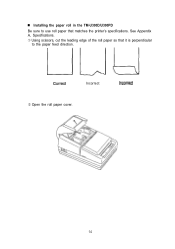
Incorrect ➁ Open the roll paper cover. 14 Installing the paper roll in the TM-U300D/U300PD Be sure to use roll paper that it is perpendicular to the paper feed direction. See Appendix A, Specifications. ➀ Using scissors, cut the leading edge of the roll paper so that matches the printer's specifications.
Incorrect ➁ Open the roll paper cover. 14 Installing the paper roll in the TM-U300D/U300PD Be sure to use roll paper that it is perpendicular to the paper feed direction. See Appendix A, Specifications. ➀ Using scissors, cut the leading edge of the roll paper so that matches the printer's specifications.

User Manual
Page 22
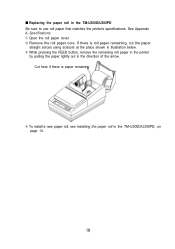
... remove the roll paper core. Cut here if there is roll paper remaining, cut the paper go- ing to use roll paper that matches the printer's specifications. If there is paper remaini ➃ To install a new paper roll, see Installing the paper roll in the direction of the arrow. ■... Replacing the roll paper for TM-U300C/U300PC Be sure to the take -up spool, using scissors at the place shown in illustration below. ➂ While pressing the FEED switch, remove the ...
... remove the roll paper core. Cut here if there is roll paper remaining, cut the paper go- ing to use roll paper that matches the printer's specifications. If there is paper remaini ➃ To install a new paper roll, see Installing the paper roll in the direction of the arrow. ■... Replacing the roll paper for TM-U300C/U300PC Be sure to the take -up spool, using scissors at the place shown in illustration below. ➂ While pressing the FEED switch, remove the ...
User Manual
Page 23
... scissors at the place shown in illustration below. ➂ While pressing the FEED button, remove the remaining roll paper in the printer by pulling the paper lightly out in the TM-U300D/U300PD, on page 14. If there is paper remainin ➃ To install a new paper roll, see Installing the paper ...roll in the direction of the arrow. ■ Replacing the paper roll in the TM-U300D/U300PD Be sure to use roll paper that matches the printer's specifications.
... scissors at the place shown in illustration below. ➂ While pressing the FEED button, remove the remaining roll paper in the printer by pulling the paper lightly out in the TM-U300D/U300PD, on page 14. If there is paper remainin ➃ To install a new paper roll, see Installing the paper ...roll in the direction of the arrow. ■ Replacing the paper roll in the TM-U300D/U300PD Be sure to use roll paper that matches the printer's specifications.
User Manual
Page 28
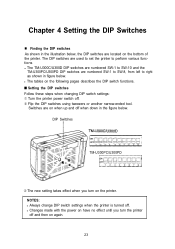
...DIP switches are located on again. 23 Switches are numbered SW-1 to SW-8, from left to SW-10 and the TM-U300PC/U300PD DIP switches are on the printer. NOTES: Always change DIP switch settings when the printer is turned off when down in figure below . The DIP switches are used to set the... printer to perform various functions The TM-U300C/U300D DIP switches are numbered SW-1 to right as shown in the figure below . Changes made with the power on have no effect until you turn the printer off . ➁ Flip the DIP switches using tweezers...
...DIP switches are located on again. 23 Switches are numbered SW-1 to SW-8, from left to SW-10 and the TM-U300PC/U300PD DIP switches are on the printer. NOTES: Always change DIP switch settings when the printer is turned off when down in figure below . The DIP switches are used to set the... printer to perform various functions The TM-U300C/U300D DIP switches are numbered SW-1 to right as shown in the figure below . Changes made with the power on have no effect until you turn the printer off . ➁ Flip the DIP switches using tweezers...

User Manual
Page 29
Baud Rate Selection 24 TM-U300C/U300D DIP Switch Functions Table 4-1. TM-U300C/U300D DIP Switch Functions Baud rate selection Refer to Table 4-2. *( ) Do not change the settings of DIP switches 9 and 10 on the TM-U300C/U300D Table 4-2.
Baud Rate Selection 24 TM-U300C/U300D DIP Switch Functions Table 4-1. TM-U300C/U300D DIP Switch Functions Baud rate selection Refer to Table 4-2. *( ) Do not change the settings of DIP switches 9 and 10 on the TM-U300C/U300D Table 4-2.

User Manual
Page 30
TM-U300PC/U300PD DIP Switch Functions Do not change the settings of DIP switches 3 through 6 on the TM-U300PC/U300PD. 25 TM-U300PC/U300PD DIP Switch Functions Table 4-3.
TM-U300PC/U300PD DIP Switch Functions Do not change the settings of DIP switches 3 through 6 on the TM-U300PC/U300PD. 25 TM-U300PC/U300PD DIP Switch Functions Table 4-3.
User Manual
Page 31
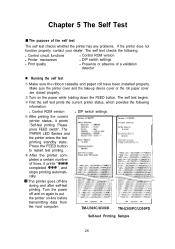
... the test printing standby state. pletes a certain number of lines, it prints "Self-test printing. TM-U300C/U300D TM-U300PC/U300PD Self-test Printing Sample 26 Make sure the printer cover and the take-up device cover or the roll paper cover are closed properly. ➁ Turn on again to restart test printing. ➄...
... the test printing standby state. pletes a certain number of lines, it prints "Self-test printing. TM-U300C/U300D TM-U300PC/U300PD Self-test Printing Sample 26 Make sure the printer cover and the take-up device cover or the roll paper cover are closed properly. ➁ Turn on again to restart test printing. ➄...
User Manual
Page 35
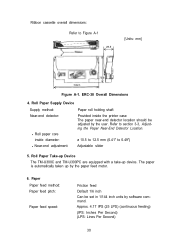
... holding shaft Near-end detector: Roll paper core inside diameter: Provided inside the printer case The paper near-end detector location should be set in 1/144 inch units by software command. Roll Paper Take-up Device The TM-U300C and TM-U300PC are equipped with a take-up by the user. Paper Paper feed method...
... holding shaft Near-end detector: Roll paper core inside diameter: Provided inside the printer case The paper near-end detector location should be set in 1/144 inch units by software command. Roll Paper Take-up Device The TM-U300C and TM-U300PC are equipped with a take-up by the user. Paper Paper feed method...

User Manual
Page 37
...DIP switch.) 8. Receive Buffer Either 40 bytes or approx. 1 Kbyte, selectable using DIP switch. (TM-U300PC/U300PD) (Refer to the life of 7.5 million lines. 32 MTBF: 180,000 hours ❏ Failure is... defined as Random Failure occurring at which the printer reaches the beginning of the Random Failure Period. MCBF: 18,000,000 lines ❏ This is ...500,000 lines Print head: 100 million characters (when printing an average of two dots/wire/character) ❏ End of Life is defined as the point at the time of the Wearout Period...
...DIP switch.) 8. Receive Buffer Either 40 bytes or approx. 1 Kbyte, selectable using DIP switch. (TM-U300PC/U300PD) (Refer to the life of 7.5 million lines. 32 MTBF: 180,000 hours ❏ Failure is... defined as Random Failure occurring at which the printer reaches the beginning of the Random Failure Period. MCBF: 18,000,000 lines ❏ This is ...500,000 lines Print head: 100 million characters (when printing an average of two dots/wire/character) ❏ End of Life is defined as the point at the time of the Wearout Period...
User Manual
Page 38
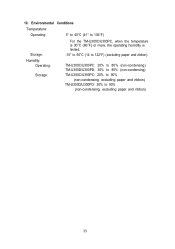
10. Environmental Conditions Temperature: Operating: 5° to 40°C (41° to 104°F) Storage: For the TM-U300C/U300PC, when the temperature is 30°C (86°F) or more, the operating humidity is limited. -10° to 50°C (14 to 122°F) (excluding paper and ribbon) Humidity: Operating: Storage: TM-U300C/U300PC: 20% to 80% (non-condensing) TM-U300D/U300PD: 30% to 85% (non-condensing) TM-U300C/U300PC: 20% to 90% (non-condensing, excluding paper and ribbon) TM-U300D/U300PD: 30% to 90% (non-condensing, excluding paper and ribbon) 33
10. Environmental Conditions Temperature: Operating: 5° to 40°C (41° to 104°F) Storage: For the TM-U300C/U300PC, when the temperature is 30°C (86°F) or more, the operating humidity is limited. -10° to 50°C (14 to 122°F) (excluding paper and ribbon) Humidity: Operating: Storage: TM-U300C/U300PC: 20% to 80% (non-condensing) TM-U300D/U300PD: 30% to 85% (non-condensing) TM-U300C/U300PC: 20% to 90% (non-condensing, excluding paper and ribbon) TM-U300D/U300PD: 30% to 90% (non-condensing, excluding paper and ribbon) 33


