Operation Guide
Page 10
... the Transportation Damper 1-2 Connecting the Printer to the Computer 1-2 TM-U295 1-3 TM-U295P 1-4 Connecting the Printer to the Drawer 1-5 Grounding the Printer 1-7 Connecting the Power Supply 1-8 Installing the Ribbon 1-9 Inserting Paper 1-12 Running the Self Test 1-13 Setting the DIP Switches 1-14 TM-U295 1-16 TM-U295P 1-17 Chapter 2 Using the Printer Buttons 2-1 Indicator Lights 2-1 Replacing a Used Ribbon 2-2 Chapter 3 Troubleshooting Power problems...
... the Transportation Damper 1-2 Connecting the Printer to the Computer 1-2 TM-U295 1-3 TM-U295P 1-4 Connecting the Printer to the Drawer 1-5 Grounding the Printer 1-7 Connecting the Power Supply 1-8 Installing the Ribbon 1-9 Inserting Paper 1-12 Running the Self Test 1-13 Setting the DIP Switches 1-14 TM-U295 1-16 TM-U295P 1-17 Chapter 2 Using the Printer Buttons 2-1 Indicator Lights 2-1 Replacing a Used Ribbon 2-2 Chapter 3 Troubleshooting Power problems...
Operation Guide
Page 12
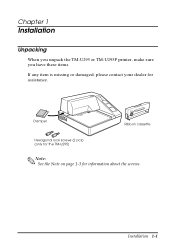
Chapter 1 Installation Unpacking When you unpack the TM-U295 or TM-U295P printer, make sure you have these items. If any item is missing or damaged, please contact your dealer for information about the screws. Damper Ribbon cassette Hexagonal lock screws (2 pcs) (only for the TM-U295) Note: See the Note on page 1-3 for assistance. Installation 1-1
Chapter 1 Installation Unpacking When you unpack the TM-U295 or TM-U295P printer, make sure you have these items. If any item is missing or damaged, please contact your dealer for information about the screws. Damper Ribbon cassette Hexagonal lock screws (2 pcs) (only for the TM-U295) Note: See the Note on page 1-3 for assistance. Installation 1-1
Operation Guide
Page 20
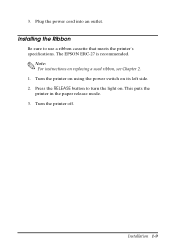
Plug the power cord into an outlet. The EPSON ERC-27 is recommended. This puts the printer in the paper release mode. 3. Note: For instructions on its left side. 2. Turn the printer on using the power switch on replacing a used ribbon, see Chapter 2. 1. Installation 1-9 Press the RELEASE button to use a ribbon cassette that meets the printer's specifications. Turn the printer off. 3. Installing the Ribbon Be sure to turn the light on.
Plug the power cord into an outlet. The EPSON ERC-27 is recommended. This puts the printer in the paper release mode. 3. Note: For instructions on its left side. 2. Turn the printer on using the power switch on replacing a used ribbon, see Chapter 2. 1. Installation 1-9 Press the RELEASE button to use a ribbon cassette that meets the printer's specifications. Turn the printer off. 3. Installing the Ribbon Be sure to turn the light on.
Operation Guide
Page 21
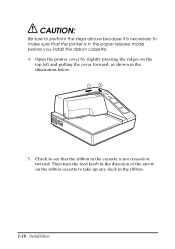
Open the printer cover by slightly pressing the ridges on the ribbon cassette to take up any slack in the illustration below. 5. Then turn the feed knob in the direction of the arrow on the top left and pulling the cover forward, as shown in the ribbon. 1-10 Installation Check to see that the printer is in the cassette is not creased or twisted. CAUTION: Be sure to perform the steps above because it is necessary to make sure that the ribbon in the paper release mode before you install the ribbon cassette. 4.
Open the printer cover by slightly pressing the ridges on the ribbon cassette to take up any slack in the illustration below. 5. Then turn the feed knob in the direction of the arrow on the top left and pulling the cover forward, as shown in the ribbon. 1-10 Installation Check to see that the printer is in the cassette is not creased or twisted. CAUTION: Be sure to perform the steps above because it is necessary to make sure that the ribbon in the paper release mode before you install the ribbon cassette. 4.

Operation Guide
Page 22
6. Notice exactly where the ribbon must go. 7. Installation 1-11 Carefully insert the ribbon cassette in the printer as shown in the illustration below. Then push firmly on the right side and then the left side of the ribbon cartridge until each side clicks into place.
6. Notice exactly where the ribbon must go. 7. Installation 1-11 Carefully insert the ribbon cassette in the printer as shown in the illustration below. Then push firmly on the right side and then the left side of the ribbon cartridge until each side clicks into place.
Operation Guide
Page 23
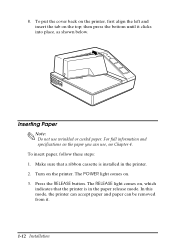
... follow these steps: 1. The RELEASE light comes on, which indicates that a ribbon cassette is in the printer. 2. The POWER light comes on the printer. 8. For full information and specifications on the top; Turn on . 3. In this mode, the printer can accept paper and paper can use wrinkled or curled paper. then press... the bottom until it . 1-12 Installation To put the cover back on the printer, first align the left and insert the tab on the paper you can be removed from it clicks into place, as shown below. Press...
... follow these steps: 1. The RELEASE light comes on, which indicates that a ribbon cassette is in the printer. 2. The POWER light comes on the printer. 8. For full information and specifications on the top; Turn on . 3. In this mode, the printer can accept paper and paper can use wrinkled or curled paper. then press... the bottom until it . 1-12 Installation To put the cover back on the printer, first align the left and insert the tab on the paper you can be removed from it clicks into place, as shown below. Press...

Operation Guide
Page 30
... error If this light blinks, turn it is not dark enough, it back on. This light blinks to replace the ribbon. First follow steps 1 through 4 in the "Installing the Ribbon" in Chapter 1. 2-2 Using the Printer If the light is in the paper release mode. Paper can be inserted only when the... printer is still blinking, contact a qualified service person. PAPER OUT This light is on when paper is not inserted or is in...
... error If this light blinks, turn it is not dark enough, it back on. This light blinks to replace the ribbon. First follow steps 1 through 4 in the "Installing the Ribbon" in Chapter 1. 2-2 Using the Printer If the light is in the paper release mode. Paper can be inserted only when the... printer is still blinking, contact a qualified service person. PAPER OUT This light is on when paper is not inserted or is in...

Operation Guide
Page 31
Then follow the rest of the steps in "Installing the Ribbon" in the illustration below. Using the Printer 2-3 Then remove the used ribbon by grasping the handle and pulling straight out, as shown by the arrow in Chapter 1.
Then follow the rest of the steps in "Installing the Ribbon" in the illustration below. Using the Printer 2-3 Then remove the used ribbon by grasping the handle and pulling straight out, as shown by the arrow in Chapter 1.
Operation Guide
Page 40
...°C (41° to 104°F) -10° to 50°C (14° to 122°F) (except for ribbon and paper) 30 to 85% (with no condensation) 30 to the EPSON TM-U295/U295P Specification for ribbon and paper) Interface Specifications Serial interface: RS-232 compatible Parallel interface: IEEE 1284 compatible (Nibble/Byte Modes) Note...
...°C (41° to 104°F) -10° to 50°C (14° to 122°F) (except for ribbon and paper) 30 to 85% (with no condensation) 30 to the EPSON TM-U295/U295P Specification for ribbon and paper) Interface Specifications Serial interface: RS-232 compatible Parallel interface: IEEE 1284 compatible (Nibble/Byte Modes) Note...


