

User Manual
Page 17
... parallel interface, squeeze the wire clips on the printer together until they lock in place on both sides of the cable connector. Connecting the Drawer WARNING: Use a drawer that matches the printer specifications. Note: Your printer has inch-type hexagonal lock screws installed. Using...damage the drawer as well as the printer. 2. Setting Up the Printer 1-3 If your interface cable requires millimeter-type screws, replace the inch-type screws with the enclosed millimeter-type screws using a hex screwdriver (5 mm). If the printer has a serial interface, tighten the screws on both...
... parallel interface, squeeze the wire clips on the printer together until they lock in place on both sides of the cable connector. Connecting the Drawer WARNING: Use a drawer that matches the printer specifications. Note: Your printer has inch-type hexagonal lock screws installed. Using...damage the drawer as well as the printer. 2. Setting Up the Printer 1-3 If your interface cable requires millimeter-type screws, replace the inch-type screws with the enclosed millimeter-type screws using a hex screwdriver (5 mm). If the printer has a serial interface, tighten the screws on both...
Technical Reference
Page 9
... 2-8 Serial Interface Connection 2-8 Parallel Interface Connection 2-11 USB Interface Connection 2-11 Ethernet Interface Connection 2-13 Connecting Power Supply Unit and Cash Drawer 2-15 Connecting the Power Supply Unit 2-15 Connecting the Drawer Kick-out Cable 2-16 Installing the Driver 2-16 Chapter 3 Application Development Information Introducing the Control Methods 3-1 Windows Driver (EPSON Advanced Printer Driver 3-1 EPSON...
... 2-8 Serial Interface Connection 2-8 Parallel Interface Connection 2-11 USB Interface Connection 2-11 Ethernet Interface Connection 2-13 Connecting Power Supply Unit and Cash Drawer 2-15 Connecting the Power Supply Unit 2-15 Connecting the Drawer Kick-out Cable 2-16 Installing the Driver 2-16 Chapter 3 Application Development Information Introducing the Control Methods 3-1 Windows Driver (EPSON Advanced Printer Driver 3-1 EPSON...
Technical Reference
Page 13
...printer model. 1.1 Product Structure 1.1.1 Model ❏ Product Name TM-T88III (current product)/TM-T88II (legacy product) • Print method: Thermal line printing • Interface specifications: Serial...10063; External power supply unit model: PS-180 (TM-T88III: packaged power supply) ❏ Power cable model: AC-170 for both printers.) • Model PS-180 (*1) (PS-180 ...TM-T88II printer, also is described only for legacy support. Chapter 1 Product Overview TM-T88II/T88III Technical Reference Guide The TM-T88III thermal printer product is currently available from EPSON.
...printer model. 1.1 Product Structure 1.1.1 Model ❏ Product Name TM-T88III (current product)/TM-T88II (legacy product) • Print method: Thermal line printing • Interface specifications: Serial...10063; External power supply unit model: PS-180 (TM-T88III: packaged power supply) ❏ Power cable model: AC-170 for both printers.) • Model PS-180 (*1) (PS-180 ...TM-T88II printer, also is described only for legacy support. Chapter 1 Product Overview TM-T88II/T88III Technical Reference Guide The TM-T88III thermal printer product is currently available from EPSON.
Technical Reference
Page 14
...11 pages including WPC 1252, PC866 [Cyrillic #2], PC852 [Latin2]) 8 pages Also can be used in serial communications (38400 bps, 2400 bps). Note: The driver cannot set a 38400 bps baud rate. Purchase ...cable may not come packaged with the driver will cause garbled characters (the printer does not support a 2400 bps baud rate). * For details on the conditions for canceling receive buffer BUSY state * 5. the TM-T88II. Driver (EPSON OPOS ADK, Advanced Printer Driver) 38400 is no longer being sold.) 1.1.4 Consumable products ❏ Specified paper: Thermal paper 1.1.5 TM-T88II/TM...
...11 pages including WPC 1252, PC866 [Cyrillic #2], PC852 [Latin2]) 8 pages Also can be used in serial communications (38400 bps, 2400 bps). Note: The driver cannot set a 38400 bps baud rate. Purchase ...cable may not come packaged with the driver will cause garbled characters (the printer does not support a 2400 bps baud rate). * For details on the conditions for canceling receive buffer BUSY state * 5. the TM-T88II. Driver (EPSON OPOS ADK, Advanced Printer Driver) 38400 is no longer being sold.) 1.1.4 Consumable products ❏ Specified paper: Thermal paper 1.1.5 TM-T88II/TM...
Technical Reference
Page 17
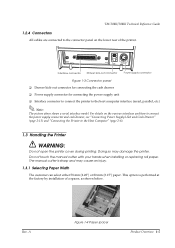
...cutter with your hands when installing or replacing roll paper. This option is sharp and may damage the printer. TM-T88II/T88III Technical Reference Guide 1.2.4 Connectors All cables are connected to the connector panel on the various interfaces and how to connect the power supply connector..., see "Connecting Power Supply Unit and Cash Drawer" (page 2-15) and "Connecting the Printer to the host computer interface (serial, parallel, etc.) Note: The picture above shows a serial interface model. FG FG DK DC24V Interface connector Drawer kick-out connector Power supply connector Figure ...
...cutter with your hands when installing or replacing roll paper. This option is sharp and may damage the printer. TM-T88II/T88III Technical Reference Guide 1.2.4 Connectors All cables are connected to the connector panel on the various interfaces and how to connect the power supply connector..., see "Connecting Power Supply Unit and Cash Drawer" (page 2-15) and "Connecting the Printer to the host computer interface (serial, parallel, etc.) Note: The picture above shows a serial interface model. FG FG DK DC24V Interface connector Drawer kick-out connector Power supply connector Figure ...

Technical Reference
Page 22
... foreign matter. ❏ Be sure to avoid bumping so that the printer is turned off . 2.1 Installing the Printer In addition to regular horizontal installation, the printer can be set on serial interface model printers. 2.2.1 DIP Switch Positions and Steps for Changing DIP Switch Settings Follow ...8226; Adjust of the power supply or other cables or other objects. 2.1.2 Precautions for the printer is not exposed to malfunction. 1. Otherwise, a short-circuit may cause the printer to strong impact during operation. ❏ Avoid placing the printer on top of near-end detector • ...
... foreign matter. ❏ Be sure to avoid bumping so that the printer is turned off . 2.1 Installing the Printer In addition to regular horizontal installation, the printer can be set on serial interface model printers. 2.2.1 DIP Switch Positions and Steps for Changing DIP Switch Settings Follow ...8226; Adjust of the power supply or other cables or other objects. 2.1.2 Precautions for the printer is not exposed to malfunction. 1. Otherwise, a short-circuit may cause the printer to strong impact during operation. ❏ Avoid placing the printer on top of near-end detector • ...
Technical Reference
Page 28
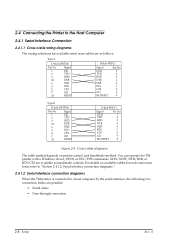
... are available as follows: Figure 2-4 Cross cable diagrams The cable needed depends on printer control and handshake method. 2.4 Connecting the Printer to the Host Computer 2.4.1 Serial Interface Connection 2.4.1.1 Cross cable wiring diagrams The wiring selections for each connection form, refer to "Section 2.4.1.2, Serial interface connection diagrams." 2.4.1.2 Serial interface connection diagrams When the TM printer is connected to a host computer by...
... are available as follows: Figure 2-4 Cross cable diagrams The cable needed depends on printer control and handshake method. 2.4 Connecting the Printer to the Host Computer 2.4.1 Serial Interface Connection 2.4.1.1 Cross cable wiring diagrams The wiring selections for each connection form, refer to "Section 2.4.1.2, Serial interface connection diagrams." 2.4.1.2 Serial interface connection diagrams When the TM printer is connected to a host computer by...

Technical Reference
Page 30
... the ground line to the host computer. 2-10 Setup FG FG DK DC24V Interface connector Drawer kick-out connector Figure 2-9 Printer connectors Power supply connector Rev. A 2.4.1.3 Connecting the serial interface (RS-232) cable WARNING: Be sure to replace the installed screws with hex-head screws with metric-threaded holes, also supplied. Insert the...
... the ground line to the host computer. 2-10 Setup FG FG DK DC24V Interface connector Drawer kick-out connector Figure 2-9 Printer connectors Power supply connector Rev. A 2.4.1.3 Connecting the serial interface (RS-232) cable WARNING: Be sure to replace the installed screws with hex-head screws with metric-threaded holes, also supplied. Insert the...
Technical Reference
Page 31
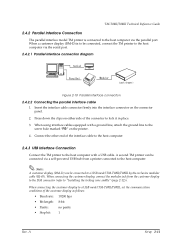
...-D) is connected to the host computer via the serial port. 2.4.2.1 Parallel interface connection diagram Figure 2-10 Parallel interface connection 2.4.2.2 Connecting the parallel interface cable 1. A Setup 2-11 TM-T88II/T88III Technical Reference Guide 2.4.2 Parallel Interface Connection The parallel interface model TM printer is to be connected, connect the TM printer to the host computer via the parallel port. When...
...-D) is connected to the host computer via the serial port. 2.4.2.1 Parallel interface connection diagram Figure 2-10 Parallel interface connection 2.4.2.2 Connecting the parallel interface cable 1. A Setup 2-11 TM-T88II/T88III Technical Reference Guide 2.4.2 Parallel Interface Connection The parallel interface model TM printer is to be connected, connect the TM printer to the host computer via the parallel port. When...
Technical Reference
Page 33
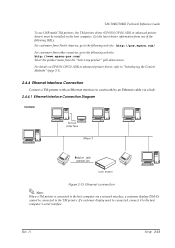
... the following web site: http://www.epson-pos.com/ Select the product name from the "Select any product" pull-down menu. Rev. TM-T88II/T88III Technical Reference Guide To use USB model TM printers, the TM printer driver (EPSON OPOS ADK or advanced printer driver) must be connected, connect it to the host computer's serial interface. For details on the...
... the following web site: http://www.epson-pos.com/ Select the product name from the "Select any product" pull-down menu. Rev. TM-T88II/T88III Technical Reference Guide To use USB model TM printers, the TM printer driver (EPSON OPOS ADK or advanced printer driver) must be connected, connect it to the host computer's serial interface. For details on the...
Technical Reference
Page 36
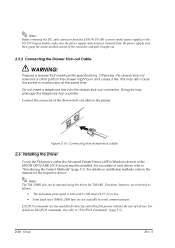
...commands are also available for directly controlling the printer without the user of the connector and pull straight out. 2.5.2 Connecting the Drawer Kick-out Cable WARNING: Prepare a drawer that meets printer specifications. Doing so may also cause the printer to the manual for TM-88II. For details on... is restricted to the printer. Do not insert a telephone line into the drawer kick-out connector. Figure 2-16 Connecting the drawer-kick cable 2.6 Installing the Driver To use the TM printer, either the Advanced Printer Driver (APD) (Windows driver) or the EPSON OPOS ADK (OCX driver...
...commands are also available for directly controlling the printer without the user of the connector and pull straight out. 2.5.2 Connecting the Drawer Kick-out Cable WARNING: Prepare a drawer that meets printer specifications. Doing so may also cause the printer to the manual for TM-88II. For details on... is restricted to the printer. Do not insert a telephone line into the drawer kick-out connector. Figure 2-16 Connecting the drawer-kick cable 2.6 Installing the Driver To use the TM printer, either the Advanced Printer Driver (APD) (Windows driver) or the EPSON OPOS ADK (OCX driver...
Technical Reference
Page 50
...procedure 1. Check the serial communication cable, and check the cable connector specifications. (See "Serial Interface Connection" on page 2-8.) 2. Serial communication conditions • ...Baud rate • Parity • Flow control • Data length You can occur when the handshake between the host computer and printer is not performed correctly. Setting communication conditions using the DIP switches. Check the serial communication conditions of the printer...
...procedure 1. Check the serial communication cable, and check the cable connector specifications. (See "Serial Interface Connection" on page 2-8.) 2. Serial communication conditions • ...Baud rate • Parity • Flow control • Data length You can occur when the handshake between the host computer and printer is not performed correctly. Setting communication conditions using the DIP switches. Check the serial communication conditions of the printer...


