
Quick Reference Guide
Page 3
S30670 2 Front - S50670 and S70670 3 Back 4 Loading Media 4 Using the Auto Take-up Reel 13 Cutting Off and Removing Prints 18 ...Feed Adjustment 21 Performing Auto Head Alignment 21 Cleaning the Media System 22 Checking and Cleaning the Print Head 23 Maintaining the Printer 23 Checking Ink Status 24 Replacing Ink Cartridges 25 Washing the Ink System 27 Cleaning the Print Head, Wiper, Caps,... Cleaner, and Flushing Pad 34 Ordering Supplies and Accessories 37 Where to Get Help 37 English Contents Printer Parts 2 Front - S50670 and S70670 3 Inside - S30670 2 Inside -
S30670 2 Front - S50670 and S70670 3 Back 4 Loading Media 4 Using the Auto Take-up Reel 13 Cutting Off and Removing Prints 18 ...Feed Adjustment 21 Performing Auto Head Alignment 21 Cleaning the Media System 22 Checking and Cleaning the Print Head 23 Maintaining the Printer 23 Checking Ink Status 24 Replacing Ink Cartridges 25 Washing the Ink System 27 Cleaning the Print Head, Wiper, Caps,... Cleaner, and Flushing Pad 34 Ordering Supplies and Accessories 37 Where to Get Help 37 English Contents Printer Parts 2 Front - S50670 and S70670 3 Inside - S30670 2 Inside -

Quick Reference Guide
Page 4
S30670 Left maintenance cover Front cover Control panel Media loading lever Right maintenance cover USB port After heater Tensioner LAN port AC inlets Cartridge check lights Lock levers Ink cartridges Roll locking screw Roll support Auto switch Vent Waste ink tube Waste ink tank Adjuster Manual switch Caster Inside - S30670 Print head in maintenance position Flushing pad Wiper Media holding plate Cutter Pressure groove rollers Platen heater Wiper cleaner Nozzle caps 2 | Printer Parts Printer Parts Front -
S30670 Left maintenance cover Front cover Control panel Media loading lever Right maintenance cover USB port After heater Tensioner LAN port AC inlets Cartridge check lights Lock levers Ink cartridges Roll locking screw Roll support Auto switch Vent Waste ink tube Waste ink tank Adjuster Manual switch Caster Inside - S30670 Print head in maintenance position Flushing pad Wiper Media holding plate Cutter Pressure groove rollers Platen heater Wiper cleaner Nozzle caps 2 | Printer Parts Printer Parts Front -

Quick Reference Guide
Page 6
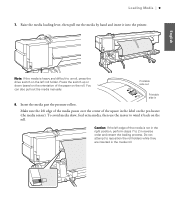
... media rolls may be careful to avoid creases and curling. 1. Caution: Load media immediately before printing to avoid burns. If you start, make sure the printer is turned on -screen User's Guide for loading and removing. Open the front cover and remove the media holding plates may require two people for...
... media rolls may be careful to avoid creases and curling. 1. Caution: Load media immediately before printing to avoid burns. If you start, make sure the printer is turned on -screen User's Guide for loading and removing. Open the front cover and remove the media holding plates may require two people for...

Quick Reference Guide
Page 7
At the back of the printer, loosen the roll locking screws and slide the roll holders apart. Note: If you don't see the right holder handle shaft, rotate the holder forward until it stops. Center the roll supports between the holders. English Loading Media | 5 2.
At the back of the printer, loosen the roll locking screws and slide the roll holders apart. Note: If you don't see the right holder handle shaft, rotate the holder forward until it stops. Center the roll supports between the holders. English Loading Media | 5 2.

Quick Reference Guide
Page 8
Orient the roll based on the printable side Printable side out Printable side in For the S50670/S70670, place the left edge is not in place, attach it as shown. If the label with black squares is aligned as described in For the S30670, place the media on the roll supports and make sure the left edge of the media in any of the black squares on the bar in back of the printer and the right edge on any of the printer. Orient the roll based on the back of the holes on the printable side Printable side out Printable side in the Setup Guide. 6 | Loading Media 3.
Orient the roll based on the printable side Printable side out Printable side in For the S50670/S70670, place the left edge is not in place, attach it as shown. If the label with black squares is aligned as described in For the S30670, place the media on the roll supports and make sure the left edge of the media in any of the black squares on the bar in back of the printer and the right edge on any of the printer. Orient the roll based on the back of the holes on the printable side Printable side out Printable side in the Setup Guide. 6 | Loading Media 3.
Quick Reference Guide
Page 11
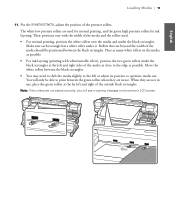
... media loading lever, then pull out the media by hand and insert it back on the roll. Do not attempt to wind it into the printer. Insert the media past the pressure rollers. Loading Media | 9 7.
... media loading lever, then pull out the media by hand and insert it back on the roll. Do not attempt to wind it into the printer. Insert the media past the pressure rollers. Loading Media | 9 7.

Quick Reference Guide
Page 12
Pull the media straight forward past the label on the right side of the after heater. 10 | Loading Media 9. Keep the right edge of the media parallel to the front of the after heater. Move to the scale markings on the left side of the printer, make sure the front cover is open, and grasp the media as shown. 10.
Pull the media straight forward past the label on the right side of the after heater. 10 | Loading Media 9. Keep the right edge of the media parallel to the front of the after heater. Move to the scale markings on the left side of the printer, make sure the front cover is open, and grasp the media as shown. 10.
Quick Reference Guide
Page 13
... in use, place the green rollers at the left and right of the media as close to the edge as many white rollers on the printer's LCD screen. Move the white rollers between the black rectangles. • You may need to shift the media slightly to the left or adjust its... between the green rollers when they are used . • For normal printing, position the white rollers over the media and under it. For the S50670/S70670, adjust the position of the media should be able to optimize media use . Make sure each rectangle has a white roller under the black rectangles. Place...
... in use, place the green rollers at the left and right of the media as close to the edge as many white rollers on the printer's LCD screen. Move the white rollers between the black rectangles. • You may need to shift the media slightly to the left or adjust its... between the green rollers when they are used . • For normal printing, position the white rollers over the media and under it. For the S50670/S70670, adjust the position of the media should be able to optimize media use . Make sure each rectangle has a white roller under the black rectangles. Place...
Quick Reference Guide
Page 20
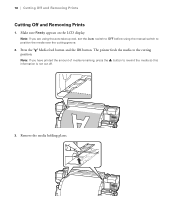
Note: If you have printed the amount of media remaining, press the u button to rewind the media so this information is not cut off. 3. The printer feeds the media to position the media over the cutting groove. 2. Make sure Ready appears on the LCD display. Press the Media feed button and the OK button. Remove the media holding plates. 18 | Cutting Off and Removing Prints Cutting Off and Removing Prints 1. Note: If you are using the auto take-up reel, set the Auto switch to OFF before using the manual switch to the cutting position.
Note: If you have printed the amount of media remaining, press the u button to rewind the media so this information is not cut off. 3. The printer feeds the media to position the media over the cutting groove. 2. Make sure Ready appears on the LCD display. Press the Media feed button and the OK button. Remove the media holding plates. 18 | Cutting Off and Removing Prints Cutting Off and Removing Prints 1. Note: If you are using the auto take-up reel, set the Auto switch to OFF before using the manual switch to the cutting position.

Quick Reference Guide
Page 21
... media and print: • Check the media packaging for print requirements. • Select a media bank number (1 to 30) and assign an alphanumeric name that the printer uses the optimum print quality settings, and is the most effective way to 30 types) and select the desired configuration whenever you print on your...
... media and print: • Check the media packaging for print requirements. • Select a media bank number (1 to 30) and assign an alphanumeric name that the printer uses the optimum print quality settings, and is the most effective way to 30 types) and select the desired configuration whenever you print on your...
Quick Reference Guide
Page 24
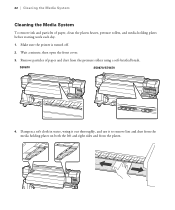
Remove particles of paper, clean the platen heater, pressure rollers, and media holding plates on both the left and right sides and from the platen. Wait a minute, then open the front cover. 3. S30670 S50670/S70670 4. Dampen a soft cloth in water, wring it out thoroughly, and use it to remove lint and dust from the media holding plates before starting work each day. 1. 22 | Cleaning the Media System Cleaning the Media System To remove ink and particles of paper and dust from the pressure rollers using a soft-bristled brush. Make sure the printer is turned off. 2.
Remove particles of paper, clean the platen heater, pressure rollers, and media holding plates on both the left and right sides and from the platen. Wait a minute, then open the front cover. 3. S30670 S50670/S70670 4. Dampen a soft cloth in water, wring it out thoroughly, and use it to remove lint and dust from the media holding plates before starting work each day. 1. 22 | Cleaning the Media System Cleaning the Media System To remove ink and particles of paper and dust from the pressure rollers using a soft-bristled brush. Make sure the printer is turned off. 2.
Quick Reference Guide
Page 25
...button. 2. If you cannot recover all nozzles by running the heaviest cleaning cycle, you need to be performed. Do not turn the printer off, or this maintenance will not be cleaned. 6. You can set up automatic cleaning cycles. 1. Cleaning not needed Clean the print ...head 4. Select a cleaning level and press OK. 8. For the S50670/S70670, the printer performs automatic maintenance to determine whether the head cleaning was successful. Select Nozzle Check and press OK. 3. Choose the nozzle arrays (...
...button. 2. If you cannot recover all nozzles by running the heaviest cleaning cycle, you need to be performed. Do not turn the printer off, or this maintenance will not be cleaned. 6. You can set up automatic cleaning cycles. 1. Cleaning not needed Clean the print ...head 4. Select a cleaning level and press OK. 8. For the S50670/S70670, the printer performs automatic maintenance to determine whether the head cleaning was successful. Select Nozzle Check and press OK. 3. Choose the nozzle arrays (...

Quick Reference Guide
Page 26
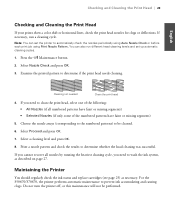
...The easiest way to check ink levels is from the control panel LCD display. S30670 Platen heater After heater temperature temperature Printer status messages Pre-heater temperature Platen gap Selected media Optional drying fan indicator Media width Media remaining Waste ink tank status ...Ink cartridge status S50670 Printer status messages Pre-heater temperature Platen gap Selected media Platen heater After heater temperature temperature High-speed drying fan status Media...
...The easiest way to check ink levels is from the control panel LCD display. S30670 Platen heater After heater temperature temperature Printer status messages Pre-heater temperature Platen gap Selected media Optional drying fan indicator Media width Media remaining Waste ink tank status ...Ink cartridge status S50670 Printer status messages Pre-heater temperature Platen gap Selected media Platen heater After heater temperature temperature High-speed drying fan status Media...

Quick Reference Guide
Page 29
... cannot recover nozzles by running the heaviest cleaning cycle, you need to clean them more maintenance kit supplies, you can order an Additional Printer Maintenance Kit. The washing process also requires you notice blurred ink or gaps in the same way as used only to clean the area... then reinstalling ink cartridges. Press the # Maintenance button. 2. Used ink cleaner should be disposed of ink consumed, you should be removed with the printer, you will need more often if you to prevent the print head from drying out. Note: If you cannot recover nozzles through normal head cleaning...
... cannot recover nozzles by running the heaviest cleaning cycle, you need to clean them more maintenance kit supplies, you can order an Additional Printer Maintenance Kit. The washing process also requires you notice blurred ink or gaps in the same way as used only to clean the area... then reinstalling ink cartridges. Press the # Maintenance button. 2. Used ink cleaner should be disposed of ink consumed, you should be removed with the printer, you will need more often if you to prevent the print head from drying out. Note: If you cannot recover nozzles through normal head cleaning...
Quick Reference Guide
Page 30
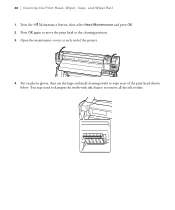
Press the # Maintenance button, then select Head Maintenance and press OK. 2. Press OK again to move the print head to wipe areas of the printer. 4. Put on plastic gloves, then use the large and small cleaning swabs to the cleaning position. 3. 28 | Cleaning the Print Head, Wiper, Caps, and Wiper Rail 1. Open the maintenance covers at each end of the print head shown below. You may need to dampen the swabs with ink cleaner to remove all the ink residue.
Press the # Maintenance button, then select Head Maintenance and press OK. 2. Press OK again to move the print head to wipe areas of the printer. 4. Put on plastic gloves, then use the large and small cleaning swabs to the cleaning position. 3. 28 | Cleaning the Print Head, Wiper, Caps, and Wiper Rail 1. Open the maintenance covers at each end of the print head shown below. You may need to dampen the swabs with ink cleaner to remove all the ink residue.

Quick Reference Guide
Page 31
...from your skin interfering with ink. Clean the front and back of the wiper (or wipers for the S50670/S70670) with your hands or swab. Cleaning the Print Head, Wiper, Caps, and Wiper Rail | 29 Ink ... the print head (shown below . You may damage the print head. Do not reuse a cleaning swab; S30670 S50670/S70670 English Sensors Sensors Head 1 Head 2 Caution: Do not touch the nozzle surface or any other internal part with a ...Do not let the cleaning swab touch any other part of the printer or it may need to dampen the swab with water or it may damage the print head. 5.
...from your skin interfering with ink. Clean the front and back of the wiper (or wipers for the S50670/S70670) with your hands or swab. Cleaning the Print Head, Wiper, Caps, and Wiper Rail | 29 Ink ... the print head (shown below . You may damage the print head. Do not reuse a cleaning swab; S30670 S50670/S70670 English Sensors Sensors Head 1 Head 2 Caution: Do not touch the nozzle surface or any other internal part with a ...Do not let the cleaning swab touch any other part of the printer or it may need to dampen the swab with water or it may damage the print head. 5.
Quick Reference Guide
Page 34
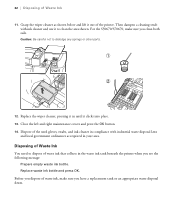
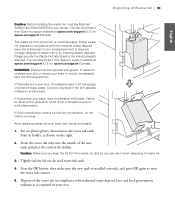
...in compliance with industrial waste disposal laws and local government ordinances as shown below and lift it to clean the area shown. Dispose of the printer. Grasp the wiper cleaner as required in until it in your area. Replace the wiper cleaner, pressing it clicks into place. 13. Caution:... Be careful not to dispose of Waste Ink You need to dislodge any springs or other parts. 12. For the S50670/S70670, make sure you have a replacement tank or an appropriate waste disposal drum. Replace waste ink bottle and press OK. Disposing of waste ink ...
...in compliance with industrial waste disposal laws and local government ordinances as shown below and lift it to clean the area shown. Dispose of the printer. Grasp the wiper cleaner as required in until it in your area. Replace the wiper cleaner, pressing it clicks into place. 13. Caution:... Be careful not to dispose of Waste Ink You need to dislodge any springs or other parts. 12. For the S50670/S70670, make sure you have a replacement tank or an appropriate waste disposal drum. Replace waste ink bottle and press OK. Disposing of waste ink ...
Quick Reference Guide
Page 35
...in compliance with industrial waste disposal laws and local government ordinances as shown on the right. 2. You can download it from the printer is discolored. Please provide the Waste Ink Data Sheet to an industrial waste disposer. Failure to reset the waste ink counter. 5.... seal the lid on plastic gloves, then remove the waste ink tank from Epson's support website at epson.com/support (U.S.) or epson.ca/support (Canada). The waste ink from Epson's support website at epson.com/support (U.S.) or epson.ca/support (Canada). Consult a physician if the skin appears irritated or is...
...in compliance with industrial waste disposal laws and local government ordinances as shown on the right. 2. You can download it from the printer is discolored. Please provide the Waste Ink Data Sheet to an industrial waste disposer. Failure to reset the waste ink counter. 5.... seal the lid on plastic gloves, then remove the waste ink tank from Epson's support website at epson.com/support (U.S.) or epson.ca/support (Canada). The waste ink from Epson's support website at epson.com/support (U.S.) or epson.ca/support (Canada). Consult a physician if the skin appears irritated or is...
Quick Reference Guide
Page 36
For the S50670/S70670, make sure you see dust from the media on your media or if you replace both wipers and wiper cleaners. Press the # Maintenance button, then select Head Maintenance and press OK. 2. You may need more flushing pads, purchase an Additional Printer Maintenance Kit. Press OK again ... head to replace it sooner if you notice ink smears on the front of the wiper cleaner starts to get stained with ink. Replace the printer's flushing pad every six months. Note: If you need to the cleaning position. 3. Open the right maintenance cover. 34 | Replacing the Wiper, Wiper...
For the S50670/S70670, make sure you see dust from the media on your media or if you replace both wipers and wiper cleaners. Press the # Maintenance button, then select Head Maintenance and press OK. 2. You may need more flushing pads, purchase an Additional Printer Maintenance Kit. Press OK again ... head to replace it sooner if you notice ink smears on the front of the wiper cleaner starts to get stained with ink. Replace the printer's flushing pad every six months. Note: If you need to the cleaning position. 3. Open the right maintenance cover. 34 | Replacing the Wiper, Wiper...

Quick Reference Guide
Page 37
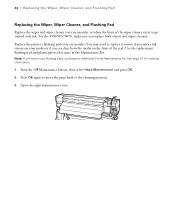
English Replacing the Wiper, Wiper Cleaner, and Flushing Pad | 35 4. Insert a new wiper cleaner and press it down until it clicks into place. 5. Then insert a new wiper and press it down until it clicks into place. Put on plastic gloves, then grasp the wiper cleaner as shown and lift it out of the printer. Tilt the wiper to the left and lift it out of the printer.
English Replacing the Wiper, Wiper Cleaner, and Flushing Pad | 35 4. Insert a new wiper cleaner and press it down until it clicks into place. 5. Then insert a new wiper and press it down until it clicks into place. Put on plastic gloves, then grasp the wiper cleaner as shown and lift it out of the printer. Tilt the wiper to the left and lift it out of the printer.


