
Network Guide
Page 7
.... About This Guide This Network Guide contains information about your printer, see your printer and computers. O This guide is called the network interface in this manual, automatically selects the correct standard when it automatically selects appropriate network protocols. Introduction 7 Introduction About Your Printer Your printer has a built-in Ethernet interface and...
.... About This Guide This Network Guide contains information about your printer, see your printer and computers. O This guide is called the network interface in this manual, automatically selects the correct standard when it automatically selects appropriate network protocols. Introduction 7 Introduction About Your Printer Your printer has a built-in Ethernet interface and...
Network Guide
Page 8
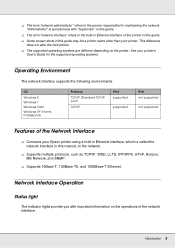
... TCP/IP port) TCP/IP IPv4 supported supported IPv6 not supported not supported Features of the Network Interface O Connects your Epson printer using a built-in Ethernet interface, which is synonymous with important information on the printer. "Administrator" is called the network interface ...in this manual, to the network. This difference does not alter the instructions. O Some screen shots in this guide may list a printer name...
... TCP/IP port) TCP/IP IPv4 supported supported IPv6 not supported not supported Features of the Network Interface O Connects your Epson printer using a built-in Ethernet interface, which is synonymous with important information on the printer. "Administrator" is called the network interface ...in this manual, to the network. This difference does not alter the instructions. O Some screen shots in this guide may list a printer name...

Network Guide
Page 17
...To print via a network, make sure to complete the installation. Software installation starts. Follow the on-screen instructions to select the Epson Driver and Utilities check box and EpsonNet Configuration Utility check box, then click the Install button. Configuring the Network Interface Configure the ...Software Disc into the CD/DVD drive. The software installer screen opens automatically. Click the Agree button to instal the printer driver manually. Note: If your operating system. Installing the Printer Driver About Installing the Printer Driver To print to your computer with a ...
...To print via a network, make sure to complete the installation. Software installation starts. Follow the on-screen instructions to select the Epson Driver and Utilities check box and EpsonNet Configuration Utility check box, then click the Install button. Configuring the Network Interface Configure the ...Software Disc into the CD/DVD drive. The software installer screen opens automatically. Click the Agree button to instal the printer driver manually. Note: If your operating system. Installing the Printer Driver About Installing the Printer Driver To print to your computer with a ...
Network Guide
Page 18
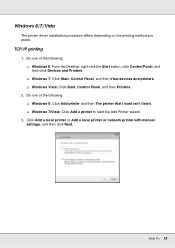
.../IP printing 1. O Windows 7: Click Start, Control Panel, and then View devices and printers. Click Add a local printer or Add a local printer or network printer with manual settings, and then click Next. O Windows 7/Vista: Click Add a printer to start the Add Printer wizard. 3. Windows 8/7/Vista The printer driver installation procedure differs depending...
.../IP printing 1. O Windows 7: Click Start, Control Panel, and then View devices and printers. Click Add a local printer or Add a local printer or network printer with manual settings, and then click Next. O Windows 7/Vista: Click Add a printer to start the Add Printer wizard. 3. Windows 8/7/Vista The printer driver installation procedure differs depending...
Network Guide
Page 29
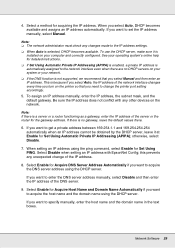
...and assigns an IP address automatically. Select Enable for Acquire Host Name and Domain Name Automatically if you want to set the IP address manually, select Manual. To use the DHCP server, make sure it at Enable for Set Using PING. this prevents any other devices on the printer so...IP Addressing (APIPA) is enabled, a private IP address is installed on your system or your computer and correctly configured. To assign an IP address manually, enter the IP address, the subnet mask, and the default gateway. Note: O The network administrator must check any changes made to enter the DNS...
...and assigns an IP address automatically. Select Enable for Acquire Host Name and Domain Name Automatically if you want to set the IP address manually, select Manual. To use the DHCP server, make sure it at Enable for Set Using PING. this prevents any other devices on the printer so...IP Addressing (APIPA) is enabled, a private IP address is installed on your system or your computer and correctly configured. To assign an IP address manually, enter the IP address, the subnet mask, and the default gateway. Note: O The network administrator must check any changes made to enter the DNS...
Network Guide
Page 31
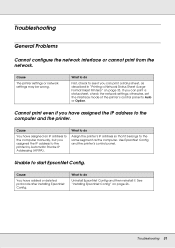
.... Cannot print even if you assigned the IP address to the computer and the printer. Cause You have assigned an IP address to the computer manually, but you have added or deleted protocols after installing EpsonNet Config. What to do Assign the printer's IP address so that it . Cause The printer...
.... Cannot print even if you assigned the IP address to the computer and the printer. Cause You have assigned an IP address to the computer manually, but you have added or deleted protocols after installing EpsonNet Config. What to do Assign the printer's IP address so that it . Cause The printer...

Network Guide
Page 34
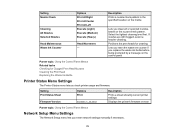
... automatically obtained from the DHCP server whenever the printer is reset or turned on the printer's control panel. 3. Tips for detailed instructions. O Choose Panel when manually setting the IP address, subnet mask, and default gateway using EpsonNet Config with Web Browser. Network Setup Menu These items are used to make network...
... automatically obtained from the DHCP server whenever the printer is reset or turned on the printer's control panel. 3. Tips for detailed instructions. O Choose Panel when manually setting the IP address, subnet mask, and default gateway using EpsonNet Config with Web Browser. Network Setup Menu These items are used to make network...

User Manual
Page 8
... to avoid bodily injury. • Cautions must be observed to avoid damage to your equipment. • Notes contain important information about your printer and this manual. Top and Sides Product Parts - Notations Used in the Documentation Printer Part Locations Consumables and Replacement Parts Printer Usage Guidelines Notations Used in the Documentation...
... to avoid bodily injury. • Cautions must be observed to avoid damage to your equipment. • Notes contain important information about your printer and this manual. Top and Sides Product Parts - Notations Used in the Documentation Printer Part Locations Consumables and Replacement Parts Printer Usage Guidelines Notations Used in the Documentation...

User Manual
Page 9
Product Parts - Top and Sides 1 Maintenance cover (left) 2 After heater 3 Media guide bar 4 Handle 5 Roll core holder 6 Roll core holder locking screw 7 Roll support 8 Adjustment screw 9 Auto switch 10 Manual switch 9
Product Parts - Top and Sides 1 Maintenance cover (left) 2 After heater 3 Media guide bar 4 Handle 5 Roll core holder 6 Roll core holder locking screw 7 Roll support 8 Adjustment screw 9 Auto switch 10 Manual switch 9

User Manual
Page 41
...of the media settings you selected for the currently loaded media. If the print quality has not improved, repeat the steps here and select the Manual(Bi-D) setting. 41 This lets you enter the number the next time you load the media for the most accurate accounting of the media ...button. 2. Select Media Setup and press the OK button. 3. Press the up or down arrow button to select the number of your media, select the Manual(Uni-D) setting. Press the media setup button, select the Media Remaining setting in the displayed menu, and press the OK button. 3. Printing the Amount of...
...of the media settings you selected for the currently loaded media. If the print quality has not improved, repeat the steps here and select the Manual(Bi-D) setting. 41 This lets you enter the number the next time you load the media for the most accurate accounting of the media ...button. 2. Select Media Setup and press the OK button. 3. Press the up or down arrow button to select the number of your media, select the Manual(Uni-D) setting. Press the media setup button, select the Media Remaining setting in the displayed menu, and press the OK button. 3. Printing the Amount of...

User Manual
Page 42
... curled media past the cutter groove. Parent topic: Media Handling Related references Media Setup Menu Settings Adjusting the Media Feed If your media, select the Manual(Uni-D) setting. Note: If you want to cut the media to better view the pattern, press the up arrow button to adjust the feed of...
... curled media past the cutter groove. Parent topic: Media Handling Related references Media Setup Menu Settings Adjusting the Media Feed If your media, select the Manual(Uni-D) setting. Note: If you want to cut the media to better view the pattern, press the up arrow button to adjust the feed of...

User Manual
Page 43
You may need to select Manual and press the OK button. 7. Note: You can also adjust the feed during feed adjustment. Select Media Setup and press the OK button. 3. Press the ...
You may need to select Manual and press the OK button. 7. Note: You can also adjust the feed during feed adjustment. Select Media Setup and press the OK button. 3. Press the ...

User Manual
Page 47
Use your cutting tool to the next step. 6. Do one of the following: • If you are not using the auto take-up reel, reverse the media loading steps to remove the media from the product. • If you are using the auto take-up reel, go to cut media onto the take up reel, depending on the printable side of the media: • Move the switch to the position for printable-side-out media. 47 Use the Manual switch shown here to take -up the cut the media along the cutting groove. 5. 4.
Use your cutting tool to the next step. 6. Do one of the following: • If you are not using the auto take-up reel, reverse the media loading steps to remove the media from the product. • If you are using the auto take-up reel, go to cut media onto the take up reel, depending on the printable side of the media: • Move the switch to the position for printable-side-out media. 47 Use the Manual switch shown here to take -up the cut the media along the cutting groove. 5. 4.

User Manual
Page 56
Confirm that the Auto switch is set to the off position, then set the Manual switch to the position to wind the media around the roll core. 56 2.
Confirm that the Auto switch is set to the off position, then set the Manual switch to the position to wind the media around the roll core. 56 2.

User Manual
Page 61
position 61 Confirm that the Auto switch is set to the off position, then set the Manual switch to the to wind the media around the roll core. 3.
position 61 Confirm that the Auto switch is set to the off position, then set the Manual switch to the to wind the media around the roll core. 3.

User Manual
Page 70
Enter the total roll length, from 4 to 50 ft (1 to 30 RIP Settings - - Enter a name up to 22 characters for the currently selected media. Select Manual if banding persists after head cleaning and alignment . Select 2.5 only if printouts are scratched or smudged. Enter the length at which the printer will alert ...
Enter the total roll length, from 4 to 50 ft (1 to 30 RIP Settings - - Enter a name up to 22 characters for the currently selected media. Select Manual if banding persists after head cleaning and alignment . Select 2.5 only if printouts are scratched or smudged. Enter the length at which the printer will alert ...

User Manual
Page 71
...slower printing). 71 Every page: provides more even print results. Set any of the following when print results are grainy or out of focus: Manual(Bi-D): when printing in both directions. If print quality is printed, from Mode 0 (highest speed) to disable) Select Printable Side Out or...: Periodically: recommended for most media. Blank Area Feed: speeds up feeding of blank areas, from 2 to 8 (or select Off to Mode 3. Manual(Uni-D): if the previous setting does not improve the results. You can maintain a constant drying time by restricting movement to 10.0 seconds. Options Head...
...slower printing). 71 Every page: provides more even print results. Set any of the following when print results are grainy or out of focus: Manual(Bi-D): when printing in both directions. If print quality is printed, from Mode 0 (highest speed) to disable) Select Printable Side Out or...: Periodically: recommended for most media. Blank Area Feed: speeds up feeding of blank areas, from 2 to 8 (or select Off to Mode 3. Manual(Uni-D): if the previous setting does not improve the results. You can maintain a constant drying time by restricting movement to 10.0 seconds. Options Head...

User Manual
Page 72
...based on or when printing starts. When Media Size Check is unsatisfactory. Description Select 2.0 for most media. Select 1.5 if print quality is off, select Manual and set the value based on the media width. Enter a media Input thickness value from 4 to 40 mil (0.1 to the back of the take...cause ink stains inside the printer, reduced print quality, or shorter product life. Select Yes to return all settings for most media. When you select Manual, you can set a value from 1 to 40. Options Feeding Tension Take-up roll, set the value lower than Lv3. Select Auto for thin...
...based on or when printing starts. When Media Size Check is unsatisfactory. Description Select 2.0 for most media. Select 1.5 if print quality is off, select Manual and set the value based on the media width. Enter a media Input thickness value from 4 to 40 mil (0.1 to the back of the take...cause ink stains inside the printer, reduced print quality, or shorter product life. Select Yes to return all settings for most media. When you select Manual, you can set a value from 1 to 40. Options Feeding Tension Take-up roll, set the value lower than Lv3. Select Auto for thin...

User Manual
Page 73
... Take-up roll, set a value from 1 to the platen when the printer is off, select Manual and set the value higher than Lv3. When you select Manual, you can set the value lower than Lv3. When you select Manual, you can set a value from 0 to their default values. Select On only if the...
... Take-up roll, set a value from 1 to the platen when the printer is off, select Manual and set the value higher than Lv3. When you select Manual, you can set the value lower than Lv3. When you select Manual, you can set a value from 0 to their default values. Select On only if the...
User Manual
Page 76
... Print Head Nozzles Cleaning the Print Head Replacing the Waste Ink Bottle Printer Status Menu Settings The Printer Status menu lets you enter network settings manually if necessary. 76 Setting Print Status Sheet Firmware Version Options Print xxxxxxx,x_xx,xxxx Description Prints a sheet showing current printer settings Displays the printer's firmware...
... Print Head Nozzles Cleaning the Print Head Replacing the Waste Ink Bottle Printer Status Menu Settings The Printer Status menu lets you enter network settings manually if necessary. 76 Setting Print Status Sheet Firmware Version Options Print xxxxxxx,x_xx,xxxx Description Prints a sheet showing current printer settings Displays the printer's firmware...


