
User's Guide
Page 5
... Display 19 1 Setting Up the Printer Unpacking and Assembling the Printer 21 Unpacking and Assembling the Stand 22 Unpacking the Printer and Mounting It on the Stand 25 Attaching the Paper Basket (Epson Stylus Pro 7700 27 Attaching the Paper Basket (Epson Stylus Pro 9700 34 Completing Setup and Connecting the Power Cord 42 Installing Ink 46 Connecting to...
... Display 19 1 Setting Up the Printer Unpacking and Assembling the Printer 21 Unpacking and Assembling the Stand 22 Unpacking the Printer and Mounting It on the Stand 25 Attaching the Paper Basket (Epson Stylus Pro 7700 27 Attaching the Paper Basket (Epson Stylus Pro 9700 34 Completing Setup and Connecting the Power Cord 42 Installing Ink 46 Connecting to...

User's Guide
Page 8
... Control Panel . . 154 Automatically Checking and Cleaning the Print Head 154 Running Cleaning Cycles 155 Aligning the Print Head 156 Replacing Ink Cartridges 157 Changing the Date and Time 161 Using Maintenance Mode 161 Replacing the Paper Cutter 162 Removing the Old Cutter 162 Installing the ...Cleaning the Printer 168 Transporting or Storing the Printer 170 Preparing the Printer for Shipment 170 Moving the Printer on the Stand 172 Setting Up the Printer After Transportation 173 7 Solving Problems Diagnosing Problems 175 Checking Error Messages and Lights 176 Auto Take-Up Reel ...
... Control Panel . . 154 Automatically Checking and Cleaning the Print Head 154 Running Cleaning Cycles 155 Aligning the Print Head 156 Replacing Ink Cartridges 157 Changing the Date and Time 161 Using Maintenance Mode 161 Replacing the Paper Cutter 162 Removing the Old Cutter 162 Installing the ...Cleaning the Printer 168 Transporting or Storing the Printer 170 Preparing the Printer for Shipment 170 Moving the Printer on the Stand 172 Setting Up the Printer After Transportation 173 7 Solving Problems Diagnosing Problems 175 Checking Error Messages and Lights 176 Auto Take-Up Reel ...
User's Guide
Page 9
... Environmental 195 Electrical 195 Dimensions and Weight 196 Printer Interfaces 196 Safety Approvals 196 Media 196 Roll Paper 196 Cut Sheets 198 Printable Area 201 Ink Cartridges 201 B Using the Optional Auto Take-Up Reel Loading Roll Paper Onto the Take-Up Reel 204 Winding Prints Forward 205 Winding Prints Backward 206... 208 Installing a Take-Up Reel Core 210 C Control Panel Summary Control Panel Buttons and Lights 213 Buttons 213 Lights 215 LCD Display Icons 216 Menu Setting Summary 217 Index 9
... Environmental 195 Electrical 195 Dimensions and Weight 196 Printer Interfaces 196 Safety Approvals 196 Media 196 Roll Paper 196 Cut Sheets 198 Printable Area 201 Ink Cartridges 201 B Using the Optional Auto Take-Up Reel Loading Roll Paper Onto the Take-Up Reel 204 Winding Prints Forward 205 Winding Prints Backward 206... 208 Installing a Take-Up Reel Core 210 C Control Panel Summary Control Panel Buttons and Lights 213 Buttons 213 Lights 215 LCD Display Icons 216 Menu Setting Summary 217 Index 9

User's Guide
Page 11
... keep it working at its best, and provides troubleshooting tips in case you use and printer maintenance-loading paper, replacing ink cartridges and other components, cleaning and aligning the print head, and using the printer's menu system. Cautions must be observed ... your printer to maintain your equipment. 11 Introduction This User's Guide provides important information on setting up and using your printer, loading paper, using the Epson printer drivers, and replacing ink cartridges. For additional information, see the following: • The Quick Reference Guide provides a handy...
... keep it working at its best, and provides troubleshooting tips in case you use and printer maintenance-loading paper, replacing ink cartridges and other components, cleaning and aligning the print head, and using the printer's menu system. Cautions must be observed ... your printer to maintain your equipment. 11 Introduction This User's Guide provides important information on setting up and using your printer, loading paper, using the Epson printer drivers, and replacing ink cartridges. For additional information, see the following: • The Quick Reference Guide provides a handy...
User's Guide
Page 25
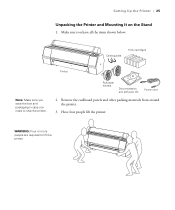
Setting Up the Printer | 25 Unpacking the Printer and Mounting It on the Stand 1. Remove the cardboard panels and other packing materials from around the printer. 3. Have four people lift the printer. Make sure you have all the items shown below: Cable guides 5 Ink cartridges Printer Note: Make sure you save the box and packaging in case you need to lift the printer. 25 WARNING: Four or more people are required to ship the printer. Roll paper holders Documentation and software CD Power cord 2.
Setting Up the Printer | 25 Unpacking the Printer and Mounting It on the Stand 1. Remove the cardboard panels and other packing materials from around the printer. 3. Have four people lift the printer. Make sure you have all the items shown below: Cable guides 5 Ink cartridges Printer Note: Make sure you save the box and packaging in case you need to lift the printer. 25 WARNING: Four or more people are required to ship the printer. Roll paper holders Documentation and software CD Power cord 2.
User's Guide
Page 46
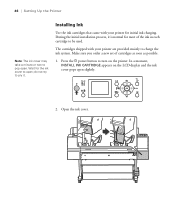
... a minute or two to pop open slightly. 2. Make sure you order a new set of the ink in each cartridge to be used. In a moment, INSTALL INK CARTRIDGE appears on the printer. Installing Ink Use the ink cartridges that came with your printer for initial ink charging. The cartridges shipped with your printer are provided mainly to pry it is normal...
... a minute or two to pop open slightly. 2. Make sure you order a new set of the ink in each cartridge to be used. In a moment, INSTALL INK CARTRIDGE appears on the printer. Installing Ink Use the ink cartridges that came with your printer for initial ink charging. The cartridges shipped with your printer are provided mainly to pry it is normal...
User's Guide
Page 47
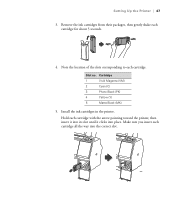
Remove the ink cartridges from their packages, then gently shake each cartridge with the arrow pointing toward the printer, then insert it into its slot until it clicks into the correct slot. 47 Slot no. Hold each cartridge for about 5 seconds. 4. Note the location of the slots corresponding to each cartridge all the way into place. Cartridge 1 Vivid Magenta (VM) 2 Cyan (C) 3 Photo Black (PK) 4 Yellow (Y) 5 Matte Black (MK) 5. Make sure you insert each cartridge. Setting Up the Printer | 47 3. Install the ink cartridges in the printer.
Remove the ink cartridges from their packages, then gently shake each cartridge with the arrow pointing toward the printer, then insert it into its slot until it clicks into the correct slot. 47 Slot no. Hold each cartridge for about 5 seconds. 4. Note the location of the slots corresponding to each cartridge all the way into place. Cartridge 1 Vivid Magenta (VM) 2 Cyan (C) 3 Photo Black (PK) 4 Yellow (Y) 5 Matte Black (MK) 5. Make sure you insert each cartridge. Setting Up the Printer | 47 3. Install the ink cartridges in the printer.

User's Guide
Page 149
...the control panel, you can check the amount of ink remaining, the total number of prints, and the status of printer settings. 149 Chapter 6: Maintaining and Transporting the Printer The Epson Stylus Pro 7700 and Pro 9700 require little maintenance to the features described in the next...routine procedures: • Checking printer status • Checking and cleaning the print head • Aligning the print head • Replacing ink cartridges • Changing the date and time • Performing additional maintenance tasks • Replacing the paper cutter blade • Replacing the ...
...the control panel, you can check the amount of ink remaining, the total number of prints, and the status of printer settings. 149 Chapter 6: Maintaining and Transporting the Printer The Epson Stylus Pro 7700 and Pro 9700 require little maintenance to the features described in the next...routine procedures: • Checking printer status • Checking and cleaning the print head • Aligning the print head • Replacing ink cartridges • Changing the date and time • Performing additional maintenance tasks • Replacing the paper cutter blade • Replacing the ...
User's Guide
Page 150
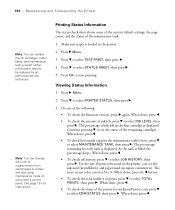
... check sheet shows some of the current default settings, the page count, and the status of the following: • To check the firmware version, press r again. Do one of the maintenance tank. 1. Continue pressing d to see the ink used (in milliliters) and paper used (in...the status of prints, press d to select TOTAL PRINTS, then press r. Press d to select MAINTENANCE TANK, then press r. Note: You can replace the ink cartridges, cutter blade, and maintenance tank yourself. Press r Menu. 3. Viewing Status Information 1. When done, press l. • To check how much capacity the...
... check sheet shows some of the current default settings, the page count, and the status of the following: • To check the firmware version, press r again. Do one of the maintenance tank. 1. Continue pressing d to see the ink used (in milliliters) and paper used (in...the status of prints, press d to select TOTAL PRINTS, then press r. Press d to select MAINTENANCE TANK, then press r. Note: You can replace the ink cartridges, cutter blade, and maintenance tank yourself. Press r Menu. 3. Viewing Status Information 1. When done, press l. • To check how much capacity the...

User's Guide
Page 158
...INK CARTRIDGE is displayed, the cartridge is expended. Make sure you are ready to replace it. When the light stays on images printed, print settings, paper type, frequency of the cartridge that you start, make sure the printer is turned on . You must replace the cartridge before you can purchase genuine Epson ink... and paper from an Epson Professional Imaging Authorized Reseller. ...
...INK CARTRIDGE is displayed, the cartridge is expended. Make sure you are ready to replace it. When the light stays on images printed, print settings, paper type, frequency of the cartridge that you start, make sure the printer is turned on . You must replace the cartridge before you can purchase genuine Epson ink... and paper from an Epson Professional Imaging Authorized Reseller. ...
User's Guide
Page 159
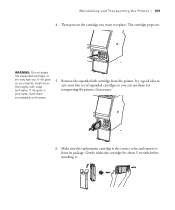
...set of expended cartridges so you want to replace. Maintaining and Transporting the Printer | 159 4. The cartridge pops out. Then press in your hands, wash them immediately with soap and water. Make sure the replacement cartridge is the correct color and remove it . 159 Remove the expended ink cartridge... from its package. Gently shake the cartridge for transporting the printer, if necessary. 6. If ink gets on your eyes, flush them thoroughly with water. 5. If ink gets in the cartridge you can use them for about 5 ...
...set of expended cartridges so you want to replace. Maintaining and Transporting the Printer | 159 4. The cartridge pops out. Then press in your hands, wash them immediately with soap and water. Make sure the replacement cartridge is the correct color and remove it . 159 Remove the expended ink cartridge... from its package. Gently shake the cartridge for transporting the printer, if necessary. 6. If ink gets on your eyes, flush them thoroughly with water. 5. If ink gets in the cartridge you can use them for about 5 ...
User's Guide
Page 177
... YES (RECOMMENDED) NO COMMAND ERROR CHECK DRIVER SETTINGS CUTTER UNIT NEARING END OF SERVICE LIFE. RECOMMEND REPLACING THE CUTTER UNIT FRONT COVER OPEN CLOSE FRONT COVER F/W INSTALL ERROR UPDATE FAILED RESTART THE PRINTER INK CARTRIDGE INK LOW REPLACE INK CARTRIDGE Explanation Response Head cleaning did not clear the ...see page 157. 177 If cleaning doesn't start, cancel printing from the computer. Front cover is not enough ink to perform cleaning. The ink cartridge is not enough space in the maintenance tank to the printer or the data has an incorrect command. Damaged...
... YES (RECOMMENDED) NO COMMAND ERROR CHECK DRIVER SETTINGS CUTTER UNIT NEARING END OF SERVICE LIFE. RECOMMEND REPLACING THE CUTTER UNIT FRONT COVER OPEN CLOSE FRONT COVER F/W INSTALL ERROR UPDATE FAILED RESTART THE PRINTER INK CARTRIDGE INK LOW REPLACE INK CARTRIDGE Explanation Response Head cleaning did not clear the ...see page 157. 177 If cleaning doesn't start, cancel printing from the computer. Front cover is not enough ink to perform cleaning. The ink cartridge is not enough space in the maintenance tank to the printer or the data has an incorrect command. Damaged...
User's Guide
Page 183
... standard (STD) when you 've created a custom paper configuration, be accurate.) Replace ink cartridges if necessary, as described on ink. (If you replace ink cartridges with the printer turned off the High Speed setting. Your print has vertical banding. See page 108 for overlapping dark lines. ◗ If you 're done ... and increase it . Solution ◗ Check the ink indicators and light to tune out banding. Check these suggestions help, try the solutions in the printer software is correct. ◗ If you're using a third-party RIP and non-Epson media, see if you are low on page 157...
... standard (STD) when you 've created a custom paper configuration, be accurate.) Replace ink cartridges if necessary, as described on ink. (If you replace ink cartridges with the printer turned off the High Speed setting. Your print has vertical banding. See page 108 for overlapping dark lines. ◗ If you 're done ... and increase it . Solution ◗ Check the ink indicators and light to tune out banding. Check these suggestions help, try the solutions in the printer software is correct. ◗ If you're using a third-party RIP and non-Epson media, see if you are low on page 157...
User's Guide
Page 184
.... see if you are low on ink. (If you replace ink cartridges with the printer turned off, the ink indicators will not be accurate.) Replace ink cartridges if necessary, as described on each of the ink cartridges. Check these settings: ◗ Make sure Paper Thickness setting is correct. ◗ If you ...'re using a third-party RIP or non-Epson media, custom color profiles will give you the best color reproduction. ◗ If you replace ink cartridges with the printer turned off, the ink indicators will not be sure to return the setting to standard (STD) when you 're using...
.... see if you are low on ink. (If you replace ink cartridges with the printer turned off, the ink indicators will not be accurate.) Replace ink cartridges if necessary, as described on each of the ink cartridges. Check these settings: ◗ Make sure Paper Thickness setting is correct. ◗ If you ...'re using a third-party RIP or non-Epson media, custom color profiles will give you the best color reproduction. ◗ If you replace ink cartridges with the printer turned off, the ink indicators will not be sure to return the setting to standard (STD) when you 're using...

User's Guide
Page 185
... menu system to change the setting to NARROW if printing on non-Epson media, you 're using cut sheet media, make sure PAPER SIZE CHECK is not correct for instructions. ◗ Run a nozzle check and cleaning cycle (see page 152). ◗ Check the ink indicators and light and replace ink cartridges if your paper. See...
... menu system to change the setting to NARROW if printing on non-Epson media, you 're using cut sheet media, make sure PAPER SIZE CHECK is not correct for instructions. ◗ Run a nozzle check and cleaning cycle (see page 152). ◗ Check the ink indicators and light and replace ink cartridges if your paper. See...
User's Guide
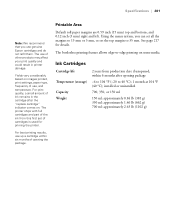
Page 201
... lb (662 g) 700 ml: approximately 2.43 lb (1102 g) 201 For print quality, a small amount of ink remains in printer damage. Ink Cartridges Cartridge life Temperature (storage) Capacity Weight 2 years from this first set the top margin to 35 mm. within six months of opening package -4 to 104 °F (-20 to ... you can set all the margins to 15 mm or 3 mm, or set of cartridges is used for details. Using the menu system, you use of other products may affect your print quality and could result in the cartridge after opening the package. The use genuine Epson cartridges and do not...
... lb (662 g) 700 ml: approximately 2.43 lb (1102 g) 201 For print quality, a small amount of ink remains in printer damage. Ink Cartridges Cartridge life Temperature (storage) Capacity Weight 2 years from this first set the top margin to 35 mm. within six months of opening package -4 to 104 °F (-20 to ... you can set all the margins to 15 mm or 3 mm, or set of cartridges is used for details. Using the menu system, you use of other products may affect your print quality and could result in the cartridge after opening the package. The use genuine Epson cartridges and do not...

User's Guide
Page 221
...OS X 10.6 & 10.5, 121 Windows, 96 Auto Rotate setting, Windows, 96 Automatic media tracking, 61 Automatic Take-Up Reel, optional ordering, 12 problems, 193 using, 203 to 210 B Banding, 183 Barcode, 61 Basket, paper SP 7700, 27 to 33 SP 9700, 34 to 42 Blank pages, 188 Blurry prints, 185 ... 221 Canceling print jobs Mac OS X 10.4, 138 Mac OS X 10.6 & 10.5, 125 Windows, 107 Cartridges, see Ink cartridges Checking printer status, 149 to 152 Cleaning print head, 152 to 156, 162 printer, 168 Coarse Rendering setting, 109 Color management Mac OS X 10.4, 132 to 133, 141 to 145 Mac OS X 10.6 & 10...
...OS X 10.6 & 10.5, 121 Windows, 96 Auto Rotate setting, Windows, 96 Automatic media tracking, 61 Automatic Take-Up Reel, optional ordering, 12 problems, 193 using, 203 to 210 B Banding, 183 Barcode, 61 Basket, paper SP 7700, 27 to 33 SP 9700, 34 to 42 Blank pages, 188 Blurry prints, 185 ... 221 Canceling print jobs Mac OS X 10.4, 138 Mac OS X 10.6 & 10.5, 125 Windows, 107 Cartridges, see Ink cartridges Checking printer status, 149 to 152 Cleaning print head, 152 to 156, 162 printer, 168 Coarse Rendering setting, 109 Color management Mac OS X 10.4, 132 to 133, 141 to 145 Mac OS X 10.6 & 10...

User's Guide
Page 222
...how to use, 11 E EDM status, checking, 150 Electrical specifications, 195 Energy consumption, 195 Environmental specifications, 195 ePlaten, 19, 213 to 215 Epson accessories, 12 help, 13 media, 57 to 59 EpsonNet Config, 52, 56 Error messages, 176 to 181 Error notification, Windows, 110 Ethernet ...Alignment menu, 157 Height of printer, 196 Help, Epson, 13 High Speed Copies setting, 108 High Speed setting Mac OS X 10.4, 131 Mac OS X 10.6 & 10.5, 118 Windows, 89 Humidity requirements, 195 I ICM setting, 93 Ink icons, 216 light, 19, 176, 215 Ink cartridges checking status, 107, 149 to 152, 157 to...
...how to use, 11 E EDM status, checking, 150 Electrical specifications, 195 Energy consumption, 195 Environmental specifications, 195 ePlaten, 19, 213 to 215 Epson accessories, 12 help, 13 media, 57 to 59 EpsonNet Config, 52, 56 Error messages, 176 to 181 Error notification, Windows, 110 Ethernet ...Alignment menu, 157 Height of printer, 196 Help, Epson, 13 High Speed Copies setting, 108 High Speed setting Mac OS X 10.4, 131 Mac OS X 10.6 & 10.5, 118 Windows, 89 Humidity requirements, 195 I ICM setting, 93 Ink icons, 216 light, 19, 176, 215 Ink cartridges checking status, 107, 149 to 152, 157 to...
User's Guide
Page 226
...cannot be cut, 188 smeared prints, 185 Profiles, color, 141 to 148 Progress Meter, 107, 108 Q Quality Options, Windows, 88 to 89 R Registering non-Epson media control panel, 82 to 84 Mac OS X 10.4, 133 to 134 Mac OS X 10.6 & 10.5, 119 to 120 Windows, 100 to 103 Remaining ... Safety approvals, 196 instructions, 15 to 17 Save Roll Paper setting Mac OS X 10.4, 135 Mac OS X 10.6 & 10.5, 122 Windows, 94 Setting up printer, 21 to 45 Software installing, 51 to 54 uninstalling, 193 to 194 Specifications electrical, 195 environmental, 195 ink cartridges, 201 paper, 196 to 201 printable area, 201 printer, ...
...cannot be cut, 188 smeared prints, 185 Profiles, color, 141 to 148 Progress Meter, 107, 108 Q Quality Options, Windows, 88 to 89 R Registering non-Epson media control panel, 82 to 84 Mac OS X 10.4, 133 to 134 Mac OS X 10.6 & 10.5, 119 to 120 Windows, 100 to 103 Remaining ... Safety approvals, 196 instructions, 15 to 17 Save Roll Paper setting Mac OS X 10.4, 135 Mac OS X 10.6 & 10.5, 122 Windows, 94 Setting up printer, 21 to 45 Software installing, 51 to 54 uninstalling, 193 to 194 Specifications electrical, 195 environmental, 195 ink cartridges, 201 paper, 196 to 201 printable area, 201 printer, ...
User's Guide
Page 227
Stylus Pro 7700, paper basket, 27 to 33 Stylus Pro 9700, paper basket, 34 to 42 Suction, 83, 101, 120, 134 Super strong cleaning cycle, 162 Support, Epson, 13 System requirements, 13 T Take-Up Reel, Auto, see Automatic Take-Up Reel, optional Technical support, 13 Temperature requirements, 195 Test Print menu, 150 Time and date setting..., 161 Total prints, checking, 150 Transporting printer, 170 to 173 Trim lines, printing control panel, 69 Mac OS X 10.4, 135 Mac OS X 10.6 & 10.5, 122 Windows, 96 Troubleshooting, 175 to 194 U UltraChrome with Vivid Magenta ink cartridges, 158 ...
Stylus Pro 7700, paper basket, 27 to 33 Stylus Pro 9700, paper basket, 34 to 42 Suction, 83, 101, 120, 134 Super strong cleaning cycle, 162 Support, Epson, 13 System requirements, 13 T Take-Up Reel, Auto, see Automatic Take-Up Reel, optional Technical support, 13 Temperature requirements, 195 Test Print menu, 150 Time and date setting..., 161 Total prints, checking, 150 Transporting printer, 170 to 173 Trim lines, printing control panel, 69 Mac OS X 10.4, 135 Mac OS X 10.6 & 10.5, 122 Windows, 96 Troubleshooting, 175 to 194 U UltraChrome with Vivid Magenta ink cartridges, 158 ...


