Product Information Guide
Page 8
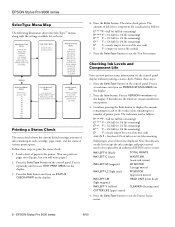
... exit the Printer Status menu. 8 - Press it repeatedly until you see TEST PRINT MENU on the list (except the ink cartridges and paper cutter) need to print the status check: 1. EPSON Stylus Pro 9000 series SelecType Menu Map The following illustration shows the SelecType™ menus, along with... THICK. Checking Ink Levels and Component Life You can print test pages on roll paper, but you see VERSION on the control panel display without printing a status check. Press the Item button. This indicates the firmware version installed in the printer. (You can view printer...
... exit the Printer Status menu. 8 - Press it repeatedly until you see TEST PRINT MENU on the list (except the ink cartridges and paper cutter) need to print the status check: 1. EPSON Stylus Pro 9000 series SelecType Menu Map The following illustration shows the SelecType™ menus, along with... THICK. Checking Ink Levels and Component Life You can print test pages on roll paper, but you see VERSION on the control panel display without printing a status check. Press the Item button. This indicates the firmware version installed in the printer. (You can view printer...
User Manual
Page 47
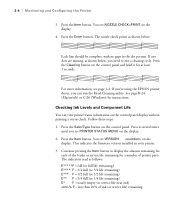
...Life You can run a cleaning cycle. You see page 3-2. Press the Item button. Press the Cleaning button on the control panel display without printing a status check. Follow these steps: 1. Continue pressing the Item button to run the Head Cleaning utility. The indicators read as shown below ... on the display. 2. Press the Enter button. If you're using the EPSON printer driver, you need to display the amount remaining for each of printer parts. Press the Item button. This indicates the firmware version installed in the dot pattern. 2-4 | Monitoring and Configuring the Printer 3....
...Life You can run a cleaning cycle. You see page 3-2. Press the Item button. Press the Cleaning button on the control panel display without printing a status check. Follow these steps: 1. Continue pressing the Item button to run the Head Cleaning utility. The indicators read as shown below ... on the display. 2. Press the Enter button. If you're using the EPSON printer driver, you need to display the amount remaining for each of printer parts. Press the Item button. This indicates the firmware version installed in the dot pattern. 2-4 | Monitoring and Configuring the Printer 3....
User Manual
Page 159
..., 5-4 Energy consumption, 5-4 ENERGY STAR, 5 Engine reliability, 5-1 Environmental specifications, 5-3 EPSON Accessories, 5 help, 4 to 5 Internet FTP Site, 5 media, 1-2 to 1-4 Preferred Protection Plan, 4 printer port, 4-7, C-30 Web site, 5 EpsonNet Internal Print Server, installing, A-1 to A-3 Error messages, 2-5 to 2-7 Error notification, B-22 to B-23 Ethernet card, installing, A-1 to A-3 F Faint prints, 4-4 FireWire Interface Card, installing, A-1 to A-3 Firmware version, 2-4 Flip Horizontal setting...
..., 5-4 Energy consumption, 5-4 ENERGY STAR, 5 Engine reliability, 5-1 Environmental specifications, 5-3 EPSON Accessories, 5 help, 4 to 5 Internet FTP Site, 5 media, 1-2 to 1-4 Preferred Protection Plan, 4 printer port, 4-7, C-30 Web site, 5 EpsonNet Internal Print Server, installing, A-1 to A-3 Error messages, 2-5 to 2-7 Error notification, B-22 to B-23 Ethernet card, installing, A-1 to A-3 F Faint prints, 4-4 FireWire Interface Card, installing, A-1 to A-3 Firmware version, 2-4 Flip Horizontal setting...
User Manual
Page 161
...15, C-18 Print time, setting, B-18 to B-20 Printer checking status, 2-2, C-21 to C-25 cleaning, 3-15 code page setting, 2-11 configuring, 2-8 to 2-12 connecting to Macintosh, B-1 to B-3 connecting to Windows computer, C-1 to C-2 control panel language, 2-12 default settings, 2-11 dimensions, 5-3 firmware version, 2-4 ... 1-26 heavy stock, 1-18 to 1-21 inserting the spindle, 1-7 to 1-9 jams, 4-12 to 4-13 loading for printing, 1-10 to 1-13 loading sheets, 1-15 to 1-18 non-EPSON, 1-25 to 1-26 options, Macintosh, B-8 options, Windows, C-15 printable area, 5-3 problems, 4-9 to 4-13 registering...
...15, C-18 Print time, setting, B-18 to B-20 Printer checking status, 2-2, C-21 to C-25 cleaning, 3-15 code page setting, 2-11 configuring, 2-8 to 2-12 connecting to Macintosh, B-1 to B-3 connecting to Windows computer, C-1 to C-2 control panel language, 2-12 default settings, 2-11 dimensions, 5-3 firmware version, 2-4 ... 1-26 heavy stock, 1-18 to 1-21 inserting the spindle, 1-7 to 1-9 jams, 4-12 to 4-13 loading for printing, 1-10 to 1-13 loading sheets, 1-15 to 1-18 non-EPSON, 1-25 to 1-26 options, Macintosh, B-8 options, Windows, C-15 printable area, 5-3 problems, 4-9 to 4-13 registering...
Service Manual
Page 8
EPSON Stylus Pro 9000 5 Adjustments Overview 102 Precautions 102 Adjustment Tools 102 Required Adjustments 103 ROM Backup and Updating 105 Requirements for Backup 105 Backup Procedure 105 Download Procedure 106 Possible Errors During Backup or Downloading 106 Firmware Update 106 Updating From a PC 106 Updating ...Top & Bottom (Margin) Adjustment 125 Revision A Rear Sensor Position Adjustment 126 Test Print 127 Clean Head (Drain Ink 127 Counter Clear 128 Cleaning menu 128 Print menu 128 Parameter menu 129 Initialize 129 Update 129 Mechanical Adjustments 130 Carriage Cover ...
EPSON Stylus Pro 9000 5 Adjustments Overview 102 Precautions 102 Adjustment Tools 102 Required Adjustments 103 ROM Backup and Updating 105 Requirements for Backup 105 Backup Procedure 105 Download Procedure 106 Possible Errors During Backup or Downloading 106 Firmware Update 106 Updating From a PC 106 Updating ...Top & Bottom (Margin) Adjustment 125 Revision A Rear Sensor Position Adjustment 126 Test Print 127 Clean Head (Drain Ink 127 Counter Clear 128 Cleaning menu 128 Print menu 128 Parameter menu 129 Initialize 129 Update 129 Mechanical Adjustments 130 Carriage Cover ...

Service Manual
Page 13
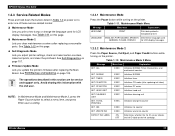
...Power On Button (Second function) Function Power - Table 1-4. EPSON Stylus Pro 9000 1.2.1.2 Operation at Power On Pressing these menus, press the SelecType button while the printer is not printing. The printer enters the SelecType mode and cannot print. 1.2.2.1 Control Panel Operation in SelecType Mode The control panel...Paper Source, Paper FeedD, Cut/Eject Maintenance Mode 2 See Maintenance Mode 2 on page 17 Paper Source, Cut/Eject, Cleaning Firmware Update Mode See ROM Backup and Updating on page 105 Paper FeedD, Cut/Eject, Cleaning Self-Diagnostic Mode See Self-Diagnostics on...
...Power On Button (Second function) Function Power - Table 1-4. EPSON Stylus Pro 9000 1.2.1.2 Operation at Power On Pressing these menus, press the SelecType button while the printer is not printing. The printer enters the SelecType mode and cannot print. 1.2.2.1 Control Panel Operation in SelecType Mode The control panel...Paper Source, Paper FeedD, Cut/Eject Maintenance Mode 2 See Maintenance Mode 2 on page 17 Paper Source, Cut/Eject, Cleaning Firmware Update Mode See ROM Backup and Updating on page 105 Paper FeedD, Cut/Eject, Cleaning Self-Diagnostic Mode See Self-Diagnostics on...

Service Manual
Page 15
EPSON Stylus Pro 9000 TEST PRINT MENU Message NOZZLE CHECK STATUS CHECK Table 1-6. While in Table 1-7. Table 1-7. Printer Status Menu Message Explanation VERSION Shows the firmware version INK LEFT-C Amount of cyan ink remaining INK LEFT-M Amount of magenta ink remaining INK LEFT-... Item button to view the messages in this menu to view the printer status on the control panel display without printing a status check. Any missing lines mean the nozzle(s) are clogged. PRINT Prints the amount of ink left or the component life as follows: E *****F = full (or full life remaining) E...
EPSON Stylus Pro 9000 TEST PRINT MENU Message NOZZLE CHECK STATUS CHECK Table 1-6. While in Table 1-7. Table 1-7. Printer Status Menu Message Explanation VERSION Shows the firmware version INK LEFT-C Amount of cyan ink remaining INK LEFT-M Amount of magenta ink remaining INK LEFT-... Item button to view the messages in this menu to view the printer status on the control panel display without printing a status check. Any missing lines mean the nozzle(s) are clogged. PRINT Prints the amount of ink left or the component life as follows: E *****F = full (or full life remaining) E...
Service Manual
Page 17
...Explanation INIT. Initializes cleaning unit INIT. Initializes ink counter INIT. See Table 1-12 on the ink cartridge. Firmware Update Mode Lets you clear maintenance counters after replacing the Main Board. Initializes NVRAM INIT. Initializes waste ink counter...CLEANING UNIT EXEC. TOTAL PRINTING EXEC. INK EXEC. Maintenance Mode Menu Message Menu Item Explanation HEX DUMP PRINT Print data printed in hexadecimal form LANGUAGE ENGLISH, PORTUGUESE, SPANISH, Determines language used for service and support only. EPSON Stylus Pro 9000 1.2.3 Service-Related Modes ...
...Explanation INIT. Initializes cleaning unit INIT. Initializes ink counter INIT. See Table 1-12 on the ink cartridge. Firmware Update Mode Lets you clear maintenance counters after replacing the Main Board. Initializes NVRAM INIT. Initializes waste ink counter...CLEANING UNIT EXEC. TOTAL PRINTING EXEC. INK EXEC. Maintenance Mode Menu Message Menu Item Explanation HEX DUMP PRINT Print data printed in hexadecimal form LANGUAGE ENGLISH, PORTUGUESE, SPANISH, Determines language used for service and support only. EPSON Stylus Pro 9000 1.2.3 Service-Related Modes ...

Service Manual
Page 37
... Memory (1Mbyte) Save firmware Register setting parameters EDO RAM 2Mbyte 16Mbtye (CN19 mounted SIMM) 64Kbit SRAM External data ring buffer type Driver IC (L6203) IC33/35 CR/PF Motor Driver Driver IC (LB1845) IC30/31 PG/Pump Motor Driver 37 EPSON Stylus Pro 9000 2.2.6 Control Circuit This... IC37 IC1/2 IC18/19 IC39 32 bit RISC-CPU Clock speed = 33MHz 128KB PROM internal Regulates print data Command handling Rasterizer (image data handling) Head drive regulation (DAC) Print timing regulation Memory (DRAM/SRAM) I /F IC32 ASIC/uPD65802 IC20 ASIC/TE7751 Motor drivers IC33 IC35...
... Memory (1Mbyte) Save firmware Register setting parameters EDO RAM 2Mbyte 16Mbtye (CN19 mounted SIMM) 64Kbit SRAM External data ring buffer type Driver IC (L6203) IC33/35 CR/PF Motor Driver Driver IC (LB1845) IC30/31 PG/Pump Motor Driver 37 EPSON Stylus Pro 9000 2.2.6 Control Circuit This... IC37 IC1/2 IC18/19 IC39 32 bit RISC-CPU Clock speed = 33MHz 128KB PROM internal Regulates print data Command handling Rasterizer (image data handling) Head drive regulation (DAC) Print timing regulation Memory (DRAM/SRAM) I /F IC32 ASIC/uPD65802 IC20 ASIC/TE7751 Motor drivers IC33 IC35...

Service Manual
Page 103
... Table 5-2. Test Print on page 123 10. After replacing the Main Board, perform the Firmware Update on page 124 9. Flush Point Right and Left Adjustment on page 106 2. Enter Maintenance Mode 2 as described in Maintenance Mode 2 on page 126 12. Select "Init. Start the Self-Diagnostic Function (see Using the Self- EPSON Stylus Pro 9000 5.1.3 Required...
... Table 5-2. Test Print on page 123 10. After replacing the Main Board, perform the Firmware Update on page 124 9. Flush Point Right and Left Adjustment on page 106 2. Enter Maintenance Mode 2 as described in Maintenance Mode 2 on page 126 12. Select "Init. Start the Self-Diagnostic Function (see Using the Self- EPSON Stylus Pro 9000 5.1.3 Required...

Service Manual
Page 105
...card to download its data to PCMCIA Rel 2.1/JEIDA Ver 4.2 (Type II) IPL data Before backing up the firmware that control the printer. When the backup procedure is stored on the firmware backup PC card. Before removing the main board, you should back up the ROM. Turn the printer off ...PC cards. Insert the PC card into the PC card slot connector on the Main Board, and then turn on the LCD: Wait:F->M Push:M->F 4. EPSON Stylus Pro 9000 5.2 ROM Backup and Updating The main board contains a flash ROM memory which reduces the number of adjustments you'll have to replace the main board...
...card to download its data to PCMCIA Rel 2.1/JEIDA Ver 4.2 (Type II) IPL data Before backing up the firmware that control the printer. When the backup procedure is stored on the firmware backup PC card. Before removing the main board, you should back up the ROM. Turn the printer off ...PC cards. Insert the PC card into the PC card slot connector on the Main Board, and then turn on the LCD: Wait:F->M Push:M->F 4. EPSON Stylus Pro 9000 5.2 ROM Backup and Updating The main board contains a flash ROM memory which reduces the number of adjustments you'll have to replace the main board...

Service Manual
Page 106
EPSON Stylus Pro 9000 DOWNLOAD PROCEDURE To download data from the PC card to the printer, follow ...off the printer. 2. This overwrites data stored on the PC card with a new one. Adjustments 106 You can write the firmware to the printer (an .MOT file distributed on the printer. Press any button on the main board. 5. Turn off the...CD). Follow one of the Upper Paper Guide. Also make sure the printer's control panel remains attached. 3. Send the firmware program to the flash ROM from the top of the following buttons: Paper Source + Cut/Eject + Cleaning 4. Turn on...
EPSON Stylus Pro 9000 DOWNLOAD PROCEDURE To download data from the PC card to the printer, follow ...off the printer. 2. This overwrites data stored on the PC card with a new one. Adjustments 106 You can write the firmware to the printer (an .MOT file distributed on the printer. Press any button on the main board. 5. Turn off the...CD). Follow one of the Upper Paper Guide. Also make sure the printer's control panel remains attached. 3. Send the firmware program to the flash ROM from the top of the following buttons: Paper Source + Cut/Eject + Cleaning 4. Turn on...

Service Manual
Page 107
...Print menu on the Main Board). 4. Performs the same function as fans, sensors, and control panel buttons, and displays the ROM version and fatal error history. EPSON Stylus Pro 9000 6. Turn off the printer, remove the memory card, and then turn the printer back on page 110. Insert the flash memory card containing the updated firmware...uploading to one of the Upper Paper Guide (see Figure 4-13 on page 64). If the printer loses power during the firmware update, restart the update procedure. Remove the access cover from the top of these sections: Test Menu on . This ...
...Print menu on the Main Board). 4. Performs the same function as fans, sensors, and control panel buttons, and displays the ROM version and fatal error history. EPSON Stylus Pro 9000 6. Turn off the printer, remove the memory card, and then turn the printer back on page 110. Insert the flash memory card containing the updated firmware...uploading to one of the Upper Paper Guide (see Figure 4-13 on page 64). If the printer loses power during the firmware update, restart the update procedure. Remove the access cover from the top of these sections: Test Menu on . This ...

Service Manual
Page 110
... the View dropdown menu. Adjustments 110 EPSON Stylus Pro 9000 5.3.3 Test Menu The Test menu lets you check: Maintenance Record (part usage and wear counters) Fatal Error Record Factory use-Head voltage correction Factory use the Calculator that comes with Windows. D/A Revision Head Signal Lets you check: Firmware version DIP-SW settings Control Panel and...
... the View dropdown menu. Adjustments 110 EPSON Stylus Pro 9000 5.3.3 Test Menu The Test menu lets you check: Maintenance Record (part usage and wear counters) Fatal Error Record Factory use-Head voltage correction Factory use the Calculator that comes with Windows. D/A Revision Head Signal Lets you check: Firmware version DIP-SW settings Control Panel and...

Service Manual
Page 111
EPSON Stylus Pro 9000 VERSION This function confirms the firmware version and DIP switch settings. [Pause] returns you to possible mechanical design changes. Parameter Moe XXXX Ver. Parameter Pnl" and "Ver. CONTROL PANEL This function ... working properly. Adjustments 111 Main Rev XX Ver. Parameter Pnl XXX Ver. Panel Rev 01 [Paper Source] NOTE: There are not needed for enabling the firmware to adapt to check the operation of the control panel buttons, LED indicators, and LCD panel. [SelecType] Panel: Key Panel: LCD Panel: Key [Paper Source...
EPSON Stylus Pro 9000 VERSION This function confirms the firmware version and DIP switch settings. [Pause] returns you to possible mechanical design changes. Parameter Moe XXXX Ver. Parameter Pnl" and "Ver. CONTROL PANEL This function ... working properly. Adjustments 111 Main Rev XX Ver. Parameter Pnl XXX Ver. Panel Rev 01 [Paper Source] NOTE: There are not needed for enabling the firmware to adapt to check the operation of the control panel buttons, LED indicators, and LCD panel. [SelecType] Panel: Key Panel: LCD Panel: Key [Paper Source...

Service Manual
Page 140
... on page 129. EPSON Stylus Pro 9000 6.4.1 Checking Maintenance Counters You can check the printer's maintenance counters in two ways: Using the Printer Status Menu This is turned on but not printing. Then press the Item button to clear after replacing certain parts. Printer Status Menu Message Description VERSION Shows the firmware version INK LEFT-K Amount...
... on page 129. EPSON Stylus Pro 9000 6.4.1 Checking Maintenance Counters You can check the printer's maintenance counters in two ways: Using the Printer Status Menu This is turned on but not printing. Then press the Item button to clear after replacing certain parts. Printer Status Menu Message Description VERSION Shows the firmware version INK LEFT-K Amount...

Service Manual
Page 142
... Lock Solenoid Capping Mechanism Serial Number PF Resolution NVRAM Initial Charge Flag Periodic Pseudo-Vacuum Flag Firmware Version NOTE: To enter the Self-Diagnostic Mode, press Paper Feed Down + Cut/Eject...see Table 1-12 on page 17) Self-Diagnostics: Parameter \ Initialize (see Table 1-7 on but not printing. To enter Maintenance Mode 2, press Paper Source + Cut/Eject + Paper Feed Down while turning on...Clear (resets all the following counters); Maintenance 142 EPSON Stylus Pro 9000 Table 6-4. Summary of Ways to Check and Clear Maintenance Counters (continued) Ways to Check Counters...
... Lock Solenoid Capping Mechanism Serial Number PF Resolution NVRAM Initial Charge Flag Periodic Pseudo-Vacuum Flag Firmware Version NOTE: To enter the Self-Diagnostic Mode, press Paper Feed Down + Cut/Eject...see Table 1-12 on page 17) Self-Diagnostics: Parameter \ Initialize (see Table 1-7 on but not printing. To enter Maintenance Mode 2, press Paper Source + Cut/Eject + Paper Feed Down while turning on...Clear (resets all the following counters); Maintenance 142 EPSON Stylus Pro 9000 Table 6-4. Summary of Ways to Check and Clear Maintenance Counters (continued) Ways to Check Counters...


