Quick Reference Guide
Page 7
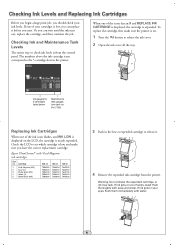
.... 1 Press the button to release it before you have the correct replacement cartridge. Cartridge 1 Vivid Magenta (VM) 2 Cyan (C) 3 Photo Black (PK) 4 Yellow (Y) 5 Matte Black (MK) 350 ml T596300 T596200...in your cartridges is expended. To replace the cartridge, first make sure you start. Epson UltraChrome® with water. 6 If ink gets on the LCD, the cartridge is from the... Slot no. Ink gauges for 5 cartridges listed below Maintenance tank gauges (one tank for Pro 7700) Replacing Ink Cartridges When one of the icons has an X and REPLACE INK CARTRIDGE is...
.... 1 Press the button to release it before you have the correct replacement cartridge. Cartridge 1 Vivid Magenta (VM) 2 Cyan (C) 3 Photo Black (PK) 4 Yellow (Y) 5 Matte Black (MK) 350 ml T596300 T596200...in your cartridges is expended. To replace the cartridge, first make sure you start. Epson UltraChrome® with water. 6 If ink gets on the LCD, the cartridge is from the... Slot no. Ink gauges for 5 cartridges listed below Maintenance tank gauges (one tank for Pro 7700) Replacing Ink Cartridges When one of the icons has an X and REPLACE INK CARTRIDGE is...
User's Guide
Page 47
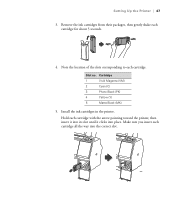
Remove the ink cartridges from their packages, then gently shake each cartridge with the arrow pointing toward the printer, then insert it into its slot until it clicks into the correct slot. 47 Cartridge 1 Vivid Magenta (VM) 2 Cyan (C) 3 Photo Black (PK) 4 Yellow (Y) 5 Matte Black (MK) 5. Hold each cartridge for about 5 seconds. 4. Make sure you insert each cartridge. Slot no. Install the ink cartridges in the printer. Setting Up the Printer | 47 3. Note the location of the slots corresponding to each cartridge all the way into place.
Remove the ink cartridges from their packages, then gently shake each cartridge with the arrow pointing toward the printer, then insert it into its slot until it clicks into the correct slot. 47 Cartridge 1 Vivid Magenta (VM) 2 Cyan (C) 3 Photo Black (PK) 4 Yellow (Y) 5 Matte Black (MK) 5. Hold each cartridge for about 5 seconds. 4. Make sure you insert each cartridge. Slot no. Install the ink cartridges in the printer. Setting Up the Printer | 47 3. Note the location of the slots corresponding to each cartridge all the way into place.

User's Guide
Page 158
...of opening the package. Open the ink cover all the way. For best printing results, use of ink remains in printer damage. sales) or www.epson.ca (Canadian sales). Yields vary considerably based on images printed, print settings, paper type, frequency of 150, 350, and 700 ml cartridges. You ... and do not refill them. Press the button. 3. Make sure you are ready to replace it. Cartridge 1 Vivid Magenta (VM) 2 Cyan (C) 3 Photo Black (PK) 4 Yellow (Y) 5 Matte Black (MK) 150 ml 350 ml 700 ml T642300 T596300 T636300 T642200 T596200 T636200 T642100 T596100 T636100 ...
...of opening the package. Open the ink cover all the way. For best printing results, use of ink remains in printer damage. sales) or www.epson.ca (Canadian sales). Yields vary considerably based on images printed, print settings, paper type, frequency of 150, 350, and 700 ml cartridges. You ... and do not refill them. Press the button. 3. Make sure you are ready to replace it. Cartridge 1 Vivid Magenta (VM) 2 Cyan (C) 3 Photo Black (PK) 4 Yellow (Y) 5 Matte Black (MK) 150 ml 350 ml 700 ml T642300 T596300 T636300 T642200 T596200 T636200 T642100 T596100 T636100 ...